Materials, advantages and disadvantages
There are many different types of sealant on the market, but not everyone is suitable for such a specific job as sealing joints in a wooden house. Sealants based on acrylic and butyl rubber are widely used.
Acrylic type sealant is the most used material in European countries and America.
Pros of acrylic sealant:
- Within half an hour, a dust-protective film begins to form on the surface of the sealant. The time for complete polymerization depends on the manufacturer, usually from one day to four. In humid rooms, the film formation time increases.
- Allows you to seal seams of different thicknesses.
- It is environmentally friendly, does not emit odor and is used for decoration inside and outside the house.
- Working with the material does not require special protective equipment; it is enough to use gloves and special clothing.
- Temperature range from -10 to +35С°
- There are different color solutions, which will allow you to decorate the sealant to match the color of the house paint.
Acrylic sealant
- Partial finishing of the facade of the house, the interior and rooms with high humidity is possible.
- The sealant has good adhesion and adheres well to wood. In a frozen state, it is plastic and does not crack when the walls of the house “walk.”
- Quick and easy to apply. Excess parts are easily removed. The instrument is washed with ordinary water.
- The material is vapor permeable, allows air to circulate, but prevents moisture from penetrating through the seam. Acrylic is resistant to sunlight, does not fade or deteriorate, and is durable. If necessary, the seam can be easily removed.
- Good protection against insects.
- The price is no more expensive than traditional properly made caulk.
- The seam performed can be of various shapes, concave or convex.
The disadvantage of the material is that during the work process and until the final moment of polymerization, the weather must be dry.
Domestic manufacturers suggest using sealant based on butyl rubber, a material that is non-curing and copes well with the function of insulation and is easy to apply.
Why do gaps appear?
A large number of materials and devices are used to insulate and seal wooden houses. The most common and ancient material for sealing seams is felt or tow. Such materials are affordable, but not practical, since they will not last more than 2-3 years. Each replacement incurs financial costs, which is the cost of maintenance, which can increase significantly if frequent repairs are necessary.
Gaps in a wooden house and the reason for their appearance
Causes of holes:
- raw timber or other wooden elements were used during construction;
- unstable operating conditions due to environmental humidity;
- miscalculations in the quantity or type of sealant used;
- movement or shrinkage of the foundation that occurred due to natural phenomena or poor quality construction;
- failure to comply with construction standards when laying wooden elements;
- damage to the insulation sheet during installation or further construction.
Minor repairs and replacement of individual sections of insulation do not guarantee a long service life of the structure. Thus, resistance to weather conditions is minimized, which leads to the appearance of unwanted cracks.
Acrylic sealant for insulation of wooden houses using the “Warm seam” technology
Thanks to modern technologies, which undergo special testing and are certified by government services, a universal material has been created that will help get rid of this problem for decades. Warm seam is a new technology that allows you to reliably protect a wooden house, forever getting rid of the problem of holes.
Types of packaging
Types of sealant packaging depend on the manufacturer:
- In file packages, for use in pistols.
- Packaging in the form of a bucket, convenient for working with a spatula. The box may have a classic or hermetically sealed lid with a hole inside to allow the sealant to be loaded into the gun.
- In the form of a cord in a polyethylene protective film. After removing the film, the cord is placed in the seam and leveled with a chisel. This type allows people who do not have sufficient experience in sealing seams to insulate a house, and allows them to save on the purchase of an expensive automatic gun.
Stages of creating a “warm seam”
- Preparation. The process consists of cleaning the entire channel from foreign objects, debris, dirt, and dust. The insulation must be laid tightly, without protruding ends or cuts. The entire working surface is treated with a primer mixture, and its perimeter is covered with masking tape.
- If necessary, a cord is placed in the channel to seal the insulation that was used during construction.
- Sealing is the step of filling all joints using an air gun and a metal spatula soaked in cold water.
- The final step is to level the seam; for this you will need a spatula, brush or sponge, but it is important to remember that you have no more than 10 minutes to do this.
- After this, the seams should be allowed to harden for several days, but sometimes this can take a week. It depends on the positive environmental factors.
The sequence of work when applying a warm seam is extremely important!
A warm seam is a universal way to protect butt joints, has a long service life and does not require much effort and time. This allows you to avoid the constant minor repairs that haunted the owners of wooden houses using tow caulk while naturally drying the logs.
Warm seam technology
The “warm seam” technology for wooden houses involves several stages of work.
Materials used, tools:
- Putty knife.
- Special construction pistol. During the work process, lubricant may be required for better operation of the gun mechanism.
Important!
The cut size of the spout allows you to adjust the amount of sealant released and the size of the seam.
- Primer for impregnation of the most absorbent parts of wood.
- Special insulating cord made of foamed polyethylene, for laying in wide cracks from 1 cm, to save the amount of sealant and improve the finishing of the seams.
- An industrial stapler with an elongated spout, or a hammer and small furniture nails, for possible fastening of insulation in cracks.
- A soap solution that moistens the surface of the spatula when leveling the seam.
- Construction tape may be needed for home owners who do not have experience working with sealant.
Preparatory work:
- Cleaning the wood surface from dirt and the top flaking layer.
Note!
Sealing should be done before covering the wood with an antiseptic, as the solution may interfere with the adhesion of the material.
- Drying the surface.
Basic operations:
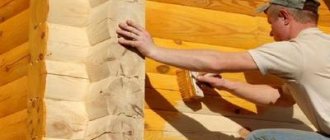
- To simplify the work, stick special industrial tape onto the logs, which will protect the wood of the joint from contamination by sealants outside the application area.
- The sealant is applied to all seams between the logs and any cracks formed. If the gap is larger than 10mm, it is recommended to lay a special cord.
Cord installation diagram
- The cord can be installed using a chisel; in some cases, additional fixation of the cord along its entire length with small nails or a stapler may be required. The seam size should be within 4÷12 mm.
- Apply the composition using a gun or chisel. If using sealant in the form of a cord, remove the film and install the sealant into the gap.
Applying a seam using a gun
- Level the surface and remove excess elements from the seam using a chisel or sponge soaked in water. It is also allowed to work with only one spatula.
Working with a spatula
- Removing the tape.
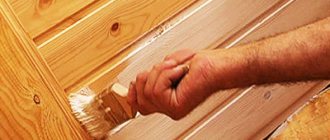
- After the polymerization process is completed, the seam can be treated with acrylic-based paints and varnishes.
Carrying out the “warm seam” technology for wooden houses with your own hands, using a gun or spatula, is not a difficult task, but requires a certain skill and patience. Since for a beginner it will be problematic to apply a professional, even seam from the start, especially to do it quickly.
Using a sealant in the form of a cord will speed up the procedure, but this technology requires subsequent coating of the joint surface with an alkyd-based varnish.
Characteristics of sealants
There are several types of sealants that can be used to insulate roof joints and cracks:
- acrylic;
- silicone;
- polyurethane;
- bituminous.
The most popular of the presented types is acrylic composition. Among its advantages are:
- elasticity;
- good adhesion;
- moisture resistance;
- biosustainability;
- color fastness;
- simplicity and ease of application.
Silicone-based sealant withstands high temperatures and humidity well, which is why it is often used to seal cracks in baths and saunas.
The polyurethane composition also has decent characteristics, but due to the fact that it contains toxic components, it can only be used for external insulation.
Bitumen mastics have a very high degree of moisture resistance, so they are usually used to seal the dampest places: basements, basements and roofs.
More detailed characteristics of acrylic and other types of sealants can be found in the article “Sealant for a wooden house - a review of materials and manufacturers.”
Types of packaging
The sealant is produced:
- In cartridges. This packaging is intended for use in special construction guns.
- In tubes. The mass is squeezed out of the tube directly onto the seam, and then it is given the desired shape with a chisel. Leveling is carried out within 10 minutes after application, otherwise the sealant will polymerize and it will be quite difficult to correct the frozen shape.
- In plastic buckets. In this case, the sealant is applied using a spatula.
Recommendations for using sealant
Log and timber houses can be insulated no earlier than 1-2 years after construction.
The exception is houses made of laminated veneer lumber, which can be sealed almost immediately after construction. To achieve maximum effect, it is advisable to carry out sealing outside and inside the house. However, only external thermal insulation of seams is also allowed.
The sealant can only be applied in dry weather at a temperature of at least 5 degrees Celsius.
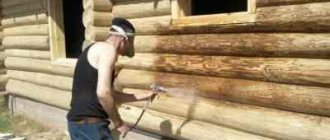
If work is carried out in the summer in hot sunny weather, the shady side is sealed first. When the sun is active, the sealant dries quickly, which is undesirable, since the technology is disrupted.
When applying sealant to a previously painted surface, it is necessary to first conduct an adhesion test with the dye on a small area.
Varieties
The question is which sealant for warm joint wood is best to buy.
There are 3 options in total, if you rely on the basis for manufacturing. They can be used when processing the following elements:
- interventional seams;
- rafter systems;
- window frames;
- door frames and openings;
- wooden stairs;
- internal interior elements, etc.
Good warm seams are not afraid of deformation, as well as temperature changes. They have high adhesion rates and a long service life.
The following sealants are distinguished.
- Silicone
. May have a neutral or acidic base. Widely used for wood processing. Service life is about 20-25 years. But silicone cannot be painted. Therefore, manufacturers offer ready-made mixtures in different colors; - Polyurethane
. It features improved adhesion and high strength. But the price is higher. They are not afraid of mechanical influences, moisture and chemicals. There is no shrinkage after drying. Can be painted. But they do not withstand ultraviolet radiation well; - Acrylic
. The most popular sealants. Are not toxic. Completely environmentally friendly. Excellent adhesion to wooden surfaces. Contains no solvents. After polymerization it can be painted.
If we talk about which one is better, then I advise you to choose proven brands, as well as well-established manufacturers.
From personal experience, the following examples of high-quality sealants can be given:
- Neomid;
- Eurotex;
- Accent 136;
- Remmers;
- Perma Chink;
- PU 25;
- Bartons;
- Energy Seal;
- EuroAcryl;
- Zobel.
This is my personal rating. But without reference to the first or last place. I just chaotically wrote down companies that came to mind.
I have worked with them several times. For some reason, Accent 136 came across especially often. Although here I know the reason. More about her later.
Log house sealing services
offers professional services for sealing wooden houses using the warm seam method. Our company has everything necessary for high-quality work - qualified craftsmen who are fluent in this technique, a sufficient supply of knowledge and experience, the necessary tools and readiness to start work at any time convenient for you.
We use only certified sealants; their price will be minimal for you, since we work directly with manufacturers. We apply a loyal pricing policy, which provides various discounts for regular customers. You can contact us using the coordinates on the “Contacts” page.
Professional insulation of houses
In a short time and at an affordable cost, he carries out work on insulating houses made of timber and any wooden buildings. We offer our clients convenient service, high quality sealing of building joints, and stage-by-stage payment for work. We accept payment including by card. We work in Moscow, the Moscow region, and surrounding areas. We are ready to consider the possibility of cooperation with other regions of the country.
"Master Srubov" is the official representative of many manufacturers of premium sealants - Ramsauer, Remmers, Wooden Wood, the domestic enterprise "Oliva" and other Russian and foreign companies. When choosing materials for work from those manufacturers whose dealers our organization is, we have the opportunity to offer you the most favorable prices for them. But at the customer’s request, we are ready to work with any materials, including VGT sealant.
Our craftsmen have all the necessary knowledge and experience, and have many positive reviews about their work. But our company’s specialists do not stop there, constantly improving their skills, including on an ongoing basis attending practical classes and seminars from leading manufacturers, getting acquainted with new products and technologies for working with them.
For advice, more information or to order sealing services for your home, please contact our employee by phone. You can also leave a request in the “Contacts” section, and a specialist from our company will call you back shortly.
Calculate the cost of painting and insulating your home right now
Do you have accurate measurements of the house?
I measured it myself. I have a house design. Measurers came. I want to call a measurer.
By clicking on the button, you consent to the processing of personal data
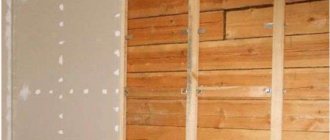
How to properly sand the interior walls of a timber house
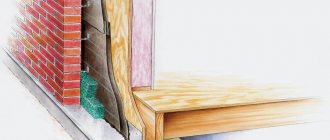
Preparing materials and installing a window sill when installing windows in a wooden house
How to insulate a basement yourself
How to seal seams in a bathhouse correctly and accurately.
So you’ve come to the idea that it’s time to build a bathhouse. The bathhouse has been built. But here a natural question arises: how to cover the seams in an already built bathhouse, which are very visible. No matter how tightly the timber or frame is laid during the construction of a bathhouse, the seams still remain. But it is through them that the precious heat will escape, without which comfortable conditions for visitors to your bathhouse are impossible. It follows from this that in winter, heat in a timber bath can only be maintained if all joints, cracks and seams between the crowns are sealed
Wood itself, due to its natural characteristics, can be deformed, changing volume and size. And in the bathhouse itself, due to constant temperature changes, this will be especially noticeable, since cracks appear on the logs themselves, and gaps are likely to form between the blocks. All this will lead to the fact that the bathhouse itself becomes very unprotected from natural phenomena. This problem is completely solvable, and modern insulation means will not require large material costs. But insulation begins during the construction of the bathhouse, when the initial sealing and sealing of the bathhouse seams is carried out. And from this moment a completely natural question arises: “What should I use to cover the seams in the bathhouse and ensure its thermal insulation?” As thermal insulation, you can use traditional materials that are used when laying crowns: tow, moss. Modern materials that provide thermal insulation in wooden buildings are also suitable for sealing external seams in the bathhouse.
Modern materials - acrylic sealants for wood.
Modern thermal insulation materials are resilient and elastic, so they are used quite widely. The peculiarity is that acrylic sealants are easy to work with, dry quickly and, if necessary, it is possible to apply several layers, which is very convenient and profitable. All modern sealing materials have high adhesion, which has a positive effect on thermal insulation properties, and are not afraid of changes in air temperature and humid environment. But they have one more main property - vapor permeability, which allows the tree to breathe. Acrylic sealants are used not only to seal bath seams, but also to seal any splits and cracks that form in the wood over time.
Details by phone.
Among modern materials for preserving heat in a bathhouse, special sealing tapes should be noted. They need to be distributed in the space between the beams. They hardly caking, which means that there is no need to use other sealing materials, which creates additional savings. In addition, the sealant changes its shape when the logs begin to deform during the natural shrinkage of the bath.
- They contain only natural materials, to which environmentalists cannot make any claims.
- Moss and jute do not let warm air out of the room and keep cold out.
- They have excellent absorbent properties, which is very important in constantly wet bath rooms. Therefore, there is no need to worry about the walls starting to rot.
Conditions and recommendations for using sealant
- It is recommended to seal a house made of timber or logs 1-2 years after completion of construction (after shrinkage) or after the first heating season.
- A house made of timber or logs can be sealed 1-2 years after completion of construction (after shrinkage) or after the first heating season.
- Sealing is carried out in dry weather, without precipitation, at an air temperature of at least + 5 ° C
- Pay attention to the permissible joint thickness of the sealant used.
- For maximum effect, insulation with sealant is best done outside and inside the house
- The sealant is applied to a dry and clean surface
- Before applying to a painted surface, test the sealant for adhesion to the surface on a small area.
- When applying sealant to caulked seams, be sure to lay a heat-insulating cord (Vilatherm)
Cuts and joints
The most labor-intensive process is the process of sealing cracks in the joints of the walls of a wooden building.
To seal cuts and warm joints, the gaps are filled using a spatula with a polyethylene cord of a certain length and thickness.
In many cases this takes a long time. Next, the seam is covered with sealant, leveling the applied product with a damp spatula.
In the case where the joints were impregnated with an oil composition (fire retardant), it makes sense to sand the wood with a grinder in advance, otherwise the sealant will not polymerize properly.
Characteristics of “warm joints” for wooden coverings
Wood fixings for professional use are multifunctional and effective.
They can be used for processing warm joints of log houses, brick walls, cracks in concrete and stone structures, as well as for use with materials such as plastic, foam and aerated concrete, and plaster.
The seam lock completely protects wooden structures from adverse weather conditions. All sealants contain substances that prevent the appearance of fungi and mold.
Tools and raw materials
To start treating cracks with sealant, you need to purchase a retainer in a form suitable for the installation gun. For work you will also need:
- polyethylene foam in the form of a cord;
- narrowed spatula;
- brush for painting;
- a piece of fabric;
- water;
- spray;
- masking adhesive tape;
- primer for wood.
You can process the seams by hand, but using a mounting gun will speed up and simplify the process.
The device helps to comply with the consumption rate, treat the cracks with sealant, applying the fixative evenly in strips. It is almost impossible to achieve this manually.