Today, the requirements for the appearance of buildings have increased significantly. In addition to the quality of the work itself and the result obtained, what the structure looks like is very important. This especially applies to residential buildings. External finishing of facades is carried out using various materials. One of the most common and convenient is facade tiles for exterior decoration.
Facade tiles
Advantages
First of all, you need to understand why this is needed. The Internet is full of photos of façade decoration with tiles, with a wide variety of variations.
The first thing people think about is appearance. It is quite natural, because even the most ordinary tiles can change the appearance of a very dull and unremarkable building. For such finishing, tiles made of durable ceramics and its varieties are used. The final result and its durability depend on its quality, which is very important.
Now I would like to talk about the advantages of such cladding. First of all, tiles for finishing the facade of a house are good due to a certain level of thermal insulation, in particular, frost resistance.
When it comes to exterior decoration, you need to select materials that will not only affect the appearance of the building, but also play an important role in durability, as well as in protection from natural conditions. In colder regions, building insulation is actively used using polystyrene foam and similar materials that have poor heat transfer.
However, frost resistance is important not only for protecting the building, but also for the strength of the cladding - poor quality tiles rarely survive the first winter.
All tiles that are at least average quality will be strong enough to withstand basic physical damage. This result is achieved through heat treatment, which is carried out at temperatures above 1000 degrees Celsius.
All together creates the durability factor. This is a very conventional designation, which can roughly tell you how many years a certain type of coating will last you.
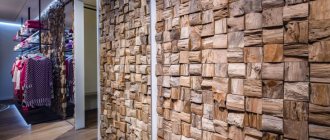
By the way, recently finishing facades with clinker tiles has become increasingly popular. This is partly due to the fact that there are many types of it that copy brickwork - one of the most popular materials in the construction of private houses.
Tips for choosing tiles
There are a number of recommendations that you should pay attention to when going to a hardware store for this type of facade finishing.
1) To highlight the appearance of your home's trim, make sure that the color of the clinker is in harmony with the color of the roof of your home.
2) The density of the purchased material also plays an important role. The higher it is, the stronger and more durable the tile will be. However, the price of clinker is higher.
3) When purchasing material from different packs, it is advisable to immediately mix the tiles so that they do not differ in shades on the wall.
4) If you need to drill clinker, choose diamond-coated drills. You can cut the tiles using a tile cutter. An angle grinder is also suitable as an option. True, you need to choose diamond wheels for it and not the cheapest ones. The strength of the material is still very high.
Flaws
There are many more advantages of tiles than can be said in one article, but what about the disadvantages? Although they are few, they still exist.
First of all, the choice of material. We considered this a disadvantage, because without experience it is quite difficult to buy high-quality tiles for facade finishing.
It is better to buy from reliable sellers who provide detailed information and technical documentation that should accompany the cladding material. Without this information, it is almost impossible to select tiles to suit your climate and weather conditions.
At the same time, it is important to take into account even the most unusual little things, such as the presence of a reservoir, river or lake nearby, because this affects the overall level of humidity, which increases greatly in the summer, and we are not talking about the cold that will come from it in the winter. That is why the price of finishing facades with tiles differs from object to object.
This also includes installation. If you want the tiles to be installed not only beautifully, but also with high quality, you will need to find a specialist for this type of work.
At the same time, larger tiles require additional fastenings, and therefore the adhesive solution itself will not be enough, and cement mixtures cannot be used for outdoor work.
We’re not talking about the complex compositions that parts make when decorating a facade with ceramic tiles, and this also requires certain skills, and you definitely wouldn’t want to hire someone who will study at your facility.
Insulators ShF-20G- Production of plastic for finishing
How and how to caulk a timber house with your own hands: materials and step-by-step instructions
House façade cladding technology
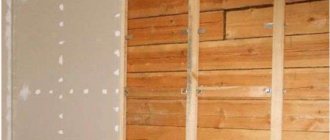
Finishing a house with tiles is carried out using two different technologies: wet and dry. Let's look at each one separately. But let us immediately note that, regardless of the method of laying the cladding, the surface of the facade wall must be prepared:
- repair,
- level,
- strengthened with primer solutions.
Wet cladding method
It is called that only because the tiles are “set” on a water-based adhesive composition: cement, polymer or resin-based. But in any case, this is a solution mixed with water
Please note that special adhesives are used to work with facades. They are frost-resistant
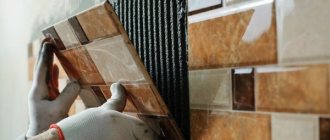
The technology of tiling a house itself is no different from laying tiles in a bathroom or kitchen. That is, on the prepared surface, starting from the bottom, tiles are laid with gaps that are formed by plastic crosses.
Varieties
Over the past 10 years, a real variety of types of tiles for facade finishing has emerged. When choosing, you will have the opportunity to choose texture, size, color, material and other properties.
Thanks to a very generous color palette, you can create a unique composition using the same type of tile. In this regard, everything depends more on your imagination or the designer’s inspiration.
Video description
We invite you to watch a video of how a wall is covered with clinker tiles using the wet method:
Dry cladding method
This is a more complex technology called frame technology. That is, on the facade, a frame is first assembled from galvanized metal profiles, onto which the tile itself is mounted. Such facades are called ventilated because there is a gap between the finishing material and the wall of the building that is not closed. That is, the air moves in it without problems. This is how the façade is ventilated.
This gap is often filled with thermal insulation material, creating insulation from the outside. What are board products made of polystyrene foam or mineral wool used for? In this case, the insulation is attached to the wall with special mushroom-shaped plastic dowels. They are clearly visible in the photo below.
Insulation attached to the wall with mushroom-shaped dowels on a ventilated facadeSource fasadproekt.com
The most important operation is assembling the frame. There are ready-made frame structures for a specific cladding material, which include brackets in the form of an angle and guides. How to install the frame.
First, markings are made on the wall. Using the drawn lines, the installation locations of the brackets are determined. They are mounted at these points using anchors. They carry out insulation of the wall, for which cuts are made with a knife in the places where they coincide with the brackets in the insulation.
Please note that holes cannot be made. Thermal insulation boards are laid closely together
You cannot leave even the smallest cracks or gaps. Thermal insulation slabs are fastened with mushroom-shaped dowels - two per slab. Next, the guides are installed. The main requirement is the gap between the heat-insulating layer and the inner edges of the guide elements.
The frame is ready, all that remains is to install the tiles for cladding the facade of the house. For this purpose, clamps are used. Install the first lower row of fasteners on the guides at the same level horizontally. One tile is inserted into them, two more clamps are placed on top, which, like the lower ones, are attached to the guides with metal screws. This fastening is very reliable, no weaker than cement mortar. In addition, this type of fastener allows you to easily dismantle the tiles without breaking them, if such a need arises.
Manufacturing of molded products for decorative stone
Molds for artificial stone, just like for tiles, can be made with your own hands or purchased ready-made, complete with materials for making products.
The most convenient to use are considered to be rubber, silicone and polyurethane molds, from which the stone is easiest and fastest to remove after the mass has hardened.
Considering that the cost of ready-made forms is high, it makes sense to consider the possibility of making them at home.
The best option is to make a mold from polyurethane. Packing material weighing 7 kg will cost no more than three thousand rubles, while it will be possible to make several forms of the sizes you need from it. If you decide to use silicone, then it is best to select a vinegar-based material made in Europe.
To make it easier to remove finished products from the mold, it is useful to use a matrix separator, which is simply made from gum turpentine, beeswax and paraffin. To prepare the mass, wax and paraffin are melted in a water bath, adding turpentine at the end. The mixture is used to lubricate the sides of the mold and the surface of the stone.
Instructions for making a mold from polyurethane or silicone are as follows:
- Select several stones that you think are suitable as samples.
- Place them face down on a sheet of chipboard or fibreboard, a few centimeters apart.
- Treat the smooth side of the stones with silicone and press firmly into the surface.
- Treat the contours of the stones with sealant to prevent air from getting under them. Silicone for aquariums is suitable for filling, which will help avoid leaks.
- Let the sealant dry for several hours.
- Prepare the formwork at a distance of a few centimeters from the stone.
- Seal the edges and corners of the formwork with silicone to prevent leakage of polyurethane.
- Allow the mixture to dry (at least 12 hours).
- Lubricate the formwork and samples with the wax mixture prepared earlier and let dry for two hours.
- Prepare the polyurethane mixture.
- Fill the matrix with silicone or polyurethane. Pour out the polyurethane in a thin stream, and pour the silicone with a brush dipped in soapy water.
- Disassemble the formwork after 24 hours and remove the stone models from the mold.
- Dry the finished products for two weeks.
Porcelain tiles
Porcelain tiles appeared relatively recently, but have already gained unprecedented popularity. For the production of products, granite chips, expanded clay and a number of additives are used.
It is believed that this type of finish is the most convenient in terms of installation. Every novice craftsman knows how to attach facade tiles. Moreover, this particular material for wall decoration perfectly withstands low temperatures. You can safely decorate any external surfaces with porcelain stoneware.
Another important advantage is its pronounced aesthetic value. Often, porcelain stoneware imitates natural textures so skillfully that it can replace any artificial stone.
The disadvantages include the fact that a mosaic of such elements most likely will not work. The cladding made from such tiles ends up being quite heavy in weight, so it’s still not worth using the material to decorate lightweight structures.
Installation of a ventilated facade using clinker tiles
To build a ventilated facade, you will need to perform a number of operations:
- Marking walls and installing brackets.
- Laying insulation, fixing with disc-shaped dowels.
- Installation of vertical guides with plane projection.
- Installation of horizontal guides with a pitch corresponding to the dimensions of the clinker. They also provide a ventilation gap.
- Installation of tiles on horizontal guides.
- Grouting joints.
IMPORTANT! The process is quite labor-intensive, especially when it comes to the direct installation of the material. However, the result is a strong and durable outer layer that reliably protects the insulation.
The ventilation gap serves to remove moisture from wall materials and insulation, reducing heating costs and increasing the service life of wall materials.