The seam between the bathtub and the tiles - how to seal it.
Just 20 years ago, there were few truly good materials on the construction market that would help in decorating a bathroom. In the recent past, the favorite method was to seal the joints with cement mortar and then paint them with enamel paint. But for reliable and long-term use of this bathroom element there was no vibration of the object.
But now, thanks to the intensive development of the chemical industry and the improvement of technology, the market has been filled with a large assortment of this type of product, which makes it possible to seal the seams between the bathtub and the tiles gracefully and without difficulty.
Design methods
In the process of arranging a bathroom, it is important to carry out all installation work in strict sequence so that after a while there are no leaks at the junctions of the bathroom and the tiles. Experienced professionals offer many options to effectively solve this problem.
If the main piece of plumbing is planned to be used for a long period, then it is better to immediately install its sides into the wall. Then you can start laying tiles and treat the joint space with a special grout. This solution to the problem in the future completely eliminates the flow of water at the junction of the bathtub and the tile, which is a huge plus. The main disadvantage of the described method is the high probability of disruption of the tile laying at the joint due to the poor stability of the volumetric plumbing item. In the event of an unexpected replacement of the latter, additional financial costs will be required for dismantling the tiles, as well as re-laying them.
Before sealing the joint with the wall or starting to lay tiles from the side, the bathtub is filled with water so that it shrinks Source mirvannaja.ru
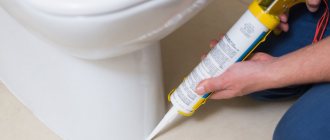
Adhesive sealant for seams, brown
CEMMIX Adhesive-sealant for seams is a one-component polyurethane sealant for sealing various seams, junctions of steps and walls, entry of pipes and ventilation systems and rigid-elastic gluing of various materials.
More details
Another option is to use a grout color that contrasts or matches the tile. For example, light joints (white, light gray) look impressive on dark tiles, and dark or colored joints on light ones. The color wheel will help you choose a harmonious combination.
Interesting!
The color of the seams can also be matched to any element of the bathroom interior, for example, to match the mirror frame.
Tips for using polyurethane sealants in the bathroom:
- make sure that the sealant is intended for wet areas;
- use sealant for gluing tiles only on movable, level bases;
- think about the color scheme in advance;
- use only high-quality materials from reliable manufacturers, for example, CEMMIX sealants;
- When applying sealant, remember that errors can be corrected within 15 minutes.
A beautiful and functional bathroom is the result of thoughtful actions and the use of high-quality and reliable materials. Their availability is no less important. CEMMIX sealants - Facade adhesive-sealant and Adhesive-sealant for seams can be bought in Leroy Merlin and other construction stores, as well as in bulk from the manufacturer.
You can buy CemPlast, CemBase CEMMIX without leaving your home, with discounts from 5 to 33%!!!!
Buy on Ozon
Buy on VseInstrumenty.ru
Buy on Wildberries
Buy at Leroy Merlin
Or you can find the nearest official dealer in your region on our map
← Sealing joints of external wall panels of buildings: what materials should be used
Installation of expansion joints in concrete floors using polyurethane sealant →
Return to list
Comments
Silicone sealant
Seal the joint between the bathtub and the tiles with a sealant - the simplest option. It is suitable for gaps that do not exceed 10 mm. Otherwise, you will have to use a different method or combine the sealant with other building materials (cement, construction foam, grout). To perform this work you need to purchase:
- masking tape;
- solvent;
- syringe gun;
- rubber spatula;
- silicone sealant.
Procedure:
- First wash the working base, then degrease it.
- Cover the bathtub and tiles with paper tape, leaving a 5 mm corner.
- Insert the tube of sealant into the gun, attach the tip, and go over the joint once. It is highly undesirable to apply a second layer, as this may cause the formation of defects.
- Remove excess mixture with a spatula or brush pre-moistened with soapy water.
- Carefully level the surface.
- Wait a day and completely remove the masking tape.
Attention! While the applied material is drying, the bath cannot be used for its intended purpose.
The silicone sealant used to seal the seam must be sanitary, otherwise mold will appear on it over time Source design-homes.ru
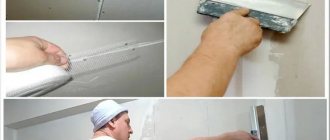
Preparatory work
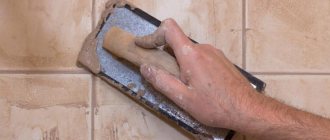
Before applying tile grout, it is necessary to carry out preparatory work. It is advisable to grout the seams on the day of installation of the tiles, since over time it will be very difficult to remove the glue that has dried in the seams.
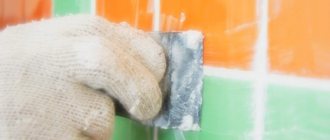
To remove excess glue and not damage the glaze on the tile, you can use a knife blade or a special scraper that has an abrasive coating. First, all vertical seams are processed, and then horizontal ones.
Silicone grout can only be placed in clean and dry joints, otherwise it will not be wear-resistant.
Tile grout
If there is any mixture left after sealing the tile joints, it can be used to treat the joint between the bathtub and the tiles. It is important to take into account that this method has a significant disadvantage: over time, mold and rust stains may appear on the created foundation. To avoid such troubles, you need to use a special impregnation. It gives the surface smoothness and protects it from the harmful effects of moisture. To eliminate the gap you need: a spatula, a sponge, a mixture.
Step-by-step instruction:
- Clean the crack from dirt.
- Moisten the working surfaces.
- Seal the joint between the tub and the tiles using a putty knife. In this case, the tool should be held at an angle of approximately 45° and pressed firmly. Only in this way is it possible to fill the space as hermetically as possible.
- Using a damp sponge, carefully remove excess (within an hour after completing all work).
If you want to treat the surface with “Fuga-gloss”, you need to wait a few days (until the material has completely hardened), then apply the composition with a brush.
The main advantages of using tile grout are high moisture resistance and long-lasting color retention Source diy.obi.ru
Sealant instead of grout for tiles
Tell me what is the best way to seal the seams between tiles? I'm considering a method for sealing tile joints in the bathroom. 1 Apply cement grout and then apply a layer of varnish or sealant on top of it (perhaps on the Internet it was meant that varnish and sealant are the same fundamental means). But a possible disadvantage is that this coating must be renewed later. Perhaps there are products that only need to be applied once - I would like to know about them. 2 Dilute cement grout not with water, but with a special latex-based liquid. Here I would like to know about the reliability of this method compared to the first in terms of water resistance. And the last question. How important do you think it is to seal seams in a bathroom? Maybe it’s still necessary for the wall to “breathe” a little?
Buy good imported grout, for example from Mapei, and you won’t need any more sealing. Since almost any grout protects seams well from water penetration, unless it’s done with crooked hands
Regular grout is enough, no need to reinvent the wheel
I use the product dolphin, made in Poland
The grout is satin and no more impurities are needed.
Try treating it with IDROSTUK latex additive and wiping it with a dampened sponge two or three times to get a waterproof coating.
Why do you need this? You don’t have a swimming pool, or white tiles with white grout in the hallway? For the bathroom - the most common grout and that’s it.
Yes, I completely forgot, sealing is also needed for floor tiles - so that the seams do not become clogged with dirt and are easier to clean
it won’t breathe in any case. And it’s better to add a simple primer to the grout, not water
In general, if you have high-quality grout, done by a professional, no more manipulations are required! BUT! If you have doubts, then 1. you can mix the grout not with water, but with a latex plasticizer (for example AXTON, although there are quite a lot of them and their properties are almost the same). This will improve the technical characteristics of cement-based grout mixtures. It will increase the resistance to water absorption and abrasion of the grout in the joints. It will increase adhesion to the edges of the tiles. It will increase the elasticity and deformability of the grout in the joints. Will not change the color of the grout. Increases grout resistance to fading. There is another way. After the final strengthening of the grout (after two weeks), carefully impregnate the seams with a special impregnation using a small brush, better for drawing, for example, ATLAS Dolphin. This is the best impregnation today. The effect is fabulous. Five years ago I treated the seams on the tiled floor in the kitchen and hallway in this way. I still can’t get enough of it! And one last thing. The joint between the end of the tile and the bathroom after regular grouting is always covered with a good transparent or white, depending on the situation, silicone sealant. GOOD LUCK!
Cement mortar
Often the joint between the bathtub and the tiles is sealed with a cement-based mixture. Among its advantages, it is worth noting its affordable price, ease of application and high reliability. Among the disadvantages of such a composition, it is important to mention: the need for waterproofing, unsightly appearance. Because of the latter, tiles, corners, and border strips are often laid on top of such material.
To seal the holes with cement mortar, you need to prepare: a mixture, a spatula. If the gap width exceeds 10 mm, it is recommended to install temporary formwork: it will prevent the applied mass from falling through.
Sequencing:
- Clean the surface thoroughly.
- Dilute the mixture.
- Wet the working base.
- Apply the solution with a spatula.
- Wait for the material to dry completely.
- Treat the plaster layer with water-repellent impregnation.
- Install decorative trim.
Advice! In order to ensure additional water flow down the wall in a room with high humidity, it is advisable to lay the cement composition at a slight angle and glue the tiles on top.
An essential condition for obtaining a high-quality result is a thick consistency of the cement mortar Source design-homes.ru
Colored, white and transparent sealant: popular manufacturers
The range of sealants is represented not only by silicone, polyurethane, acrylic and combined options, but by a number of other compounds.
These are rubber, silicate and bitumen sealants, but the latter types are rarely used for work in the bathroom. Thanks to the variety of colors, you can choose the necessary option for processing seams in order to highlight the desired areas with contrasting shades. The most common sealants are colored, white, and transparent. In addition to the type of base and color of the composition, sealants must be selected based on quality and ease of use. Trusted brands include the following:
- "Moment". Silicone-based sealant can be of Russian, German, Czech or Belgian origin. Used for various purposes, including work in wet areas. Release form: tubes of different sizes.
- "TYTAN". Polish high quality sealant, available in two types: acrylic and silicone based. The only drawback is the small volume of packaging (no more than 300 ml).
- CIKI Fix. Turkish composition, which combines quality and reasonable price. Can be used as an adhesive.
- "Ceresit". Popular among experienced builders. The German composition is used for sealing and gluing decorative elements. Among the “cons” is the inability to use for food surfaces.
Popular brands of sealants: Moment, Ceresit, TYTAN, CIKI Fix Regardless of the brand of sealant and its type, the composition must meet the basic requirements for working in the bathroom: be safe, durable and resistant to moisture. For insulating tiles, grouting cracks and joints, it is best to choose a product with antibacterial properties. Typically, manufacturers put appropriate marks on the packaging with the composition.
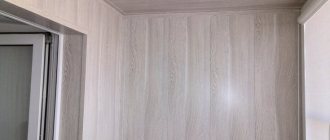
Plastic skirting board
The main advantages of modern high-quality plastic are affordable cost, ease of installation, and attractive appearance. It can be attached over any finish: various panels, tiled cladding, painted base. To perform installation work, you need to prepare: adhesive sealant, masking adhesive tape, a ruler, and a stationery knife.
Procedure:
- Clean and thoroughly degrease the surface.
- Stepping back the width of the curb, stick paper tape to the wall and the outer part of the bathtub.
- Seal the joint with a sealant and leave until completely dry.
- Cut the skirting boards to the required sizes and attach them with the same sealing compound.
- Install plugs.
Attention! The bath can only be used after two days, when the adhesive material has completely dried.
Inexpensive plastic plinth is especially convenient to use when finishing a joint is necessary. Source vodatyt.ru
Silicone grout - efficiency and ease of use
Repairing is not a particularly pleasant experience for some. The only good thing is that in the end it will be clean and comfortable. When we started renovating the bathroom and toilet, we decided that we couldn’t handle laying the tiles on our own. The most important thing is not enough time.
Therefore, the decision was made to hire workers. The total cost of renovating the bathtub and toilet room with materials and labor cost us 150,000 rubles. See the entire repair stage as a set of measures to restore the operational or serviceable condition of any object and/or restore its resource.
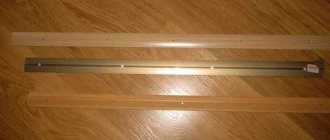
Tiled border
In order to install curbs efficiently, they must first be cut to the required size, and neat gaps must be made for plumbing and pipes. An angle grinder will help you quickly cope with such a task. It is better to use a diamond disc as a consumable. Additionally you will need: a spatula, sealing silicone, tile adhesive, sandpaper, and a rubber mallet.
Sequencing:
- Wash and degrease the surface.
- Dilute tile adhesive.
- Start laying from the corner. Cut two adjacent elements at an angle of 45° to one another and sand.
- Cover the back side of the border with glue, place it in the appropriate place, and remove the excess.
- Attach the second part in the same way.
- Continue working in the same way, adjusting each part to the height with a mallet.
- After the adhesive has completely dried, seal the joints with grout.
Ceramic plinth is extremely easy to lay on a layer of cement mortar, which is laid in a slide.
Ceramic borders are absolutely not afraid of moisture, resistant to chemical detergents, and are ideally combined with tiles Source diy.obi.ru
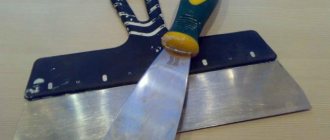
Preparing the tool for work
The quality and speed of the work directly depend on the tools available.
| Set of rubber spatulas | Although most often only 1 rubber spatula is selected for the job, it is better to purchase a set and then choose the one that is most convenient for the job. |
| Container for mixing the mixture | Since the volume of the batch is small, a small plastic bucket from some kind of construction mixture will do. After finishing the grouting, the container must be thoroughly washed, otherwise the new composition will contain dried pieces of the old grout. |
| Special knife for clearing tile joints | This tool is very convenient to use, as with its help the work is done quickly and efficiently. When removing old grout, you can combine actions - first clean the seam with a hacksaw blade, and then with a special knife for clearing seams. |
| Narrow paint brush | A narrow paint brush is more convenient to use, but it is better if it is stiff enough to thoroughly clean the seams. |
| Narrow metal spatula | You don’t need to choose the narrowest spatula – 35–50 mm is enough. |
| Sponge for cleaning tiles from grout | Choose a high-density foam sponge. A dishwashing sponge is often used. |
| Cloth for wiping tiles | There are various soft fabrics, but you need one that absorbs water well. A purchased washcloth is ideal. |
| Latex gloves | Many mixtures can corrode skin, so it is best to wear thick rubber gloves. |
| Respirator | A protective mask will be needed both when mixing a new mixture and when removing an old one. |
Corner
When arranging the connection of the bathtub to the wall, you can immediately purchase a special insert - a plastic or aluminum inner corner. It is tightly attached above the main piece of plumbing, and the tiles are already laid on top of it.
The main advantages of the described method are hygiene, reliable sealing, and attractive appearance. But it is possible to install such an element only during repair work. For this you will additionally need: a stationery knife, tile adhesive, grout, tiles.
Step-by-step instruction:
- Mark and then cut the strips to the required size.
- Apply adhesive to the wall.
- Install prepared corners.
- Place the tile products into the grooves of the attached elements, then glue them.
- Lay out the remaining rows of tiles.
A day later, when the glue has completely dried, the joints should be sealed with grout.
In a finished bathroom, installing an internal corner under the tiles will no longer be possible Source design-homes.ru
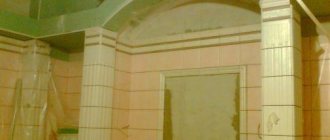
How to seal a wall-to-floor joint
The sequence of actions is important here. First, all vertical wall joints are treated with silicone. After they have completely hardened, we take up the silicone seam on the floor. Apply silicone along the corner, then moisten it with a soap solution and remove all excess.
The wall-ceiling junction is formed in the same way, but the sealant for it is replaced with acrylic (it can be painted later).
As you can see, there is nothing difficult in making an even silicone seam. Start with the simplest method - and everything will work out!
We use masking tape
Apply masking tape on both sides of the joint (professionals recommend using Eurosel, Tesa) and apply silicone. This method is also called dry grouting because the tiles are not wetted. If you accidentally missed any area, you can add more grout.
Using masking tape to create an even seam
The advantage of this method is that the surface around the seam remains clean. This is the best option for beginners as there is an opportunity to correct mistakes.
Apply some excess silicone, then wet the corner and tool with a regular solution of water and liquid soap (diluted as for soap bubbles). Quickly remove excess. This is a quick method, but requires some experience. If everything doesn’t work out the first time, you’ll have to redo it, since the sealant will no longer adhere to the wetted surface.
Source of the article: https://grand-haus.ru/materialy/germetik-vmesto-zatirki.html
When is silicone grout required?
Every owner wants their kitchen and bathroom to look aesthetically pleasing after renovation. In addition, drywall, even if perfectly adjacent to the wall, can crack at the joint. And in the bathroom and kitchen, it is necessary to protect the boundary between the sink and the wall from leaks.
Often, plastic corners or jointing (grout) are used for the inner edges of tiles. But the corners do not fit tightly, and dirt accumulates under them due to humidity. And the edge worn with jointing becomes cracked over time. In this case, silicone grout is the most reliable method.