The gap that remains between the bathtub and the wall after installing the equipment and tiling the room spoils the entire impression of the renovation, so it needs to be repaired. In addition to the aesthetic side of the issue, sealing the gap also has a practical purpose, since water will flow into this gap, which will lead to the appearance of mold and black spots, and with prolonged exposure to moisture, to damage to building structures.
Preparatory stage
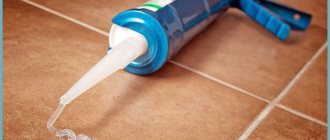
Having chosen a sealing composition suitable for the planned work, you can begin to apply it. But first you need to figure out how to use the sealant correctly so that the work does not have to be redone.
Consumption
Experts recommend applying joint sealant in an even strip 3.5-4 mm high. A thinner layer will not provide complete protection against leaks. Approximate consumption is 300 grams per 17 linear meters. Knowing this, you can calculate how many tubes of material you need to purchase.
Important! It makes no sense to buy extra tubes in reserve. The sealant does not have a very long shelf life, so it may deteriorate before it needs to be reused.
What will you need?
Before applying sealant to the bathtub, you need to prepare everything you need. This:
- the sealant itself and its composition are selected taking into account operating conditions;
- mounting gun, if the composition is used in a rigid tube;
- degreasing liquid, you can use alcohol, acetone;
- sponge for applying degreaser;
- tape for painting;
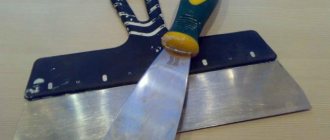
- spatulas for smoothing the seam;
- napkins for wiping spatulas;
- soap solution (you can dilute dishwashing liquid in water).
Instead of spatulas for leveling the seam, you can purchase special attachments for the gun. When using them, the seam immediately turns out smooth and beautiful; no work on leveling the seam is required.
It is also worth preparing special clothing and protective equipment. It is better to wear gloves on your hands; your skin and nails will remain clean. It makes sense to use a respirator when applying acidic silicone sealant because it has a strong odor.
Surface preparation
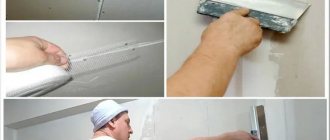
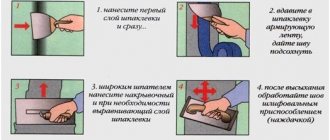
How to apply sealant in the bathroom so that the seam is reliable and lasts a long time? Work begins with thorough surface preparation. The quality of work at this stage determines the degree of adhesion. If the preparation is poor, the seam may soon crumble or move away from the surface.
If there are traces of old sealant in the gap, they must be carefully removed. The remaining material is removed with a spatula, trying to remove all traces. Then the surface needs to be cleaned well; for this it is convenient to use a vacuum cleaner. But you can walk over the surface with a damp sponge to remove as much dust and dirt as possible.
Now the surface is degreased. To do this, moisten a sponge or cotton swab with a special compound (you can use acetone or alcohol) and wipe the surfaces thoroughly. The next stage is drying; the place where the sealant will be applied must be completely dry. Even a drop of water will affect the quality of the clutch. You can dry the surfaces naturally, after taking a break from work, or using a hair dryer. In the second case, drying will take only a few minutes.
To protect the wall and sides of the bathtub from accidental contact with the sealing compound, use masking tape. Strips of adhesive tape are placed on both sides of the gap that will be filled with sealant. Gluing tape not only provides protection from accidental smearing of the material on surfaces, but also allows you to create the most even seam possible.
Preparing material for work
If you are using a tube, you will need to know how to use a caulk gun. The tool has a fairly simple structure. Its constituent parts:
- frame or body;
- a piston connected to a rod;
- a trigger that releases pressure on the rod;
- a lever block that moves the rod to the required distance;
- a latch that prevents the reverse movement of the rod.
At home, mechanical mounting guns are more often used. This is a reliable and inexpensive tool. Based on the degree of openness of the body, skeletal, semi-hull and hull structures are distinguished. Skeletal ones have only a frame that holds the tube, while case ones have a closed body. The semi-hull version is something between the first and second designs.
The supply of sealant is ensured by applying mechanical force: the user presses the trigger with his hand, which leads to the movement of the rod and piston. The uniformity of material supply when using a mounting gun is much higher than when using soft tubes.
For large volumes of work, mechanical mounting guns are inconvenient. Professionals use the following equipment options:
- electrical;
- battery;
- pneumatic.
The battery type is considered the most convenient, since electric and pneumatic are less mobile due to being tied to a power source or compressor for air supply.
For use with a mounting gun, purchase sealant in a hard tube or in a soft tube. For the latter option, only the case model of the instrument is suitable. The tube can be inserted into any version of the mounting gun.
To prepare a rigid tube for work, you need:
- cut off the tip of the cone-shaped tip of the package;
- remove the nozzle that is attached to the body, put it on the tip, tightening it along the thread;
- cut off the tip of the nozzle, making a cut at an angle of 45 degrees;
- Place a protective cap on the end of the nozzle.
Important! The nozzle is made in the form of a cone. The farther the cut is made from the pointed tip, the wider the sealing layer will be.
To insert the prepared tube into a skeletal type instrument, you need:
- press the spring lock and pull out the rod until it stops;
- place the tube in the frame;
- pressing the spring shutter, smoothly lower the rod until it rests against the bottom of the tube.
When using soft tube packaging, a case-type gun is required. To prepare it for use you need:
- unscrew the plastic nut with spout;
- pull out the rod as much as possible;
- insert the foil tube into the body;
- pressing the trigger, make sure that the soft packaging gives a little forward, cut off its edge with scissors;
- Screw the plastic nut with a conical tip into place.
The mounting gun is loaded and ready for use, you can begin sealing gaps and sealing cracks.
Sealing the joint between the bathtub and the wall using polyurethane foam
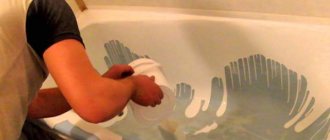
Filling the seam between the bathtub and the wall with foam is one of the easiest ways to solve the problem. Especially compared to the outdated solution method. And one-component polyurethane foam, which has excellent water-resistant qualities, is best suited for these purposes. You just need to work very carefully, since polyurethane foam that gets on tiles, painted surfaces, or even hands is extremely difficult to clean off later.
The “foam” process of sealing seams is simple:
- first the seam is cleaned, degreased and thoroughly dried;
- the foam in the container is shaken properly and poured into the cavity of the leaking joint;
- 40 minutes are allotted for complete foam drying in a room with high humidity;
- excess foam along the edge of the bathtub is carefully removed with a painting knife;
- Then the sealed joint is designed at the discretion of the master.
Important: during the drying process, the polyurethane foam increases in volume several (up to 30) times. Therefore, it is necessary to clearly measure the amount of composition to be laid.
You will see a detailed description of the process of sealing a joint using foam by viewing this review:
Combination of different methods
Experts in the field of finishing work believe that no matter how effective each of the methods of sealing the joint between the bathtub and the wall is considered, the most reliable is still a combination of two or more of these methods.
And the most common combination is applying sealant over dried polyurethane foam. First, the master pours the foam (as described above), waits for it to dry, and then cuts off the excess. And then a layer of silicone (or acrylic) sealant is applied.
The result is a smooth joint with an ultra-strong level of protection from water. And if you also stick a border tape on top, the level of reliability and durability of the sealed seal will triple! And the bathroom itself will look complete in terms of design, neatly decorated.
( 50 votes, average: 4.70 out of 5)
Related Posts
We influence the surface mechanically and chemically
The coating of the washing container must not only have a presentable appearance, but also without obvious signs of damage to its integrity.
It is quite difficult to scrape off dried silicone sealant. If the layer thickness is large, then it is necessary to gradually cut off large pieces using a knife or razor blade.
In this case, a sharp object must be kept parallel to the surface so as not to scratch it (this condition is relevant for flat planes). When a thin layer remains, fill it with solvent.
After the allotted time has passed, the remaining sealant will turn into a jelly-like mass, now it will be easier to remove them. To do this, it is best to use a plastic or wooden spatula. If you work carefully, you can use a spatula.
It is more difficult to remove old sealant, since the adhesion to the coating is too strong. First, masking tape is applied around the silicone seam on both sides to protect the coating. Apply the cleaner to the treated area for 10 minutes, or more, depending on the thickness of the remaining layer.
Sealing a seam in a bathroom with tape
One of the most effective methods of sealing the joints between the bathtub bowl and the walls is to finish the seams with a special border tape. But only where we are talking about very small gaps.
Self-adhesive border tape is one of the easiest modern finishing materials to use. It is a strip of super-thin and super-durable plastic with a highly adhesive layer of sealant on one side. This tape is very elastic and fits perfectly into the corners of the joints, sealing them securely and making an insurmountable barrier to moisture penetration.
This type of border strip is especially relevant for bathrooms whose walls are tiled. And sealing the seams between the bathtub and the tiles with tape is a very simple process that does not require any special skills. However, this operation must be performed in stages:
- cleaning, degreasing and drying the joint;
- peeling off the paper fuse from the curb tape;
- warming up the released sticky layer (this can be done using a regular hair dryer or a construction hair dryer);
- applying with simultaneous alignment of the tape on the seam;
- gluing the applied border tape along the joint;
- pressing and smoothing the tape over the surface.
The advantages of this method of sealing seams between plumbing equipment (bathtub) and walls are obvious:
- Speed.
- Simplicity.
- No need for any additional and/or finishing.
An example of using border tape from one of the German manufacturers is presented in the video review: