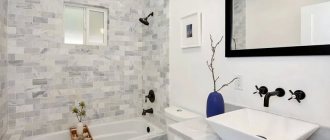
The need to seal seams between sheets of drywall
The small number of metal profiles used when installing walls or ceiling structures often leads to insufficient strength and rigidity of the frame. During operation, bends in the canvas often occur. The most sensitive elements of any construction with plasterboard are the joints of the sheets. It is on the correctness of their installation that you should pay the closest attention.
Sealing gypsum board joints allows you to avoid many problems during further operation. The most common defect is the formation of cracks at the joints of sheets. They are formed due to shifts in drywall caused by temperature fluctuations. Other possible problems include:
- the appearance of stains after painting or wallpapering;
- impossibility of applying a high-quality finishing coating;
- reduction in the service life of gypsum boards.
The edges of drywall are the most vulnerable part of the sheet material. They are often subject to drying out and waterlogging. Over time, this leads to surface deformation and, as a consequence, disruption of the ideal plane.
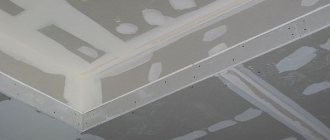
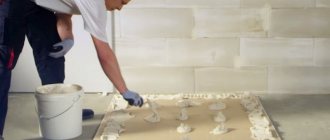
Treatment of seams will ensure long service life of drywall Source otdelkagid.ru
Putty consumption per square meter of drywall
- When using gypsum putty it is even simpler: one to one when putting on walls and ceilings.
- Glue-based putty is consumed even less - half a kilogram per square meter is enough.
To calculate the approximate amount of putty, you need to know the surface area of all the walls in the room. It's easy: each sheet of drywall has certain dimensions, they are indicated on the label. All numbers are summed up and the total area for finishing putty is obtained.
For the starting putty, the same amount of material is taken, with a small margin
If you hesitate or are distracted from work, then it is recommended to dispose of the dried putty. It's not worth using. It is not advisable to redo work that has already been done. Either the surface of the wall will not be smooth, as expected, or in the long term the finishing materials will begin to fall off the drywall due to the lack of a strong adhesion.
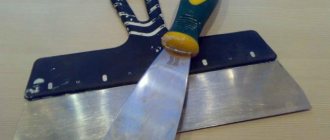
Necessary tools for grouting
Before sealing seams in drywall, you need to ensure that you have the full range of necessary equipment. Despite the apparent simplicity of the event, it is important to have a full set of equipment in your arsenal to efficiently complete the task. In addition to traditional spatulas of several sizes, you will need:
- container for stirring the mixture;
- level;
- falcon - a tool to facilitate the application of putty;
- roller or brush for applying primer;
- special emery mesh for grouting putty;
- construction mixer or drill with a mixer attachment.
- painting or chamfering knife;
Chamfers can also be cut using special equipment Source taloon.com
Considering the large amount of dust and other suspended particles that are formed when working with drywall, you should take care of having the simplest protective equipment - a respirator, goggles, gloves and long-sleeved work clothes.
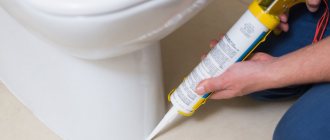
Materials for processing gypsum boards
The most important element for grouting drywall joints is the starting putty. It is used as a base before further processing. In addition to the starting putty, you will also need a finishing putty to create an ideal, flat surface. The next most important part is the primer - a mandatory attribute that protects the edges of the sheets from cracking.
High-quality plaster is the key to long-term service of drywall Source kraski-net.ru
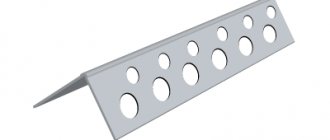
To process corner surfaces, a perforated profile made of aluminum or plastic is used. You will also need serpyanka - an adhesive mesh film that is used to reinforce joints. Instead, you can use perforated paper for seams.
See also: Catalog of companies that specialize in finishing materials and related work
External signs of various causes of defects
When a defect is detected, it is important to find out the reason why the crack occurred and observe its dynamics.
They look at the speed of crack propagation, localization and shape: They look at the speed of crack propagation, localization and shape:
- Developing. After the appearance, the web gradually expands and deepens. As a rule, such defects are characteristic of building shrinkage, and the dynamics of their growth are extended over time.
- Stable. They appear immediately after repairs are completed and indicate installation errors. During the process of puttying and painting, the drywall material first absorbs and then releases moisture. It softens a little, and at this point it is susceptible to sagging. If the joints are laid incorrectly or poorly executed, a crack will immediately appear, sometimes even before the surface dries. It is located at the joints between the sheets.
The result of unscrupulous sealing of a seam.
Peeling of the putty indicates that the master ignored the priming step, or the proportions of water and dry mixture were not observed when mixing.
The finishing material ages, and this is attributed to the natural reasons why a crack appears or the plaster begins to peel. Over time, the material changes structure and depolymerizes.
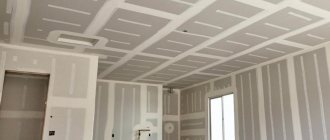
Preparing drywall corners for puttying
Pre-treatment of the working surface is the key to a high-quality final result. Before sealing seams in drywall, you should remove particles of dirt and dust from the edges of the sheets. They are wiped with a dry, clean rag or soft brush. The edges are inspected for protruding paper burrs. They are carefully trimmed with a stationery knife.
The next stage is working with self-tapping screws. They should be recessed just below the level of the drywall. To determine the protruding edges, use a medium-width spatula to determine the protruding edges of the sheet. The self-tapping screw is carefully tightened using a screwdriver or screwdriver.
The screws should be slightly recessed into the drywall Source ispovednik.ru
Joining the edges of drywall
Factory-made gypsum board edges covered with a layer of cardboard do not require pre-treatment. Joining is only needed to join the end sides with the open plaster part. The procedure will require a stationery cutter or a knife with a sharp blade. You also need a special grater with mesh sandpaper to clean the processed edges before sealing drywall joints.
Joining is not a difficult task, but it requires concentration when working. Using a sharp knife, make a chamfer along the edges of the drywall at an angle of 45 degrees. To make the task easier, you can draw a line with a pencil parallel to the edge of the sheet. 9 or 12 mm are deviated from the joint, depending on the thickness of the material. With a confident movement, make an incision at an angle. The finished surface is cleaned using a grater with mesh sandpaper.
Serpyanka and perforated paper for sealing seams
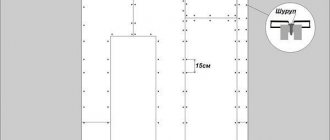
Before caulking the drywall seams, it is recommended to strengthen them with a special fabric - serpyanka. For joints, a product with a width of about 10-15 cm is most often chosen. It is evenly glued onto the embroidered edges. The serpyanka should lie flat without sagging. If the pasting is uneven, there is a risk of the tape peeling off and possible damage to the joints of the finished structure.
Applying serpyanka to the joints of plasterboard sheets Source stroyfora.ru
How and with what to seal cut drywall joints
As already mentioned, sealing the cut edges of drywall with tape creates a bump in this place. You can seal such joints with strips of fiberglass, which is much thinner and does not swell when wet. One of the disadvantages of paper tape is that it can swell when wet, but when placed inside a seam, it will not swell, which cannot be said about cut seams. Therefore, it is more advisable to use strips of fiberglass on cut seams.
It is better to seal seams with cut edges of gypsum boards with fiberglass
That's all, our joints are ready for further finishing and will not crack!
Ideally, after sealing the joints, the drywall can be glued with fiberglass over the entire area, so nothing will crack, and, moreover, the surface will be uniform, which is good when painting. But the method described above is quite sufficient for high-quality sealing of gypsum board joints. Leave your tips and comments below. Subscribe to our newsletter. Good luck to you and good luck to your family!
Sealing drywall seams
Having thoroughly prepared the surface, you can begin to putty the gypsum board joints. Since seams on drywall need to be sealed quickly, it is not recommended to mix more than 5 liters of the prepared solution at a time. After half an hour, the mixture loses its elasticity. Dilution of plaster or putty is carried out strictly according to the manufacturer’s instructions.
The mixture is applied with a wide spatula, evenly distributing it over the surface of the drywall. When using perforated paper, it is pressed into fresh plaster. The finished seams are left for 12-24 hours to dry completely.
Recommendations
Let's consider a few practical tips that will help you carry out the work correctly:
- Do not make the solution in large portions unless you have a mixer. Such a solution will be difficult to mix, so there will be a lot of lumps in it. It is better to make the solution in small but uniform portions - such a solution will be of high quality and reliable.
- Some people place a heating device next to the structure after applying plaster. However, this is not recommended, since the combined effect of the liquid solution and temperature changes can negatively affect the strength of the drywall.
- The prepared gypsum/plaster gradually hardens, and after 30-40 minutes the mixture becomes hard enough to make its application impossible. Therefore, do not hesitate - after preparing the mixture, immediately apply it to the seam/surface of the drywall.
Video description
To see how to seal drywall seams, watch this video:
Grouting joints after plastering
Before proceeding with finishing, it is necessary to carefully sand the dried joints. To do this, use fine-grain sandpaper or abrasive mesh sheets with a value of 120-180. Since it is not always possible to repair it correctly the first time, if serious flaws are found, they are treated with plaster again until a perfect surface is obtained, followed by grouting.
Important! Processing dried plaster is a rather dusty task. You should stock up on personal protective equipment - a mask, goggles and gloves.
Finished seams are rubbed down with an abrasive mesh Source norman-piette.com
The procedure for sealing seams
Sealing of joints is carried out in stages - preparing the surface for sealing, jointing, preparing mortar, priming, sealing and many others. Please note that the work may take several days, since the primer, putty and plaster need time to dry completely. Below we will look at each of the stages in detail.
Preparing for work
Immediately before carrying out work, it is recommended to read the instructions for the primer, putty and plaster. All work should be carried out under conditions that comply with the instructions (humidity, temperature). Before carrying out work, it is recommended to ventilate the room well, and then close the windows so that there is no draft in the room. During finishing, it is recommended to turn on overhead lighting so that you can clearly see the main seam, as well as all irregularities and surface defects.
Preparing surfaces for sealing
Now you need to prepare the working surface for sealing. To do this, do the following:
- Check the drywall working surface . If you find burrs, burrs or irregularities, remove them with a knife or fine sandpaper. After cleaning, walk along the wall with a dry cloth to remove dust and debris.
- If the drywall was fastened with screws, check the quality of their fastening . Ideally, they should be slightly recessed, but the heads should not pierce the surface of the cardboard. If the heads are not recessed well, then take a screwdriver and complete the installation. If the heads damage the cardboard, unscrew the screw a little, fill the hole with a small amount of putty, and then screw the screw back.
Note! If you are sealing a hole with putty, then the screw must be tightened immediately, without waiting for the gypsum mixture to dry. Excess putty should be removed with a dry cloth.
Joining seams
Joining is the external processing of the edges of a plasterboard board. As a result of jointing, you should get an open V-shaped recess with approximately the same location of the edges of the plasterboard boards (they should not protrude much above each other, there should be no damaged edges, and so on). Jointing is done using a knife according to the following algorithm:
- If there are damaged areas on the drywall (for example, chips, cut fragments), carefully cut them off using a knife.
- If in some places the edges of one sheet protrude over the other, then such overlaps should also be cut off with a knife, as this will make it difficult for the putty to penetrate.
The jointing should not be done vertically, but at an acute angle of 40-50 degrees. As a result, you should get a V-shaped groove into which putty can easily fall. Some companies sell drywall with already processed edges - if you use such material, you don’t have to do jointing.
Primer of seams
To ensure that the plasterboard boards adhere well to the putty, it is recommended to apply a small layer of primer. The best option would be to use acrylic mixtures with additives that dry in 5-6 hours. To prime, you need to pour a small portion of liquid into a container, and then apply it to the edge using a brush. Wait until the primer is completely dry before moving on to the next step.
Note! At this stage, the primer is applied only to the edge and not to the entire surface of the drywall. The optimal application option is 20-30 centimeters from each edge.
How to prime drywall video
Preparation of putty solution for sealing drywall joints
After the primer has completely dried, you can begin preparing the putty solution. The algorithm for preparing the solution will be simple:
- Read the instructions for the gypsum mixture, approximately calculate the amount of dry composition and water.
- Pour the dry composition into a container for preparing the solution, fill it with the required amount of water.
- Stir the mixture until smooth; If you have a drill with a mixer attachment, you can use that.
- Wait 3-5 minutes for the water to evenly dissolve the powder, and then stir the mixture again.
Sealing drywall seams with putty
The plasterboard mixture is ready - now you can start applying it. At this stage you will also need paper or sickle, so keep them with you. The sealing is done like this:
- Take a wide spatula in your left hand and apply a large layer of putty onto it in a thick layer. Take a small spatula in your right hand and smooth out the putty a little on a wide spatula.
- Using a narrow spatula, scoop small portions of putty from a large one and carefully apply them along the entire groove of the seam. Please note that there is no need to remove excess putty.
- Now take a wide spatula, place it at an angle and move it up and down with slight pressure. As a result, the plaster should spread evenly along the entire edge of the seam.
- When you form the seam, apply paper or sickle tape on top. If you use paper, treat it with boiling water and squeeze it out. To apply, simply bring the paper/sickle tape to the seam and place it on the layer of plaster.
- Apply a thin layer of plaster on top of the paper/serpyanka. Do the finishing like this - use a small spatula to apply a small layer of plaster, and then level it with a wide spatula.
How to putty drywall video
Sanding drywall seams
The gypsum mixture usually dries quickly - from 2 to 6 hours, depending on the brand of the mixture. When the plaster adheres well to the wall surface, take sandpaper and carefully clean the seam. Please note that using a sander is not recommended as this can damage the drywall. Upon completion of cleaning, you need to shake off the dust from the surface of the drywall using a dry cloth.
Main job
Now you can start applying the finishing putty. The work is carried out according to a similar algorithm:
- Pour a small portion of plaster into a container, dilute it with the required amount of water according to the instructions, mix the mixture thoroughly by hand or using a mixer.
- Take a wide spatula and evenly apply the required amount of plaster onto its surface. Using a narrow spatula, scoop out the solution and apply it in small portions to the seam, slightly extending to the edges of the drywall (15-20 centimeters).
- After applying all the plaster, take an empty wide trowel and move it up and down several times with light pressure to distribute the material in a thin layer over the surface of the drywall. The hardening time of the plaster is up to 1 day.
Caulking seams at corners
If you are working with corners, then the seams are sealed using an identical algorithm - stripping, priming, putty, a layer of paper/serpyanka, finishing plaster. The only important point is a different application of serpyanka/paper:
- To seal corners, material of increased width is used - up to 10 centimeters.
- For application, the material is folded strictly in the middle and applied to a layer of plaster.
- An additional layer of plaster must be applied on top of the material + do not forget to grout.
How to putty corners of drywall video
Grouting joints after plastering
After the final plaster has dried, you need to grout the joint. Work is also carried out manually using sandpaper, since a sanding machine can damage the cardboard. Upon completion of work, you need to remove dust and ventilate the room. Then you need to apply a layer of primer over the entire area of the drywall - the work on sealing the seams is completed.
Causes of seams bursting
If the work is carried out incorrectly, the seams may burst. The main reasons for seams bursting:
- Ignoring paper/serpyanka.
- Poor quality jointing.
- Ignoring grouting joints with sandpaper.
- Ignoring dust on the work surface.
- Using low-quality putty/plaster.
- Carrying out work in conditions of excessive humidity.
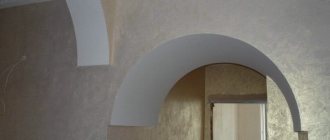
Sealing plasterboard corner seams
The technology for puttingtying internal corner joints is similar to the traditional method of sealing seams. Before sealing drywall joints, chamfers are cut into them at an angle of 45 degrees, then the joint area is covered with sickle tape no more than 10 cm thick. To obtain an ideal, even joint, use an angled spatula, using it to smooth out the grout mixture.
To seal seams at external corners, aluminum or plastic corner profiles are additionally used. They provide additional structural strength, protecting corners from moisture and mechanical damage. In this case, chamfers are not needed, since their functions are completely replaced by profiles. For ideal geometry, an angle spatula is also used.
To strengthen the outer corners of drywall, metal profiles are used Source himki-remont.ru
Methods for eliminating damage
If, despite everything, defects still appear on the surface of the new coating, they can be eliminated. And this will not require significant financial investments or special skills. Usually, to repair cracks in the ceiling, basic skills in finishing work and a small amount of material are enough. Depending on the size of the defect, slightly more materials may be required.
The crack needs to be made bigger before it can be repaired. Yes, that’s right - to expand the existing defect, increasing it in size. This is necessary so that the material applied during repair has a large area for adhesion to the surface, and it is also possible to remove all loose particles of the coating.
Along the edges of the resulting depression, it is necessary to remove the paint to a distance of about 2-3 centimeters. This is done for the same reason as the previous operation - to increase the adhesion area of the putty.
After removing dust and other contaminants, you need to carefully prime the recess. It is better to use a brush rather than a roller. The nap of the roller does not always apply the primer well in the recesses.
After the primer has dried, the first layer of putty mixture is applied. When using a fugenfuhler, it will be possible not to use paper tape to reinforce the area being repaired. If another putty is used, tape will be necessary.
When the first layer of applied putty has dried, it is once again treated with a primer. Next, you can apply the finishing putty or, in the case of conventional compounds, stick a paper tape and apply the finishing compound over its surface.
After this layer has dried, it must be sanded if necessary and painted. At this point, the repair of the plasterboard ceiling will be completed and you can begin cleaning.
Sealing seams without using serpyanka or perforated paper
Modern construction technologies do not stand still. Every year a new manufacturer appears who talks about a revolution in working with drywall. In his opinion, before sealing drywall seams, there is no longer a need to use a traditional serpyanka. Such statements are most often attributed to special reinforced plaster.
The special composition ensures reliable adhesion to drywall. During crystallization, such plaster seems to stick repeatedly into the sheets. In fact, this design can only be used in dry rooms without sudden changes in temperature and humidity. As a result, reinforced plaster for sealing drywall joints is used only in living rooms - bedroom, living room or office. For the kitchen, corridor or bathroom, serpyanka or perforated paper tape are mandatory attributes.
Puttying
We take a wide spatula and spread the mortar applied to it along the seam. We level the seam level with the surface of the drywall, removing excess mortar. Further actions depend on the type of putty used and the result of the work to be obtained.
Docking seams are classified according to the quality of workmanship:
Note! The air temperature when processing joints should not be less than 5 degrees Celsius (for some putties - not lower than 10 degrees). Moreover, the temperature level must be maintained for at least two days after completion of work
Below we will figure out how to putty drywall seams using Uniflot and Fugenfüller putty compounds.
Puttying with Uniflot mixture
The surface treatment process consists of several stages. To ensure high quality joints, you will need at least two layers of putty. In this case, reinforcing tape is not used.
Putty for plasterboard joints "Uniflot" is applied to the seam using a spatula and left for 30 minutes. After the specified time, excess putty composition is removed from the seam
If irregularities remain, we treat them with an abrasive material, but very carefully so as not to damage the drywall
Next, apply a second layer of putty. We process it in the same sequence as the first one. It should be noted that Uniflot has a high grain size, and therefore even after the second layer the surface is unlikely to be perfectly smooth. Therefore, it is recommended to use Fugenfinish for final processing of the seam. When the topcoat is completely dry, sand the surface to bring it to perfect condition. And the last step is priming the seam.
Puttying with Fugenfüller mixture
The technology for applying putty for drywall joints called “Fugenfüller” is somewhat different. After applying the layer, the seam is sealed with reinforcing tape. The tape can be either perforated paper or a transparent plastic product with a self-adhesive surface for connection to drywall.
How to remove cracks: effective methods
And so, we look at the crack, the crack “looks” at us. What's next? First we need to get rid of the old putty and dust inside. To do this, rinse it with water. You need to thoroughly wet the crack in the ceiling.
If it is too thin (less than 3 mm), it needs to be expanded (just up to 3 mm). To expand, use a small thin spatula, chisel, or cardboard cutter. Moreover, we need a large, “reinforced” knife, since an ordinary stationery knife will most likely declare ahead of time that it is tired, after which it will break.
Why widen our chasm - I think it’s understandable. If it is too narrow, the putty will not be able to penetrate inside and properly perform its “functional duties.”
So, we widened the cracks. What to do next? - Now is the time to start puttingty. A gypsum solution is ideal for this. You can use either just chalk with plaster, or a ready-made mixture specially designed for such work. You can purchase it at a hardware store in the general construction materials department.
It goes without saying that the ready-made mixture is the optimal solution: thanks to the special additives in its composition, it interacts well with the work surface. In terms of consistency, this mixture is just what you need! In general, as they like to say in advertising, this is your best choice. Moreover, this is not advertising, but nothing more than a statement of fact.
After the putty has dried, we have every right to proceed with further processing. We need to make sure that there is a “=” sign between the place where the crevice is conveniently located and the rest of the ceiling surface. Otherwise, the gap will stand out, which will not look very aesthetically pleasing.
For such work we use special putty, which can be bought at a hardware store. There are many companies that produce similar mixtures, but now we will not advertise any of them. Sales consultants can better tell you about this. However, the putty produced under the Knauf brand is considered a really good example.
There is nothing special in the process of applying putty: for this we use a regular spatula and apply the solution in layers. Especially if you need to cover a large and wide gap. By the way, how to deal with large cracks should be discussed separately.
Advantages and disadvantages
Cement putty:
- Able to withstand high temperatures and even open fire. Doesn't melt.
- Moisture resistant. The high density of the mixture prevents moisture from penetrating into its structure.
- Resistant to frost. Able to withstand frequent temperature changes, even with sub-zero temperatures.
- Can be used in almost all types of premises, even for finishing drywall on the facade of a house.
Minuses:
- The cement mixture shrinks quickly, which can lead to cracks. This is especially true for those moments when the installation of gypsum boards was carried out unprofessionally.
- The mixture is not elastic and is difficult to apply to the surface.
Gypsum putty:
- The porous structure prevents mold from forming.
- Elastic, lies evenly on the walls.
- It is practical, since sealing seams is done quickly and without much difficulty.
- Does not shrink.
Disadvantages - gypsum absorbs moisture very quickly. But thanks to its advantages and optimal cost, it is gaining popularity among consumers.
Polymer putty:
There are two types - acrylic and latex. Latex contains various plasticizers, hardeners, and antiseptics.
Pros:
- Elasticity, strength after hardening, moisture resistance, practicality and cost-effectiveness.
- It has maximum adhesion, so the mixture can be used on any surface.
Acrylic putty is made from synthetic material and has a distinctive property - it is an ideal binding element. Excellent for sealing drywall seams. The putty lays evenly on the surface, does not absorb moisture, does not deform under its influence, and is quite durable.
Despite its enormous popularity and advantages, acrylic mixtures do not withstand low temperatures, and it is better not to use it in unheated rooms.
Joints of plasterboard sheets and their sealing
When fastening in two layers, it is necessary to shift the sheets of the second layer by 60 cm in relation to the first. You should start with half, cut along a line running along the sheet.
After joining, there is one more important part left - sealing the seams. Putty will help us with this. Following the instructions, dilute the gypsum base in water.
In order for your repair to be durable and reliable, you first need to take care of the quality of the seams, and therefore the putty itself. In addition to this, we need a spatula; a regular 15-centimeter construction spatula will do. The most important question for beginners is whether to leave a gap between sheets of drywall? Yes, because plasterboard sheets, like any other material, tend to expand from heat and swell from moisture.
The gap in this situation will help prevent the deformed sheet from leading the rest. If the joint is located in a corner, one sheet is attached to the profile, then the second is attached to the one standing next to it. Only then a perforated corner specially designed for this purpose is put on the outer corner.
The internal one is simply covered with putty. The gap should not exceed 10 mm.
Sanding corners
Sanding is the final step. It removes small irregularities, sagging, and drops from the walls. If puttying is carried out with high precision, then grinding is reduced to a minimum.
The main disadvantage of grinding is the formation of fine dust. In addition, it is time-consuming and labor-intensive. This is a painstaking process that requires patience and endurance from a specialist.
Cleaning is carried out in several steps:
| 1. Doors, floors, openings are covered with a damp cloth. It allows you to reduce the amount of suspended matter in the air. | |
| 2. Clean the walls with a sharp spatula. It allows you to remove pieces of mortar and other irregularities. | |
| 3. For grinding, use a block and a mesh with a cell of 1800-200. The movements are carried out in a circular manner, moving along the entire surface of the wall. |
To identify surface irregularities and defects, oblique lighting is used. The surface is illuminated throughout the grinding period.
If the work is carried out for gluing thick wallpaper, then perfect sanding of the layer is not required. It is enough to remove obvious defects.
How to seal seams correctly
Sealing drywall joints begins with inspecting the seams. For high-quality grouting of joints, it is advisable to make a cut along the edge of each sheet to form a V-shaped opening . The chamfer should be 5 mm long on one and the other edge. Putty fits well into such a hollow. The same must be done if the edge is defective - has breaks or chips.
It is also necessary to inspect whether all the screws are screwed in well and evenly . During operation, some of them may have weakened.
After the primer has dried, you can begin to fill the seams . This stage of work is performed in the following sequence:
- Mix the putty according to the instructions on the package using a construction mixer.
- First, cover the heads of the screws that fastened the sheets of drywall with the mixture.
- Apply the putty mixture to the chamfers so that it has time to harden a little inside.
- Fill all the seams one by one.
- Rub it in with a spatula, then remove the residue and let it dry.
The entire space between the sheets should be well filled, since the voids may collapse over time, which will lead to the collapse of the plaster in these places.
Using serpyanka
If you use the classic method - serpyanka - after the layer of putty has dried, you need to apply a mesh so that the joint runs exactly in the middle .
Holding the serpyanka, press it down with a spatula and apply the second layer. Next, the plaster is sanded after drying. The advantages of serpyanka are that it allows air to pass through and can be used to reinforce any surfaces – flat, rounded.
Serpyanka can be self-adhesive or non-self-adhesive . This material is not considered the most durable, but it copes with the task. Sold in rolls of 20, 45 and 90 m. Width – 45 – 50 mm.
If a roll of self-adhesive sickle for drywall has been opened but not used, it must be placed in a sealed bag so that the adhesive layer does not dry out.
Sealing with paper tape
In addition to serpyanka, you can use perforated or regular paper tape.
The seam is stronger if perforated tape is used instead of traditional mesh. The connection quality also improves. Some types of reinforcing tapes must be pre-soaked in hot water. The time required must be taken into account. Next, a layer of PVA glue is applied to the tape, and the tape is folded in half.
The sanded and prepared joint is also coated with glue and tape is applied to it. You need to level it with a spatula, but you cannot press too hard, as the tape may tear. After drying, the tape takes the shape of a seam, then it can be puttied again.
Valera
The voice of the construction guru
Ask a Question
It is better to use perforated tape. Even though the connection seems weak, it holds the two sheets of drywall together very well. There are guaranteed to be no cracks in these places. When working, there should be no wavy areas or bubbles left on the tape.
The paper tape is sold in rolls of 50 or 153 m. It is made of special glass fiber reinforced paper. Thanks to the fold in the middle, it can be used to finish corners.
Fiberglass - material characteristics
Fiberglass web is a synthetic but environmentally friendly material. It is able to completely hide all construction defects, even the smallest ones. After applying the final layer of putty and sanding, the joined sheets of drywall look like a single unit.
When using fiberglass, it is necessary to determine where the front side . It is smooth and usually directed towards the inside of the roll. The reverse side has a pile for better adhesion to the surface.
To glue this material you need a special glue for glass wallpaper. It is also necessary to take care of eye protection , since when cutting fiberglass, a synthetic finger rises into the air, which irritates the skin and mucous membranes.
After applying the adhesive to the drywall, the fiberglass is applied and smoothed with a putty knife. The wall will take about a day to dry. Then you can apply a layer of putty.
Non-woven tape
ProfiShov tape is produced on a non-woven basis. This enhances the reinforcement effect .
Advantages of non-woven tape
Abrasion resistant
High tensile strength
The composition includes components that absorb the putty well and adhere tightly to it, preventing the appearance of cracks
Does not change properties due to changes in temperature and humidity
Environmentally friendly - consists of organic fibers and cellulose
The tape can be used to reinforce corners thanks to the perforated fold in the middle.
This building material is produced by a domestic company, so it is cheaper.
Caulking seams at corners
Processing fillet welds may seem quite difficult at first. But you can easily cope with it if you were able to seal simple seams. The principle of operation is the same, but you will need metal corners for reinforcement and an angle spatula.
Angle spatula
Apply one layer of plaster and secure the metal corners to it by pressing them into the mortar. Remove the excess and apply several more layers of putty.
You can also cover the seams at the corners using serpyanka. Take a one-sided spatula and spread the putty along one side of the corner, and then on the other. This way you will avoid wasting putty.
Cut a piece of tape to the required length, fold it in half, and attach it to the corner. Apply putty alternately to both sides of the tape and pull it through with a spatula.
In the same way you can seal the internal corners along the ceiling.
How to putty the outside corners of drywall
To repair external corner joints of gypsum boards, prepare reinforcement, a knife for cutting them, and a level in advance.
Experts recommend choosing products made of galvanized steel. They are more reliable and are not subject to rust.
Fastening technology includes a number of sequential steps:
| 1. The height of the wall is measured with a tape measure. The required size is cut from the corner. | |
| 2. The slope is checked with a level for the presence of distortions. Differences of more than 5 millimeters require preliminary leveling. If there are no defects, then a small layer of putty is applied to the joint. | |
| 3. The corner must be applied to the junction of the sheets and pressed slightly. The excess that comes out through the perforation is distributed over the entire height. | |
| 4. The accuracy of placement is checked with a level. If necessary, adjustments are made. | |
| 5. The starting layer is sanded with a float and primed. | |
| 6. Finally, the finishing solution is applied. To do this, grab a nearby plane at a distance of 20-30 centimeters. It is important that there are no noticeable obvious transitions. |
The leveled and sanded wall is treated with a primer. It binds dust particles and increases the adhesion of the base.
When to start subsequent work
After the work has been done on reinforcing the joints, as well as grouting them, you need to thoroughly clean everything from dust, cover it with a primer, and only then start working.
The entire surface of HA sheets is covered with a finishing putty solution. After complete drying, use sandpaper and a grinding machine to remove small stones and other defects from the surface.
Before applying a decorative coating (paint, wallpaper, decorative plaster, tile), the surface is primed again.
Recommendations from the experts:
- After grouting, small cracks may appear on the plasterboard surface. This happens due to temperature changes. If cracks are found, they must be covered with a thin layer of joint putty.
- When the soil moves or the house subsides, cracks appear in the corners. They must be reinforced and then puttied.
- The packaging of putties often contains the inscription: “Use without reinforcing tape.” To achieve strength, it is worth using tape for gypsum board joints.
After all of the above, it is clear that the joints must be reinforced with tape and putty intended for this purpose. Grouting of joints is required for a good appearance, and the corners must be reinforced with a corner profile and tape with a metal insert.
Types of putty
There are several types of putty on the market. To choose the appropriate one, you need to understand how they differ from each other.
The material is selected taking into account its purpose:
- Leveling starting putty. Used for initial sealing of seams and joints, leveling chips, filling chamfers. The color can be white, brown, gray. The composition is coarse-grained - this is necessary for better adhesion to the next layer. It cannot be used as a finishing layer - large fractions are difficult to sand well.
- The finishing putty is white so that it does not show through paint or light-colored plaster. The composition is fine-grained and sands well.
- Universal putty. Suitable for both starting and finishing layers.
To choose a mixture of the appropriate composition, you need to take into account the microclimate in the room. You can choose three varieties:
- Polymer mixture. Moisture-resistant, durable putty after drying. Does not dry out or crack due to shrinkage. The cost is high, but the material is suitable for any room, with any finish.
- Cement based. It is considered the most moisture resistant, so it is used in rooms with high humidity. The disadvantage is the tendency to shrink and the appearance of small cracks due to this. It is better to use it under tiles; it is better not to use the material for drywall due to drying and shrinkage.
- Gypsum-based putty More hygroscopic, therefore suitable for dry living areas. There is no shrinkage, so cracks do not appear after drying.
You can buy a dry mixture or a ready-made liquid solution. In the first case, the mixture, if stored correctly, can be useful again.
The main causes of cracks in drywall
External factors
Strong vibration, for example, when the building is located near a transport highway or due to repairs at the neighbors (powerful hammer drill, etc.).
Shrinkage of the home, which can cause many cracks to appear, especially in corners and walls. You can begin sealing cracks from the inside only after the shrinkage process has been completed.
Force majeure (flood from above, earthquake, strong shock).
Violation of repair technology
The use of cheap building materials, for example, metal profiles with a thickness of 0.35-0.5 mm instead of the recommended 0.65-0.7 mm.
Weakening of the wooden frame: if the sheathing is knocked off the damp timber, then when it dries, the wood bends, then cracks appear.
Formation of steam or condensation between the rough ceiling and drywall. That is why it is recommended to use moisture-resistant plasterboards, and to install the sheets only after the plaster has completely dried and with the windows closed.
Poor quality frame fasteners. For example, for installation it is better not to take plastic dowels, which come in the same set with screws. The diameter of the fastener in relation to the original bushing is too small, the dowel does not stretch well in the hole, and the structure begins to sag.
Installation of gypsum boards without displacement of vertical joints, in one line, “sheet to sheet”.
When, when installing gypsum boards, the seams at the joints between the sheets were not sealed or the seams were sealed without the use of sickle stacks.
Incorrect fastening of the U-brackets - to additional bending “ears”, and not to the main fastening. As a result, the bracket soon begins to pull back, and the integrity of the walls is compromised.
Often cracks appear if, when installing gypsum boards without a factory edge, they were not chamfered.
Lack of primer on gypsum plasterboard walls or ceilings or presence of dust on the surface before applying putty.
If you are sure that the crack is isolated, then proceed with the repair. But if there are signs of further deformation of the ceiling or walls, for example, when gypsum boards begin to “float after pressure,” it makes sense to redo the entire surface.
Preparation of the working area, correct joint
To begin with, it is important to understand how to join plasterboard sheets together so that in the future they do not cause all the troubles described. Fastening and joining is the cornerstone of all work. Drywall has two types of edges: longitudinal and end. And if everything is simple with the end edges, since they are the same on all products and represent a straight cut of the material, then the longitudinal edges are different:
- Folded. Found on moisture-resistant boards used for rough finishing. The edge is marked as FC;
- Straight edge, which is also rough and is designated as PC;
- Rounded. This type does not require the additional use of reinforced tape. Denoted as ZK;
- Semicircular edge that requires special attention. It must be processed in several stages, without using a serpyanka. Marked as PLC;
- PLUK, or semicircular. This slab is thinned on the front side. When working with such a seam, you cannot do without serpyanka (perforated masking tape), which, if necessary, can easily be replaced with drywall putty;
- Beveled is the most difficult type of edge; to seal the seams you will need a serpyanka and several layers of putty.
These are the main types of edges that can be found on the domestic market. It is necessary to separately note the method used by experienced installers. When using it, any types of edges in advance or already on the mounted structure are cut along the edge with a construction knife, at an angle of about 45 degrees each. Thus, an angular groove is formed with increased adhesiveness, which is the same on all joints and does not require additional special means for its processing.
The gap between the sheets of drywall should be in the range from 3 to 7 millimeters. You need to make an indent of one centimeter from the floor, and half of this value from the flow. In the future, these places will be puttied and covered with baseboards.
Dimensions
Standard sizes: 10, 15, 25, 45, 60, 80, 100 cm.
Existing spatula sizes
For puttying drywall, two types are used: the main one, which is used to putty the surface, and the backup one, which is used to apply the putty mixture to the blade. Each master selects the size individually for himself.