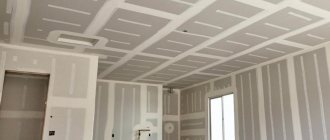
Among finishing and repairs, leveling plasterboard walls is one of the most common. Working with gypsum plasterboard is not difficult and does not require special knowledge; in addition, the price is much lower than that of many other materials. That is why plasterboard is popular in home construction, in the decoration of offices and premises, and in production.
Features of working with plasterboard sheets
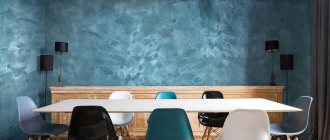
One of the most budget-friendly options that does not require a lot of money is painting gypsum boards. This method is much simpler than gluing large pieces of special paper that requires precise measurements. In addition, the simplicity is noticeable, since there is no need to adjust the design. The ease of finishing and painting makes plasterboard a practical and convenient material that is useful for finishing home construction. When painting the material, you can use any designs, making the wall exclusive and not similar to the other.
Do-it-yourself painting of gypsum boards without putty:
- Increasing the strength of the material;
- Increased adhesive properties, so the paint lasts longer;
- There is a decrease in absorbed liquid;
- The color of the paint is evened out, which gives a beautiful appearance.
However, there are also negative features. If you do not use putty, stains may form due to uneven drying. Puttying drywall for painting is a necessary process that is carried out to perfectly level the surface.
Important. If you don't want to use putty, you can avoid using it, but you should use it on seams and paint joints. This will allow the coating to be distributed evenly over the entire surface.
Applying finishing mixture
As soon as the base composition finally becomes solid, you can move on to the final stage. Let's figure out how to properly putty drywall for painting.
Finishing putty is designed for finishing immediately prior to painting. To make it, gypsum or polymers are used. To prepare the composition, you must also follow the manufacturer's instructions.
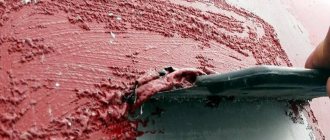
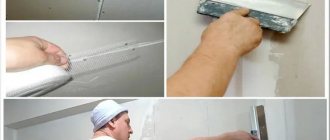
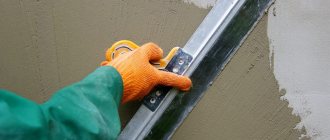
To work with finishing putty, you will need 2 types of spatula - wide and narrow. Using a narrow tool, it is convenient to take the solution from the container, and you need to distribute it evenly over the surface to be treated in a thin layer with a wide spatula. Next, the mixture should be distributed over the entire plane of the wall in a thin layer with sweeping movements.
You need to start work from the top corner so that drops of solution do not fall on the already treated surface. When the finishing layer hardens and dries, you need to go over it with sandpaper to eliminate minor imperfections and completely prepare the drywall for painting. Before painting, apply a primer, and you can cover the surface with any paint and varnish compositions.
There are situations when it is not possible to apply putty onto drywall perfectly the first time. To verify the quality of the work done, you can take a table lamp or flashlight, turn off the light and illuminate it from the side, at the smallest angle of incidence of the light rays. In this situation, the smallest defects will be noticeable. If there are any, you can remove them with sandpaper, and if the defects are significant, you will have to apply another layer of putty.
However, don’t be too upset, because when checking in this way, even professionals can see “shortcomings”. You can learn how to putty a plasterboard ceiling for painting in the video below.
Materials and tools
In order to carry out the putty job efficiently, you need to have some tools in your arsenal that will facilitate and speed up the process.
Main tools:
- spatulas;
- paint bath;
- grater;
- containers for storing building materials;
- sharp painting knife.
The main thing in this work is a complete set of spatulas. Without them, it is impossible to imagine most finishing work, so this tool will be the main one when performing the work. It is best to acquire a variety of spatulas of different widths. This is very convenient in cases where you need to seal cracks or small joints, or vice versa, use it for large, flat surfaces where it is better to distribute a large amount of putty.
An object width of 50-60 mm is suitable for finishing a hole or crack, since this requires using a lot of putty at once. To reinforce and putty seams, a wider spatula is needed. When work related to finishing putty is necessary, the largest tool sizes are used, which reach up to 500 mm.
The main requirement for a spatula is a smooth surface of its metal part. If the surface has defects or unevenness, the coating on the drywall will be uneven, which will lead to disproportionate shapes. In addition, the instrument must be absolutely clean and free of dust and other contaminants. If you do not adhere to this rule, the coating may deteriorate over time due to mechanical stress. After previous use, always wash your instrument, as drying it out will negatively affect the final result.
A paint spatula may come in handy. This is the same tool, but with a tooth along the edge. This will make it easier to work related to reinforcement.
A paint bath is best suited for finishing and preliminary priming. Another useful tool is a roller. It is advisable that it be fitted with a comfortable handle made of plastic or wood.
To cut sheets of drywall, a construction knife, preferably with different attachments, is best suited. This will allow you to quickly deal with the material and cut it out after the measurements have been taken.
And finally, prepare special containers for materials. It is best, according to the experts, to use long but narrow trays that will be approximately the same thickness as a spatula. This will make the labor-intensive process much easier and increase efficiency.
How to putty gypsum boards
Choosing a suitable putty mixture for an inexperienced finisher may not be so easy due to the wide variety of this type of material in construction stores. Some compounds are used for ceiling work, others for walls, there are decorative putties, and there are starter ones. Both ready-to-use solutions and dry mixtures that require mixing with water are sold.
If the amount of work is insignificant, for example, we are talking about finishing one small room, the best option may be to buy a ready-made solution. This is especially true when the work is carried out by non-professionals, since they will not make mistakes when preparing it. The disadvantage of this approach is that the solution, ready for application, cannot be stored for a long time.
According to the binder, the putties in their composition are:
- cement;
- gypsum;
- polymer.
Cement is resistant to moisture, but is not highly elastic and shrinks slightly. Putties based on it are used in wet rooms: bathroom, kitchen, etc.
Gypsum is flexible and dries quickly. Very easy to use material. The key disadvantage of this putty is its intolerance to temperature changes and high humidity.
Compositions based on polymer binders are very versatile. They are easily applied to the surface and are free from most of the flaws of cement and gypsum mixtures. Payment for quality is the high price of the product compared to dry formulations.
Popular putty mixtures:
Knauf HP . Brand of gypsum-based putties for starting and finishing finishing. Drying time is a day. The maximum layer thickness is 15 mm, the minimum is 0.5 mm. Packaged in 30 kg bags. The disadvantage is the presence of impurity particles, which complicate the finishing putty.
SCANMIX TT . Waterproof composition based on cement binder. Tolerates low temperatures well. Suitable for interior and exterior finishing work, including in regions with harsh climates. The maximum layer is 20 mm, the minimum is 4 mm. It dries within 24 hours, but the finish can only be applied after 48 hours. The main disadvantage is that it often cracks during shrinkage.
SCANMIX LH STANDARD . Polymer composition for finishing putty. It has a very high adhesion rate, which makes it suitable for working with almost any surface. It is not afraid of water and does not shrink. The disadvantage is the high price.
Founded Ekonsilk . Russian-made gypsum putty. Dries in about 5 hours. It has good plasticity and is easy to level. The maximum layer thickness is 5 mm. Economical mixture consumption. Attractive price. The disadvantage is that after the solution dries, cracks sometimes appear.
Volma Standard . Gypsum composition with the addition of special modifiers. Good adhesion and ductility. Low thermal conductivity. The disadvantage is the long drying period of the solution.
Weber vetonit LR+ .
Superplastic putty on a polymer binder. Used for finishing. It can be applied not only manually, but also by machine. The maximum layer thickness is 5 mm. The solution is suitable for use within 48 hours after mixing. Disadvantages - it takes a long time to dry, the filler size of 0.3 mm does not allow applying putty in a layer thinner than 1 mm.
Types of putties for drywall for painting
There are 3 types of drywall putty:
- polymer;
- plaster;
- cement.
The polymer type of putty is universal. It contains polymers. It is suitable for finishing any premises, which is why it is popular. It can even be used in children's rooms, since its composition is environmentally friendly and does not cause any harm. This is the safest type of putty used for both walls and ceilings.
Gypsum consists of 50% gypsum. It is designed for fragile materials. It should not be used in bathrooms, as it may destroy the surface.
Cement is best suited for bathrooms as it protects against moisture. This is the strongest type of putty, therefore it is often used for finishing work.
Drywall plaster or putty - what's the difference?
It is no coincidence that the two building materials have different names. There are significant differences between them:
- Purpose. Plastering is used to level out large deviations and uneven surfaces of the base. Putty – for leveling minor unevenness.
- The size of the filler varies. Coarse-grained components are possible in the composition of the plaster mixture; the grain size can reach 5 mm. In the starting putty, the filler grain has dimensions of 80-200 microns (0.08-0.2 mm), in the finishing putty - 20-80 microns, in thin putty - up to 20 microns. The grain size affects the minimum thickness of the created layer. The putty paste intended for finishing is applied with a thickness of 0.1-0.4 cm.
- Shrinkage of putties is less.
- Plasters have higher strength.
- The cost of plaster compositions is lower.
- Application technology also varies. You can apply plaster manually and mechanically, throw it on, apply it in a thick layer. The putty composition is applied in small portions and leveled.
You can also decorate walls with putty, just like with plaster.
Cleaning and priming drywall
There is a lot of debate about whether a primer is needed before further processing of drywall. The debate concerns which part of the surface needs to be primed. Some believe that only the caps and seams of the joints need to be modified, while others believe that the entire surface needs to be treated. Still others believe that there is no need to use a primer for drywall, and it is not needed at all.
Practice shows that it is best to use a primer over the entire surface of the drywall.
Reasons for using around the perimeter:
- The primer improves the adhesion of materials, so it will reduce the costs of materials such as glue, and others;
- when removing old wallpaper, the primer will allow this to be done without harming the material itself. If you stick the wallpaper on bare gypsum board, the wallpaper can no longer be replaced, since the material has deteriorated;
- Paint absorption occurs noticeably less when priming with GCM. This will allow the paintwork to be applied evenly to the surface, which will prevent the formation of stains.
Important. The use of primer on GCM is a controversial issue, but experts believe that it is best to apply primer over the entire surface of the coating. This will improve adhesion, coloring properties and make it possible to throw away old wallpaper.
Basic special tools
The main tools include those without which you simply cannot work when puttingtying drywall, these are:
- spatulas,
- roller,
- bath,
- mixer,
- Sander.
Spatulas must be selected according to your hand; too long, too short amenities will add little. How to understand this? First, buy what the store recommends and try to work. You will see for yourself if the mixture constantly falls off the spatula or there is too little of it, it is not suitable.
The roller should be selected wide for large surface areas, narrow for corners, protrusions, columns. When priming walls, you need a handle to the roller. The most convenient option is a telescopic holder, but a mop stick will also work. You will need a fluffy roller, one that wets well. It should not “shed”; the less lint on the wall, the better the quality of the primer, but it doesn’t matter if hair gets into the primer, further work will hide the defect.
Tools need to be selected individually for yourself
The bath is selected according to the size of the roller. The quantity depends on the number of people performing the work.
A mixer is a power tool designed for preparing small volumes of building mixtures. You can replace this with a regular drill or hammer drill. Be careful when using a tool not intended for preparing mixtures, take into account the technical characteristics. Overloading is unacceptable, otherwise it will burn out.
A grinding machine is a power tool designed for mechanical grinding. It can be replaced with a block of sandpaper.
Tools should always be at hand
Preparing putty
Preparing putty is an important process, since it will affect the quality of the material used for the work. However, it is difficult to choose a decent option, since the market is crowded with various manufacturers whose reputation is unknown. In addition, it is necessary to pay attention to such nuances as the dryness of the mixtures and storage methods.
Experts give recommendations on the use of dry mixtures, since they will enable long-term storage and proper temperature control. That is why such mixtures are always suitable for use, since they can be stored for a long time. Ready-made putties pose more problems, since when purchasing them they must be immediately used for their intended purpose. In addition, ready-made mixtures, already diluted with water, have a high cost.
Preparation consists of diluting the dry mixture with water. Before diluting, you need to look at the instructions that are on each package. The main thing is to calculate the correct consistency and proportions.
How to calculate the required amount of mixture?
First you need to know exactly the area of the surface to be finished (it can be easily calculated; for this you need to look at the exact dimensions of the plasterboard sheets indicated on the label and add up all the numbers).
The amount of material will depend on the degree of complexity of the work, that is, the more defects, roughnesses and irregularities, the more putty and time it will take to apply it. There is a general formula that will help determine the required amount of mixture and it is calculated by multiplying 1 kg of putty (+100 g) by 1 square meter of wall or ceiling surface (provided that they have been previously primed). The formula is suitable for calculating dry mixtures. If a gypsum-based mixture was chosen for finishing, then you do not need to add 100 grams to it. There is an even more economical option - adhesive putty, you only need 500 grams per 1 square meter.
Trimming corners and reinforcing seams
Corner reinforcement is work that is associated with the processing of walls, the purpose of which is to align the corners. This process is one of the most important in processing, since the proportions and beauty of the work performed will depend on it. Since the GCM itself already assumes smooth surfaces, reinforcement is only necessary to provide reinforcement and prepare areas for further processing.
Various materials can be used for reinforcement. It can be like regular paper that is attached to the corner of the wall. For stronger reinforcement, metal inserts made at an angle of 90 degrees are used. The essence of the technology is not very different between the two types, since working with roll tape involves the same actions.
There is also special equipment that is designed for reinforcement. It allows you to get work done quickly and efficiently.
How is it shown:
- applying the solution at the required width and height;
- there are installations for applying the solution;
- angles that allow them to be used for alignment.
In home construction, it is not necessary to use special equipment and adjust the correct angles. You can do this yourself, from improvised or purchased materials. In addition, you can use basic tools that everyone has at home.
A little about the material
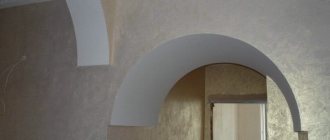
One of the positive features of plasterboard is that when covering walls or ceilings with it, an excellent, flat surface is obtained. And, as it might seem at first glance, plaster is now a thing of the past. But not everything is so simple, because putty is still needed here, although it requires much less effort, time and money. Puttying drywall is required for the following reasons:
Sheet edges
- There are different types of edges on the edges of the slab that form small valleys. Reinforcing tape should be placed in them and puttied to achieve a smooth overall surface;
- slight level differences between two adjacent sheets;
- There may be some errors when installing the frame, which could not create a perfectly flat surface;
- presence of minor damage to the material during transportation and installation on walls or ceilings.
In addition, when using certain decorating materials without putty, the joints between the slabs will remain noticeable. Another important factor why puttying sheets is necessary is the need to preserve the surface of the drywall for further updating of the final design. Although this factor is not particularly important in a situation where you plan to paint the ceiling or walls.
Grinding
In order to bring the coating to perfect condition, it is necessary to prepare the drywall, namely sand it. To do this, use a special tool - a grater with a fine sharp coating, which is used to rub the GCM. It should be remembered that sanding must be done carefully, as you can remove an excess layer of coating, after which the GCM will become unusable.
After this process, it is necessary to completely get rid of dirt and dust and prepare the drywall for finishing activities, for further priming.
Important. All work must be carried out only on a dry surface, free of dust. After applying the next layer, you need to wait until the layer has dried.
Painting features
Poor quality painting
Paint, unlike wallpaper, has a certain specificity. To apply it, the surface must be perfectly flat and not react with the paint itself. And given the fact that the outer layer of the boards consists of cardboard, the paint will simply penetrate into the material without additional surface preparation. As a result, you will get a non-uniform wall on which dark spots will be visible. In addition, paint without surface preparation can:
- form lumps that will negatively affect the uniformity of layer application;
- uneven impregnation, which will be especially visible if the room is well lit by natural light;
- impossibility of further high-quality repainting of the ceiling or walls in a different color.
As you can see, puttying drywall for painting is a necessary process to obtain a high-quality final result.
Do-it-yourself drywall putty for painting video
Puttying drywall for painting is done with your own hands, without the need to use special tools and equipment. We have already figured out that before painting, you need to use putty. Before work, it is necessary to treat with a water-soluble composition, as this prevents the paint from peeling.
Application instructions:
- the corners are puttied one by one;
- screws are puttied;
- The joints of the gypsum board sheets are sealed.
To make the work more efficient, we will attach a video. Puttying drywall with your own hands is not particularly difficult.
It is advisable to use all the rules that are indicated in the article, since the effect of finishing work depends on this. In order to paint drywall, it is necessary to use putty. The main thing in this work is not to rush, since it is necessary to carry out subsequent actions after the previous layer has dried.
Advantages and disadvantages
GKL sheets are easily attached to the frame
and have many advantages that helped it quickly become the most popular finishing material of our time. Among the main positive qualities of gypsum boards are the following:
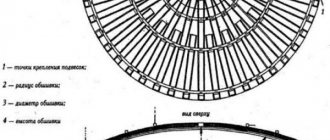
- Easy to install. The sheets are attached to a special frame assembled from a metal profile. The frame profile is specially designed for plasterboard and allows you to create a wide variety of compositions - from simple planes to multi-level ceilings and openwork arches.
- Affordable price. Cost per sq. m. plasterboard walls are much lower than sq. m. m of wall, leveled using ordinary plaster mortar. The price per square meter, in addition to the materials themselves, also includes the cost of the work of a team of plasterers and painters.
- A large assortment. The widest range of gypsum board sheets allows them to be used for a wide variety of work: finishing walls, ceilings, constructing decorative interior items. In particular, special gypsum board sheets can be used in rooms with high humidity or a risk of fire.
In addition to simple drywall, moisture- and fire-resistant varieties are also produced - Ease of pre-finishing. Structures obtained using plasterboard do not need to be plastered or otherwise leveled. The resulting surface is only covered with a layer of putty before the final decorative finishing.
- Versatility. GKL is suitable for any decorative finishing: wallpapering, decorative plaster coating, painting, etc.
Among the obvious disadvantages of drywall, one can only note its excessive fragility. In this regard, plasterboard walls cannot be used as load-bearing structures: you cannot even attach an ordinary bookshelf to them. Another disadvantage of gypsum plasterboard, the fear of dampness, has successfully become a thing of the past with the advent of moisture-resistant sheets.
Work rules
Putty, as we found out, is a necessity. Only with it is it possible to properly paint plasterboard walls or ceilings. And in order to get the expected result, you must adhere to the following rules:
Sealing joints
- the most important place is the joints of the sheets. They should be sealed especially carefully and carefully. The likelihood of cracks appearing over time will depend on how correctly the joints were puttied, especially on the ceiling;
- mandatory treatment of joints with reinforcing tape or serpyanka;
- correct screwing of screws. The optimal depth for their heating is 1 mm;
- uniform application of the solution.
After completing the plastering work, the surface should remain perfectly flat and smooth. Professionals can do this the first time, but beginners will have to sand down any uneven areas with sandpaper.
Paint selection
The success of the final finishing of a ceiling or walls made of plasterboard sheets also depends on how correctly the paint was chosen. Moreover, bad paint can ruin even perfectly executed putty. Therefore, this issue is quite relevant today.
Drywall paint
Today on the market or in a hardware store there is a wide range of different enamels to choose from. In our situation, you can use those types of paints that are made on a water basis:
Note! If you need to paint the ceiling and walls in the bathroom, then you need to choose products with vapor-proof properties. Here it is best to use latex acrylic paint. In a normal situation, silicone paint will have the best characteristics. It has antiseptic properties and is resistant to various types of pollution. Water-dispersion and water-emulsion products are also a good choice. Remember that for the best color effect, you need to paint plasterboard sheets in several layers.
Step-by-step instruction
Installing the tape
The puttying procedure, which is carried out before painting, differs from that for wallpaper, although it has a lot in common. It always starts with caulking the joints between adjacent sheets. Instructions for carrying out puttying work:
- Apply a little mortar to the joints and install reinforcing tape. If it is self-adhesive, then you can do without putty;
- then we apply the solution over the tape and carefully distribute it over the entire joint surface;
Note! The joint between the slabs should be level with the general surface of the walls or ceiling.
Solution distribution
- the solution must be evenly distributed between the entire surface of the groove formed by the edges of two adjacent sheets;
- smooth out any unevenness remaining after the solution has dried with sandpaper;
- After this, we seal the joints of the plasterboard sheets with the ceiling and walls. Here you can use a thicker solution to create a strong bond between the sheets and adjacent surfaces;
- then we cover all the screws. But here you need to first check all fasteners for protrusion from the sheets. If any are found, simply tighten them;
- then apply the second layer. Here the entire surface of the wall is already captured. Therefore, we apply the solution in a very thin layer. This is done in order to even out the overall color of the ceiling or wall. This way the paint will apply evenly and without lumps;
Ceiling putty
- rub the second layer until perfectly smooth;
- After the solution has completely dried, prime the surface. It is recommended to apply several layers to create a good protective layer and prevent uneven penetration of the paint into the material.
If you do not apply a second layer of putty, which you can safely do without when wallpapering, then when applying light paint, the transition will be very clearly visible. To get a smooth surface, experts recommend using ready-made mixtures in this situation rather than kneading them yourself. Self-prepared putty may be poorly mixed and contain lumps. They will lead to roughness, which will remain noticeable during painting. The process of puttying plasterboard sheets for painting is not difficult. The main thing is to consistently follow the above instructions, and you will get an excellent surface, ideal for painting.
Nuances of work
Removing excess
When applying a putty solution to a plasterboard surface, you need to know the following nuances:
- sheets with some types of edges do not form a groove for the reinforcing tape when joining. Therefore, in this case you can do without installing it;
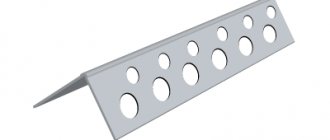
- Perforated corners should be used at the corners of ceiling or wall structures;
- excess solution should be removed using a spatula;
- The seams between the plates should not be long, as they will crack over time. Therefore, during installation, the sheets are slightly shifted relative to each other;
- Before applying putty, be sure to read the instructions for working with the solution.
By following the above rules and the process algorithm, you will be able to carry out high-quality putty and create an excellent surface for applying paint. After such work, the paint will adhere perfectly, lumps will not spoil the appearance of the ceiling or walls, and the entire repair will be perfectly completed!