Installing a cornice for the ceiling - 5 options for performing the work
Before you begin the work, you need to purchase a cornice
, it can be sold either as a set or as individual elements, so first of all you need to figure out what parts it consists of:
This diagram shows in detail all structural elements
| Materials | Description |
| Cornice profile | This is an important element on which the curtains are held; it can be single-row, double-row or three-row. As for the color, it is very often white, but beige and brown options can be found. The manufacturing material is very often plastic, but there are also products made of aluminum, but they are much more expensive and in terms of strength they are not very much superior to the first option |
| Roundings | They are allowed to be installed on the sides to give the structure greater accuracy and create a specific frame around the window opening. They are placed at the ends of the key profile, which is very comfortable and simple |
| Straight plugs | It is used in cases where the cornice occupies the entire width of the wall. It is also allowed to use plugs if you prefer a straight cornice or there is no room left for fastening the curves, because they take up some space and make the structure more indented from the wall surface, which is not always necessary. Again, they cover the ends in curves so that they look neat |
| Connectors | They are needed so that, if necessary, you can combine two or more key profiles. Thanks to these elements, you will not only fasten the individual parts together, but also combine them perfectly so that the curtains close and open without any obstacles |
| Stoppers | They are mounted along the edges and are needed to reduce the movement of the hooks and prevent window curtains from crawling out of the structure. They are placed on the grooves in the place you need |
| Hooks | They are needed for fastening window curtains and are placed during assembly, their number depends on the weight of the materials that will be hung and the width of the structure, very often the parts are placed in increments of 10-15 cm |
| Fasteners | Very often the kit includes dowels, screws and plugs. From my own experience I can say that standard parts are not always suitable for the application; sometimes other elements are needed |
| Decorative tape | It is necessary to cover the cornice for the ceiling and give the structure a much more beautiful appearance. Such an element is often purchased separately and selected depending on the interior design. If you will place the structure in a niche or install a plinth for the ceiling in front of the cornice, then decorative tape is not required |
Decorative ribbons can have all sorts of colors and textures. When purchasing, always look carefully at the quality of the plastic; I have come across options that are made of soft material and bend very easily without much effort. Therefore, just try to bend the profile slightly; it should not be difficult to bend. Now let’s try to figure out such a very important nuance as price, I will tell you using the example of a cornice 200 cm long, the set in most cases includes the following elements:
Selection and installation of molded cornices on the ceiling and wall joints
You started a renovation. This is a troublesome business: floors, walls, windows, doors, ceilings - everything needs updating! Work was in full swing. And here are the first results: all window frames and door jambs have been replaced. Everything moves as usual, but the mood is spoiled by uneven walls, corners and some flaws on the ceiling, and the room seems very small. What to do?
A simple solution to these issues is to use gypsum stucco: molded cornices at the junction of walls and ceilings, as well as other gypsum decorative elements (in the same style as the cornice) in corners and on wall surfaces. All attention should be focused on the plaster cornice , since it is the main part of the decor, and all other moldings should “adjust” to it.
How to choose the size of the cornice? Most often, this size is selected depending on the height of the ceiling. But sometimes designers use little tricks: if the room seems small, then it is better to use plaster cornices due to the fact that they have the ability to visually increase the area of the living space. Also, large, complex cornices give the room a certain sophistication and chic, while simple and unpretentious ones impart simplicity and modesty to the interior. The former are used in living rooms, state rooms, the latter - in dining rooms and other rooms.
If you decide to make repairs on your own, then first of all you need to decide on the choice of interior style.
Installation recommendations
1. Prepare the walls thoroughly:
a) Clean, wash off the whitewash from the places where parts are installed on the wall and ceiling;
b) Level the walls (if necessary, treat the walls with putty and primer);
c) Dry the walls (at least 24 hours);
2. Monitor the level of humidity and temperature in the room (at high humidity, gypsum elements become fragile).
3. It is recommended to install plaster cornices before painting walls and ceilings, and before wallpapering;
4. Select materials and determine their quantities. The quantity is calculated according to the following scheme: length of the perimeter of the room + 10% (consumption for cutting corners).
5. Carry out the installation of gypsum cornices by two craftsmen.
Necessary tools for installing plaster cornice
- Saw box – miter box;
- Saw or fine-toothed hacksaw, knife with a comfortable handle;
- Tape measure (minimum 3m);
- Spatula for applying glue;
- String cord with paint (for marking);
- Gypsum;
- cycle;
- Medium size brush
- Fine-grained skin, for removing glue after hardening;
- Syringe (for filling the seams with solution);
- Water sprayer.
Installation of gypsum cornice
Preparing the wall
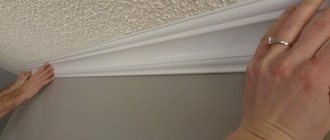
Apply markings on the wall and ceiling. To do this, you need to attach the cornice to the corner and make marks at the contact points on the ceiling and wall. Do the same manipulations in all corners.
Using a cord-beater, beat off lines along the entire perimeter of the room, taking the marks at the corners as a basis. Perforate the walls and ceiling with a drill in the places where the cornice is adjacent for better grip (suction) of the elements.
Wet the section of wall to attach the first cornice using a sprayer.
Preparing the molded cornice
It is recommended to start installation of cornices from the corners. To do this, you need to saw down the cornice on one side at an angle of 45°. After this, try the cornice on the corner, if necessary, remove a small amount for a better fit (angles are not always ideal, and the standard 45° angle may not be observed). The second end of the cornice must be trimmed using the wort evenly for a better fit.
After this, apply notches along the inside of the cornice using a scraper.
In plaster, prepare a solution of plaster with a small amount of PVA glue.
Spread the solution evenly on the inside of the cornice.
Place the plaster cornice against the wall in place of the fastener, slightly moving it left and right to squeeze out excess mortar and for better adhesion.
If the stucco parts are small and light, then they can only be firmly held on mortar. For larger parts, special fastenings must be provided. Heavy stucco elements are attached to dowels and galvanized screws (to protect against rust).
Briefly about ceiling cornices
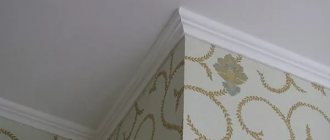
These designs make it possible to visually make the ceilings much higher and give the interior solution a complete look. This is actually why cornices that are fixed to the ceiling surface are replacing wall cornices and curtains.
They are easy to incorporate into virtually any design. They stand out for their low weight, low cost and regular lines. However, this does not in any way affect their durability.
Their installation is simple, regardless of the shape of the window over which they need to be fixed and its width. They move across the ceiling without any problems and are easy to care for.
Briefly about ceiling cornices
These designs allow you to visually make the ceilings higher and give the interior solution a finished look.
That is why cornices that are mounted on the ceiling are replacing wall cornices and curtains. They are easy to fit into almost any design. They are distinguished by their low weight, low cost and simple lines. But this does not in any way affect their durability. Their installation is simple, regardless of the shape of the window over which they need to be fixed and its width. They move easily across the ceiling and are easy to care for.
What types of ceiling cornices are there?
Foamed polyurethane
Polyurethane-based structures are lightweight and flexible. You can hang textiles on it or simply decorate the ceiling surface with it.
It is suitable for decorating arches and other architectural solutions. This material weighs little, and it is easy to install it on your own, without having difficult tools nearby or without the ability of a repairman/finisher. The polyurethane plinth for the ceiling can be painted in the color you like; it is not affected by the humidity of the room. And when the temperature changes, it will not lose its shape.
This is a decorative baguette that covers the space at the junction of the wall and ceiling. This product is environmentally friendly.
It will not cause allergies in the owner of the room, which is priceless if it is intended to decorate a nursery. The material is not flammable, looks great, is durable, and does not shrink. Such a cornice can be easily restored and painted as it ages.
The appearance of this element is luxurious. It will show the well-being of the homeowners.
Moreover, gypsum cornice
will absorb additional moisture in the room well and quickly release it back in case of moisture deficiency in the room.
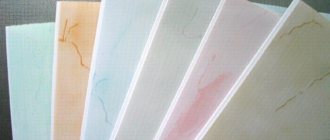
Polystyrene
Polystyrene cornices perfectly hide defects and inaccuracies during repairs. They have an affordable price, but successfully transform the interior, giving it a complete look.
They fit perfectly into different styles and have many models, sizes and colors. The base for the product is considered to be a polymer-based substance, which consists of most fine-cell sintered granules. At its own budget price, the material has many good qualities. It is lightweight and visually looks a little worse than plaster cornices.
The product made from it is strong and has a long service life.
It is easy to install; it does not become unusable under the influence of moisture or temperature changes. You can even cut it with an ordinary stationery knife.
What types of ceiling cornices are there?
Foamed polyurethane
Polyurethane structures are lightweight and flexible. You can hang textiles on it or simply decorate the surface of the ceiling with it. It is suitable for decorating arches and other architectural solutions.
This material is lightweight, and it is easy to install it yourself, without having complex tools at hand or without the skills of a repairman/finisher.
The polyurethane cornice can be painted in the color you like and is not affected by room humidity. And when the temperature changes, it will not lose its shape.
Gypsum
This is a decorative baguette that covers the space at the junction of the ceiling and wall. This product is environmentally friendly. It will not cause allergic reactions in the owner of the room, which is invaluable if it is intended to decorate a nursery.
The material does not burn, looks beautiful, is durable, and does not shrink. Such a cornice can be easily restored and painted as it ages. The appearance of this element is luxurious. It will show the well-being of the home owners. In addition, the gypsum cornice will absorb excess moisture in the room well and quickly release it back if there is a lack of moisture in the room.
Polystyrene
Polystyrene cornices perfectly hide defects and errors during repairs. They are low cost, but effectively transform the interior, giving it a finished look. They fit perfectly into any style and have many models, sizes and colors.
The basis for the product is a polymer substance consisting of many fine-cell sintered granules.
At its budget price, the material has many advantages. It is lightweight and visually looks a little worse than plaster cornices. The product made from it is durable and has a long service life. It is easy to install, it does not deteriorate under the influence of moisture or temperature changes. You can even cut it with an ordinary stationery knife.
How to Glue
Needed for work
Ceiling plinths or cornices (their number depends on the size of the room); knife or hacksaw; Gun for installation; specialized glue for fastening; acrylic based sealant.
Work progress:
- selection of material;
- Preparation;
- surface lining;
- preparation of cornices;
- gluing;
- final processing.
Material calculation
The owner of the room must know that the higher the ceiling, the larger the baguette chosen. At points of sale there is a wide selection of products that differ in sizes, materials and colors. Important! For a room measuring about 20 square meters with a ceiling height of 2.5 meters, it is better to choose cornices with a width of up to 90 mm. To calculate, we calculate the room perimeter by measuring it with a tape measure, then divide the learned number by 200 mm and round. It's better to buy one extra curtain rod just in case.
Ceiling preparation, marking
In order for the product to adhere well to the surface, it is necessary to carefully prepare it, removing all cracks and irregularities. Then we mark the surface.
To do this, apply the first test die and mark its beginning and end with a pencil.
How to glue ceiling plinths and join corners correctly.
Let's continue marking until the end of the dies. Using this procedure, installation will be simple and easy.
The marks are set with a pencil and only where they will be covered by the baseboards.
Cutting cornices, baguette
We select the angle from which installation will begin and saw it with the possibility of tilting it at 45 degrees. Then we place the product and saw it into the slots, adjusting it to an inclined angle of 45 degrees.
We adjust the joints with a knife.
Installation
We load the glue into the gun and cover with a thin layer those surfaces of the cornice that will be joined to the wall and to the ceiling. Apply a couple of drops of glue to the joint.
Press it to the surface for a couple of minutes. After drying, we go over the joints from above with putty with a very small grain, rubbing the visible connecting places. We pass the butt seams between the surface of the wall, the ceiling, and sealant dies. Then we paint the products with water-based paint in the same tone as the ceiling itself. If you wish, you can create this in 2 layers. You can create a cornice
not along the perimeter of the room, but exclusively on one wall. To do this, we go down twenty centimeters below the ceiling, glue the cornices, paint them and create special lighting behind them.
It will highlight the decorative detail of the room and highlight the ceiling.
How to glue
Required for work
Baguettes for the ceiling or cornices (their number depends on the size of the room); knife or hacksaw; gun for installation; special glue for fastening; acrylic based sealant.
Work progress:
- choice of material;
- Preparation;
- surface lining;
- preparation of cornices;
- gluing;
- final processing.
Material calculation
The owner of the room should know that the higher the ceiling, the larger the baguette is selected. The stores have a wide selection of products that vary in size, material and color.
Important! For a room measuring about 20 square meters with a ceiling height of 2.5 meters, it is better to select curtain rods up to 90 mm wide.
To calculate, we calculate the perimeter of the room by measuring it with a tape measure, then divide the learned number by 200 mm and round. It is better to buy one extra cornice in reserve.
Ceiling preparation, marking
In order for the product to adhere well to the surface, you need to carefully prepare it, removing all cracks and irregularities. After this we mark the surface. To do this, apply the first test die and mark its beginning and end with a pencil. We continue marking until the end of the dies. Using this procedure, installation will be easy and simple. Marks are made with a pencil and only in those places where they will be covered by baseboards.
Cutting cornices, baguette
We select the angle from which installation will begin and file it at an angle of 45 degrees. Then we place the product and saw it into the slots, adjusting it to an inclination angle of 45 degrees. We adjust the joints with a knife.
Installation
We load the glue into the gun and cover with a thin layer those surfaces of the cornice that will be connected to the wall and ceiling. Apply a few drops of glue to the joint. Press it to the surface for a few minutes.
After drying, we go over the joints from above with fine-grain putty, rubbing the visible joints. We pass the butt seams between the wall, ceiling, and sealant dies.
After this, we paint the product with water-based paint in the same tone as the ceiling itself. If desired, you can do this in two layers.
You can make a cornice not along the entire perimeter of the room, but only on one wall. To do this, we go down twenty centimeters below the ceiling, glue the cornices, paint them and make special lighting behind them. It will highlight the decorative detail of the room and highlight the ceiling.
Working with polystyrene foam cornice;
You will need:
- plinth with fastening strip;
- fastenings for masking corners;
- putty;
- glue (for example, “Moment Installation”);
- acrylic based sealant;
- water-based paint;
- pencil;
- centimeter (roulette);
- stationery knife;
- miter box;
- mounting gun;
- rubber spatula.
Work progress
- surface leveling;
- selection of material and its calculation;
- marking;
- gluing;
- related work.
Material calculation
We measure the perimeter of the ceiling and set aside 10–15% of the resulting number for trimming. In most cases, the typical length of the skirting board will be approximately 2 meters.
Dividing by the length of the product, we get the number of complete piece curtain rods. For typical 2.5-meter ceilings, it is best to take cornices with a width of up to 90 mm, and for “Stalin” ceilings with 3-meter ceilings, the width can be up to 17–20 cm.
Ceiling preparation, marking
First, we completely prepare the wall surface and ceiling, paint, putty, sand, etc. It must be very smooth. We apply a strip from the corner from which gluing will begin, mark the beginning and end with a pencil.
Alternately mark the location of any plank.
This way, we can glue the cornices very quickly and carefully.
Slicing
The baguettes are cut into the required size using a knife, the corners are adjusted using a miter box. To do this, you should put the cornice in it the way it will stand in the wall and cut it with a hacksaw (stationery knife).
Cutting starts from the corner, then it is selected along the length. There is no need to put too much pressure on the product so that it does not start to break. Burrs resulting from cutting are cleaned using sanding paper.
Installation
Before gluing, all preparatory work on the ceiling and walls must be done. The surface must be very smooth. Fastening can be done in two ways: It is much better to glue them to the wall surface.
Gluing ceiling moldings: preparation
Skirting for ceiling decoration is an important element of room decoration. Most often, products made of polystyrene foam and plastic are installed (we will consider methods of fastening them), as well as ceiling moldings made of polyurethane and polystyrene foam.
Preparing for fastening - choosing a plinth
When purchasing a cornice for decorating a ceiling, you should first of all focus on the size of the room. There is an unspoken rule here: the higher the ceiling and the larger the room, the larger the baguette should be installed. Ceiling cornices differ in the material of manufacture, color, size, and method of fastening. A special table will help you make your choice.
Table of the ratio of room area and size of baguettes for installation
So in a room of 20 square meters. with a standard ceiling height of 2.5 m, cornices up to 9 cm wide should be glued.
Advice: before purchasing, carefully inspect the product - if it is made of low-quality material, it may turn yellow after installation.
Calculation of the required amount of materials for installation
In order to correctly calculate the required number of skirting boards, you should measure the room before installing them. Then, having calculated the perimeter of the room, you need to divide this value by the length of the ceiling strip (standard 200mm). Round the resulting number to a whole pair figure.
Recommendation: attaching ceiling plinths is not a complicated process, however, it is better to buy one cornice in reserve.
Preparing the ceiling for installation, marking
To fasten the cornice efficiently, first prepare the surface of the ceiling: eliminate all cracks and irregularities. This will ensure a tight fit of the fillet when gluing.
Then marking is done. To do this, attach a test strip to the ceiling surface and mark its edges and the joints of the glued planks with a pencil. Place marks on the baseboards as well.
The markings will help to fasten the cornices as efficiently as possible
Preparation of materials and tools for fastening fillets
Before gluing the ceiling plinth, prepare all the necessary equipment. Materials you will need:
- ceiling plinth (and mounting strip if necessary);
- corner fasteners (glued to hide unsightly corners);
- putty;
- “Moment Installation” adhesive for ceiling skirting boards;
- acrylic sealant for eliminating cracks (can be used as glue);
- water-based paint (for painting foam baguettes).
Also, before installing the fillets, stock up on the necessary tools:
- tape measure and pencil;
- a hacksaw or a stationery knife (for cutting parts before fastening);
- miter box (a tool for cutting skirting boards at different angles);
- a mounting gun for applying sealant or glue;
- rubber spatula.
Basic tools and accessories for installing and fastening curtain rods
Cutting baguettes before fastening
Before gluing the skirting boards to the ceiling, they are cut to the required sizes. Corner parts can be trimmed with a knife, but this can be done more accurately and evenly using a miter box.
First you need to install the baguette in the miter box in the same way as it will be mounted on the wall. Next, the baguette is cut with a hacksaw. First, the corner is cut, and only then the product is adjusted in length.
Tip: do not press hard on the cornice when cutting, the foam may crumble.
If burrs form when cutting with a knife, it is enough to carefully sand them off with sandpaper before installing the baguette.
Cutting the cornice on the miter box - preparing for fastening
How to stick to a French ceiling
To do this, you need to make holes with a hammer drill, according to the holes on the ceiling cornice. It will be necessary to drill out a concrete slab; take a drill with a tip coated with Pobedit.
We install the dowels, soaking them in ceiling tile adhesive. It can be installed in two ways: open (before the ceiling is stretched, a block of wood is placed in place for installation) and closed. With the open method, the block is attached with an insert in the places where there will be screws holding the cornice
.
The holes are secured with plastic rings so that the canvas does not tear or stretch during the installation process of the baguette. If the block is not placed during installation of the ceiling, then you can place it at a height of 20 cm from the wall surface. The edge of the ceiling is fixed to the beam with a wall molding.
This technique gives a flowing shelf vault that seems larger than it actually is.
How to glue to a stretch ceiling
To do this, you will need to make holes with a hammer drill, according to the holes on the ceiling cornice. You will need to drill a concrete slab, take a drill with a Pobedit tip. We install the dowels, soaking them in ceiling tile adhesive.
It is mounted in two ways: open (before stretching the ceiling, a wooden block is placed in the installation site) and closed. With the open method, the block is strengthened with an insert in the places where there will be screws holding the cornice. The holes are secured with plastic rings so that the canvas does not tear or stretch during the installation of the baguette.
If the block is not installed when installing the ceiling, you can install it at a height of 20 cm from the wall. The edge of the ceiling is fixed to the beam with a wall molding. This technique produces a flowing shelf vault that appears higher than it actually is.
How to glue a plinth for a polystyrene foam ceiling - installation instructions
To make the final decoration of the room as attractive and unusual as possible, baseboards are glued at the junctions between the ceiling and wall surfaces. These decorative elements are made from a variety of materials.
Expanded polystyrene is considered the most popular.
This type of baguettes has a whole list of positive qualities, including low weight, low price and ease of installation. If you nevertheless decide to install this decorative element, then you need to know how to Glue a polystyrene foam ceiling plinth onto the ceiling surface - we will, in fact, talk about this below.
We will look in detail at all potential means for gluing polystyrene foam baseboards, how to make glue with your own hands, and also talk about the gluing process.
How to glue a foam ceiling plinth (cornice) under a suspended ceiling.
Let's consider two options. First we will glue it to walls with putty, then we will glue it directly to the wallpaper.
It is necessary to glue the ceiling plinth made of foam plastic under a suspended ceiling and walls with putty using a solution of PVA glue and sheetrock putty. We discussed the preparation of the solution earlier. So let's prepare, cut the cornice. You only need to glue the foam plastic ceiling plinth to the wall. We do not lubricate the part of the plinth adjacent to the suspended ceiling with the solution. After installation, we fix each cornice with screws. Drill holes into the very bottom of the cornice. Next we need fasteners that will press the cornice from the outside. White plugs with a larger diameter washer work well. I recommend plugs with a diameter of 8 mm and a length of 45 mm. I recommend self-tapping screws for plugs with a diameter of 5 mm. 45 mm long.
What are the different adhesive compositions for ceiling baguettes?
First of all, let's figure out what foam moldings can be glued to. There are three most popular types of materials on sale, each of them has its own advantages and disadvantages.
To better understand which glue is much better for gluing polystyrene foam baseboards to the ceiling surface, you will need to compare them.
There are such adhesive compositions:
- polymer adhesives;
- liquid nails;
- acrylic-based putty.
How to properly and evenly glue a baguette onto uneven walls! Not on glue!
Plaster cornices
Today, gypsum cornices are increasingly being used for interior decoration. Despite the fact that a wide range of decorative elements can be found on the market of goods and services, cornices are especially popular. This popularity is due to the ability to use them to decorate any design style. Before you start choosing and purchasing, you should first study all the nuances, advantages and disadvantages of the selected gypsum material.
Polymer-based adhesive mixture
This composition is considered the most popular for installing polystyrene foam baseboards. Very often, consumers purchase Moment and Titan glues.
The uniqueness of these compositions is that they have a special adhesive base, provide quick setting and good fixation of the bonded surfaces.
CEILING SKIRTING (FILLETS) EASY AND QUICK
It should be noted that other adhesives with similar characteristics can be found on sale, but they will not be presented here, as they have worse parameters. The characteristics of individual adhesive compositions are not without invisible aspects, so before purchasing you should either read the instructions or consult with the manager whether this adhesive is suitable for your needs. The composition must not contain any aggressive solvents that can easily damage the surface of the foamed plastic.
What are liquid nails?
This composition for installing polystyrene foam ceiling moldings differs from polymer glue in that it does not harm the material. You can always be sure that the moldings will remain intact and will be securely fixed for at least 10 years. Liquid nails come in the following 2 types:
The difference between them is that the first type is made from an organic solvent. Such liquid nails have a pungent odor and are hazardous to health in a liquid state if simple safety rules are not followed during the work.
The good thing about neopropylene adhesives is that you simply cannot do without them for use in rooms with very high levels of moisture. Acrylic glue is considered the most harmless to humans and does not have any harmful effects on moldings. The disadvantage is that such a composition is sensitive to high humidity, so it is better not to use them in the bathroom or kitchens.
Acrylic putty
Some may believe that when installing polystyrene foam moldings with your own hands, it makes sense to use acrylic putty itself. Of course, this is a wonderful material that even professionals prefer to use.
This is all thanks to the fact that the gluing of the baguette occurs virtually instantly, making it unnecessary to hold the baguette in one place for a long time until it adheres properly.
Moreover, putty allows you to veil all the cracks between the ceiling, wall and foam ceiling plinth. It’s very nice that this material is completely harmless to the human body, so you don’t have to worry about your own health.
It can be used even indoors.
Foam ceiling cornices are a simple way to emphasize the completeness of your design.
Stretch ceilings » Components and accessories
How to properly glue foam ceiling plinths
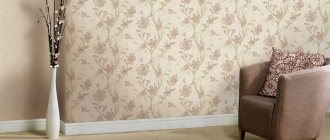
When finishing a ceiling surface, it is not always possible to carefully design its joints with the walls. More often, unevenness and minor defects remain that spoil the entire appearance. And the finishing itself seems unfinished. To eliminate these shortcomings, people usually turn to foam plastic ceiling plinths. Moreover, you can choose it so that it will fit perfectly with both the ceiling and the walls.
What is this plinth?
Foam ceiling plinths are mainly made from extruded polystyrene foam, making them very easy to install and easy to paint.
The material has different widths, and its surface can be complex - with patterns or simple, but outwardly solid, despite the low price.
Although there is nothing complicated about sticking a baguette yourself, in order to perform its high-quality installation, you need to know a number of important subtleties of this work.
First you need to decide on the type of cornice, its pattern and width dimensions. To do this, you will have to measure the perimeter of the room and calculate how many baguettes will be needed. The calculation must be based on the fact that the standard length of the element is 2 meters. At the same time, you should always have a small reserve in case one of them gets damaged during work.
How to glue skirting boards?
Foam ceiling cornices can be glued in two ways:
- The first option is to apply glue to the wallpaper. In most cases, this method is used as the simplest and most traditional. The adhesive materials usually used are “Moment Montazh”, which is reliable and time-tested. If the wall or ceiling is uneven, a small gap may appear between the wall and the molding. It can be successfully covered with the same glue, since it is white in color.
- The second method is used only by top-class masters. The ceiling molding is attached to the putty before the wallpaper is glued. In this case, all the cracks are sealed immediately, and the wallpaper is leveled to fit the glued cornices. But here you need to have the skill of working with wallpaper and generally be a master of finishing - only then does this option work out well.
Work technology
Skirting boards differ in size, pattern and material.
For gluing, in addition to the baguette itself, you need to have good glue. In finishing materials stores you can buy special adhesive material for baseboards and tiles.
To work you will also need:
- glue brush
- miter box to cut the baseboard at the desired angle
- hacksaw or mounting knife
- small spatula
- material for carefully covering joints and crevices
- paint and another brush if you are going to paint the baguette in the color you need - after all, initially they only come in white
If you plan to paint the ceiling plinth, this should be done before it is glued into place.
How to glue correctly
The sticker itself must be started from one of the corners. It’s good if you bought special corner moldings, but if you don’t have any, it’s okay. You can make the corner yourself. It's not that difficult - you just need to use a miter box and remember that you need to cut accurately and accurately.
If you are making a corner for the first time, then it is better to first practice on extra and unnecessary pieces, and then start the main work.
When gluing the foam ceiling plinth to the wallpaper, carefully coat it with glue and apply it directly to the ceiling and wall with little force. Cover the resulting cracks with glue, if it matches the color, and carefully collect its remains with a soft cloth.
That's all the wisdom. The main thing is to do everything carefully and without haste.
Comments and reviews on the material
potolki-info.ru
Making your own glue mixture
Before gluing a polystyrene foam ceiling plinth, you need to learn the technology for making your own adhesive composition. It will make it possible to securely fix the plinth for the ceiling. For this we need:
- putty for finishing work;
- PVA glue;
- filtered water;
- container and tools for mixing adhesive components.
The following is a step-by-step list of work:
Installation of ceiling cornice in 10 minutes 1 person Legrand standart
- The finishing putty is placed in the container.
- Next, add PVA glue in a ratio of 1 to 4 (you will need 4 times more putty than glue).
- Mix everything thoroughly, gradually adding water. This is done until a creamy consistency comes out. You need to make sure that there are no lumps or clots - you need to get rid of them completely.
- At the last stage, all that remains is to let the composition brew for 10 minutes and mix everything again.
Now you can begin the process of gluing the polystyrene foam baseboard. Remember that the finished glue must be applied within 2 hours, because after that it will lose its adhesive properties.
Features of installing cornices on suspended ceilings
When attaching a stretch ceiling to the walls, a small gap remains around the perimeter of the room, which must be hidden. How to properly glue a plinth to a suspended ceiling?
A plinth that is suitable for installation on suspended ceilings must be flexible and lightweight. It is attached only to the wall, not to the ceiling (the glue can damage the film). Before gluing the cornice, you should protect the suspended ceiling with masking tape. The cornice is installed by gluing. There will be a small gap between the glued plinth and the ceiling, so you can build a structure with lighting.
LEDs installed behind glued baseboards will effectively illuminate the ceiling
Instructions for gluing foam baseboards
In reality, gluing skirting boards is not such a difficult process. Even a beginner can do this.
The main thing is to ensure that the fixed parts are installed evenly and firmly.
Expanded polystyrene baguettes bend without much effort, are cut and are easy to paint. All this makes installation as easy as possible.
Preparation before installation of the ceiling molding is carried out in this order:
- First, the ceiling and walls are puttied and primed.
- Appropriate markings are made on the surface of the walls in a strictly horizontal position.
- Now the plastic skirting boards are prepared. To do this, measure the length of the walls, and, based on these dimensions, cut the slats. On the required sides, cuts are made at an angle of 45°.
- At the last stage, the accuracy of the angles is checked.
The success of all further work depends on how well the preparation stage is done.
It is recommended to purchase one extra plinth, especially if you will be performing such work for the first time. It will come in handy if you damage any of the sections of the ceiling plinth. After all the baseboards and glue are prepared, we begin their installation. Glue is applied to the foam slats from the inside and pressed in accordance with the markings made earlier throughout the living space.
There is nothing complicated about this, the main thing here is to correctly trim the corners in places where it is necessary. After all, in order to prevent the overlay from coming out and to create an attractive 90-degree joint, the skirting boards being joined must be cut exactly at an angle of 45 degrees.
In this case, the joined slats will be trimmed on the sides. To beautifully decorate the cut, you need to use a miter box. It is a special tool that allows you to cut the workpieces inserted into it at various angles.
Thanks to this, we simply put our foam plinth inside the miter box and cut it according to the desired template.
What mistakes are typical for novice masters?
It often happens that during work the plinth simply refuses to stick, or falls off two or three days after the installation work has been carried out. This occurs due to several installation errors. To prevent them, use the following tips:
- The work surface that will be subject to gluing must be thoroughly cleaned. There should not be a drop of moisture or dust left on it. To avoid staining the baseboard, wear gloves when working. And if the surface of the walls does not yet have a fine finish, then it is better to prime them.
- The problem may be a poor adhesive composition, especially if it was made with your own hands. In this case, once again study the properties of the glue and how to work with it, since different glues require different times for adhesion of surfaces. Basically, you can release your hands after pressing the baseboard only after 2-3 minutes.
- It is possible that the glue you purchased is not intended for foam baseboards. The composition may contain a solvent, so when purchasing, show interest in whether such a composition is prohibited from being used in your case.
- Drafts have not been eliminated in the room under renovation. During the installation of skirting boards, it is strictly not recommended to ventilate the apartment or house. This leads to rapid drying of the working material, resulting in poorer quality gluing.