Cracks in plaster (reasons).
There are many reasons why plaster cracks when it dries. We have already described the first and most important one, but we will consider the rest below. Knowledge will help you avoid cruel mistakes that can lead to complete falling off of the plaster. Let's start with aerated concrete. A mixture applied to aerated concrete without taking into account technology will definitely, simply certainly, crack. Don't go to a fortune teller here. Delving deeper into the physics of materials and processes, one can see that:
- Aerated concrete has an extremely useful property - excellent vapor permeability.
- However, this property sets important requirements for materials used in plastering aerated concrete walls, since they also need to possess it. The vapor permeability of materials must be at least at the same level as the vapor permeability of aerated concrete, but it is better that it be higher, otherwise the vapor passing through the first barrier will bury itself in the coating, begin to accumulate, creating unnecessary stress and someday will certainly affect the appearance of a crack . It will definitely have an impact!
- During the finishing process, a fundamental rule may be violated - finishing takes place within one day. We relaxed and decided “I’ll finish it tomorrow” or “it will do,” the result was that the plaster cracked again. During the wasted time, conditions will change several times, temperature, as well as humidity, will affect the solidifying mixture. Completely unnecessary stress will be created, which will certainly cover one half of the work with cracks, and the work that has been slightly deposited will become a victim after some time. You will have to do at least 2 repairs to one wall, which can hit your pocket, not to mention the time spent.
- Also, moisture that periodically gets onto and under the plaster will cause hairline cracks to appear in the plaster. After all, the “appearance-drying-appearance” cycle is capable of destroying centuries-old stones, and even more so plaster.
- There are cases when the solution is not able to resist cracks when under the influence of ordinary ultraviolet rays. In this case, the solution used is far from being a quality product or the conditions in which it is used are unsuitable.
https://youtube.com/watch?v=jGQR-Hdt8G4
How to properly repair cracks
Carrying out proper repairs is the key to obtaining a reliable result. It is important to begin work after the problem has been assessed by experts. They will tell you what is best to use when sealing.
Sealants, water-based compounds, polyurethane foam, and various solutions can be used. The choice is made based on the type of base (aerated concrete, concrete, brick, plasterboard or other), and the scale of the problem. They act in stages, monitoring the quality of work.
They act in stages, monitoring the quality of work.
How to learn to plaster - we plaster the simplest wall ourselves - instructions
- A novice plasterer will need the following tools and auxiliaries: a tank for preparing mortar, large and small wooden floats, a steel trowel, a triangular trowel, a plaster brush, a bucket for water, a brush, small trowels for grouting small depressions. You can prepare the plaster mixture yourself. However, ready-made plaster mixtures are also available for sale for both interior and exterior use, which simply need to be diluted with water.
- The spray plaster is applied using a trowel, throwing it onto the wall with a sharp movement of the brush. In order for the plaster to adhere firmly to the wall, it must be of the appropriate consistency.
- The plaster applied to the wall is leveled with a large wooden float, lightly pressing on it.
- Depressions and cracks are sealed with plaster mortar, smoothing it with a triangular trowel. When finishing a section of the wall near the outer corner, a board is attached to the adjacent wall as a stop-limiter for the plaster.
- The plaster applied to the wall is treated with a wooden float, making spiral movements with it and pressing the entire surface against the plaster. It will be easier and easier to work if the plaster is allowed to dry a little.
- Using a steel trowel, apply and smooth the finishing layer of plaster mortar onto slightly dried plaster. And here the tool is worked from the bottom up.
- With a brush constantly dipped in water, the plaster that has just been applied to the wall can be treated with a “rustic” look.” In this case, the brush is not driven over the plaster, but only patted on its surface, which gradually takes on the appearance of spray-applied plaster.
- The plastering machine is filled with liquid mortar. When the brush rotates, the solution is sprayed onto the surface to be plastered.
- On top of the plaster on the interior walls, gypsum plaster is additionally applied as a covering. The latter is applied in a thin layer using a steel trowel. Walls prepared in this way can be painted or covered with wallpaper. However, the covering is allowed to dry thoroughly beforehand.
Methods for sealing cracks in concrete
To increase the service life of a building or structure, it is important to promptly repair any cracks that form. List of means that are used for this purpose:
List of means that are used for this purpose:
- cement-sand mixture;
- compositions containing epoxy resin;
- sealants;
- self-expanding linear products;
- solutions with the addition of liquid glass;
- ready-made mixtures for finishing and construction work, etc.
Application of epoxy resin
If small cracks appear in the monolithic base, you can use a repair composition made on the basis of epoxy resin. The same product is suitable for repairing the foundation of a private house. The work is performed as follows:
Epoxy resin.
- Clear the area of fines. To do this, use a stiff wire brush. It needs to be carefully treated with the inside of the crack and the surface around it. Dust and smaller particles can be removed by simply blowing. After this, dry the problem area with a hair dryer.
- Before you begin the main work, you will need to start placing special nozzles along the entire length of the problem surface. Maintain a distance of approximately 30 cm. It is necessary to install the nozzle according to the height of the wall, starting from the lower section of the crack - at the same time, step back 30 cm from the level of the blind area.
- To form epoxy glue, mix resin with hardener. The resulting mass must be injected into the crack through a special nozzle - start the process from the lowest crack. The solution will gain full strength within 5 days. After this, the nozzles must be removed (cut off), and the surface of the repaired area should be rubbed using an epoxy solution.
Use of sealants
Almost any crack in a concrete surface can be effectively filled using a sealant. Such an elastic material will tightly seal the defect, since it is capable of increasing in volume. The preparatory stage involves thoroughly cleaning the problem surface from small and large fractions. Moisten the substrate before applying sealant. In addition, prepare small grooves to improve the adhesion of the composition to the material.
Use of concrete sealants.
Liquid glass for eliminating defects
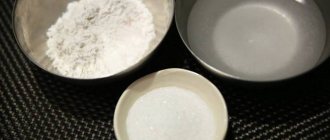
If small cracks appear in the screed, try sealing them with a sealing mixture with liquid glass added to it. This product is an aqueous alkaline solution of sodium silicates (less commonly potassium and lithium). The same composition is suitable for masking the seams that exist between floor slabs. Before starting repair work, prepare a solution from the following components:
- liquid glass - 20%;
- cement - 20%;
- sand - 60%
Self-expanding cords
A method that is used to repair concrete surfaces in the bowls of outdoor swimming pools, restore the integrity of walls in industrial premises and monolithic foundations.
Self-expanding cords are widely used to seal seams and joints, which are the most vulnerable places for water penetration.
The main actions will be as follows:
- Prepare the area to be repaired. Clean it from dust, small and large fractions.
- Measure the width and depth of each crack to determine the optimal self-expanding cord.
- Place a suitable material into the prepared seam and fill the remaining space with sealant - give preference to a polyurethane compound. For this purpose, use a mounting gun.
- Excess sealant must be smoothed out well with a spatula. Once the material has hardened, you can sand the problem surface.
Sealing self-expanding cord.
The described method for eliminating cracks in concrete allows you to select a self-expanding cord to fill almost any defect. Thanks to this, it is possible to ensure complete sealing of the seam and a long service life of the structure. The peculiarity of this repair technology is that it can be used even at subzero temperatures.
How to seal cracks?
To seal cracks, you can use cement-sand mixtures and sealants, but in this article we will dwell in more detail on the method using putties.
- polymer putties are elastic and remain in working condition for a long time (up to 24 hours). The compositions can be applied immediately without mixing. Some manufacturers produce special repair compounds for sealing cracks. Polymer compositions are divided into acrylic and latex. Acrylic ones are suitable for both external and internal work, latex ones are suitable only for indoor work.
- gypsum putties must be made from a dry mixture, and they remain in working condition for only a short time - 1.5 - 2 hours. It is recommended to make the mixture in small portions so that it does not have time to harden.
Do-it-yourself repair of large cracks on walls
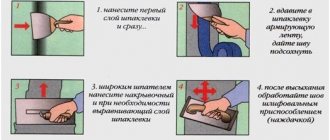
1. Deep cracks need major repairs. Using a small hammer and a sharp steel chisel, open (reach the base) and widen the crack. This creates a sufficient adhesion surface for the putty mass.
2. The open crack is thoroughly cleaned of dust and moistened with water or an aqueous primer using a sponge. This prevents dehydration and further cracking of the putty.
3. The treated crack is filled to its full depth with putty. The work is done in layers. A portion of the putty mass is placed on a trowel, from which it is transferred to the wall with a spatula. To compact and level the seal, use a small nelma or spatula
4. The reinforcing tape is fixed over the still fresh seal. The material is pressed and slightly recessed into the putty with gentle movements of the trowel.
It is important that the tape is slightly concave into the seam
5. At the final stage, a thin leveling layer of putty is applied with a trowel. In this case, the sealing must be brought to the level of the wall surface (what is called “zero”). The vertical is controlled by the building level.
Based on materials from the publication for assistance in repairs “Home”. Author Tatyana Gagarina.
Wall decor - DIY “tattoo” How to decorate a wall with cordsLarge painted...
DIY LED night light How to make your own night light...
Stable folding trestles for the workshop with your own hands - photo and drawing Folding trestles for the workshop with your own...
Painting walls to hide unevenness is my way of how to hide unevenness and defects...
Do-it-yourself tiled table - decor Decor of an old table For many, somewhere...
DIY zipper bracelet (PHOTO + STEP-BY-STEP DESCRIPTION) HOW TO MAKE A BRACELET FROM REGULAR…
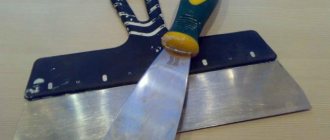
Tools
- A spatula is the main tool for working with putty. It is advisable to have two spatulas at your disposal: a narrow one (no more than 10 cm) for applying the solution and a wide one for finishing leveling.
- a clean container for putty; there should be no residual solution or small particles in it, as this will interfere with application. Since the volume of the mixture is small, it is better to take a small container
- a brush is used to apply primers; the tool must be shaped so that it can easily penetrate deep into the crack
- A brush with stiff bristles is needed to clean the crack from dust and small debris
- reinforcing material is used to strengthen cracks larger than 2 mm. In most cases, a mesh (serpyanka) or perforated paper tape is used
- Sandpaper will be needed to sand the surface of the crack. For convenience, the paper is fixed on a wooden block or a special grater.
- a v-shaped spatula is used to clean out cracks, but if such a tool is not available, you can use a similar-shaped scraper
How to repair cracks
Now let's look at how to fix mother-in-law marks on plastered walls.
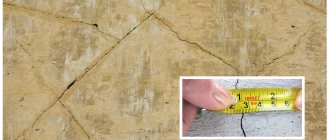
Make sure that there are no vibrations or shrinkage of the bearing surface. How to make sure that the gap in the wall does not continue to grow? A simple way is to make marks at the beginning and end of the crack and also measure its width. Place masking tape on the plaster and mark it with a marker. Please indicate the date of measurement there. After a month, evaluate the condition of the wall.
Beacons on cracks are made of paper, plaster, glass, etc.
If the cause of the crack is not in the base, then most likely the plaster around the edges is weak. Using a rubber mallet, tap the entire surface next to the crack and remove loose pieces. If the entire wall has small cracks and is “boiling”, then you will have to remove the entire layer of finishing.
If the plaster is holding tightly, the crack must be widened before sealing to be filled with new material. Jointing is done using a metal scraper, spatula, chisel and any other available tool. You can also use a small engraver with a milling attachment.
Jointing with a stationery knife
Fill the crack with the same mortar that was used to cover the walls. Do not forget to first clean the area from dust and prime it.
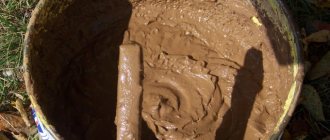
Gypsum mortar
Difficulties may arise when repairing decorative plaster, because you will have to restore not only the color of the finish, but also the relief (if you have a complex textured coating).
Cracks in smooth Venetian plaster can be filled with any acrylic compound (paint, sealant) tinted in the desired color. But to get the color, you need to first paint the samples: mix the material with the color, apply it to a sheet of paper and, after drying, compare it with the color of the plaster on the wall. If you bought and tinted the material in a salon, then they may have your catalog colors saved in their database.
For repairs, it is enough to do the jointing and level it with the same decorative mortar.The easiest types of decorative plasters to repair are: mosaic, silk (liquid wallpaper), bark beetle (roller), fur coat, and materials filled with natural stone. To fix cracks in this type of finish, simply clean the wall and apply a layer of new decorative mortar.
Previous Question How to check the quality of plastered walls Next Question What to do next after plastering the walls?
Methods and technology for sealing cracks
If there are many cracks and the coating is weak, the layer of old finishing is removed and the wall is cleaned. If there are not many cracks, then they are covered up.
There are two main techniques for sealing cracks in plaster:
- filling with solution
- sealant.
In any case, we carry out preparations that include:
- jointing;
- remove debris from the crack cavity;
- tapping (with the wooden handle of a hammer) the nearby coating and removing the lagging one (you will need a hammer and a chisel);
- replacement of unusable shingles (if the plaster was made on wood);
- remove dust with a vacuum cleaner or damp brush;
- degrease and wash the area;
- dry.
When the crack opens up to 5 mm, the gap is filled with PVA glue or assembly adhesive.
We use sealant
The sealant is popular due to its rapid polymerization. The composition of the sealant is plastic, penetrates even into narrow cracks, therefore it is often used to seal cracks in plaster on the wall. In addition, when drying, the sealant does not lose elasticity and is able to deform along with the walls of the crack. Before sealing, make sure that the selected sealant is compatible with the binder component of the plaster mixture.
If the composition of the plaster coating is unknown, then the compatibility of the sealant with it is checked in an inconspicuous place.
The operation of sealing a defect with sealant is not difficult:
- the prepared crack is filled with a small portion of sealant;
- using a spatula (or other convenient tool, even just a finger), the gap is covered and the sealant is sealed;
- remove excess with a spatula;
- moisten a rag with soapy water and wipe the surface around the crack;
- allow the sealant to dry;
- A painting mesh is glued over the covered crack and putty is applied.
Cleaning the crack
Seal the crack with sealant using a spatula
Gluing the painting mesh
Applying putty To avoid harm from applying the sealant, use safety glasses and gloves. Sealant that gets on the skin is difficult to remove without using solvents.
Sealing with plaster mortar
Unlike sealants, plaster mortar takes several days to dry. However, this tool is available and cheaper.
The sequence for sealing cracks is as follows:
- removal of damaged areas;
- reinforcement;
- primer;
- filling with plaster;
- grout.
If, when tapping and removing unusable layers of plaster coating, the area of areas to be repaired is significant, the area is reinforced with mesh (metal or synthetic). The mesh is cut out according to the contour of the area and fixed so that it is in the center of the solution layer. The surface of the area is primed before installing the mesh.
To repair damage, you will need a spatula, grout and a paint brush. Using a spatula, apply the diluted plaster mixture to the area. The recess is filled to the brim and leveled, removing excess.
If the cracks are long, a hole for the dowels is drilled along them in 30 cm increments (the dowels cannot be hammered in).
At great depths, so as not to form a thick layer, sealing with mortar is carried out in two passes. When the base layer has set, it is cleaned of pellets and protrusions with a spatula. The surface of the dried layer is primed. A finishing layer is applied over the dried primer, which is sanded after drying.
Unstable cracks are repaired by creating metal bonds between their edges using staples or metal strips. Only after this they cover it with solution.
Cleaning the crack
Crack reinforcement
Priming the crack
Filling the crack with plaster
Grouting plaster
You need to understand that fixing cracks in the plaster on the wall is eliminating the consequences. If you really want to get rid of the appearance of new defects, you need to look for the cause.
https://youtube.com/watch?v=mRJ0IggV1ek
https://youtube.com/watch?v=jGQR-Hdt8G4
General principles and rules of repair
How to repair a crack in plaster? When making repairs, you should follow a number of rules formulated by experts:
- for repairs, if possible, find a plaster mixture of the same brand and manufacturer that was used for finishing;
- the vapor permeability of the plaster layer should be no lower than that of the wall material;
- finishing and repair of cracks is carried out at a humidity not higher than 80% and a temperature not lower than +5°C;
- cement plaster on the entire wall must be applied and repaired in one go, without interruptions,
- there is no point in repairing cracks that have arisen due to increased and variable humidity until the cause of the vibrations is eliminated; they will soon appear again;
- if poor-quality plaster is cracked, it is not repaired, but replaced with a new one;
- Cracks resulting from building settlement should be repaired after natural stabilization or repair of load-bearing structures.
Cracks in plaster due to settlement of the building
In order to assess the dynamics of the building's movement, “beacons” are installed on the crack: alabaster plugs or glued strips of paper. By their destruction, you can monitor the movement of walls and ceilings.
How to repair cracks yourself - step-by-step instructions
You can cope with the repair of small cracks on your own without the involvement of a construction team and additional costs. Having previously studied the intricacies of the technology, as well as correctly choosing the tools and materials necessary for the work.
On a brick wall
The most common material for laying walls is brick. If the damage is minor or medium, then repairs should be carried out according to the following instructions:
- Carry out jointing using a hammer and screwdriver; as a result, the gap will increase slightly.
- Completely clean the joint from dust and moisten the surface. Using a spatula or trowel, apply cement mortar, carefully filling the depth of the crack and leveling the surface of the seam.
For large and through gaps, the operating procedure will be different:
- Extend and clean the surface of the crack, as in the previous instructions, knock out the remnants of the old mortar.
- Drill holes for dowels on both sides of the gap, insert dowels.
- Treat the surface with a penetrating primer to increase the adhesion of materials.
- Fill the cavity with solution, pushing it deep and filling the voids.
- Lay a reinforcing mesh on top of the seam and screw the screws into the dowels.
- In more serious situations, tighten the crack with metal bars secured with anchors or embedded elements.
- Plaster the mesh. It may be necessary to partially dismantle the old damaged masonry, and then new bricks are inserted into fresh mortar, thus restoring the masonry and strengthening the wall.
On a plasterboard partition wall
Usually, the joints of drywall sheets crack, and if the crack goes along the sheet itself, there is damage to the frame or deformation during installation.
Steps for sealing gypsum board cracks:
- Clean and unstitch sheet joints or cracks.
- Coat the edges of the sheets with primer.
- Apply a small layer of putty.
- Press the reinforcing mesh or tape into the seam surface.
- Level the entire layer and sand thoroughly.
On a plastered surface
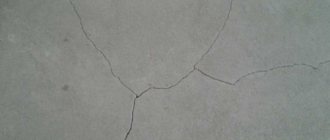
Cracks in the plaster are superficial and do not pose a threat to the structure, but they greatly spoil the appearance of the interior and spread in the form of a grid.
Stages of repairing small cracks:
- Using a hammer, tap the entire area of damage without sparing and knock off the peeling parts, remove the remaining plaster and dust with a spatula.
- Walk over the resulting recess with a penetrating primer, which will strengthen the edges and improve adhesion, or wet it with water.
- Fill the entire cavity with a solution or a special ready-made mixture, if necessary, lay a reinforcing mesh, securing it with nails or small screws.
- After the plaster layer has dried, apply finishing putty; narrow cracks can be reinforced with special tape.
On concrete
With the development of monolithic construction, concrete is becoming more and more popular, and the question of repairing concrete surfaces increasingly arises.
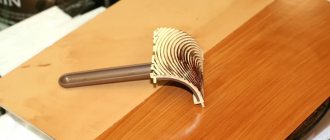
How to make a “grind”:
- Sift sand and cement to separate the finest fraction. The smaller the particles, the smoother and more reliable the coating will be. Mix the liquid solution.
- Prepare a grater, attach a piece of fur to it, and fill a bucket of clean water.
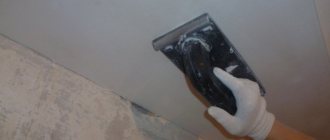
- Dip the trowel into water, then apply a small portion of the solution to it using a spatula. Press the tool against the wall and rub the solution into the crack area in a circular motion, constantly wetting it.
Using grinding, builders not only remove cracks, but also rub all the grooves and irregularities on the monolith or ordinary concrete to a perfectly smooth state. Large chips and cavities are perfectly held together by epoxy resin paired with a hardener and reinforcing mesh or tape.
Even well-built walls are subject to gradual destruction over time, so the dream of building once and for all is unattainable in practice. The house will last a long time if the owners monitor the condition of the structural elements and identify defects in a timely manner. You can cope with minor repairs to seal the cracks that have formed on your own, thereby preventing further damage from spreading.
The reasons for their appearance on the walls after finishing
First, let's figure out why such imperfections occur on the treated surface. Depending on the reason, the further plan and scope of work are planned.
Most often this is a human factor. Some are in a hurry to make facade repairs, and some do not even read the instructions that manufacturers offer to the consumer. But first things first.
Violation of technology
Modern compositions have excellent properties. But if you do everything somehow, then cracks will definitely appear.
When choosing a mixture, pay attention to:
- vapor permeability through the main structure and the same properties of plaster. The values should be at least the same, and it is better if the plaster composition is capable of passing steam much faster;
- adhesive properties of the base material. If adhesion is poor, then not only will cracks appear along the treated surface, but the layer may even fall off.
It is important not only to choose the right composition, but also to adhere to all requirements when applying it:
- Treat the entire wall in one day.
- Cover the surface with soil.
- Use reinforcing mesh.
- Choose the right weather conditions.
In the instructions, the manufacturer must indicate what absolutely should not be done when applying plaster, for what reasons it is suitable and how best to work. These recommendations should not be ignored.
Moisture ingress
This reason is associated with different vapor permeability indicators. If the base easily conducts moist air out, and the finishing does not allow it to escape into the environment, then moisture begins to accumulate at the boundary of the two materials. Regular wetting and drying of the border leads to the fact that the layer of plaster ceases to adhere firmly to the base.
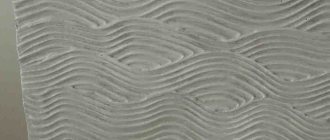
As a result, small cobwebs appear at first, but if the situation is not corrected, they grow more and more. Such defects spoil the appearance of the cladding, and then reduce the technical characteristics:
- reduce thermal insulation properties;
- allow moisture to pass through from the environment;
- transmit sound;
- allow mold to destroy the base and decorative layer.
Sun rays
Here, the cause of cracks in the plaster is incorrect weather conditions, namely too hot and sunny weather. The best way to plaster walls is:
- At air temperatures from +5 to +25 degrees Celsius.
- Air humidity up to 75%.
- There is no direct sunlight, that is, it is better if the day is cloudy.
- Calm weather.
If the plastered surface is exposed to sunlight, this will lead to too rapid and uneven evaporation of moisture from the mixture. This will lead to the appearance of a large number of cracks at the first stage of wall processing.
Shrinkage of the structure
But it happens that the composition is suitable, and the technology is carried out in all respects, but cracks still appear. What is the reason in this case?
It's very simple that the building has shrunk. Moreover, even the most elastic composition is not able to withstand such a load. For what reasons do buildings settle:
- natural shrinkage - after building a house, it is necessary to leave it without finishing for a while so that all materials are fixed in place;
- deviation from the vertical of walls under the influence of regular vibration. This happens if the house is built near roads with high traffic;
- deviation of walls due to wear and tear of the structure.
The last two options require initially strengthening the building, and then using the sealing of cracks in the plaster as repair work.
Causes of cracks in the wall
External cracks can occur both in new buildings and in old houses under the influence of various factors:
- as a consequence of deformations and distortions of supporting structures during natural shrinkage of the soil under the base and stabilization of the foundation;
- due to the close occurrence of groundwater, errors in the design of the drainage system;
- from high loads on walls due to incorrect construction calculations and violation of building construction technology;
- improper preparation or use of materials;
- from constant vibrations during traffic and wind;
- due to constant changes in temperature and humidity.
Internal cracks are usually small and appear on the surface of finishing layers for the following reasons:
- if the humidity regime is not observed during the hardening and drying of the concrete screed on the floor or plaster on the walls;
- due to incorrect composition, for example, insufficient amount of plasticizers in the concrete solution.
If corrective measures are not taken, even small cracks, the so-called cobwebs, will eventually spread throughout the entire wall and can lead to shedding of the finishing layer and peeling off fragments of wallpaper. If the width of the crack exceeds 0.5 cm, it is advisable to seek advice from specialists. Through gaps are the most dangerous; they are often formed as a result of an earthquake, a falling tree, or construction work carried out near the house. In serious cases of through ruptures in walls, the house is considered unsafe.
—