What is a ceiling
In private housing construction, the ceiling is formed either on a concrete floor, which is assembled from reinforced concrete slabs or poured in the form of a monolith, or on floor beams. In both cases, the easiest option to make a ceiling is to install a suspended structure. Essentially, this is a frame attached to the ceiling on which slab or sheet material is mounted. Traditionally, plasterboard is used for this as the cheapest option, which is not inferior in its technical and operational characteristics to expensive ceiling materials.
Previously, the concrete floor was leveled with plaster, which became the ceiling. This is a complex, long, labor-intensive and expensive process. Often the plaster was applied in several layers, each of which must dry thoroughly before applying the next. That is, it took at least 10 days to form a plaster ceiling in one room. Let us add that leveling the ceiling with plaster required special skill.
In this regard, the suspended structure is cheaper, the formation speed is faster, and it takes less time. A medium-sized room can be covered with a ceiling in one working day.
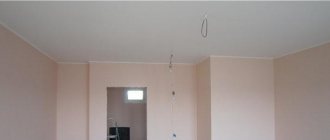
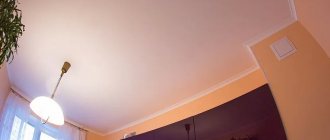
Suspended ceiling made of plasterboard Source yandex.ru
We must pay tribute that plastered ceilings are still often found today in private houses built in the 60-70s of the last century. Therefore, in this article we will tell you how to paint a plastered and plasterboard ceiling. Purely technologically, this is the same process, they just differ from each other in the way they prepare the ceiling surface.
But before moving directly to the main topic, a few words about paints and tools.
Stage 2: paint the ceiling
Paint the ceiling in stripes: overlap each strip a little on the previous one. Important: move from the window deeper into the room. If you have chosen white paint and color, conduct an experimental mixing of them until you obtain the desired tone in a small container. To accurately measure the amount of color, you can use a syringe. It is important to remember and write down the resulting proportions so that if you need to re-paint tone on tone you will not have any difficulties.
Painting the ceiling
Ceiling paints
The huge variety of paint and varnish products can confuse anyone. For the ceiling, the best option is water-based emulsion. This is a water-based paint that evaporates after application, leaving a layer of paint on the surface. This type of paint and varnish product is considered the safest. Let us add that the water-based emulsion dries quickly, which is also a significant plus.
Water-based paint in cans Source stroimmaster.ru
See also: Catalog of companies that specialize in finishing materials
We must pay tribute to the manufacturers who supply several types of water-based paint to the market today.
- Silicate. It is based on silicate glue. This type belongs to the cheap category. But it has good performance characteristics. The only drawback is high abrasion. That is, it is not recommended to wash a ceiling painted with this variety.
- Mineral. The base is either lime or cement. Rarely used for painting ceilings.
- Acrylic. One of the best varieties with excellent characteristics: low abrasion, copes well with humidity and temperature changes. Therefore, they try to use acrylic water-based paints in damp rooms. The base is acrylic resins.
- Silicone. Based on silicone resins. The characteristics are the same as the previous type. Let’s add that this paint can be used to cover small cracks. The disadvantage is the high price.
- Polyvinyl acetate. Not the best option for wet rooms, because droplets of condensation and water leave marks on such paint. The surface covered with polyvinyl acetate coating cannot be washed.
As you can see, there is a choice, but it must be made taking into account the purpose of the room.
Acrylic water-based paint Source spravka.kz
Removing old whitewash and paint
Removing the previous layer of whitewash is a necessary condition for painting. If you apply paint to the old finish, there is a risk of destroying the new finish. It is better to clean the walls and ceiling as follows:
Ceilings are washed off with water or a 3% vinegar solution, and the residue is removed with a spatula. Walls painted with oil or latex paint can be removed in the following ways:
- using a drill;
- heating with a hair dryer;
- cleaning surfaces with a scraper or wire brush;
- washing off with chemical liquids.
Mechanical removal produces a lot of dust; for this you need to use a respirator. Solvents do not always give positive results.
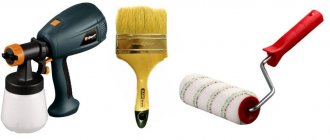
Ceiling painting tools
Before painting the ceiling with water-based paint, you need to choose the right painting tool. To do this you will need:
- a roller with long pile, can be used with a terry or velor coat;
- a brush or small roller for painting hard-to-reach places;
- tray for paint and varnish material.
Tools for painting the ceiling Source www.styazhkapola.by
Ceiling spray gun - time saving
If you have a large area to paint or just high ceilings, the application process using rollers and brushes will be very, very labor-intensive. To simplify work, there is such a convenient tool as a spray gun or paint sprayer.
A hand-held spray gun is a device consisting of a sprayer in the form of a hose, a long container and a pump. Such paint sprayers allow you to paint approximately 200-300 square meters of ceiling area in 1 hour of operation.
Painting with a hand spray gun
Painting the ceiling with a spray gun will save your time and has several advantages over painting by hand. Let's take a closer look at these benefits:
- when spraying paint on the ceiling, there are no streaks left;
- painting speed;
- almost complete absence of paint contamination of surfaces during repairs;
- less paint consumption;
- good coloring of hard-to-reach places.
There are several types of spray guns: electric, manual, airless and pneumatic. The cheapest and easiest to use are, of course, manual paint sprayers.
To choose the right spray gun, you need to pay attention to its body and what material it is made of. The best devices that will serve you for a long time are made of aluminum. If you are going to do repairs only in your apartment, and this is not a permanent job for you, you can limit yourself to purchasing an inexpensive manual or electric spray gun.
Painting the ceiling surface
Like many repair and construction processes, painting is divided into two stages: preparing the ceiling and directly applying the paint. In terms of preparation, this stage is divided into two:
- the ceiling is old;
- The ceiling is new without finishing.
Let's consider all the options separately.
See also: Catalog of companies that specialize in paints and varnishes
Preparing the old ceiling
What to do before painting an old ceiling formed with plaster.
- Decide on the scope of work. Because defects on the ceiling surface can be of varying complexity. In this case, the ceiling itself is already painted or whitewashed.
- Get rid of old finishes. If whitewashing has been carried out, the process is reduced only to washing the surface with an aqueous solution. If paint has been applied, you will have to use tools such as a spatula, iron brush, sandpaper, etc. The main task is to clean the ceiling plane of all unnecessary things and get to the plaster layer. And here all methods are good. It is important not to damage the plaster.
- Ceiling repair. Cracks are repaired, the edges of chips and gouges are leveled, all defects are moistened with water. After which a repair compound is applied, usually a plaster solution.
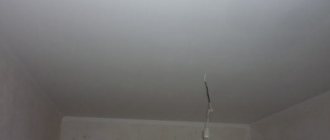
Ceiling crack repair Source sdelaipotolok.com
- Primer. At this stage, the ceiling is treated with deep penetration liquid primers. This material not only increases the adhesive properties of the putty layer, but also, penetrating deeper, strengthens it. The primer is applied with the same roller.
- Alignment. One of the main decorative functions of the ceiling structure is maximum flatness of the plane. Therefore, the old surface is leveled with a putty solution. More often, putty is applied in two layers: the first is leveling, the second is thin as a finishing touch. It is necessary to pay attention that the first layer, after it has dried, is also treated with a primer. The second coat is applied when the primer applied material has dried.
- Grinding. Any surfaces prepared for painting must have an ideal appearance. That is, no marks from the tool, small inclusions from the putty solution, etc. Therefore, they are sanded with “zero” sandpaper.
- Primer. And the last layer before painting is primer. It will increase the adhesion (adhesion) of the putty layer to the paint.
As you can see, in order to prepare an old ceiling for painting, you need to spend a lot of effort and money.
Finishing features
Painting is a durable finishing option that, with low labor costs, will allow you to obtain a beautiful, smooth surface. The material will not fade, peel or wear off. A well-chosen solution will help optically change the incorrect configuration of the room.
Material for dyeing Source sdelaipotolok.com
Decorative finishing gives a textured effect. There are 4 types of coatings:
- Glossy. The enamel shines, reflects light well and visually enlarges a small space. The higher the degree of smoothness, the more durable the material. The varnished texture emphasizes the slightest cracks and irregularities, so the surface must be perfectly prepared before application.
- Matte. Velvety ceiling paint does not shine and hides defects in the area. The porous structure of the coating absorbs dust and dirt, making the area above your head difficult to wash.
- Semi-gloss. The material has a light reflective effect and is not afraid of mechanical damage. Perfect for compact spaces, masks defects.
- Semi-matte. The slightly velvety finish is resistant to stains and wear.
Coating with varnish texture Source rusoboz.ru
The higher the hiding power, the fewer layers will be required to cover the base color. Manufacturers offer 4 classes, the details of which are indicated on the label. Ceiling paint with a coefficient of 1 will repaint a black base white in 2 approaches. At low rates, enamel consumption increases and the decorative effect of the finish is lost. Often the amount spent on expensive material is lower than that of cheap analogues.
Velvety covering over the head Source natjazhnye-potolki-rostov.ru
Painting the ceiling structure
So, let's move directly to the question of how to paint the ceiling with water-based paint without streaks. What points should you pay attention to to ensure high quality of the final result:
- Water-based paint is applied in two or three layers.
- No need to wait for each layer to dry. That is, the water-based emulsion is applied “wet on”.
- The paint is applied in even stripes with a width equal to the length of the roller, with one strip overlapping another within 5 cm.
- The process begins from the corner located near the window opening, towards the front door.
- The last layer of paint is applied perpendicular to the wall where the window is located.
Regarding the last point. If the ceiling is painted in two layers, then the first is applied parallel to the wall where the window is located, the second perpendicular. If the paint is applied in three layers, then the first and third are laid perpendicular to the window, the second parallel.
Attention! The paint does not always apply evenly. That is, problem areas may appear on the ceiling. You should not paint them separately. Just keep working, adding one layer after another. This is the only way to paint over problem areas.
Scheme for applying water-based paint in two layers Source deluxemm.ru
Applying paint with hand tools
Hand painting is done in stages. In this case, you should adhere to the following rules:
Pour the prepared paint into the tray in small portions. First, paint over the borders of the surface to be painted with a brush to prevent adjacent areas from being accidentally touched. The roller is lowered into the tray and rotated, distributing the paint over the entire surface. They begin to paint from the ceiling line down, evenly rolling along the wall. If drops fall on the lower part of the wall, they are rolled out. The processing is performed several times. When the first layer has dried, apply the next one.
Attention! All layers must dry sequentially to avoid streaks. At the end of the work, the room is tightly closed to prevent drafts and contamination.
Video description
The video shows how to paint a ceiling with a roller without streaks:
So, we have figured out the process of painting a ceiling with water-based paint. I would like to consider one situation that occurs during the process of repairing ceilings. It is characterized by the question of how to paint the ceiling with water-based paint over old paint.
The thing is that the water-based emulsion peels off from the treated surface after many years. And only if the humidity in the room is high. A layer of such paint itself is durable. The only thing is that the ceiling is located at the top, so it quickly fades, that is, it gets dirty. Of course, it can be washed. But if repairs are being carried out, then there are no prohibitions on painting it with new water-based paint. Sometimes even one layer is enough.
If peeling of the old material does occur, then answering the question of how to properly paint the ceiling must take into account the complete removal of the old decorative coating. It will not be possible to level the ceiling surface with paint. Some craftsmen simply go over it with coarse sandpaper, making the surface rough. And a leveling putty layer is already applied to such a ceiling. There is no need to take risks; the best option is to remove the paint completely using a sponge with water, and after soaking, an ordinary spatula. The water-based emulsion can be easily removed and you won’t encounter any big problems.
Cleaning the ceiling with a spatula Source domostrou.by
Creating a textured surface
There are several methods for obtaining an original finish.
- Thick paint is applied to the wall without thinning. A coarse-grained structure is formed, which is processed on top with a brush or spray.
- Using a flat brush (flute), apply a thick layer of paint. Try to make parallel furrows.
- Water is sprayed onto a wall painted in several layers in a direction parallel to the floor. A drip effect is formed.
- A special textured roller is rolled over a freshly painted surface. It turns out to be an interesting ornament.
- To get a marble pattern, you need to cover the damp wall with cling film. Once removed, the stone texture appears.
- An interesting design can be created using a sponge. To do this, a thick layer of coloring composition is applied over the water-based paint. Then, with a sponge, an additional layer is gradually applied using point movements of the hand. When the surface hardens, the protruding parts are painted in dark shades. This method visually enlarges the room. One drawback is that material consumption increases.
Preparatory activities: purchasing materials and necessary tools
When deciding whether to paint or whitewash the surface, you should take into account the specifics of the room in which the renovation is planned. From an economic point of view, whitewashing the ceilings is the cheapest and most accessible way to refresh a room.
However, this option is absolutely unacceptable in the kitchen and bathroom due to high humidity. For such rooms it is better to use water-based paint. The ceiling painted with it can be washed.
The only tools you will have to use during the work process are a brush (for small, hard-to-reach areas) and a roller.
To ensure that the final result of painting pleases you and that the dye applies correctly and evenly, avoid using a foam-based tool - when working with such a roller, you will get defects in the form of drips formed from excess water-based paint. But whitewashing a room with such a roller is very convenient. For painting, it is better to take a fluffy seamless roller - it will not leave seam marks on the surface of the ceiling.
And one last thing.
Professionals recommend buying dye “with a reserve”, that is, a little more than you plan to use - subsequently choosing the required shade will be very problematic. When all materials and tools have been purchased, you can begin to work.
The best paint according to experts
Dulux paint coatings are thixotropic, elastic and have high hiding power.
Among hundreds of names and varieties of paints, experts identify clear favorites for the title of best ceiling paint based on a combination of parameters:
- performance comparison
- price-quality ratio
- manufacturer's reputation
The coloring products presented in the table have received recognition from professionals:
Tikkurila Euro Extra 20 (Silicone)
PROS:
- It has increased resistance to abrasion and moisture, is environmentally friendly and does not have a strong odor
MINUSES:
- Takes a long time to dry and is uneconomical to use
Dulux Optima (Acrylic)
PROS:
- Fits perfectly on the surface, does not fade in the sun
MINUSES:
- High price
Tikkurila Euro Fasad (Silicate)
PROS:
- Can be applied in any way, safe, non-toxic and sustainable.
- Service life without updating – 20 years
MINUSES:
- High cost and high consumption
Dufa Eurolatex 3 (Latex)
PROS:
- It is applied to any surface, elastic and covering.
- The coating is durable and can be washed even with alkaline compounds.
MINUSES:
- High price
Speaking about the recommended combinations of coating and surface, professionals agree that good results can be achieved by using latex and silicone compounds. They are expensive, but will last longer than acrylic ones.
To bring unusual design projects to life, finishing experts suggest using textured paints. They not only give an interesting look to the ceiling, but are also able to disguise serious defects and cracks.
In addition to polymers and pigments, they contain additives:
- mineral fibers
- marble flour
- crumbs made from natural or artificial materials
- nacre
Stages of preparatory work
Before properly preparing the ceiling for painting, we must not only make a number of preparations, but also analyze in detail all the stages of our preparation. The new paint will stick much better if you follow the entire sequence of actions correctly:
- clean our ceiling by removing the existing outdated coating;
- repair the ceiling surface, repairing all existing cracks, potholes and other damage;
- prime the ceiling by applying a special primer;
- strengthen the adhesion strength of future paint by gluing the ceiling tiles with fiberglass or applying putty to level it;
- erase minor defects and qualitatively level the surface of the ceiling using grinding technology using sandpaper or other special devices.
Where does preparation begin?
Only after the ceiling has been properly prepared is the selected coating applied. However, it should be remembered that competent preparation requires not only the ceiling, but also the room itself where all the manipulations will be performed. First, you should either clear the room of furniture, carpets, curtains, or cover all items with plastic wrap or newspapers to avoid damage and contamination.
As an additional safety net, you can also wrap plastic around the front door of the room where the renovation will take place.
Important! Particular attention should be paid to electrical outlets and visible electrical wiring locations.
Since some stages of preparation include the use of water, you should protect yourself and turn off the current in this room during the repair.
What tools and equipment should you purchase before starting work:
- Stock up on work clothing, safety glasses, gloves and a respirator; they will be especially useful in cases where old surfaces will be cleaned.
- Do not forget to purchase the necessary tools - rollers, brushes, spatulas of various sizes necessary for diluting the compositions of the container, sandpaper or sanding paper.
- Actually, it would be a good idea to purchase in advance the necessary materials in the required quantities - putty, primer, glass wallpaper glue, painting fiberglass and other necessary things. Note that all the tools are purchased depending on the complexity of how to prepare the ceiling for painting and on the condition of the ceiling covering itself.
Tools for preparing the ceiling for painting
Application of fiberglass
In cases where the surface being treated is quite uneven or you want to increase the service life of the ceiling covering, it is recommended to glue an additional layer of fiberglass onto the finishing layer of putty. Fiberglass is a fairly resistant material to fire and water, so it will not only prevent the spread of fire over its surface, but will also be resistant to water.
Application steps:
- in a special container we dilute PVA-based glue - a fairly popular product in all construction stores;
- we prepare the room - we avoid drafts and penetration of sunlight, we warm the room to 18-25 degrees, since fiberglass is quite heat-loving;
- from the fiberglass canvas purchased in rolls, we measure and cut pieces of the required size, by analogy with gluing wallpaper, these canvases are glued end-to-end;
- the glue is applied directly to the ceiling covering, and the treatment area is equal to the area of the glued strip of fiberglass;
- a piece of fiberglass is applied to the ceiling surface and smoothed from the central part to the edges of the canvas; for this it is better to use a plastic wallpaper spatula;
- if excess fiberglass is detected at the junction of the panels, they can be cut off;
- After gluing the entire surface of the ceiling with fiberglass, an additional layer of glue is applied to the canvas itself.
The surface treated by gluing fiberglass will dry completely in one day and will be available for further processing.
If all stages of preparatory work for painting the ceiling were done with due diligence and in accordance with all instructions, then the surface will be perfectly smooth, without any roughness or cracks. As the finale of all manipulations performed, there will be the application of coloring compositions, depending on the chosen type, on an oil, acrylic or water-based base. The paint will lie smoothly and will please the eye for a very long time.