The quality of laying tile cladding on the ceiling depends not least on how correctly the adhesive for the ceiling tiles was chosen. The range of adhesive compositions is huge, while almost all manufacturers advertise their products as universal, natural, for all types of materials. At the same time, as practice shows, this is far from the case, at least for ceiling tiles you have to look for your own options for high-quality and safe glue.
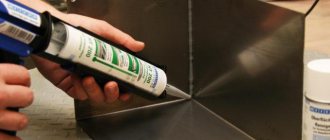
To prevent the cladding from “flapping” on the ceiling, the adhesive mixture can be applied in dots
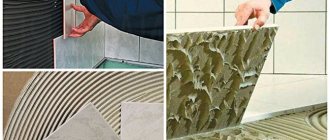
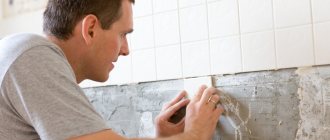
Surface preparation
Before pasting, you must first prepare the base of the ceiling, otherwise the work risks being short-lived.
This is especially true in places where the ceiling was whitewashed with lime. It must be removed from the walls, because the tiles will not stick to a whitewashed surface. If for some reason dirt or greasy stains get on the ceiling, they are cleaned off. This also applies to wallpaper if it was used to cover the ceiling. To clear the horizontal plane of them, you can use a regular spray bottle for flowers and house plants. This will reduce the amount of dust when removing the old coating. The tiles fit perfectly on a concrete base, although it is often impossible to reach it when cleaning. Do not ignore the preparation process before gluing: it is possible that the whitewash or old wallpaper will come away from the ceiling and the tile may sag against the background of others.
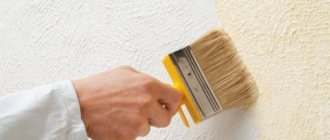
If the ceiling is uneven or has significant cracks, they should be covered with putty or gypsum-based rotband. Then you need to prepare the surface for gluing using a deep penetration primer. This mark is indicated directly on the container; thanks to it, the composition will ensure reliable adhesion of the ceiling panel to the ceiling surface. You can prime using a roller or a flat brush. In this case, a roller is used in the main space, the brush is passed along the corners and protrusions to prevent excess liquid consumption (if you use a roller, in the corners, when pressed, the primer will flow along the walls). The ceiling of the room needs to be treated with high quality, then you should wait a day until the composition is completely dry.
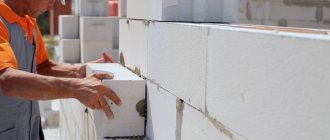
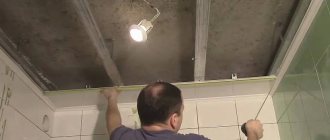
Preparing the surface for work
Puttying the ceiling to eliminate possible unevenness and strong differences in height
In order for the repair to take place with ease and without damage to the material, a small preparatory process should be carried out.
Before gluing, the old tiles are removed. If the ceiling is whitewashed, then everything needs to be washed off. Remove the crumbling layer of plaster. Large chips should be re-plastered and dried. If the ceiling was covered with wallpaper, then it should be removed and the surface cleaned of glue. After cleaning the entire surface, prime it and dry it.
After the preparatory work has been done, you can begin gluing.
Types of adhesives for ceiling finishing: consumption and characteristics
To glue polystyrene foam boards to the ceiling, use one of the following compositions:
- universal mixtures (these include the Format solution for working with polystyrene foam or Titan adhesive for ceiling tiles);
- hot melt adhesive;
- PVA;
- compound;
- solvent-based mixtures;
- acrylic putty;
- liquid Nails.
When choosing an adhesive mixture, pay attention to the following indicators:
- Quick drying and reliable adhesion to the base. For gluing to the ceiling, solutions that dry in no more than 30 seconds are ideal. The longer the glue takes to dry, the longer you will have to hold the tile with your arms up.
If work is carried out in a residential area, then it is important to choose compounds that do not release harmful substances into the air. It is prohibited to use adhesive mixtures based on solvents such as toluene, white spirit and acetone, because they react with the foam and dissolve it. Use solutions with good viscosity to ensure reliable fixation of the element to the ceiling.
Glue Titan
Thanks to its high viscosity, the adhesive easily copes with fixing heavy glass and metal products on any surface, so it will securely fasten lightweight foam panels to the ceiling. The solution dries quickly, and the thickened mixture can be diluted for further use
It is important to know how to dilute Titan adhesive for ceiling tiles
Suitable for these purposes:
- salicylic alcohol;
- denatured alcohol;
- ethanol.
The consumption of Titan brand glue is small and amounts to 0.5 liters per square meter of surface. One container is enough to glue the coating over a large area, which is considered the main advantage. Additional advantages of Titan are transparency, moisture resistance, and stability of seams. When applied to tiles, the product does not stretch or deform.
The solution can be used for gluing finishing to a base made of gypsum, concrete, cement and other materials. Since the elasticity of the composition is not affected by external temperatures and humidity, Titan is suitable for use indoors and outdoors.
Glue Moment
The advantages of this expensive and high-quality mixture include the following:
- setting speed;
- good viscosity;
- reliability of the adhesive connection;
- suitable for working with expanded polystyrene;
- speed of work.
Since the glue is sold in a tube, you will need a glue gun to squeeze it out of the container. Another disadvantage of the Moment is its rather high cost. In addition, the consumption of the mixture is quite impressive and amounts to 6 kg/m².
Liquid Nails
In the production of liquid nails, synthetic polymers and rubber are used as the basis. “Nails” glue homogeneous and foreign materials equally well. They are also suitable for gluing foam tiles.
The advantages of liquid nails are as follows:
- There are no components in the composition that aggressively interact with the foam and melt it.
- High drying speed.
- There are no visible marks left on the surface. The glue does not show through the finish.
- The solution does not change color or turn yellow over time. The adhesive seam is not susceptible to damage by microorganisms and mold. It does not rust and does not react to high humidity and direct contact with water.
- Water-based and solvent-based mixtures are available for sale. For residential premises it is better to use the first one, because it is considered harmless. But solvent-based liquid nails are suitable for use in places with changes in temperature and humidity.
PVA glue
Water-based compositions with latex and acrylic particles harden quickly after the water evaporates and bond the bonded surfaces well. Since all water-based adhesives are recommended for contact use, the mixture is applied to the tiles and base.
Due to the contact method of connecting surfaces, the mixture is not suitable for use over a large area, because the time required to complete the work significantly increases, as well as the consumption of the adhesive mixture. But in a small room this glue provides many advantages - it is odorless and does not harm health.
Positive aspects of using PVA:
- ease of application (you can use a spatula or brush);
- good adhesion to any substrate, even plastered;
- thick consistency;
- reliable grip;
- optimal setting times, which allows you to change the position of the product;
- reasonable price (less than $1 per kilogram);
- economical consumption – 0.2 kg/m².
What to do if the ceiling tiles show through the adhesive
A coating defect, when the adhesive composition is visible through the finish, occurs if a solution with a characteristic yellowish or brownish tint was used, and the panels are very thin. To prevent this from happening, choose colorless, white or transparent adhesive mixtures. Also note that some compounds will turn yellow over time, so do not use them on very thin tiles.
Important! If the defect was noticed after gluing the entire finish, then there is only one way to correct the situation - paint the ceiling covering.
But keep in mind that stamped loose tiles can only be painted with water-based paint. Injection panels can be painted with any interior paints, the main condition is that they do not contain solvents that negatively affect the foam. Laminated tiles cannot be painted, but the adhesive layer will not be visible through it anyway due to the dense decorative coating.
How to choose glue
The range of adhesive compositions designed for fixing foam plastic to the ceiling surface is large. They differ in composition and name, cost and volume offered. Lightweight and waterproof tiles place their own demands on the adhesive, which must:
- have high adhesion - adhesion to the ceiling surface should occur as quickly as possible, and the foam should hold tightly;
- grab quickly - it is too difficult to support each tile for a long time with your arms stretched up;
- have a viscous consistency. The liquid composition will not be able to hold even the lightest tile in a horizontal position without support;
- have a transparent or white color depending on the color of the tile itself and the shade of the primer layer. The thickness of the translucent finishing material is too thin, so the colored glue will show through;
- contain components that are not solvents. Otherwise, the foam will simply melt in the places where the glue is applied;
- characterized by versatility - this composition is suitable for any ceiling surface.
Criterias of choice
First of all, it is necessary to thoroughly clean the ceiling from dust, fragments of old repairs, loose pieces of putty and similar unreliable elements that can interfere with the normal gluing of the tiles and the ceiling. There is a list of criteria, meeting which will help you glue the tiles to the ceiling, even if the glue is homemade.
These characteristics include:
- Fast hardening. The tile is attached to a horizontal surface, and until the glue dries, it will not stick without the help of a specialist. It cannot hold more than one tile at a time, so it is better to choose glue that hardens within a minute or two - the speed of the work and the level of its complexity directly depends on this.
- High viscosity. The tile has a certain weight, albeit small, and therefore a substance that is too liquid will not be able to hold it at all - it simply will not set. The denser (and heavier) the finish, the thicker the adhesive is needed.
- "Invisible" color. As a result of the renovation, the owners probably want to get a single-color ceiling, on which dots or strips of glue would not stand out in a different color. You can hide the effects of gluing using white or transparent glue.
- Versatility in materials. Many types of glue have high adhesion only to a certain type of material, while gluing ceiling tiles involves connecting fundamentally different surfaces - polystyrene foam with concrete, plasterboard, wood. The adhesive must be able to adhere to the materials used in the room; the minimum condition for purchase in the case of most apartments is guaranteed high-quality gluing of foam plastic slabs to concrete.
No solvent in the composition! Some manufacturers prefer to use a concentrated solid adhesive, which can be diluted to a liquid state using a solvent. The foam from which the future ceiling covering is made will not withstand contact with such an ingredient.
Experts say that the format of the surface to which the polystyrene ceiling tiles will be glued also matters. On a new, smooth surface (this is often a newly installed plasterboard ceiling), the slabs fit better due to maximum contact, but there is nothing for the adhesive to grab onto.
Acrylic putty
The composition of acrylic putty includes a synthetic substance of the same name. Like PVA, acrylic putty has good adhesive properties, helps adjust the position of the tiles, and is safe for health. The putty can be applied with a spatula without additional tools.
It also has water-repellent properties, but it can only be applied to relatively flat surfaces - the putty layer rarely exceeds 1-2 mm. After drying it does not shrink.
It is important to consider that the panels are glued only to the final acrylic putty applied to the leveled surface.
Acrylic putty for installing ceiling tiles
You can expand the possibilities of using acrylic putty by pre-treating the ceiling with 2-3 layers of starting product. This will help hide even larger uneven areas before applying the final coat.
Other advantages include perfect adaptation to the color of the ceiling covering - it is not visible even when using thin products.
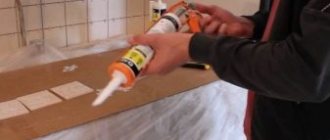
Using liquid nails to install ceiling tiles
Types of glue
Based on the above requirements, there are several categories of adhesive compositions used for gluing finishing materials with your own hands.
There are the following types of adhesive compositions:
- universal polymer;
- polyvinyl acetate;
- liquid Nails;
- acrylic putty.
Universal
There are several types of universal adhesives:
- eltitans - this glue is used for wooden, plaster and concrete surfaces. When used, an elastic seam is formed between the tile elements and the ceiling base. Among the disadvantages, the long drying time stands out;
- titanium - this glue is more often found on store shelves than others. It has a viscous structure and, in addition to plastic, can properly glue metal and glass. The drying speed is quite fast;
- master - the composition of this glue is similar to Titan, but unlike it, it has many disadvantages. Firstly, it is a pungent and unpleasant smell. Secondly, it takes quite a long time to dry. Although the price makes it quite popular;
- moment - this glue is an expensive but high-quality material. It has a significant advantage - high speed of adhesion and drying. But there is also a significant disadvantage. It requires more to work than similar compounds. Therefore, to apply it, it is recommended to purchase special guns, with the help of which the glue is released in small doses.
Materials of such brands as “Dragon”, “Power”, “Anserglob” and others have similar functional properties. Regarding the characteristics and cost, the differences are small, as a result of which they can be safely used for gluing ceiling tiles.
Liquid Nails
If you need to glue foam plastic material with your own hands in a room or any other room, use liquid nails as an adhesive. The use of such “nails” is recommended by many professionals and people who have tried this glue in practice.
To start work, in addition to Liquid Nails glue, you also need to have a special gun that will ensure a dosed release of glue. Depending on what surface needs to be covered with facing material, its quantity will depend. If the surface is fairly flat, then dotted strokes in the corners and center of the product will be enough. If the surface has uneven or other defects, the amount of adhesive may increase.
Liquid nails will also perfectly hold the tiles on the ceiling.
Despite the quality of the surface, liquid nails glue allows you to quickly and reliably glue ceiling materials to the surface. Liquid nails glue is very thick, so it can be applied to products in a thick layer. This will help when gluing slabs to uneven areas of the ceiling.
When purchasing liquid nails, pay attention to two aspects:
- the adhesive must contain no solvents;
- The color of the glue should be white.
Liquid Nails
To prevent excess glue from forming at the joints, it is applied without reaching the edges of the tile. After finishing laying the ceiling tiles, the glue can be used to seal the seams.
Polyvinyl acetate
There are two types of glue in this category:
- PVA;
- boostilate
This category has many advantages:
- when working with such compounds there is practically no unpleasant odor;
- Working with such compositions is simple and does not require special knowledge.
The glue consumption will be quite large. It is better to take it not in tubes, but in large jars.
The principle of working with this glue is that this composition needs to be treated not only the back side of the ceiling slab, but also the surface of the ceiling. After this, the lubricated foam must be pressed against the ceiling so that the glue sets. The operating time when using this glue increases significantly.
Acrylic putty
This method of attaching ceiling tiles is quite non-standard, although it is considered quite effective. To work, you will need a finishing acrylic putty that has sufficient viscosity to hold the sheet of ceiling covering. It is also used for other purposes: for attaching thin or translucent elements.
You need to start by applying a thin layer of putty to a small area of the flow. Level it and press the ceiling tile against it, fixing it in the desired position. The seams will be smooth and white, no gaps will be visible.
Diagonal tile laying
Ceiling tiles can be positioned either parallel or diagonally. In the first case, everything is quite simple and clear, but diagonal laying has a number of features. As a rule, this installation is used in situations where there is a need to visually compensate for uneven walls. Seamless tiles are not suitable for implementing such schemes.
The technology for diagonally laying foam tiles is as follows:
- First of all, you need to stretch two threads between the corners of the ceiling to find the center point;
- Installation of tiles must begin precisely from the center of the ceiling, and the tiles themselves must coincide with the corners of the marking lines;
- During further installation, you need to build on the axes that were formed in the center;
- At the junctions of walls and tiles, the latter must be trimmed so that they exactly match the dimensions of the free space.
After installing the tiles, all that remains is to install skirting boards around the perimeter of the ceiling and paint the finishing materials if necessary. If the wallpaper is already hung, then the baseboard needs to be painted before installation. Otherwise, skirting boards can be painted even when they are already installed.
Dry mixtures for foam plastic
Cement-based dry mixtures, which are designed for working with slab building materials, have a high level of adhesion. Before use they are diluted with water. This option is the most economical. After application to the surface, the glue is cemented, acquiring rigidity and strength. But working with dry mixtures takes a lot of time and is a hassle: you have to dilute the glue, which creates a lot of construction waste.
ARMIERUNGS-GEWEBEKLEBER 215 – dry plaster mixture for fixing thermal insulation boards. When mixed with water, a homogeneous adhesive mass is formed. After hardening, it is frost-resistant and water-resistant.
Adhesive for expanded polystyrene boards and reinforcement ARMIERUNGS-GEWEBEKLEBER 220 brand Kreisel
T-AVANGARD-K adhesive in the form of a dry mixture is used for installing foam plastic slabs on concrete and brick surfaces; it is also suitable for gypsum and cement plaster.
Adhesive for polystyrene foam, polystyrene foam T-AVANGARD-K
Ceresit ST 83 is considered a high-quality, quick-hardening mixture for fastening foam plastic; it is environmentally safe and has good adhesion to any surface.
Adhesive for foam plastic CERESIT ST 83 (25 kg)
What is the best glue to choose?
It is worth considering one more detail - what is the basis of the adhesive composition, because the specifics of its application depend on this.
Depending on the base, the glue is:
- water based;
- solvent based;
- adhesive compound;
- hot melt adhesives
All types can be suitable for gluing ceiling tiles made of polystyrene, polystyrene foam and other porous materials. But some subtleties should be taken into account.
The disadvantage of water-based glue is that microorganisms quickly develop in it. That is why they contain bactericidal-fungicidal additives. In addition, they take a long time to dry and cannot be used at low temperatures.
Solvent-based glue is a liquid polymer, so it evaporates quite quickly.
Hot melt adhesive also consists of a thermoplastic polymer with additional additives. It can only be used when heated to high temperature.
Silicone based adhesive compound. The peculiarity of its use is that it dries extremely quickly, so it must be used immediately after mixing and following the appropriate instructions for use.
With all the wealth of choice, universal liquid nails or special compounds are most often used for gluing ceiling tiles. Liquid nails are water-based, which are expensive, and solvent-based, which have a relatively low price.
For residential premises, it would be better to choose water-based glue because of its environmental friendliness and harmlessness to human health. But this glue is not suitable for rooms with high humidity. For the bathroom, it is preferable to use solvent-based adhesive.
In any case, the consumer decides which glue is best to choose. In addition, not with what, but how best to glue foam ceiling tiles, which is more important.
Gluing steps
Despite the well-established rule of using tiles to decorate a bathroom, foam ceiling tiles are becoming increasingly popular, which are no worse and can give the room an original look. For the bathroom, it is recommended to choose products with a water-repellent coating, including seamless tiles, which have moisture-resistant properties.
It is safest to apply the adhesive along the perimeter of the tile in zigzag lines.
Ceiling products for the bathroom can be of various configurations, square or rectangular. In addition, products for installation in the bathroom can be coated with a film that serves to protect against dust and moisture.
To properly glue ceiling tiles in the bathroom, you need to adhere to the following points:
- first you need to clean the ceiling;
- then primer;
- marking;
- gluing tiles to the bathroom ceiling. This is usually done from the center of the room.
Types of glue
The construction market offers several options for materials that are convenient for gluing ceiling fillets.
Each of them has unique features:
- Water-based adhesives. They take a long time to dry. Do not use if the room temperature is below freezing or if the room has been left without heating for a long time.
- Liquid Nails. They are convenient for attaching ceiling plinths made of any material to the ceiling.
- Adhesive foam.
- Universal compositions based on polymers.
Polymer mixtures
This material option was specially designed for gluing foam ceiling plinth. It has a dense consistency that can hold not only foam fillets, but also those made of other materials.
Polymer mixtures are conventionally divided into two subtypes according to the degree of hardening:
- instant;
- gradual.
“Moment” is an adhesive for ceiling plinths that hardens quite quickly
"Eco-naset" and "Titan" do not contain hazardous substances
Accordingly, installation will take a little longer.
Polyvinyl acetate composition (PVA) is another version of the polymer mixture that is used for gluing foam plastic ceiling plinths. It also does not contain substances hazardous to humans, and there is no pungent odor. But there are also unpleasant moments - a long drying period; You will have to use a lot of glue, otherwise the foam baseboard will not hold.
Liquid Nails
This material appeared relatively recently. Despite its short history, it managed to win a large number of fans.
Due to their characteristics, liquid nails are suitable for fillets made of any material, including foam plastic. They are convenient and easy to use for DIY work. There are two types of liquid nails.
Neopropylene
Produced from organic solvents. This product has a big drawback - a strong, pungent odor. Therefore, all work should be carried out in rooms with easily organized ventilation.
Acrylic
They are based on water. Therefore, if you are interested in how to glue foam ceiling skirting boards in rooms where it is difficult to organize high-quality ventilation, acrylic liquid nails are the best choice.
Peculiarities
The modern building materials market offers a huge selection of foam boards for decorating the ceiling surface. The thickness of such slabs varies from 6 to 14 millimeters, depending on the manufacturing method and the raw materials used. The standard size of ceiling tiles is 50x50 centimeters, which allows for accurate installation without unnecessary loss of material due to its fragility.
According to the geometric shape, the tiles are:
- square;
- diamond-shaped;
- rectangular;
- hexagonal;
- with rounded edges.
Based on the design of the front surface, this type of material is divided into smooth and embossed. The relief pattern of the tile can be patterned or imitating natural materials such as wood or stone. The surface coating of the tile can be matte or glossy, laminated with a film or with a simple rough texture. Therefore, when choosing a finishing material based on its characteristics, you should understand what the atmospheric environment of the room being repaired is.
Advantages of ceiling cladding with foam plastic
Easy installation: a novice builder can handle laying foam boards.
- Environmentally friendly and safe material: it will not harm households.
- Beautiful appearance: the slabs have different textures, shapes and colors. So you can choose what suits your taste.
- Cheap cost. The cost of covering the ceiling with foam boards will be lower compared to traditional puttying and painting or stretch ceilings.
How to glue tiles to the ceiling: two technologies
Foam or polystyrene ceiling tiles are attractive because they allow you to quickly and inexpensively tidy up a less than ideal ceiling. If the ceiling is relatively flat, the tiles are glued with special glue. It is applied in a thin layer, but provides reliable fixation.
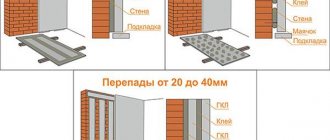
This method will not work with uneven ceilings: the tiles simply will not stick if there are large differences, or the appearance will be deplorable. There is not always time, desire or opportunity to level. Moreover, this finishing option is often considered temporary, with plans to then make a suspended or suspended ceiling. Therefore, there is no point in wasting time and money. In this case, another technology is used - using adhesive for drywall or putty. They work no worse than glue, at the same time leveling the base.
After gluing the ceiling tiles you will get something like this:
Before starting work, unpack all the material, make sure it is the same color and size. If there are irregularities or sagging, they are cut off with a blade or a sharp knife. Now you can begin installing the ceiling tiles on the ceiling.
How to glue on a flat ceiling
If the ceiling is flat, use regular adhesive for polystyrene or foam tiles, the technology is as follows:
- Apply a thin strip of glue around the perimeter of the square and diagonally. There is no need to coat the edges of the tiles.
- Place the tile in place and smooth it with your hand.
- We hold it for a while until the glue “sets.”
- We repeat the same with the next tile. We apply it to the edge of the already pasted one, if necessary, combine the pattern, and then press the rest of the part. Docking must be carried out as accurately and carefully as possible so that steps do not form later. Align the edges to the nearest millimeter.
- Repeat with the remaining fragments.
- If necessary, the ceiling tiles can be trimmed. It is convenient to do this on
As you can see, everything is very simple and these are all the rules on how to glue tiles to the ceiling. Just one caveat: you need to press one square to another tightly. If you have already glued it and there is a gap left, you can move it by pressing a wooden strip to the free edge. If you try to do this with your hands, you can break the foam or polystyrene, but it’s easier to achieve what you want with a flat bar.
If the ceiling is uneven
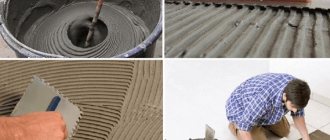
If the ceiling has significant unevenness, gluing the tiles with regular glue will not work. To remove significant differences, use drywall adhesive or putty. The mixture is diluted to a paste-like state, applied to the ceiling, and grooves are formed using a notched trowel. The amount of glue depends on the overall curvature, but it is advisable to start with a minimal layer. The area on which glue is applied at a time is approximately 4 fragments. During this time, the composition will not have time to set, and leveling such a fragment is not difficult.
Apply a thin layer of putty to the ceiling
The tiles are laid on a layer of glue. It sticks well and moves without problems. Having aligned the edges of the laid fragments, take a rule or a building level (preferably one and a half meters) and align the tiles in the same plane. Just press the fragments harder in the right place.
Then the composition is applied to the ceiling again, and, again, to about 4 tiles. All of them are set in the same plane, or at least so that there are no sudden changes. Only in this case you need to make sure that the required layer of glue does not grow too quickly - it is better not to apply more than 3-5 mm, otherwise everything will fall.
https://youtube.com/watch?v=eZPYhhpCoyI
Cleaning and caulking
You know how to glue tiles to the ceiling, but there are still some nuances, without knowledge of which a decent result is unattainable. When working, adhesive often gets on the front side of the tile. It must be removed immediately and completely. You can use a sponge or a soft, non-fading cloth. Wipe the surface immediately after placing the fragment in place. After just a few minutes, this will no longer be possible and traces will remain. Therefore, while working, keep a bucket of water and a sponge/rag on hand.
Carefully sealed seams do not spoil the look
If there are small voids left between the slabs, you can fill them with the same mastic or putty (if it is white), but immediately remove the excess. Another option is white acrylic caulk. It perfectly masks all crevices and adheres well to polystyrene foam and polystyrene. You can fill thin cracks with a rubber spatula, and immediately wipe off any excess with a damp cloth.
Tips for using glue
- When choosing a product, consider its drying speed and application method. The characteristics of one glue may differ from one manufacturer to another.
- Do not glue the tiles onto the old ceiling trim; remove them first, since over time, under the influence of load, they will fall off along with the new cladding.
- Before installing plastic panels, wash the ceiling thoroughly with soapy water.
- The adhesive is applied over the entire area of the tile in a continuous thin line, with a distance of 1 cm from the edge.
- It is better to glue the ceiling tiles from the corner that first catches your eye when entering the room. This will avoid the appearance of unevenness in the corners.