Features of plastering work
Applying plaster has its own characteristics. They depend on the nature of the base surface, the type of solution being created and the conditions of application and drying. In view of this, tools and equipment for plastering work will be needed.
Plastering can be done inside and outside the house. Regardless of this, the tools and equipment will be the same. Therefore, modern mixtures or additives can easily cope with the negative effects of temperature and humidity changes. Mixing itself requires water, but if it dries too quickly and the air temperature is high, you will need to spray water on the wall.
Surface types most commonly found are brick, concrete and wood. For high-quality adhesion to the surface, lime (to improve resistance to moisture), plasticizers (for frost resistance), gypsum (to speed up hardening), and sawdust (to increase adhesion and overall strength) can be added to the sand-cement or sand-clay mixture.
Kneading requires a certain sequence and volume. If you plan to use lime, first dilute it, and then pour water with it onto the gypsum or clay. It is not recommended to make the cement mixture in large volumes at a low speed of operations and at the final stage - it will have time to set and will be damaged.
The applied layer is recommended to be up to 3-4 cm thick. If it is exceeded, it will crack when drying and even fall off. It is good to make reinforcement (metal mesh, nails with wound wire, stuffed shingles), prime the wall and treat it against fungus and mold.
Because of this, certain tools are required to perform plastering work.
Stage four: ensuring adhesion
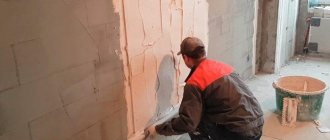
At this stage, the issues of creating conditions for good adhesion of the plaster mortar to the wall are resolved. Different surfaces have different adhesion, which requires special technological solutions for each type of wall.
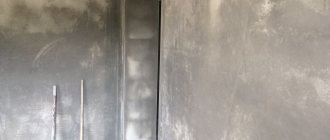
Concrete walls. Before the advent of penetrating primers, a mesh was attached to concrete walls, which provided the necessary adhesion of the plaster layer to the wall. Nowadays the process has been greatly simplified.
Using a chisel and hammer (axe, perforator), notches are made on the wall 5 mm deep and 5-10 cm long, after which a layer of penetrating primer is applied with a roller or brush. Thus, several problems are solved at once:
- the wall is saturated with moisture and does not draw it out of the plaster mixture;
- the primer creates a film on the wall, which is a kind of glue between the concrete and the plaster mortar.
Brick walls. Notches are made on the wall with a chisel and hammer (perforator, trojan, gear). Masonry joints deepen to 1 cm.
These two simple operations are enough to ensure good adhesion of the plaster mortar to the brick wall. A number of experts recommend additionally treating the brick with a penetrating primer. The experience of grandfathers and fathers shows that this is an unnecessary operation.
Aerated concrete. To ensure adhesion between the wall and the plaster, several solutions are offered:
- use a chainsaw to cut recesses in the wall that will hold the solution;
- treat aerated concrete with special penetrating primers;
- attach the plaster fiberglass mesh to the wall using glue.
Many professionals believe that it is more correct to use a plaster mesh. The technology for attaching it to the wall is discussed in detail in the work “How to plaster walls made of aerated concrete.”
Important: if the composition of the walls is heterogeneous - combinations of concrete-brick, brick-aerated concrete, etc., it is imperative to attach a plaster mesh under the plaster. The mesh is attached to wood with nails, to concrete, brick and stone bases with dowels and self-tapping screws, and to metal by welding.
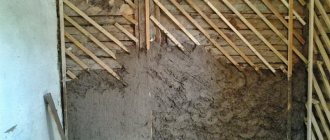
Preparing wooden surfaces for plastering has its own characteristics. It is impossible to plaster directly on the wall - the mortar does not stick to wood. Output in continuous wall covering:
- fiberglass or plastic mesh;
- wooden shingles;
- reed mat.
Wooden shingles are an old, proven method of plastering plank materials. It consists of thin wooden slats 1-2 m long. It is placed on the wall at an angle of 45 degrees with a pitch between slats of about 45 mm.
First, the lower shingles (the shingles) are nailed, then the exit shingles (the upper ones). To prevent the nails from splitting the slats, it is better to wet them. There should be a gap of about 2 mm between the ends of the slats so that the shingles do not tear the plaster under the influence of temperature.
The technology for attaching shingles is discussed in more detail in the work “How to plaster wooden walls.”
Note that there is no difference between preparing a wall for simple plastering and textured plastering. Therefore, the answer to the question - how to prepare walls for decorative plaster - is given above.
What tools are used for plastering work?
All plastering tools are divided into the following groups depending on their role in the process:
- surface preparation - removing old materials, washing and removing contaminants: this requires a hammer, chisel, wire brush, sandpaper, hammer drill, grinder, metal scissors, brushes, buckets, shovels;
- marking and setting angles: tape measure, squares, plumb lines and levels, pencil or marker;
- installation of auxiliary elements and assembly of scaffolding and scaffolding: bench hammer, screwdrivers, pliers, screwdriver, knife;
- equipment for working with plaster - creation, application, leveling and shaping of the surface, finishing and giving the appearance: are described below due to their specificity and importance;
- protective clothing, shoes and personal protective equipment: gloves, goggles, earplugs, respirator, helmet.
Mixtures for plastering
Before work, you need to know which plaster mixtures can be used for exterior and interior finishing work.
The most common is a cement-sand mixture. They work with it in rooms with high humidity: toilets, bathrooms and technical rooms. Cement grade M-400 is used. The period of complete drying under natural conditions reaches 30 calendar days.
Another product that I would like to mention is gypsum plaster. It has a number of features. The gypsum-based mixture hardens quickly, but does not shrink. Therefore, I make working portions small.
Another plaster mixture of texture consistency with various additives may interest us. We are talking about bark beetle plaster with the addition of fine marble chips. We examined the technology of its application in more detail. Read here.
Having familiarized ourselves with a small list of plaster mixtures, let's move on directly to the working tools.
Tools for plastering work and their purpose
The following describes the basic tools for performing plastering work. The list can be expanded and it is simply impossible to list everything.
nail puller
The main purpose is to remove old nails and hardware from wood. It may also be necessary to knock down old layers of plaster (if you don’t have a shovel or an ax at hand).
Made from high strength stainless steel. Colored for quick search. The handle should be soft and ergonomic: rubber or plastic. The removable one can slip, so a rubberized end of the nail puller is optimal.
To increase functionality, it is good to have a combined nail puller or to be able to remove nails using a combined tool: crowbar-nail puller, multifunctional spatula.
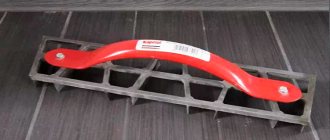
Falcon
The essence of this plastering tool is to create a supply of mortar on hand in difficult conditions. When processing a large area, frequent bending will tire your back. This “easel” allows you to avoid bending too often and is called “falcon”.
It is convenient for plastering hard-to-reach places. Plastic or wooden handles and aluminum or steel guards (400 x 400 mm) are popular. There are plastic models - lightweight and non-swelling.
For ease, you need to grab it so that the edge of the shield rests on your forearm, the center fits tightly to the fist from above - then you won’t have to squeeze it too hard. Can be used to apply mortar to the wall as a trowel.
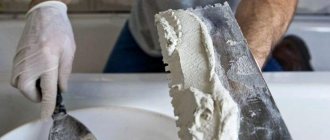
Putty knife
To level or remove the putty, use a spatula. The thin one will work in a hard-to-reach place, the wide one will act as a rule under the ceiling. Width – 3-50 cm, thickness – about 1 mm.
Selection can be made according to the following criteria:
- the length of the blade is not very long, otherwise it will bend and interfere with the operation;
- Blade width – trimming and removal – up to 20 cm, processing large areas – more than 20 cm;
- fastening the blade: the more securely, the better, otherwise instead of help from him there will be constant repairs.
Hammer for plumbing work
Plastering tools include a plastering hammer. It is used for preparing steel wire and strips that act as embedded parts and driving nails. The design is simple - a steel head on the handle, a wedge for fastening.
There are various standard sizes, the handle is wooden, plastic or fiberglass. The shape of the steel head varies within certain limits, and there may be holes on the handle for tying to a belt. The color is most often bright - for easy searching in dusty environments.
A plastering hammer differs from a regular hammer in having an elongated part, designed to serve as a point when performing blows and making it easier to remove old coatings and dismantle masonry.
It combines the functions of a hammer, pickaxe and axe. Regardless of what other tools and devices are available for plastering work, you cannot do without a hammer.
Trowel
The trowel (“trowel”) is the main device. They are convenient for mixing and applying mixtures for masonry and plaster, leveling the surface, opening seams and many similar manipulations.
It is a shield of a certain shape with an L-shaped handle. Dimensions – according to the muscular capabilities of the master, up to 100 mm long. Working with corners requires a lesser-known trowel—the corner trowel.
There are two types - internal and external (almost not used due to the prevalence of corners). Internal ones are not very common, but adjustable varieties are well used - with some skill it can save a lot of time.
Grater and grater
In order to rub the finished surface to give smoothness or a special relief, a trowel can be used. This type is used at the final stage of finishing - when completing surface treatment with further, for example, painting.
Material: foam and wood. The handle is usually made integral with the working plate. A grater is similar to a grater, but consists of a base on which a mesh, perforated metal sheet, or emery is stretched.
Floats are used after the plaster has dried to make the surface even more smooth. Composition: base, handle and mesh or plate gripper (there may be wing screws to secure the blade).
There is a subtype of this tool, which is a steel or plastic plate with a handle - a smoother.
The application is to add gloss to the surface by compacting it. Some types of decorative plaster cannot be done without a trowel. It also helps in leveling the thrown mortar - however, the amount of leveling cannot be significant.
Is it possible and why to plaster a wooden wall?
The property of wood to quickly absorb moisture and slowly get rid of it inevitably leads to destruction. Modern impregnations preserve the vulnerable material for some time, but repeated treatments are required. Plastering walls not only protects wood from moisture, rodents and beetles, it also fulfills a number of technical purposes:
- prevents cracking of the base, thus retaining heat;
- levels the surface;
- absorbs noise;
- increases fire resistance.
It is important how to plaster a wooden wall in order for the coating to fulfill its intended purpose and maintain a long-term result. The ancient technology is still relevant today: a shingle is nailed down, and a solution is applied over it.
Wooden wall plaster
Tools for plastering walls: let’s look at the main points
In order to plaster walls efficiently and quickly, you need to choose the right working tools. In this case, special attention should be paid to their functional features, as well as the method of applying the plaster solution. Plastering of walls is carried out manually or mechanically. In each case, a specific set of tools is used.
Applying plaster
There is no special technology for plastering wood. The application method is the same as for other surfaces.
Splash
Take a solution with the consistency required for this stage. He throws it over the mesh cells with his hands, because using a trowel is not convenient. Start spraying from bottom to top from the corner. Layer no more than 1 cm.
Priming
The primer solution is made thick and applied with a trowel onto the spray that has not yet dried completely. The layer does not exceed 2 cm. If the beacons are not closed, the process is repeated until the solution goes beyond the limits. The plaster is leveled according to the beacons using the following rule: go from bottom to top, removing excess. Places where there is not enough solution are abandoned and leveled again.
Covering
A thin finishing layer is applied to eliminate any remaining defects after the base primer.
Grout
After the rough soil has set, use a trowel to smooth the surface of the plaster with careful rotational movements. The surface is leveled as much as possible. If you rub counterclockwise, the solution thickens.
Splash
Application of primer
Covering
Grout
What tools are needed for machine plastering?
For machine application, hoppers with nozzles are used through which plaster solutions are supplied.
The machine is equipped with containers for the mixture. Each model has design features, which determine the performance of the installation. On average, up to 60 square meters are processed with its help in an hour. Today, the market offers a wide range of machines for machine plastering. They are used for processing vertical and horizontal surfaces. Ceiling plastering machines have a short barrel. The machines have replaceable nozzle attachments, which allows you to work with solutions of different consistencies.
To process large areas, large units with a spacious hopper are used. Modern models are able to independently prepare a high-quality solution in large quantities. This allows you to significantly speed up the execution of work.
Technology for finishing wooden walls indoors
Plastering wood inside a house consists of sequential steps. This includes surface preparation, fastening of slats, installation of beacons and the process of applying the solution itself. Before any plastering work, it is necessary to complete the construction process (if it is planned to install window and door openings). It is necessary to de-energize the electrical wiring, covering cables and sockets.
Before any plastering work, the construction process must be completed.
Preparing the walls
The surface must be cleaned of dirt. Unnecessary metal elements are removed from it and cleaned of contaminants. If necessary, the spots are planed using a plane.
The cleaned surface should be treated with an antiseptic. This will provide additional protection against the appearance of bugs and pathogens. Existing cracks are carefully covered with polyurethane foam. In rooms with high humidity, the walls are covered with waterproofing material.
The cleaned surface should be treated with an antiseptic.
Fastening shingles
In order to properly plaster a wooden wall, reinforcement should be installed using wooden slats. When you put them on the wall, you get a kind of grid.
To prevent the slats from cracking when installing on the wall, they should be soaked briefly in water.
- Work starts from the top corner. First, nail the main rail into half a right angle. Then other slats are nailed along the entire wall in increments of 4 centimeters.
- On top of the first shingles, another lath is nailed, having a slightly thicker thickness, which should be at least half a centimeter. The second rail is installed strictly vertically to the bottom. Nails should be nailed at the junction of two slats. The distance between the second shingles can be increased to seven centimeters.
The specified distance will help to avoid deformation during subsequent swelling of the shingles.
In order to properly plaster a wooden wall, reinforcement should be installed using wooden slats.
Installation of beacons
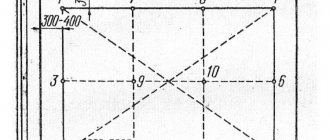
A self-tapping screw is installed with a span of 10 centimeters from the ceiling and the entrance to the next room. At the same distance, but from the lower horizontal surface, a second screw is mounted. Similar manipulations should be carried out with the remaining walls.
A cord or fishing line is pulled horizontally and vertically. Then you need to determine the most protruding place in the wall. In the gap between it and the stretched fishing line you need to drive self-tapping screws.
A cord or fishing line is pulled horizontally and vertically.
Applying plaster
How to plaster wood correctly? The process is similar to finishing any surface. First, part of the prepared surface is sprayed with a ready-made plaster solution. The thickness of the initial layer is 1 centimeter.
It is advisable to start from the bottom corner, gradually moving up. The installed beacons will serve as a clue here. They are convenient because they divide an entire wall into sections. The primer is applied with a more viscous solution consistency than for spraying. The second layer should be smoothed strictly along the protruding beacons, and the excess should be removed using the rule. To level, the bar can be moved in different directions.
After the surface has dried (on average 5 hours), grouting is done. Before this, all beacons should be removed from the walls. The finishing stage will make the surface smooth, ready for decorative finishing.
To level, the bar can be moved in different directions.
Gentleman's set
It’s better to stock up on everything you need in advance so that you don’t get distracted during the work process and waste time searching for the right tool. It’s convenient to have everything at hand: it not only speeds up the process, but also makes it more enjoyable.
What tools are needed to plaster a wall? The basic set of devices for preparing the surface for plastering and directly for plastering includes several items:
- It’s worth getting a special hammer;
- a ladle, with the help of which the plastering process is accelerated;
- construction plumb line;
- construction level;
- a rule designed to level the mortar on the wall;
- spatulas of different sizes and types;
- trowel;
- rollers;
- grater or several graters.
Tools
A professional builder should have a wide variety of tools to prepare the surface for plastering. In each specific case, their set varies. It all depends on the type of coating being removed from the wall - plaster, paint, wallpaper - and on the materials from which the wall is made:
- brick;
- concrete;
- aerated concrete;
- tree.
When doing work on your own, not all tools are needed. To make it easier for a novice builder to navigate, a list of necessary tools, fixtures and materials will be provided for each type of work performed.
Please note that it is impossible to carry out the work without a portable ladder or a special platform (gantry). Therefore, this device will not be mentioned further.
Tools used at the preparatory stage
The working tool is selected depending on the condition of the unprepared base surface of the walls/ceilings and the type of plastering (protection, relief, volumetric decor). Before any type of work you need to prepare the surface. After taking level measurements, the master determines the curvature of the walls and checks the angle (the rotation is more or less than 90 degrees). This allows you to set the thickness of the plaster layer, which can cover surface defects and compensate for the curvature of the walls.
Preparatory work is carried out using the following tools:
- Protruding and strongly convex sections of the wall are beaten with a hatchet or a plaster hammer with a pick. The tool is used to make notches that provide more reliable adhesion of the plaster to the surface.
- Priming the walls to increase adhesive properties is done with a paint brush. A large brush with long thick bristles works well on the surface for deep penetration of impregnation into the base.
- The placement of beacons in a plane is done using a plumb line. The tool allows you to accurately determine uneven areas of the surface and stretch threads between the beacons in the horizontal, vertical plane and diagonally.
- To align beacons relative to the horizon plane, a rack level is used.
- To simplify the process of marking and installing beacons, some master plasterers use a high-precision laser level.
Necessary tools and equipment
Before you start plastering wood, you need to acquire special tools. You will need:
- Container (preferably made of durable plastic);
- Mixer - a drill with an attachment for mixing the mass. This device speeds up the process;
- Spatula;
- Roller;
- Tassels;
- Special fiber (fiber) to prevent cracks;
- Wooden slats are two meters long and no more than half a meter wide. Their thickness ranges from 3 to 7 millimeters;
- Special nails for plaster;
- Profiles for installing beacons;
- Self-tapping screws.
Since some of the work will be done upstairs, you will need a stable table or stepladder. Phillips screwdriver, hacksaw (for metal), trowel, building level, grater, plumb line, tape measure, and so on.
Before you start plastering wood, you need to acquire special tools.
Tools for plastering walls
What might be needed to perform the finishing work itself? Let's make a list of tools.
- Ladle, capacity up to 1 liter. It is very convenient to use in the process of throwing a solution of different consistency onto a work surface. They can be used to measure the required volume of plaster mixtures for preparing the solution. You can also use a ladle to throw mortar between the beacons.
- Bucket. It should be 10-20 liters in volume.
- Plastering spatula. She is given the solution in those places where its quantity is not enough.
- Plaster trowel (falcon). Can be metal or wood. It has dimensions of 400x400 mm, with a handle that is perpendicular to the base. The trowel is used to bring in a small amount of mortar when correcting plastering inaccuracies. Most often it is used in conjunction with a spatula. It is best to select such a trowel according to the individual preferences of the master. To prevent your hands from getting tired during the work process, the weight of the trowel should be acceptable. The trowel can be different for each type of plaster.
- Spatula. Not everyone is comfortable using a spatula and trowel. Therefore, just in case, you should have 2 spatulas in your arsenal: one large and the other smaller. Kraftool is a leader among spatula manufacturers.
- Lighthouses. Act as guides to create a perfectly flat plane. They are made of galvanized steel. After plastering, the beacons should be removed from the plaster after it has set.
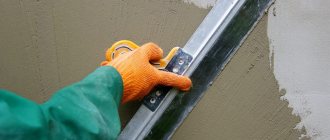
- Rule. It is a wooden or aluminum strip. Serves to align the scattered mortar along the beacons. It is used to line the inner corner. The length of the rule varies: from 0.5 m to 3 m. Working with the tool is quite simple. It is enough, after applying the bulk of the solution to the surface, to install it on adjacent beacons with both ends and stretch it from bottom to top. In this case, the excess solution will remain on the surface of the rule. This way you will immediately see all the problem areas where you need to add more.
- Half-grater. It looks like a polished long strip, the length of which is 400-800 mm, width no more than 150 mm, with a handle. Using this lath, the plasterer will be able to complete the final leveling of the surface. It can only be done when the solution has already been dehydrated, but has not completely hardened. By making circular rotations with the device, you can achieve a perfectly flat surface.
- Steel smoother. This tool is used to “iron” to compact the surface layer of the plaster mortar. It is a polished metal plate with a handle. The trowel is installed at an angle on the surface of the plaster and passed with force along it. It turns out that under this action the surface layer is compacted and does not collapse after drying.
- Cotton gloves. Hands need to be protected from contact with the solution, so it is recommended to have 2-3 pairs of gloves.
- Construction mixer. Needed for mixing small volumes of solution mechanically.
- Plastering machine. May be necessary if large-scale construction work is coming. It is enough to connect the running water supply to the device and pour the dry mixture into it. The machine mixes the solution and delivers it through a hose. It is better to work with three people: one person pours the mixture, another applies the prepared solution from a hose to the surface between the beacons, and the third levels it with the rule.
Preparation of brick surfaces and concrete
The surface should not have protruding reinforcement, cavities, sagging, or chipped ribs. Embedded products must be rigidly fixed in concrete; The aprons of the embedded products are installed flush with the protected surface. Places where the floor adjoins columns, equipment foundations, walls, and other vertical elements must be sealed. The supports of the metal structures are concreted.
Concrete and brick surfaces that have previously been exposed to acidic aggressive environments must be pre-washed with clean water, neutralized with an alkaline solution or a 4-5% solution of soda ash, washed and dried again.
Before applying most paints and, in particular, epoxy compounds, the surface must be thoroughly dried; The moisture content of concrete surfaces in the surface layer of 20 mm should not exceed 4%. As a rule, this occurs after it is kept at 20°C for 28-30 days after pouring concrete.
Preparation of the concrete surface before painting with any paints and varnishes must be thoroughly cleaned of mastics for formwork, loose layers of screed, efflorescence and cement laitance and other contaminants, degreased, puttyed if necessary, cleaned and thoroughly dust-free. In critical cases, it is useful to carry out water jet and hydroabrasive cleaning of concrete followed by drying the surface. Before painting brickwork, it is necessary to sandblast the brick to remove old paint and dirt.
The presence of oil, grease, mastic and other contaminants can be determined as follows: draw chalk lines through the suspected stain of contamination, pressing the chalk with medium force. If a line in some place has less intensity than in neighboring areas (before and after the supposed stain), this means that this area needs to be degreased.
Tools for preparing walls for plaster
At the stage of preparing the surface for plastering, a number of tools are used:
- Spatula. They apply a small amount of plaster mortar. It is best to have two options in your arsenal: one wide, the other narrow.
- Rule. A wooden strip from 0.3 to 3 meters for leveling the applied mortar on the work surface.
- Trowel. With its help, the solution is applied and leveled on the working surface.
- Scraper. It is necessary to remove old materials.
- Metal brush. It is used to clean dirt before applying a new mixture.
- Sandpaper. For preliminary grouting of the applied layer.
- Grater. Aggregates with sandpaper: the applied material is rubbed down.
- Maklovitsa. An ordinary brush with large and thick bristles. A primer is applied with it to increase adhesion. Wet the wallpaper before pasting.
- Plastering hammer with pick. They use it to knock off protruding parts of the walls.
We looked at the basic tools for plastering work. In addition to them, they are used:
As well as personal protective equipment:
- Clothes made from thick fabric.
- Protective glasses.
- Helmet
- And gloves.
But the main striking force, so to speak, heavy artillery, is considered to be a bush hammer of a pneumatic or mechanical operating principle.
This is, in fact, a hammer, but very heavy, made entirely of metal. The working surface is equipped with teeth. There are special attachments for working with a hammer drill. They make marks on bricks, masonry and concrete surfaces. It can be used to treat hardened screed. The notches help the plaster mortar to better adhere to the surface.
We almost forgot about the beacons. They are necessary to create a smooth surface.
Now let's find out what to use to apply plaster.
How to prepare the base for painting?
Treatment of the wooden surface before painting is necessary to obtain a high-quality aesthetic finish. Necessary:
- Check the condition of the surface. Identify roughness, chips, irregularities, prominent knots, protruding spots of resin, nails. Use a chisel to remove burrs and protruding bumps, hammer the nails deep, cut the resin to a depth of 2–3 mm, and wipe off oil stains with gasoline, kerosene or acetone.
- Sand the surface with sandpaper. The wall should become smooth.
- Fill defective areas with putty for wooden products. After drying, it also needs to be thoroughly rubbed.
- Treat the wall with a primer at temperatures from +18 to -28 degrees.
- Blend the primer layer with a flat brush and then sand with fine-grained sandpaper.
Advice:
After the treated layers have completely dried, make sure that the base is intact and ready for painting. It should be a uniform color, without inclusions of other shades, even, very smooth. If deviations from these parameters are noticed, then you need to repeat the previous steps until the desired result is obtained.
The falcon that doesn't fly
A very simple, but very useful tool for decorative plaster in the process of plastering ceilings and walls is the construction falcon.
It is a shield with a handle in the center. Usually a falcon is made of light metal. Its size is 35 by 40 centimeters. The purpose of such a device is to maintain the solution during application. The falcon is also used to apply plaster and level it over the surface. Technologically, the process looks like this: the mixture is placed on the shield, which is then applied to the surface to be finished using a plaster spatula.
The falcon can be replaced with a simple piece of plywood, making a tool for plastering walls with your own hands.
Plastering a wooden house outside
Exterior finishing of a wooden house is carried out after finishing the walls inside the house - this will prevent “locking” of moisture in the wood. The process begins with preparing the walls and filling the shingles. Large cracks and joints of logs are caulked with tow, mineral wool, and slats are hammered into the largest cracks. After they nail down the shingles (some builders replace them with durable plaster mesh), they install beacons, without which it will be difficult to achieve even walls. Apply the plaster in a layer of 15-20 mm, and make the solution more liquid than for interior work, and add a little PVA glue into it.
The plaster is allowed to dry naturally, but is protected from direct sunlight and freezing. To make it easier to comply with these conditions, work is planned for late spring or early autumn. To give the facade an attractive appearance, ready-made decorative plasters are subsequently used, which are applied in a thinner layer. The most common types of plasters are:
- mineral;
- acrylic;
- silicone;
- silicate.
Silicate decorative plaster for facades
The most durable and reliable, but most expensive materials are those based on silicone and silicate. Modern plasters are available in different textures and colors. In addition to decorative plastering, 28 days after the rough finishing, you can use natural or artificial stone cladding.
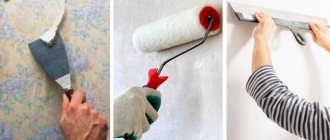
Mister Spatula
When applying decorative plaster, different spatulas are needed and all are important.
Their most popular “profession” is smoothing the plaster layer. They are also used for applying mixtures - putty or plaster. Not a single professional can do without a spatula. For plastering, the most suitable tool is a spatula, the blade of which has the shape of a trapezoid or rectangle. It would be good if it was made of stainless steel. Then the spatula will work properly for a long time and will not wear off or become deformed.
It is worth paying attention to the handle. Different materials are used for its manufacture. The handle can be wooden, plastic, rubber, or a combination.
You can make sure that a particular spatula model is right for you by holding it in your hands and imagining that you are plastering with it. There is no need to rush, because you will have to spend more than one hour working with this device.
Important! The spatula blade must be perfectly straight. And after pressing the surface, it should instantly return to its original position.
Venetian plaster requires a special spatula. Its blade is made of polished metal.
Tools for decorative plaster and its application
The most diverse means are used to decorate interiors and facades with plaster. To apply decorative plaster, use the same tools as for simple plaster. The determining factor here is the desired decorative effect. For example, the mixture for a fur coat can be applied by spraying or trimming, using a brush dipped into the solution, and also transferred to the wall with a long-haired roller.
By using conventional tools for plastering, but by changing the methods of use, surfaces of different textures are obtained. For example, by applying a trowel to a fresh mortar and lifting it slightly so that the mixture is pulled behind the tool, one texture is obtained when the blade is torn off, and another texture is obtained when it is torn off after some displacement to the side.
A variety of objects are used as plastering tools for decorative finishing:
- crumpled plastic bags;
- crumpled plastic film;
- spoons;
- combs;
- even ordinary chopsticks.
To form patterns use:
- figured rollers for decorative plaster,
- stencils,
- silicone matrices.
To imitate masonry (brick or stone), the seams are formed by scratching, for example, with the tip of a screwdriver, cutting using a self-made tin cutter, or jointing.
Some of the tools can be invented and made by yourself, for example, a shaped spatula can be cut from a polyethylene lid. Some tools can be made entirely or adapted from what is already at hand. For example, by making shaped “growths” from ropes on rollers. However, there are a number of decorative plasters that require special tools.
Venetian trowel
To perform a classic Venetian, you need a Venetian trowel.
- plate material – high quality stainless steel;
- highly polished plate;
- chamfer on the cutting edge;
- rounded corners.
The requirements for the metal are determined by the inadmissibility of leaving black marks with the trowel during ironing. Polishing and rounded corners are necessary to create a mirror-smooth surface of thin-layer Venetian plaster. The presence of a chamfer is necessary for polishing, which is carried out by pressing a trowel along the surface of the finish. Rounding of the corners is required to prevent dragging of solution particles during wiring. The Venetian trowel is used to make plasters such as microcement, travertine, and apply paint that creates a silk effect.
Polishing stone
Classic Moroccan plaster is polished with a rather exotic tool - a polishing stone. Only rocks with a hardness of at least 7 on the Mohs scale are suitable. The stone should have a flat area and be comfortable to hold in the hand.
Decorative plaster coating is often coated with varnish, wax or colorful compounds. To apply these products, use brushes, rollers or a sponge. Brushes used in finishing work are no less varied than spatulas. The most commonly used type is maklovitsa.
Necessary "Rule"
The rule is what is used to correct the already unlaid layer of plaster, in other words, to tighten it. There is no way to do without the rule if the goal is to make high-quality coverage. Rules come in different widths, lengths and shapes. The most commonly used models are two to three thousand millimeters long. Blade configuration can be
- h-shaped: used to distribute the solution applied to the wall over the surface;
- in the form of a trapezoid: it is used to trim a layer of plaster;
- rectangular: universal option; The presence of a bubble level in its composition increases the functionality of this type of tool.
What is needed to prepare the mixture
When describing the tools for performing plastering work, do not forget about the means for preparing the mixture. If the solution is prepared from a dry mixture, you can get by with a minimum of tools.
For mixing and mixing, a construction mixer and an attachment designed for mixing solutions are used. Small volumes of plaster dough can be mixed in a bucket with a spatula. Well, if the volumes of plaster are large, use a mortar mixer. For mixing the old fashioned way, take a shovel and a trough.
In the case of preparing the composition yourself, the components, for example, sand or lime paste, must be sifted or passed through a sieve so that lumps and large particles do not get into the solution. The mesh size of the sieve plays an important role when the granulometric composition of the filler is important for the plaster mortar. For example, for covering you need sand with grains no larger than 1.5 mm.
Auxiliary equipment requires measuring containers, as well as containers for the finished solution (plastic buckets or troughs).
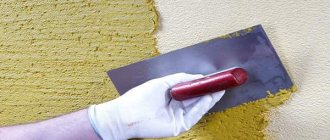
Three hard
Different types of plaster coating require the use of specific plastering tools. Thus, bark beetle plaster cannot be made without a special grater. It is this very device with the help of which a special pattern characteristic of this type of coating is created on the surface of the solution.
The grater prepares the plastered surface for the final finishing – painting or wallpapering. With its help, you can eliminate defects and make the wall or ceiling as smooth as possible. To achieve the best effect, the top layer of plaster is slightly moistened with water. It is possible to lubricate it a little with a liquid plaster solution. The working part of the grater can be made of different types of materials. Polyurethane graters are especially common. There are plastic, metal and rubber options.
A type of grater - a trowel tool used for grinding plaster has a handle and a wooden blade. The most comfortable graters are made from coniferous wood. They are used for preliminary leveling of the plaster layer.
Drying plastered surfaces
Natural drying gives the best effect. This is especially important in the first three days after plastering is completed. Accelerating the process leads to uneven drying of the layers - the top layer dries out, but the bottom is still wet. This leads to cracks in the plaster.
The process of accelerating drying can begin on day 4-5. To do this, use additional heating of the room and provide ventilation. They increase the temperature inside the rooms by installing a heat gun and heating devices.
External plastered surfaces require special attention. They are affected by precipitation, solar heating and wind. To protect against these factors, a protective film is used to cover the facades with it.
Accessories
Plastering and finishing work can be carried out manually and using construction equipment. In addition, if a thick layer of plaster mixture is to be applied, beacons must be placed and a mesh laid to improve the adhesion of the solution to the base. In their work, craftsmen additionally use the following tools and devices for plastering work:
- Plaster corners - metal products are used to form external corners.
- Construction mesh - mounted between the beacons, when a thick layer of the mixture is applied to an uneven surface.
- Painting mesh - the material is laid on areas of the wall with shallow cracks when applying a thin layer of plaster.
- Mixer - manually preparing a solution from cement, sand, water is long and tedious; the mixer attachment is inserted into a drill and the mixture is quickly prepared.
- Plastering machine is a mechanical device for automatically stirring the solution and applying it to the walls.
When performing decorative plaster, a Venetian trowel is used - a special spatula with teeth, veins, and stripes. With their help, unique patterns and visual effects are created on the surface of the walls.
If the prepared surface is to be painted after the applied layer has dried, it is necessary to use a painting and plastering tool for finishing. Brushes, rollers, and brooms are used to apply paint; on large areas, spray guns are used to quickly spray the paint composition.
Plastering tools are needed in the work of every craftsman when leveling the surfaces of walls and ceilings. When choosing products, you need to pay attention to the quality of the working surface, handles, the absence of nicks and chips, and the strength of the connection.
Review of tools for decorative finishing (2 videos)
What you will need for work (25 photos)
Stage two: wall repair
After removing the plaster or finishing coating of the walls, they undergo a thorough inspection. They may have chips, cracks, damage to masonry joints, etc. All defects must be eliminated.
The repair of reinforced concrete wall panels is completely similar to the repair of concrete floors, which is discussed in detail in the work “Preparation of the base for a floor screed”, in the section “Priming of concrete”.
In brickwork, loose bricks must be removed and the cement mortar must be beaten off from the sides and top. Then lay the brick again on a cement-sand mixture or polyurethane foam. Expand small cracks (the operation is carried out to penetrate the mortar inside the crack), reinforce large ones with self-tapping screws, and then treat them with “cement laitance” (it must be prepared from 1 part cement to 1 part water; instead of milk, you can use commercial deep penetration primers).
During priming, the edges of the crack are secured, preventing their further destruction, and adhesion with the repair mortar is ensured. After the primer has dried, the cracks are sealed with a repair solution. Chips and unevenness are repaired in the same way - first they are treated with “cement laitance”, then they are sealed with mortar. You can make the repair solution yourself or buy a ready-made mixture.
For reference: using a commercial primer for priming cracks is much more expensive than laitance, but the result is the same.
Problems in masonry mortar are solved by deepening the seam by 2.0-2.5 cm, followed by priming and sealing with a mortar of cement and sand. The cement mixture can be replaced with a very effective polymer-based repair composition. But again it all comes down to the price of the material - cement-sand mortar is much cheaper.
Minor internal damage (non-through cracks) of aerated concrete is reinforced and sealed with gypsum-based putty (for example, Knauf HP Fin gypsum finishing mixture).
Choosing a pistol
A special gun is a great help when you need to plaster large areas. It is especially often used when finishing facades. The gun directs a strong stream of mixture onto the wall. This method of applying the solution is called spraying.
One of the fairly economical options is a cartouche pistol. This tool for applying decorative plaster significantly reduces the time of plastering work. If you calculate the time that will have to be spent per square meter of finishing with plaster, it turns out that purchasing a gun will be much more profitable.
Structurally, this is a semi-automatic device. It is attached to the container in which the plaster solution is located.
The mixture is then supplied to the sprayer using a compressor. You can choose the amount of pressure - more or less. The operating mode of the pistol varies in this way. The container has to be periodically filled with the solution again - this takes time. You can optimize the process if you use a plastering station. It provides separate functions for mixing the solution and supplying it to the sprayer.
A fairly large container is used for the mixture, which allows you to work longer without being distracted by preparing the solution.
The solution supply pressure is selected individually in each specific case. Do not make it too low: the mixture will fly to the sides and leak. Too high pressure is also unfavorable: the hose can be torn out of the device. Experts recommend choosing the distance at which it is better to position the gun in relation to the surface being treated, about forty centimeters.
Important! Experts advise keeping the gun constantly at the same distance from the wall while applying the mixture to the selected area. This will ensure an even layer. Finding the optimal distance is not difficult: you need to see at what pressure and at what distance the mixture lies smoothly and does not leak.
For guns, gypsum-based plaster mixtures are usually used. They dry quickly. Special solutions designed for such devices are commercially available, although they are more expensive.
The topic of the lesson is “Preparation of wooden surfaces for plastering.”
Lesson topic : “ Preparation of wooden surfaces for plastering .”
Characteristics of the topic.
Wooden surfaces. When preparing surfaces, boards more than 10 cm wide are split and wedges are driven into the splits to create cracks 5-12 mm wide. Wider boards cannot be used, as they warp. To obtain rough surfaces, shingles are stuffed onto the boards. To reduce the thermal conductivity and sound conductivity of wooden partitions, walls and ceilings, matting, burlap, and felt are stretched over them before filling the shingles. The mortar adheres well to these materials, and the boards get wet less and do not warp, which largely prevents the plaster from cracking. The felt is pre-antiseptic with a 3% sodium fluoride solution and then dried. The prepared material is applied to the wall so that one end touches the floor, and nailed at the bottom, then straightened and stretched at the top so that there are no folds, and also nailed along the edge. Panels of thin materials (matting, burlap) are overlapped, thick ones end to end and nailed. The nails are driven only half their length, and the remaining half is bent.
Lightly felted felt, which is easily torn, is first rolled onto a round wooden rod or metal pipe. As it is nailed, the roll of felt is rolled out from the bottom up, pressing it to the surface. It’s more convenient to work together: one worker rolls out and stretches the material, the other nails it.
Soft felt is covered with glassine. Glassine is a soft rolled roofing material obtained by impregnating roofing cardboard with bitumen. If this is not done, the gaps between the surface and the exit shingle will be filled with felt, which will worsen the adhesion to the shingle. In addition, the felt, pressed with shingles, is squeezed out of the cells in the form of pads, over which the plaster is easily pressed. The rubbish can be piece or panel. Piece shingles are used for small amounts of work.
Depending on the manufacturing method, shingles can be plucked or sawn. Plucked shingles can be ordinary, selected and veneered. The width of ordinary shingles is 12–30, thickness 2–5 mm; the width of selected shingles is 15–25, thickness 3–4 mm; The width of the veneer chips is 14–30, the thickness is 2–5 mm. Sawn shingles are made from waste wood. Such shingles are worse than plucked ones, because their annual layers have been sawn through. The width of the shingle is 25–40, thickness 5–7 mm. The length of all types of shingles is 1000-2500 mm. The rubbish must be multi-layered. There should be no rot, mold, or short shingles in the shingles. It is packaged in bundles of 50-100 pieces.
Before stuffing or weaving of panels begins, the shingles are sorted into prostyle (for stuffing the lower, prostyle rows) and output (for stuffing the upper, output rows). For the lower tile rows, curved and narrow shingles with a thickness of at least 3 mm are used. Between the output shingles and the surface, voids are created, under which the applied solution falls and firmly adheres to the packed output shingles. With thinner shingles, the adhesion of the solution to the surface is insufficient. For the output row, straight, even, thick (no more than 5 mm) shingles with a width of 15-20 mm are selected, since shingles narrower than 10 mm prick when nails are driven into it, and wider than 20 mm warps. If all the walls, partitions and ceilings are wooden, then the filling of shingles begins from the bottom of the walls. Having reached the top, they move on to stuffing shingles on the ceiling. The rows of front and exit shingles are placed at an angle of 90° to one another, and in relation to the floor - at an angle of 45°. The location of the shingles at an angle of 45° relative to the boards additionally holds them together and gives them rigidity. According to SNiP, a distance of 45 mm must be maintained between the shingles of the profiling and exit rows in order to form cells in the clear 45×45 mm. When filling a sheet of shingles, it is only attached in the middle with one mounting nail or along the edges with two nails. They hammer them lightly so that they can just hold the shit. Having filled one or two rows of exit shingles in height on the walls and completely on the ceilings, they begin to stuff the output shingles. First, each exit shingle is completely nailed with two nails only at the ends. One of the nails is driven straight, and the second with tension at an angle of 45°, while pointing the tip of the nail towards the end of the shingle. This nail pulls the shingles tightly. Then intermediate nails are driven in: on the walls through two shingles into the third, and on the ceilings through one. The ends of the built-up shingles are not connected end-to-end, but with a gap of 2-3 mm. An end-to-end connection without a gap when wet leads to warping of the ends of the shingles and swelling, which causes rupture of the plaster. The shingles are stuffed on the ceiling in the same way as on the walls. First, the entire ceiling is stuffed with final shingles, and then with exit shingles. The exit shingle is also positioned at an angle of 90° to the outer shingle. When stuffing shingles at the bottom of the wall, supplies are placed on the floor or placed against the wall. When the shingles are nailed at chest level, a bundle of shingles is placed in a stand, which is also recommended for use when nailing shingles onto ceilings. Dranitsa are pressed to the surface with the left hand, in the fingers of which nails are clamped. When placing a nail on the shingle, give it a light blow with a hammer so that the nail holds. Then the hand is removed and a stronger blow is applied to the nail and it is completely driven in. Stuffing the output shit; sequentially remove the mounting nails from the sheet metal and use them again. The ends of the exit shingles must be nailed down, since, when moistened, they will warp and tear the plaster. During work, plaster nails are poured into the left pocket of the overalls and several pieces are taken from it at once, pinching them with three fingers. The nails should be driven in quickly, with two blows, inserting them only in the center of the shingles. Shagged boards are made on a template workbench. The workbench template is a table 0.7 m wide and 3.2 m long. Square bosses are nailed along the edges of the workbench, between which the ends of the shingles are placed, laid at an angle of 90°. There are holes with a diameter of 30 mm on the edge of the workbench at the intersection of the shingles. Shields 3 are made from ordinary shingles, sorted into outer and outer ones. Some of the shingles are cut into pieces, which are placed on the corners of the boards. On the workbench, first the profiling row is placed, then the output row. The shingles are lightly knocked down with plaster nails so that their ends extend outward by 4-5 mm. The nails are driven in with a hammer designed by P. A. Velichko. The hammer's hammer can be adjusted to drive nails to the required depth. Nails are driven in through one or two intersections of the shingles. The shields are prepared by two workers who are located on both sides of the workbench. The manufactured shield is removed, compressed to 1-1.2 m and placed in stacks. The boards are nailed to the vertical surface so that the shingles are directed at an angle of 45° to the floor. If the partition boards are installed at an angle, then the boards are placed straight, i.e. the shingles should be directed vertically. The shields are nailed in this order. The pre-stretched shield is placed against the surface and nailed with the nails that were driven into it during assembly. Piece shingles or panels are secured with plaster nails 25, 30 or 40 mm long. Sewn to vertical surfaces, they are attached through two intersections of the shingles, to horizontal surfaces - through one intersection. The unreinforced ends of the shingles are nailed additionally. Fiberboard, reed and straw surfaces. Fiberboard, reed and straw slabs have a rough surface that firmly adheres to the plaster layer. The frame located between the slabs (pillars, racks, purlins) is prepared for plastering: shingles are stuffed onto it or nails are driven in and braided with wire or covered with mesh. The wire and mesh should cover the seam between the posts and slabs by 40-50 mm. To avoid warping and bulging, the ends of the stuffed shingles should extend no more than 10-20 mm onto the slabs. To braid with wire, nails 75–80 mm long are driven into the posts at intervals of 40–70 mm. They put shingles or willow twigs under the mesh and fasten it with nails so that the mesh does not lie close to the tree. In places where there will be a thick mark of plaster (over 25 mm), rods and cornices drive in nails and braid them with wire or reinforce a metal mesh. The nails are driven into the surface so that their heads are recessed into the plaster to a depth of 15-20 mm. This protects the plaster from rust. The nails are driven in, placing them in a square or checkerboard pattern at a distance of 100 mm from one another; they should be twice as long as the thickness of the plaster marking. In partitions made of planks, nails should not go through. The nails are braided with soft wire 1.5-2 mm thick. For ease of use, the wire is pre-wound into a ball. While working, hold the ball with your left hand, and with your right hand, pull the wire tightly and wrap it 1-2 times around the nails at the very head.
I affirm:
Head master
_________________ Ibragimova I.V.
Lesson Plan
- Address category
Name of profession:
1401000 -Construction and operation of buildings and structures
Name of qualification:
140104 – plasterer
Well:
1 course
Group No: 15
Program topic:
Lesson topic: “ Preparation of wooden surfaces for plastering ”
Lesson type:
lesson in applying and improving knowledge
Lesson type:
combined
Teaching method:
- Verbal – story, conversation;
- Visual – slide show, display of tools;
- Test method ZUN-oral
1.2 Objectives of the special technology lesson:
Educational:
- familiarize students with methods of preparing wooden surfaces for plastering and tools;
- mastering the technology of preparing wooden surfaces for plastering;
- Consolidate knowledge about tools and devices;
- teach techniques for applying decorative plaster;
- deepen knowledge about preparing surfaces for plastering;
Educational
:
- involve students in active activities;
- contribute to the education of environmental consciousness;
- create an objective basis for nurturing love for the chosen profession;
- improve communication skills.
Developmental
:
- teach how to work with additional literature and other sources of information;
- develop cognitive activity and independence;
- develop relationships and mutual assistance in the team;
- develop creativity and self-confidence;
- develop professional skills.
- Development of logical thinking, memory, attention, creative imagination, ability to analyze a work of art, develop speech.
- Development of cognitive and interest.
1.3 Material and technical equipment of the lesson:
- Technical training aids:
computer, projector, screen.
- Didactic material:
perspective thematic plan, lesson plan, dictionary of professional terms, clusters, slides;
- tools:
trowel, trowel, cutter, grater, chisel, ladle.
1.4 Interdisciplinary connections:
When studying this topic, students reveal their knowledge of the subjects.
Special technology: "
Parts of buildings
",
"Tools, fixtures, plasterer's equipment".
Materials Science: "
Solutions for decorative plasters
."
Mathematics: "
Surface area of a rectangle
."
Russian language:
"Study of professional terminology and spelling."
Professional ethics:
“Formation of professionalism and highly qualified attitude to work.”
Occupational Safety and Health
: “The concept of industrial injuries and occupational diseases”, “Safety requirements for plastering work”.
Kazakh language:
“Study of professional terminology in the state language.”
1.5. Description of the expected result on the topic: “ Preparation of wooden surfaces for plastering ”
Students should know and be able to:
- surface preparation sequence;
- requirements for work performance;
- tools for preparing wooden surfaces for plastering ;
Subject Literature
.:
- A.M. Shepelev "Plastering works",
- Construction forms,
- https://www.akirarus.ru/ Akira Krovlya,
- https://www.buildinn.ru/index.php/ochtukaturivanie.html?start=5 Plastering surfaces - Accessories
- https://www.bibliotekar.ru/spravochnik-128-stroitelnye-raboty/263.htm Builder's Handbook
- https://www.baurum.ru/_library/?cat=plaster_works_general&id=909 Builder's Handbook | Plastering works
- Organization and course of the lesson.
The lesson is held in the finishing workshop.
Method of conducting the lesson: explanatory-illustrative, game.
During the classes
- Organizational part (3-5 min.)
— checking student attendance.
2. Checking homework
2.1 Target setting:
- lesson topic message: “ Preparing wooden surfaces for plastering .”
Lesson objectives:
- familiarize students with
the preparation of wooden surfaces for plastering - mastering the technology of preparing wooden surfaces for plastering;
- repeat the plasterer’s tools, fixtures, and equipment;
- deepen knowledge about preparing surfaces for plastering;
- consolidate the acquired knowledge to solve educational and production problems.
- A message about the form of the lesson.
Today we will check our homework in an unusual form in the form of the game “Clever and Clever.”
In any game there is a jury that records the correct answers, today …………… will help me. He will record the number of correct answers on the control card, and the final grades will be assigned based on this card. Please take a seat at the table. And a video engineer to work with video material.
1. Attention on the screen you see a magic square in which there are 3 sectors A, B, C. In sector A - questions are collected on the topic “Parts of buildings”, in sector B - questions are collected on the topic “Tools, devices, equipment”, in sector B - questions on the topic “Safety precautions when performing plastering work”. When choosing questions from sector B “Tools, devices, equipment,” you must go to the table and show this tool.
So please...
Questions on the topic
Sector A Parts of buildings
- Bottom of exterior wall?
(
BASE) - Design for communication between floors? (ladder)
- A building envelope that can withstand wind and snow loads? (roof)
- A structure dividing buildings into floors? (overlapping)
- A structure that transfers the load from a building to the ground? (foundation)
- Sections of the wall located between the openings? (piers)
Sector B “Tools, devices, equipment”
- A tool designed for dosing, mixing dry mixtures and solutions, pouring, spreading a solution, cleaning tools, equipment? (trowel)
- A small spatula designed for cleaning tools, cutting cracks, cutting architectural elements, ironing? (segment)
- A tool for leveling or spreading mortar onto a surface, rubbing architectural elements? (politer)
- Tool used for grouting? (grater)
- A tool used for cutting out joints in masonry, notching and decorative plaster? (chisel)
- A tool used to apply solution to hard-to-reach places? (bucket)
Sector B “Safety precautions when performing plastering work”
- Should all scaffolding and scaffolding decks have guards if they are located above ground level? (1.1 m)
- Those working on cradles are required to be secured to strong building structures or a safety rope? (safety belt)
- The act of acceptance of scaffolding over 4 meters in height is approved? (chief engineer of the organization)
- Are workers allowed to install and dismantle scaffolding and scaffolding? (who have undergone special training)
- According to safety regulations, builders can start work only with……..? (special clothing)
- Requirements for tools?
(
It is necessary to work only with a working tool. The handles of hand tools must be firmly seated and have a smooth surface without cracks or burrs).
(Well done, you know the material you studied)
- The second part of our competitive repetition Game "Anagrams".
Pay attention to the screen, the names of the instruments are encrypted here; by rearranging the syllables, you will understand what kind of instruments they are. My assistant will give you pieces of paper on which you must write the correct answers. Time to complete the task is 5 minutes.
Here we will review the Russian language, Kazakh and their spelling
- Casovotre - cut-off
- Mendafun - foundation
- Ring - base
- Venuro - level
- Lokmeoka - stone
- Kolso - falcon
- Weight - plumb line
3.
stage of our work is checking homework. You should have prepared clusters on the topic “Preparation of stone-like surfaces for plastering”
If you want to comment on your homework, please come to the board. (Rubble stone walls, brick walls, slag concrete surfaces)
(Well done, you completed your homework)
" I suggest you make a table of attention on the screen. Write what you know about preparing a wooden surface for plastering within 5 minutes.
Now let’s move on to explaining the new material, as you remember today the topic of our lesson is “ Preparing wooden surfaces for plastering.”
Help me explain the topic of the lesson………………………………………………………………
And so I ask the board……………………………………I will explain to you the sequence in which wooden surfaces are prepared for plastering
- To reduce the thermal conductivity and sound conductivity of wooden surfaces, matting, burlap or felt, and glass wool (fiberglass) are stuffed. The mortar adheres well to these materials, and the boards get wet less and do not warp, which largely prevents the plaster from cracking. These materials are impregnated with an antiseptic 3% sodium fluoride solution and then dried.
- Soft felt is covered with glassine. If this is not done, the gaps between the surface and the exit shingle will be filled with felt, which will worsen the adhesion to the shingle. In addition, the felt, pressed with shingles, is squeezed out of the cells in the form of pads, over which the plaster is easily pressed.
- To obtain rough surfaces, shingles are stuffed onto the boards
What is shit and its varieties will tell us………………………
- Depending on the manufacturing method, shingles can be plucked or sawn.
Plucked shingles can be ordinary, selected and veneered. - The width of ordinary shingles
is 12–30, thickness 2–5 mm; the width of selected shingles is 15–25, thickness 3–4 mm; The width of the veneer chips is 14–30, the thickness is 2–5 mm. Sawn shingles are made from waste wood. Such shingles are worse than plucked ones, because their annual layers have been sawn through. The width of the shingle is 25–40, thickness 5–7 mm. The length of all types of shingles is 1000-2500 mm . The rubbish must be multi-layered. There should be no rot, mold, or short shingles in the shingles. - Before stuffing or weaving of panels begins, the shingles are sorted into prostyle (for stuffing the lower, prostyle rows) and output (for stuffing the upper, output rows). For the lower tile rows, curved and narrow shingles with a thickness of at least 3 mm are used.
- For the output row, straight, even, thick (no more than 5 mm) shingles with a width of 15-20 mm are selected, since shingles narrower than 10 mm prick when nails are driven into it, and wider than 20 mm warps.
- The rows of front and exit shingles are placed at an angle of 90° to one another, and in relation to the floor - at an angle of 45°. The location of the shingles at an angle of 45° relative to the boards additionally holds them together and gives them rigidity. According to SNiP, a distance of 45 mm must be maintained between the shingles of the profiling and exit rows in order to form cells in the clear 45×45 mm.
- When filling a sheet of shingles, it is only attached in the middle with one mounting nail or along the edges with two nails. They hammer them lightly so that they can just hold the shit. Piece shingles or panels are secured with plaster nails 25, 30 or 40 mm long.
We will consolidate the material covered using graphic dictation. My assistant will hand out the pieces of paper to you. Using symbols you must answer whether my statements are correct or incorrect. Right wrong -
- For better adhesion to the wooden surface, holes are drilled into it in a checkerboard pattern. (-)
- Depending on the manufacturing method, shingles can be plucked or sawn.( ).
- Sawn shingles are worse than plucked shingles, because their annual layers have been sawn through.( )
- The length of all types of shingles is 2000-2500 mm (-).
- To reduce the thermal conductivity and sound conductivity of wooden surfaces, matting, burlap or felt, and glass wool (fiberglass) are stuffed. ( )
- The rows of front and exit shingles are positioned at an angle of 70°( - ).
Attention to the screen, and now the correct answer
Summing up the lesson.
- Questions for students:
Was the goal of the lesson achieved today?
- Listen to the foremen's analysis of the work of the team:
What difficulties did you encounter while doing the work?
Did the team get the job done?
- Analysis of the work of foremen:
Did the group cope with the task as a whole?
Explain typical errors.
- Brief analysis of the group’s work by the industrial training master:
General characteristics of students' work.
- Analysis of labor discipline.
- Recommendations from the industrial training master.
- Show and analyze the work, analyze typical mistakes made during work.
- Report the grade for the lesson to each student.
- Note which student achieved excellent quality of work.
- A message about achieving the lesson goal.
- Analyze compliance with safety regulations and compliance with rules.
Generalization of assessments on the self-control card.
- Homework assignment.
- Fill out on-the-job training diaries.
- Cleaning workplaces.
- Analysis and evaluation of results.
Summing up the lesson, grading. Homework to make a cluster on the topic : “ Preparation of wooden surfaces for plastering ”
Subject Literature
.:
- A.M. Shepelev "Plastering works",
- Construction forms,
- https://www.akirarus.ru/ Akira Krovlya,
- https://www.buildinn.ru/index.php/ochtukaturivanie.html?start=5 Plastering surfaces - Accessories
- https://www.bibliotekar.ru/spravochnik-128-stroitelnye-raboty/263.htm Builder's Handbook
- https://www.baurum.ru/_library/?cat=plaster_works_general&id=909 Builder's Handbook | Plastering works
Quality price
Tools for finishing plaster of different brands, sizes and qualities vary in price. For example, the cost of a spatula varies from fifty to five hundred rubles. The price of a trowel is from one hundred thirty to one thousand rubles. The rule will cost from four hundred to two thousand rubles. A grater costs from one hundred to four hundred rubles. You can buy a tool for applying plaster at a finishing materials store or order it online. The costs for it are included in the costs that will have to be incurred for performing plastering work per square meter. However, according to professionals, it’s worth the investment. A good and correctly selected tool will allow you to do the job at the highest level.
data-matched-content-ui-type=”image_stacked” data-matched-content-rows-num=”2″ data-matched-content-columns-num=”3″ data-ad-format=”autorelaxed”>
Source
Stages of preparatory work
Preparing walls for plastering consists of several stages, including a set of sequential works.
1. Pre-preparatory stage: at this stage all construction and installation work directly or indirectly related to the walls must be completed (in accordance with SNiP and GOST regulating plastering work in a new building, the priority implementation of this type of work is mandatory):
- the floor covering has been laid, or in extreme cases, the floor screed has been poured;
- work on laying hidden wiring was completed (grooves were punched and sealed);
- door and window frames installed;
- Built-in furniture has been installed.
Before starting the main work, the floor and ceiling at the junction with the wall are sealed with masking tape, the floor covering is covered with plastic film.
- First stage: the walls are cleaned of old plaster, paint, wallpaper, putty and various fasteners: nails and screws.
- Second stage: repairs and strengthening of walls are carried out. Chips and peeling are removed, cracks are sealed.
- Third stage: the walls are cleaned of oil stains, soot and other contaminants.
- Stage four: work is being carried out to ensure adhesion between the wall and the plaster.
- Fifth stage: beacons are installed.