If during renovation it becomes necessary to remove decorative plaster from the walls, then this can become a real problem for an unprofessional craftsman. After all, it cannot be removed as easily as wallpaper.
To remove the coating, preparatory work is required, as well as the availability of special tools.
Read the article about how to remove decorative plaster from walls.
What tools will you need?
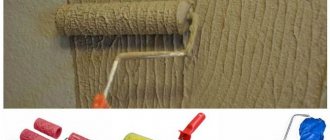
Before removing decorative plaster from the walls, you need to stock up on tools. You can get the job done as quickly as possible using a sanding machine . Thanks to the rotating serrated rollers, which are located on its “sole,” you can quickly remove even thin layers of finishing materials.
In the absence of specialized power tools, you can use a spatula/scraper , vibrating and grinding machine . If the processing surface is large and you don’t have any electrical equipment in your home arsenal, rent it for the required period.
Preparatory work
Before removing decorative plaster from the walls, you need to do a little preparation. It consists of generously wetting the surfaces with hot water. The hot liquid will perfectly soften the material and reduce the amount of dust in the future. During the entire process of stripping walls, we recommend that you regularly use heated water.
After moistening, tap the walls with a hammer. Loosely attached materials will fall off on their own. You will have to “fight” others in the following ways.
Algorithm for eliminating old mixture
Removing plaster from walls begins with wetting the surface with hot water. This action will help you understand how to clean the surface, significantly reducing the layer of dust and softening the old coating. In the future, this procedure with the wall can be repeated throughout the entire work process, because with its help we remove excess accumulated dirt.
Initially, the plaster is beaten off with a hammer, and remove the old layer that is not removed immediately by prying it off with a pick. When considering options for how to remove old plaster from walls, you can resort to using a scraper.
However, when working on a wall, a spatula tends to become dull rather quickly, so when removing it in this way, time is required for regular sharpening.
Clean particularly problematic areas of old walls with a hammer drill. It is used in a situation where removal through the use of other percussion instruments does not bring the desired results.
Plaster can also be cleaned by dividing it into small sectors. This procedure is carried out using a grinding machine for removal.
The final stage is to widen the seams of the brick base. After this, the brick wall is cleaned with a drill or a metal brush.
Methods for removing decorative plaster
The removal method depends on the tool used:
- Roughing spatula (unlike the traditional “competitor”, it has a thicker blade). Apply its blade to Venetian or any other decorative plaster, holding it at an acute angle and using a scraping motion to remove the finish. Move the blades from one area to another. The option does not require a lot of money and does not create clouds of dust. But if the processing area is large, it will not be suitable. Since the speed of work is minimal. Another important point: using a spatula and a scraper can only deal with loose coatings;
- Roughing and grinding machine . For very thin and strong plasters, you should stock up on the specified tool. Choose a medium speed setting and, applying force to the machine, press it against the wall and move it slowly and slowly. Important! When using a power tool, a lot of dust will be generated. You cannot do without a respirator that protects your respiratory tract.
- Chisel and hammer drill . Select medium speed and hold the tool at an 80 degree angle. Proceed in the same way as above. But keep in mind that a hammer drill can cause damage to the base. So take your time and work slowly. In general, the use of a hammer drill is recommended for removing ordinary plaster materials, rather than decorative materials;
- Vibrating machine (also for decorative coatings from 3 mm thick). It is distinguished from a roughing and grinding tool by its operating principle: the vibrating working element quickly moves in one plane from side to side. Lean the device against the wall at a minimum angle, and move slowly in a certain direction.
As a rule, silicate plasters are easier to deal with than decorative gypsum compounds. Venetian and textured finishes are easier to remove.
Tips and tricks
Having familiarized yourself with the stages of removing plaster, you can understand how important, but at the same time unpleasant, this process is.
Builders who deal with such situations every day offer some useful advice to beginners:
- When starting work, you should first determine the location of the wiring and, if necessary, turn off the power supply. Prepare in advance all the tools and materials, as well as the means necessary for personal safety.
- The hammer drill should be used carefully so as not to damage the base of the wall. It is better to remove the plaster layer a little longer than to repair the damaged base again.
- A sanding machine is used on a small layer of coating. If the layer exceeds 3 mm, a vibration grinder is used. Its distinctive feature is a different principle of movement of the working element.
- If the old layer of finishing partially remains on the surface, then the next layer must be a little weaker. For example, any composition can be applied to a cement-sand or polymer coating. A gypsum or clay mortar will fit well on the lime layer. Gypsum is not able to withstand the cement layer, since it is heavier. And nothing at all should be applied on top of clay plaster; this composition can only withstand its own kind. But the clay-sand mortar will stick to any surface.
- If the layer of plaster is on drywall or on top of shingles, then dismantling should be done carefully, avoiding strong impacts. It is better to remove the coating manually with a spatula or scraper.
- When applying a new layer of coating, experts advise using a more expensive composition. The main thickness of the previous layer can be “added” with the same composition, and applied on top with a more expensive thin layer.
- During the dismantling process, the problem of disposing of the removed plaster becomes acute. In multi-storey buildings, it is necessary to immediately organize the process of removing construction waste, since there is usually nowhere to store it. In private buildings, construction waste must be placed under a canopy (hidden from precipitation) before it can be removed, because during rain the waste may increase in weight, which will complicate loading of waste.
It is worth understanding that the weight of plaster in one square meter. meter with a coating thickness of about 2 cm is about 20-30 kg, depending on the composition of the finish.
- During the dismantling process, do not forget about moistening the surface being treated. These manipulations will not only help loosen the old layer, but will allow you to work in the cleanest possible conditions, without the formation of dust.
- It is better to scrape off plaster from the ceiling with a scraper or a long-handled spatula. Using such devices, you can remove the coating with both hands.
See below for possible mistakes when dismantling plaster.
Basic methods for removing decorative plaster
When deciding how to remove decorative plaster quickly and efficiently, it is worth considering that there are several methods of dismantling:
- Force method. To implement this method, you will need the simplest set of tools: an old axe, a hammer, a chisel. This option is considered the fastest in terms of execution. But if you apply a little more force in the wrong place, it is easy to significantly damage the wall surface.
- Sedimentary method. In this situation, you will have to be patient, since the plaster will be removed layer by layer. To complete the work, you will need a grinder or grinder with an abrasive disc.
- Technical method. To remove strong compounds from a solid wall, you should choose a hammer drill with a special attachment.
It is sometimes difficult to remove old plaster, so it is worth using a combined method in certain areas.
Getting rid of decorative coating
Often homeowners engaged in renovation work think about how to remove decorative plaster from the walls, because unlike ordinary mortar, the Venetian mixture is quite thin, so it will not yield to a hammer drill.
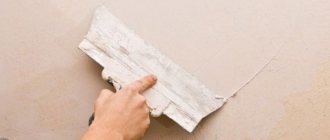
Decorative plaster is most often removed using a spatula. It is leaned against the old wall with its sharp side, and then they are engaged in removing unnecessary elements of the mortar, gradually moving the tool along the entire perimeter of the decorative coating.
The advantage of this technology is that it does not require large material costs and is produced with the formation of a minimum amount of dust. However, the scraper can only cope with Venetian decorative plaster, since it has a loose structure. It is almost impossible to remove the silk mixture in this way. In addition, it is unknown how quickly the finish will come, because this is a rather long and labor-intensive process.
Silk plaster is the most difficult to destroy because it has high adhesion to walls. Silk decorative solutions are removed by using sandpaper with a high coefficient of moisture resistance. To do this, put the material on a coarse grater and grind it on a wall covered with a silk mixture, removing the decorative base layer by layer.
Venetian and silk plaster can be removed faster. This is done using a grinding machine. This removal of decorative layers of mortar is designed to ensure a tight fit of the tool to the surface and its further smooth movement along the brick walls.
Preliminary preparation of plastered walls
Sometimes it is difficult to imagine how to remove decorative plaster from walls quickly and efficiently. In fact, the progress of the work is influenced by the preliminary preparation that is carried out at the initial stages.
Related article: How to sand walls after puttying without dust
How to remove plaster from a wall?
- You should first remove the surface finish. This could be wallpaper, wood, plastic, paint.
- Depending on what material is under the plaster, wet the surface.
- Tap the surface to identify areas where the plaster is loose or blistered. Identify them as priority options for dismantling.
- Prepare the necessary tools that will correspond to the type of wall and method of work.
Next, the plaster is mechanically dismantled, which requires certain tools.
Features of dismantling plaster from drywall
Drywall is a very fragile building material that can be easily damaged when the plaster is removed. It is worth taking this nuance into account when choosing a dismantling method and selecting tools.
To remove decorative plaster from drywall without damaging the base, you must proceed as follows:
- To simplify the process of removing plaster, it is worth slightly moistening the surface. The degree of water treatment depends on what type of drywall is under the plaster. If too much moisture is applied to the decorative layer, this can lead to deterioration of the drywall itself.
- Next, it’s worth identifying the weak points of the plaster by palpation. Use your fingers or palm to press onto the wetted surface. In weaker areas, the applied layer may lag. A characteristic of weakness is the sinking of the palm, reverse deformation.
- Using a metal spatula or scraper, begin removing the plaster from the weak spots. Then move on to more difficult areas.
- If the plaster is firmly fixed, then you can beat it off using a small chisel and a hammer: drive the chisel under the base of the plaster and lightly tap it with a hammer.
This type of work must be carried out carefully so as not to damage the drywall.
How to remove textured or Venetian plaster?
- when the power tool is turned on, it is necessary to press the “sole” against the wall;
- press the tool with moderate force;
- move it from one side to the other;
- the required number of passes over one area is determined visually: (if the rough coating is exposed, move to another place and remove the coating from the next area).
Also, using a grinder and attachments, coarse sandpaper or a metal brush, you can sand and process a layer of decorative gypsum plaster. The working time is determined visually - grinding continues until the base material is exposed. Thanks to abrasive discs, which are designed to cut the appropriate material, the old coating is “cut” into pieces and then chipped off using a chisel and hammer.
It is very easy to remove the gypsum plaster coating. Such walls are quite loose and sensitive to high moisture. Before you start cleaning, wet the walls with water with the addition of acetic acid - this will speed up the process and make the plaster more pliable and soft. After 15 minutes you can begin removal.
Surface cleaning occurs very quickly and with minimal physical effort. You just need to change the attachments and monitor the work process.
How to remove decorative plaster yourself using a grinding machine
To find out the secret of how to remove decorative plaster from a wall with your own hands, you need to contact a specialist. An experienced builder will definitely recommend using a grinding machine in this situation.
The tool has many advantages compared to manual work:
- Does not require much physical effort.
- It will take less time.
- Can't damage the wall.
- Dismantling will be done carefully.
The principle of working with a grinding machine is quite simple. It is enough to purchase a disc with an abrasive coating and protective clothing. You should definitely buy safety glasses and a respirator.
It is worth pre-wetting the surface of the plaster to reduce the amount of dust during the process of removing layers of decorative coating. After sanding the walls, you need to re-clean the surface with a wire brush.
Tools needed to work with the solution intended to remove
Before removing old plaster from the walls, you need to acquire certain equipment that will significantly speed up this process:
- Brush made of metal.
- A chisel equipped with a long handle.
- Goggles that will protect your eyes from dust while cleaning the coating.
- A respirator that allows you to protect yourself from the penetration of mixture particles into the respiratory tract.
- Rubber or canvas gloves that will allow you to remove the solution without causing calluses.
- Sledgehammer.
- Scraper.
- A hammer drill with a jackhammer function.
The scraping method for removing decorative trim
Knowing how to remove decorative plaster from walls correctly, you can avoid many problems with further work. Experts recommend carrying out an initial sanding of the top surface of the plaster.
For the scraping process you need to choose the right tool. Cycles are used more often. It is advisable to choose a tool with a length of no more than 150 mm, so as not to damage the surface of the wall itself. It is necessary to install the scraper at the correct angle, then this operation will become easier for the worker and more effective for the coating.
A similar tool for scraping would be a metal spatula and a small hammer. First you need to soften the decorative coating with hot water. Wait a few minutes. Lightly tap the surface with a hammer. Weak areas of the plaster will fall off on their own, and the rest will have to be cleaned more painstakingly.
Drywall
Removing the old coating from drywall is not so easy, because this material is very fragile. If the integrity of the layer that covers the drywall is compromised, it will lose its protection. Therefore, power tools and even chisels and hammers cannot be used for dismantling. It will not be possible to diagnose walls by tapping.
In order not to damage the material, you need to take a knife or screwdriver and pick out a layer of plaster in one of the corners to the very base. Having exposed a small area, then do all the work of dismantling the cycles. To do this, carefully push the tool under the finish and pick out piece by piece.
Economical plaster removal
It is worth knowing a few secrets on how to remove decorative plaster from walls in order to save some money. There are only 2 secrets that will be useful during the dismantling process:
- It is necessary to remove only the plaster that does not adhere well: bubbles, the area around cracks.
- Treat the bottom layer with a cheap compound, and the top layer with a higher quality and more expensive one. This already applies to secondary finishing.
If you do the dismantling carefully, this will also save money on repairs, since the internal parts of the walls will not be damaged. Savings are possible during the work itself. To spend even less money on the process of removing decorative coating from walls, you need to use available tools.
When is it better to repair rather than remove?
Plaster does not always need to be completely removed. It can be left partially if some area needs repair or renovation, or there is a need to redo a poorly applied composition. This will save time on dismantling and money on finishing materials.
Sometimes partial removal is performed in areas where rust has appeared. Before starting work, the area must be delineated.
It is recommended to remove the coating completely, reaching the wall, cutting out rectangular sections in it. When partial dismantling is completed, the wall is leveled and decorated with new material.
Video and photo tips on how to remove decorative plaster from walls
Sometimes during the renovation process it is discovered that it is not possible to carry out a fine finishing on the old plaster. Well, or the new one is made very poorly and needs to be removed. In such cases, we are faced with the question “how to clean the walls from plaster?”
This article will help you understand how to remove coatings from surfaces. Here we will consider working with a spatula, a simple and roughing one, a hammer drill, as well as a grinding-grinding and grinding-vibrating machine.
How to determine that the plaster needs to be removed?
Before making such an important decision, you need to carefully examine all the walls and ceiling. This will help determine the extent of removal. Perhaps a partial cleanup can save the situation.
You can evaluate coverage in the following ways:
- The first gentle assessment is carried out with a spatula or you can take any scraper, for example, a trowel. If, after passing them over the surface, small areas slightly crumble, then complete removal of the plaster will not be necessary. It can be saved with putty;
- when, when removing old wallpaper, the plaster drags behind the canvas, falling off in large pieces, there is no point in restoring it. Even if some areas remain intact, they must be tapped with a trowel handle or a hammer. A dull sound will indicate those places where the surface layer does not have an adhesion to the wall and must be removed;
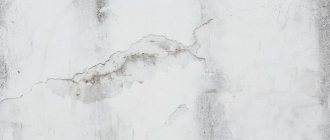
- There are situations when the old plaster is very durable, but a damp spot has appeared on its surface. Do not try to dry this place. The layer of this area will already be weakened and will fall off over time anyway. There is only one way out, the damp coating must be removed, plus 500 mm of dry area around it. The situation with a greasy stain is similar. The plaster must be cut down to the base of the wall;
- Durable plaster with cracks should not be removed. Minor repairs can be done here. It is enough to widen and deepen all the cracks until you get a V-shaped groove, moisten them and seal them with fresh mortar.
Repairing cracks in plaster
A correct assessment of the condition of the plaster will help to avoid unnecessary unforeseen work.
How to remove plaster from ceilings and walls
The choice of method for removing the coating depends on the quality of the latter: gypsum from a brick or concrete wall can be removed manually, but with cement, most likely, you will have to work with a power tool.
Related article: Watering tap in the wall of a building
How to remove old plaster from walls: gypsum and cement
The easiest way to knock down gypsum coatings. If they are small in thickness, you can get by with a scraping spatula. It differs from a simple one in that it has a thicker blade. You can remove the coating like this: lean the spatula at an angle of 90 degrees. to Wall; We begin to apply light blows with a hammer to the end of the handle; As the blade sinks into the finishing layer, we tilt the tool, gradually reducing the angle between it and the wall. At the same time, move the spatula to remove one and move on to the next section. In a similar way, you can remove old cement plaster that has lost its strength. We only replace the roughing spatula with a chisel.
How to remove the coating: using a scraping spatula
To the question “how to remove plaster from walls if it is made of cement, new and made with high quality?” There is only one answer: a hammer drill + a chisel attachment. We turn on the tool at medium speed, place it on the surface at 80 degrees; As the chisel deepens into the thickness of the finish, we reduce the angle of inclination of the hammer drill and bring it to approximately 30 degrees. We remove the coating in chiseling mode.
Please note: it is very easy to damage the base with a hammer drill. Therefore, you need to remove the plaster carefully, slowly. It’s better to go back and clean the surface again than to damage it and then have to repair it.
How to remove old plaster from walls: using a hammer drill
Removing decorative coatings
How to remove decorative plaster from the walls, since it is thin and cannot be used with a hammer drill? In this case, you can use a spatula/scraper, grinder and vibrating machine. With a spatula, everything is simple: we lean the blade against the surface of the Venetian or other mineral finish at an acute angle and remove the composition with scraping movements.
Move the tool to another location and repeat the removal. This method is the most budget-friendly and does not produce a large amount of dust. However, it is suitable for processing small areas, since due to the low speed it will not be possible to remove much in one working day. In addition, a trowel and scraper are only good for loose coatings that are easy to remove.
How to remove decorative plaster from walls and ceilings: you can use a regular spatula
Very thin but strong plasters can be removed with a sanding machine. Its working disk removes the decorative layer with serrated rollers located on its underside. The work is not difficult: with the machine turned on at medium speed, we press it firmly against the surface and move it slowly. We work in small sections, moving from one to another as we clean the surface. And don’t forget about personal protection - a lot of dust is generated during the process, so you need to protect yourself with a respirator.
How to remove old plaster from walls: video about the operation of a stripping and grinding machine.
Decorative plasters with a layer of 3 mm or more are easier to remove with a vibrating grinder. It differs from roughing and grinding in the principle of operation: in a vibration type, the working element quickly moves from side to side, in one plane. It is easy to work with: we lean the tool against the base at a slight angle and slowly move it in the desired direction. It is not difficult to remove gypsum compounds in this way, but you will have to tinker with silicate compounds.
Please note: removing plaster with these power tools is much easier than using a spatula or scraper. However, you will have to spend money on purchasing a car or worry about finding a place where you can rent it.
How to remove old plaster from walls: using an orbital sander
How to remove cement and gypsum plasters: process features
Sometimes cement-sand plaster is difficult to remove even with a powerful hammer drill. That is, it can be removed, but very slowly, with great physical effort. In such cases, the coating must be weakened by cutting into sectors. This is done using a grinder with a diamond blade. The size of the sectors can be arbitrary, but the smaller they are, the easier it is to remove them with a punch.
Please note: under the influence of acids, gypsum becomes friable. This property of the material can be used if you need to remove plaster based on it. Half an hour before starting work, you should thoroughly wet the coating with water acidified with vinegar. This will make it easier to remove the finish.
How to remove plaster from walls: cutting the coating into sectors
How to remove old coating
Before removing old plaster from the walls, you need to tap the surface with a hammer with a rubber head. If the old coating does not hold up well, the hammer sound will be dull. Such places must be marked with chalk. In the same way, areas of walls with moisture seeping through the layers of plaster are marked. Individual layers of the coating may fall off the wall along with the old wallpaper. It also needs to be completely removed. You do not need any special qualifications to remove old coating. The main thing is to follow safety measures so as not to injure yourself and others from flying fragments and dust. To do this, you must wear safety glasses, gloves and clothing. The respiratory organs are protected with a gauze bandage or a respirator. It is recommended to turn off the power supply.
The tool is selected depending on the thickness of the coating layer and its composition. The standard tool is:
- putty knife;
- hammer, ax or pick;
- metal brush;
- chisel;
- perforator and attachment for it;
- broom, dustpan;
- bin;
- bags for storing garbage.
It is good to have special tools for removing plaster. They can be an AGP, Flex, or a regular angle grinder. When working with hand tools, wet the wall surface thoroughly. It softens and there will be much less dust. First you need to remove the pieces that are not holding well. This is done using a spatula. Then the remaining parts of the coating are knocked down with a chisel and hammer. The collected material is put into bags and disposed of.
How to remove old plaster from plasterboard walls? This must be done with great care. The base of plasterboard boards can be damaged by strong blows of a hammer or ax. It's better to work in cycles. This is a tool that resembles a spatula, but with a sharpened edge. You need to remove the weakest areas first, then the main coating.
How to remove plaster from a wall mechanically? This is done after manually removing the weak spots of the coating. Use a hammer drill or grinder to remove durable plaster. When working with a hammer drill, you need a special attachment in the form of a chisel. The tool switches to the chiselling position. The disadvantages of such work include a fairly high noise level. The grinding machine is equipped with a disc coated with diamond chips. Typically, such discs are used when working with stone. The plaster coating is cut into squares, which are removed with hand tools or a hammer drill. When working with power tools, it is recommended to use a vacuum cleaner.
How to remove old decorative coating from walls - advice from professionals
Decorative coating is a material that is gaining popularity, which is quite simply applied to the surface, creating an interesting effect. But the time comes and you want to change the decorative finish to a new type of plaster, hang wallpaper or simply paint the walls. To do this, you need to remove the decorative coating. Smooth paint and silk-effect paint for walls under embossed plaster simply need to be cleaned with sandpaper, primed and can be repainted immediately.
Related article: Finishing plasterboard walls made of foam blocks - which building materials to choose
When you only need to change the color of previously applied textured plaster (Intonachino Minerale, Marmorino Classico, Marmo Antico, Canalgrande, Concrete Art, Rilievo), you can leave the texture and paint it with paint, for example, Armonia.
If the relief plaster is changed to smooth, the old coating is completely removed and here you cannot do without the recommendations of professionals.
How to remove decorative plaster from walls: brief instructions
To efficiently remove the old coating, you should follow some tips and instructions that will determine the progress of the work. First of all, you need to:
- stock up on personal protective equipment (respirator, gloves, goggles);
- cover the floor with plastic film to prevent dirt from spreading;
- clarify what type of plaster was used, the degree of its strength and the approximate thickness of the layer;
- choose convenient tools and tools;
- start with simple methods and move on to more complex ones, combining them if necessary;
- Sharpen your tools while working to get faster results.
Before you begin removing the decorative covering, be sure to remove all switches or sockets, as well as all lighting fixtures. If all the tools and materials are prepared, you can start working.
Necessary tool for removing plaster
The type and number of tools needed depends on how the old plaster is removed. Since decorative plasters are a very broad concept that contains materials of different thickness and structure, the difficulty of removing them will vary. To cover all possible options, we list the most popular devices. It can be:
- chisel, preferably with a long handle;
- hammer;
- spatula/scraper;
- scraper (a tool for removing old textured finishes and other paints and varnishes);
- metal brush;
- perforator;
- machine for removing plaster.
In addition, you will need plastic film, a bucket of water, a damp cloth, and a spray bottle, since during the entire process you will have to wet the walls with water, and at the end, wipe the walls from dust and remnants of decorative plaster.
Sanding decorative coatings and methods for doing it
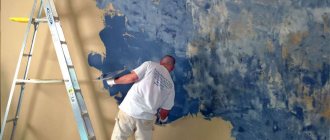
To effectively remove plaster, it is better to choose a scraper with a length of 130-150 mm. Pressing lightly, it is passed along the wall at the correct angle of application. Using light movements, cycle the finish, starting from a small part of the surface, moving to a large one. At the same time, wipe the wall with a cloth soaked in water. Instead of a scraper, you can use a hammer and spatula. Before starting work, the decorative finish is moistened with hot water to reduce dust and soften the putty. Next, they tap the wall with a hammer, so that poorly adhering parts of the plaster will fall off on their own. Other parts need “help”.
A grinding machine with abrasive discs is an effective method and solution to the problem of how to remove Venetian plaster from walls. For example, Gracelo di Calce, Stucco Veneziano, Marmorino Classico. This tool does not knock down, but rather erases the plaster. To completely remove it, you need to walk over the surface with a wire brush. It also helps remove sand-effect decorative wall paint well.
Other coating removal methods
When the coating to be removed is strongly strengthened on the surface, you can use a grinder with special attachments, which has greater power. This tool works faster than a sander. But here you should work carefully so as not to damage the wall. If a coating, including Venetian plaster, was applied to the paint, an industrial hair dryer, which softens the paint, will help remove it. Next, use a spatula to remove it and the coating.
Preparing the room for removing decorative plaster
When starting repair work, before dismantling the decorative plaster, we prepare a place for ourselves, freeing the room from cluttering things. Everything that remains indoors needs protection.
cover large furniture with protective film
Preparation measures:
- Since the removal of plaster is accompanied by a large amount of dust and debris generated, in the form of hard pieces of the removed coating falling from a height onto the floor, protection of the floor and remaining furniture is required. In some cases, the coating is wetted to facilitate dismantling. This causes muddy water to fall onto the floor. Therefore, we take out what we can take out, and protect the rest by covering it with film. Under the film on the floor, in order to protect the linoleum or wooden parquet from damage by the sharp edges of finishing fragments, we lay out softening rugs, corrugated cardboard or other unnecessary sheet materials.
- We seal the windows and door panels with film, protecting them from splashes, dust and flying small fragments. We cover the door panels with stretch film. We seal the trims with masking tape. By covering the window frames with film, we provide the possibility of opening the window for ventilation.
- We remove lamps, sockets and switches from the walls. Be sure to de-energize all electrical wiring. If the electrical wiring goes on top of the finish, then it is better to separate it from the walls and roll it into a ring so as not to damage it. If we do not remove the lamps, for example, a chandelier, then we wrap it with cloth and film.
- We lay fabric, old wallpaper or cardboard on the window sills. To prevent the protective coating from moving, we press it down at the edges with weighty objects.
- If there are other rooms adjacent to the room being repaired, we protect them from dust. To do this, cover the cracks under the door block with rugs.
- We think in advance about what to put the garbage in, as well as where to take it out. Since plastering materials are heavy, it is irrational to fill the bags completely. They are too heavy to lift. This means that you need to prepare quite a few bags. The amount of debris directly depends on the thickness of the coating and the size of the area that needs to be cleaned.
- Sometimes a paint coating or whitewash is applied over decorative plaster. They are removed before dismantling the plaster layers.
- Portable lamps are prepared for work in the dark.
Some features of removing textured paints and Venetian plasters
Textured surfaces are obtained not only using decorative plasters, but also using paints with special fillers (quartz sand, sawdust). Removing textured paint is quite difficult, since it has good adhesion to the surface. As with removing Venetian plaster, you can use a scraper rather than a wide spatula. You can also clean the surface to be removed with a regular metal brush or coarse sandpaper. In any case, it is necessary to use personal protective equipment for hands, eyes, and respiratory organs (protective uniform, respirators, goggles, etc.). Before starting work, you should consult with familiar specialists who can share their secrets. Also watch the training video.