How to easily and simply make smooth and right angles with plaster.
The curvature of corners and walls is typical for the premises of houses and apartments that were built back in Soviet times, but this fate did not spare new buildings either. Aligning the corners is a mandatory procedure, since otherwise the pattern on the wallpaper will inevitably be damaged, and for ceramic tiles you will need to use quite a lot of glue, and even then, a positive result will not be a 100% guarantee. Let's look at how to make a right angle when plastering walls.
How to level
There are two main compositions used for leveling - dry plaster or wet plaster.
Dry plaster is essentially drywall - perfectly flat sheets. They will help you level even the crooked walls yourself. They are placed on a frame, which helps hide unevenness with differences of at least 50 cm. Installation does not take too much time, but then careful puttying of the joints and additional leveling will be required. But doing this on drywall is much easier.
Wet plaster is the usual method. It usually leaves a lot of dirt behind, and physically doing the work is not easy. But the method is well suited when the elevation changes are not very strong. When leveling with a plaster mixture, it is possible to preserve the free area.
Plaster plane
Plaster planes resemble tools for processing aerated concrete blocks. The base of the instrument can be solid or in the form of a frame with crossbars.
Depending on the scope of use, they can be of 2 types:
- Planar devices are designed to remove unevenness on walls when using cement-sand compositions. They have frequently spaced blades that can move perpendicular and parallel to the axis of the plane;
- The products are designed for cutting corners and removing excess mortar from slopes.
Plaster plane
On the wall after plastering by an inexperienced craftsman, bumps and waves may be noticeable. These defects can be removed with a plaster plane, moving it along the surface to be treated and thus cutting off protruding areas on the plaster.
Aligning interior corners
Not everyone understands how to properly plaster the inside corners of walls. Taking into account the instructions, even a novice master can understand the work. The main thing is to do everything strictly step by step, extremely carefully. Plastering of internal corners is carried out in three ways - beacons, perforated profiles or serpyanka.
Rules
Before you start, you need to learn the rules on how to align corners. Knowledge will help you successfully implement your plans:
- Plaster is applied to brick, concrete, cement-sand, gypsum base. Without a special sheathing made of mounting mesh and slats, adhesion to wood is poor.
- The thickness of the mixture is no more than 5 cm, sometimes it can reach up to 7 cm.
- Mixing the solution is done strictly according to the manufacturer's instructions. It always states the ratio of dry powder to water. A lack of liquid will cause a lack of plasticity of the solution, making it difficult to interact with it, which will ultimately lead to cracking after hardening. Excess water is also a bad idea - it won’t be possible to properly fill the solution and properly seal the recesses in the base. It is also not recommended to use technical water; there should be no foreign impurities left in it.
- After mixing the solution, it must be used within the next half hour. In this regard, they prepare in small portions. The mixture that dries in the container does not need to be diluted - this will deteriorate the quality of the finish.
- The deviation of the angular line is less than 1 mm, so as not to spoil the aesthetics of the finish.
- The angle between adjacent walls must be 90 degrees. Violation will provoke problems in laying the rotating parts of pipes, problems in the process of joining skirting boards, and placing furniture.
Beacons
This method is used when the joints and the entire walls are leveled at the same time. First, guides made of wood or metal are secured - they will be beacons to the wall. The profiles must be spaced apart according to the size rule. From the lighthouse to the wall - approximately 100 mm.
Such actions are done on both walls that form the corner. The mixture is first applied to one wall, then to the second. The entire distance between the beacons is filled, the excess solution is usually removed, and any excess that appears is carefully cut off with a wide spatula. Then you need to wait until it dries and move on to the next section.
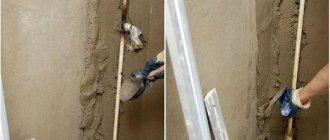
How to make smooth corners with beacons when plastering
An angled spatula is suitable for forming the joint. It is periodically moistened with water. After drying, the beacons are dismantled, and the remaining recesses are puttied with the same solution.
Perforated profiles
This method is suitable when the wall is already covered with plaster in advance. The profile is cut with metal scissors, taking into account the length of the joint. Then the perforated corner is placed on the plaster corners, it is pressed down a little with a rule. There is no need to press hard, as it is easily deformed. The solution that appears through the mesh is removed.
After hardening, plastering is carried out and, if necessary, a thin finishing layer is applied.
Serpyanka
This method is rational only when strengthening the joint is required - for example, when interacting with sheets of drywall. Additional tools you will need are reinforcing tape, a block 60 cm in length, and mortar. A small amount of gypsum mixture is applied to the seam between the walls, taking 10 cm from the walls.
The serpyanka is applied to the top of the corner, the roll is unrolled down to the length of an outstretched arm. It is necessary that the bottom of the tape does not move to the sides. A block is applied to the tape with light pressure and a 90-degree angle is formed. The released solution is removed with a spatula and the tape is leveled.
The movements are very careful so that the serpyanka does not become deformed.
Serpyanka
Preparatory work
Before any type of repair work, the first thing you need to do is prepare all the necessary tools. It is important that all tools are at hand.
To plaster wall corners you will need the following tools:
- long building level, rule;
- two spatulas - straight and angled;
- grater;
- plaster mixture;
- perforated corner profile.
Before plastering the corners of the walls, you first need to prepare the walls:
- First, clean the walls of the old coating. A rule is applied directly to the joint of the walls in order to achieve more accurate alignment. It is best that it is about 2 meters, then the result will be more accurate. To eliminate irregularities, as well as lumpiness, a chisel is suitable, which must be carefully removed.
- For small recesses, the same gypsum mixture is suitable, which is intended for leveling the wall panel. It must be applied to the recess and left until it dries completely. This takes approximately 48 hours. After the mixture in the recesses has dried, it is necessary to move on to the main part of the work - plastering the entire surface of the wall.
Corners can be both internal and external, so the plastering process for each type differs in its technology.
Three plastering methods are used for plastering internal corners:
- using perforated profiles with a reinforcing mesh (counter-schultz);
- by lighthouses;
- using serpyanka.
For plastering external corners use:
- profiles with reinforcing mesh (contra-schultz);
- straight slats.
Aligning outside corners
Smooth, straight external corners are created not only with the use of perforated corners.
Without a contrarian
For implementation, a wide strip is required; it is wrapped with adhesive tape. The following sequence is:
- Install the batten on the adjacent side of the corner, the protrusion should correspond to the thickness of the layer.
- Apply the solution in the direction from the corner, slightly downwards.
- Wait for 48 hours to dry, then you can remove the slats by doing the same steps on the opposite side.
- After hardening, the wall must be sanded.
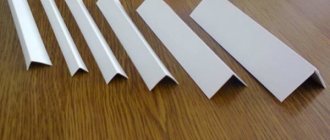
Aluminum perforated profile
A perforated corner or counter-shoulder helps not only to make an ideal line, but to prevent chipping under various impacts. Establishing the length of the corner is a simple calculation - just add the length of all the corners, add 20% for waste. Sections are required for small niches and protrusions. And inserts on long sections should not be done to avoid the appearance of cracks.
The sequence of work is as follows:
- Apply the mixture to the treated corner on both sides. You need a long rule that will help you press the corner to the desired area. Using a straight spatula, remove excess solution that has come through the mesh.
- The level checks the horizontal. If necessary, make corrections.
- When the solution hardens, sanding is carried out.
- Finishing is organized simultaneously with adjacent walls.
Perforated profile
Marking
You can plaster corners correctly if you have the correct markings. To draw 90 degree angles on walls, you can use old-fashioned simple tools and marking methods. You will need a rigid rod (or rule), a square, and a plumb line.
Measure (with a plumb line or a rule with a level) the angle for verticality (adjacent walls for collapse). Taking into account the identified surface features on the floor or ceiling, angle lines are drawn along the square, extending them using a rule or a rigid strip. Then, using a plumb line, they transfer these lines and the top of the figure to the ceiling or floor, where they draw an angle. Beacons (methods for installing beacons) are placed along the upper and lower marks.
As a rule, the corners of two adjacent walls are plastered after the leveling plaster has dried on them, that is, last. In this case, the internal corners do not need to be marked; it is enough to plaster one side, resting the rule on one plastered surface, then (after drying) plaster the remaining part.
For marking, you can use a laser level that forms perpendicular vertical planes. The device is installed in a corner so that one of the planes formed by the beams is parallel to the longer wall.
In some cases, when the walls are not perpendicular, in order to save money, time and space, only two corners are left straight, for example, near the wall where the bathtub will be installed. Plastering oblique angles requires making templates yourself. If plastering is done using corners, then their opening is adjusted according to the template made.
Rounded corners
Rounded shapes are no more difficult to plaster than regular ones.
Stages of work:
- Leveling the surface. It is plastered and leveled using traditional technology.
- Reinforcement. An ellipse of small diameter does not require reinforcing mesh. But with a large rounding - more than 10 cm in diameter, the corner is strengthened with reinforcement or wire. You can also get by by screwing in screws, but the step is at least 20 cm.
- Spray.
- Using a template. First, the solution is poured, the excess is removed as a rule. When forming a rounding, adjacent walls act as beacons, and instead of a rule, a prepared template is taken.
Rounded corners
A curved rule is created like this: a bendable strong wire is applied to a rounded surface, pressing it into an ellipse. This forms the drawing for the future template. The wire is applied to plywood - more than 6 mm in thickness, you can replace plywood with sheet steel or tin. The workpiece is outlined with a pencil, and excess parts are cut off along the line.
The rounded corners are subsequently rubbed down exclusively with movements in the horizontal direction.
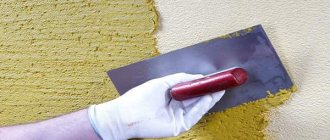
Grout
To grout correctly and efficiently, you need to wait until it completely dries.
If you rush too much and do it when it’s raw, it’s easy to damage and scratch the base. Grouting is done indoors using sandpaper, and outside using a trowel.
Before using the trowel, wet it and apply the solution thinly. Then the surface is rubbed at an angle of 45 degrees with strong pressure. You need to work until there is no more excess left on the ironing board. The result is smooth, aligned corners.
Plaster is important to the geometry of the room and helps ensure the quality of the remaining finishing work. You just need to strictly follow the technology and promptly ask for help from the craftsmen who carry out the finishing.
Beauty depends on the correct implementation of the work. Aligning the corners is the final stage of finishing before proceeding to the finishing coating - painting, wallpapering.
The best option
And the cheapest and easiest option for leveling external/internal corners, window/door openings would be to use a plaster mixture. Although the method itself is dusty, dirty and labor-intensive, it is just right for finishing an apartment with a small area. The advantages include the fact that the method can be used on any surface except wood, the finished base is very durable, and there are all the possibilities for creating an extraordinary coating.
( 1 rating, average 3 out of 5 )
Checking the verticality of the walls
Now that we have built our rectangle, let's check the walls. The point here is that the resulting square may not work out due to the curvature of the walls and you will have to move its edges away from the wall. We check using a rule with a bubble level or a rule with a bubble level or plumb line leaning against it, which is not entirely convenient. Let's see how to check a wall with a rule and a bubble level.
From the edges of the rectangle we look at the possibility of vertically aligning the walls
The bottom edge of the rule is placed on the edge of the rectangle. The rule is set vertically, the bubble level is closely adjacent to the rule. It is important that the rule and level are clean, that there are no layers of dry plaster - this is a priori.
We walk along the walls, especially in the corners, and look at the possibility of leveling them. If somewhere it is impossible to set the rule vertically from the edge of the rectangle, because a wall is in the way, the edge of the rectangle must be moved to the distance required to level the wall and install the beacons.
It should be remembered that the beacons are 6 mm thick. Look through the walls based on the fact that beacons will need to be placed on it.
The edge is moved away from the wall parallel to the opposite edge by the same distance at both ends.
General information
Uneven corners are not only not aesthetically pleasing, but also an obstacle to ensuring that all the furniture and household appliances you so carefully choose fall into place, since any, even the slightest deviation will be visible to the naked eye.
In addition, family photos from a photo shoot, paintings or panels cannot be placed near the corner, as they will perfectly “emphasize” the errors in the joints of the wall. There are two ways to solve the problem, and each of them has its own advantages and disadvantages:
- Drywall sheets. This method is used if there are large irregularities at the corners. In this case, the installation of the sheets is carried out on a frame base, which can help correct the curvature of up to 50 cm. Although after the installation work is completed, you will have to putty the corners, but this will be several times easier. Just keep in mind that this leveling method will steal precious centimeters, or even meters of usable area.
- Plastering the surface. This method is distinguished by the fact that it is labor-intensive, and is also advisable only if there are small flaws. Despite the fact that the process itself is quite dirty, plastering makes it possible to align corners with relatively uncurved walls, as well as preserve maximum usable space.
Now let's move directly to the process, or rather to its subtleties.
Angle trowel
This tool was specially made for plastering corners; its working surface is bent at 90 degrees.
If the joints on normally plastered walls have slightly “failed,” experienced specialists use a corner trowel.
It is convenient for aligning mainly internal corners; it is almost never used for external corners - perforated corners are more often installed.
Another option is an angle spatula. This tool has a handle attached to the side of the work surface, but the essence of use is the same.
Corner spatula for plastering internal and external joints.
You need to work with the tool, positioning it at a slight angle to the surface to be finished. The plaster is evenly distributed with smooth movements.
Tools and materials
For quick and convenient work, you need to prepare the usual tools for plastering walls. You will definitely need:
- Container for plaster mortar;
- Plumb line, tape measure;
- Rule;
- Spatulas of different sizes;
- Trowel;
- Grater;
- Drill mixer.
Before work, you need to prepare the surfaces - clean the joints of the walls, knock down all protruding parts of the brick or sagging concrete. Dust and dirt must not be left behind. If there are stains of grease or bitumen on the surface, they must be removed.
Ways to check the 90 degree angle between the walls inside and outside
There are several ways to check how straight the angle is. So:
- A square is the easiest way.
- The second method is to create a corner from a profile. Measure 30,60,90 cm from the corner along one wall. The length of one side of the profile will be equal to 90. To the other side on the adjacent wall, set aside 30,60,90,120 cm. The length of the second side of the profile corner will be equal to 120 cm. From one point where set aside 90 to another point 120 there should be a distance of 150 cm. The sides of the profile are connected with screws at 90 degrees. The edges are connected with another piece of profile equal to 150 cm. With this corner, the internal corner in the room is measured in several places.
- The outer corner is measured according to the same scheme, only all marks are marked on the floor. That is. From the outer corner on the floor you need to set aside a length that is a multiple of 4. Let’s say 1.6 meters. It is laid along one wall. Next, along the other wall you need to set aside 1.2 meters. There should be a distance of 2 meters between the end points. If so, then the angle is 90 degrees. If not, then alignment should be applied.
Related article: How to properly paint the walls in an apartment Before you start aligning the joints of the walls, you need to find out how much deviation or curvature they have. For leveling, drywall, plywood, conventional putty, and perforated corners are used. To derive an exact beautiful angle, you need to stock up on materials, tools and a little mathematical knowledge - the Pythagorean theorem.
Why is this necessary?
A room with smooth walls and corners looks very beautiful: in this case, any subsequent design will not encounter any obstacles. On the other hand, even if there is a high-quality ceiling surface, beautiful furniture and flooring, crooked, uneven corners will blur the entire favorable impression. There is a common belief that such defects can be smoothed out by decorating with various elements: while this can work with walls, it is almost impossible to hide uneven corners. So that at the final stage of finishing the room you do not rack your brains trying to eliminate such shortcomings, it is recommended that you initially pay due attention to this issue.