Decorating balconies involves some difficulties. The work is performed using materials that are resistant to moisture and temperature changes.
One of the options for durable finishing is covering the balcony with MDF panels. And you need to consider the strengths and weaknesses of the method, as well as the installation algorithm.
What are MDF panels - pros and cons
MDF wall panels are very popular in the Russian construction market. Due to their aesthetic, operational, environmental, mechanical and moisture-resistant characteristics, these panels are in great demand in their market segment.
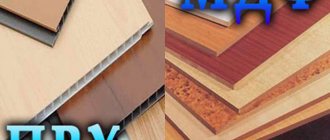
So what is MDF?
MDF (Medium Density Fiberboard) – medium density particle board. If we compare MDF and fiberboard, then despite their similarity, MDF differs from fiberboard in production technology. The production of fiberboard using the dry process contributed to the emergence of MDF.
The MDF production technology does not use harmful resins and phenol, and lignin, released when wood is heated, is used to bind the fibers. All this speaks about the environmental friendliness of wall panels.
Pros of MDF
The advantages of MDF are as follows: wall panels are superior to natural wood in terms of resistance to moisture and mechanical characteristics. Good sound and heat insulation (especially with additional insulation), durability and environmental friendliness.
The panels are easy to process, even the thinnest ones. Despite its lower cost than wood, MDF has all its advantages and lasts longer.
Installation and dismantling of MDF panels
MDF wall panels are easy to install. You can easily cope with their installation, even without special skills.
There is no need to prepare the walls for installing the panels, which greatly simplifies working with them. MDF panels are also easy to dismantle, allowing you to easily remove them or replace a damaged panel.
Disadvantages of MDF
The disadvantages of MDF include its low strength; you can’t press it with your finger, but the panels are unlikely to withstand blows in the event of a family quarrel (personal experience). Wood is wood and the second disadvantage of MDF is its flammability.
In order to avoid a short circuit in the electrical wiring and, as a result, a fire, the wiring under the panels should be hidden in a special corrugation. Using, of course, other fire protection methods.
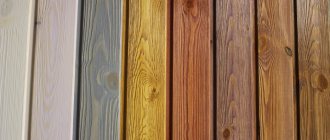
Color range of panels
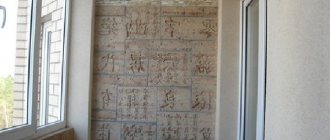
The construction market offers a wide range of colors for MDF wall panels. Colors like wood, stone, brick, and indeed for every taste.
What is finished with MDF panels
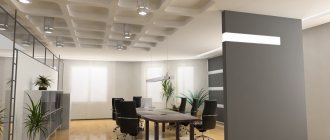
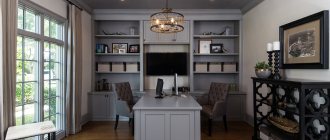
MDF is used in furniture production for finishing the walls of corridors, bars, restaurants, offices, and balconies.
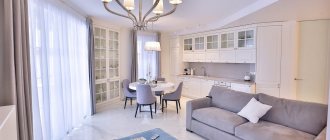
You can use these panels to decorate your veranda. It is not recommended to decorate living rooms with MDF; the whole point is that after finishing the walls and ceiling in the living room, an unpleasant feeling of a “box” is created.
Today, the construction market includes MDF, which has increased moisture resistance, for finishing bathrooms and kitchens.
MDF in the world
The world's first MDF began to be produced in the USA in 1966. The first production technology was a wet method for producing panels. The dry method of producing MDF was developed in the seventies.
Thus, in 1975, the annual production of MDF panels exceeded 380 thousand cubic meters. But already in 1990, there were 74 factories producing wall panels in the world.
MDF in Russia
31 years after the start of MDF production in the USA in 1997, the first line was launched in Russia. The production capacity of this line was 50 thousand cubic meters. in year. A second, smaller capacity was opened in Balabanovo.
The needs of our furniture industry in Russia are 200 thousand cubic meters. per year they talk about the need to open new MDF production lines. In the meantime, the resulting deficit is covered by imports.
Should I buy MDF or not?
As you know, there are no friends according to taste. After wandering through websites and forums, I was left alone with my question. Some say that MDF is “squeaky”, others praise other materials. So the choice, as they say, is yours.
Source: sherwood-nn.ru/stroyka/329-chto-takoe-mdf-paneli-plyusy-i-minusy
Preparatory work
To get started, you should learn more about the material. In addition to many advantages, they also have disadvantages.
MDF panels are resistant to moisture and are a fire hazard. A fire on a balcony is a rare occurrence, but moisture is always present. Make sure there are no leaks. If they are still present, then eliminate them.
- Use foam for installation and seal all defects.
- If there is mold on the balcony, then you need to treat it with an anti-fungal agent.
- Spray the liquids, in this way the solution is not spread evenly over the entire plane.
- The above actions cannot protect against moisture, then waterproof it.
- Insulate your balcony for a more comfortable stay.
Read here! Kitchen on the balcony: 85 photos of the best designer solutions for decorating a loggia
Features of MDF panels
For the production of MDF panels, the technology of pressing fine wood chips is used. The binding components are synthetic resins and melamine. After a cycle of processing, such material becomes:
- waterproof;
- fire resistant;
- durable;
- immune to the influence of living microorganisms;
- aesthetically attractive.
Manufacturers of cabinet furniture use MDF panels in the manufacture of kitchen furniture, and sheet panels for cladding work. The material can be easily milled, which increases its decorative effect. Due to their strength, the panels can be bent. This is often used in the production of rounded furniture facades. MDF wall panels have excellent sound insulation properties. They are durable and superior to wood in many ways. Having all its qualities, MDF panels have a lower price.
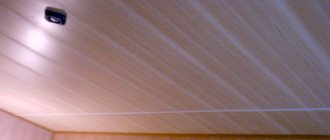
Classification of MDF panels by surface type
The front side is formed using different technologies. In this regard, the following slabs are distinguished:
- veneered;
- glossy;
- painted;
- embossed;
- with imitation stone.
A wide range of colors allows you to implement the most unusual design solutions.
MDF panels in the Leroy Merlin store
Our online store offers you to buy high-quality MDF panels at affordable prices. We have a large selection of colors, textures and sizes. A detailed product description and customer reviews will help you easily choose the most suitable option. Fast delivery is carried out to all cities of Russia where there are hypermarkets of our distribution network. You can also pick up your order yourself.
Advantages and disadvantages
In principle, the balcony can be plastered, painted, tiled, plastic panels and even covered with wallpaper. However, finishing with wood panels has its advantages:
- the frame (sheathing) on which the panels are attached simultaneously accommodates insulation, promotes sound insulation, and hides the wiring underneath;
- no need to level the walls, as when painting and wallpapering;
- wood is a warm and aesthetically pleasing material, loved by many;
- It’s easier to mount shelves, hooks, and attach cabinets to a wooden surface; during installation, the panels are easily cut to the required parameters;
- The panels are fastened using the tongue-and-groove principle, which makes their installation accessible even to a novice craftsman. If damaged, a separate panel can be replaced.
The panel material itself also has advantages:
- MDF is environmentally friendly ; it consists of small wood chips bonded with synthetic resins. MDF has a high environmental class - E1, which means that according to GOST the material is recognized as safe for the manufacture of furniture, including children's.
- Elasticity. Sheathing a balcony does not imply leveling the walls, which means minor differences in height are possible. The elasticity of MDF allows you to smooth out up to 7 mm of such an error.
- MDF is laminated with film of different colors and textures, this expands design possibilities and allows you to create your own, special interior.
- The film traps dust and dirt ; when cleaning, just wipe the panels with a damp cloth.
The disadvantages of the material also need to be taken into account:
- The panels are vulnerable to moisture, because the film only protects the outer surface. When wet, the surface becomes deformed and darkens. Before covering, it is necessary to waterproof the balcony: close all cracks with moisture-proof material. When temperatures change, condensation forms, so thermal insulation and vapor barrier are also necessary. A dry and insulated balcony extends the service life of MDF panels.
- The film is vulnerable to mechanical stress , for example, to the claws of pets. For the floor on the balcony, other materials are chosen, since the film of the floor panels quickly loses its appearance and wears out under constant load.
- MDF panels are more expensive than plastic panels and lining (thin cladding boards).
- Like any wood, the material is flammable, so metal socket boxes are installed under sockets and switches.
Installation methods
Before sheathing a balcony or loggia, it is necessary to completely complete all other work: leveling and finishing floors, installing windows and doors.
Finishing a balcony with MDF panels begins with preparing the surface. There are two options for mounting panels:
Covering an MDF balcony with glue has only one advantage - the thin thickness of the coating. This requires labor-intensive and dirty work to level the surface.
Installation on the lathing can be easily done even by low-skilled specialists, with their own hands and practically without dust and dirt. The lathing allows for additional thermal insulation of the surfaces being finished, which is especially important on balconies with their thin walls. The greatest advantage of the frame is the ability to level and hide any unevenness of the load-bearing surface.
Positive aspects of using MDF
The material is difficult to bend or break because it has excellent flexibility. This property allows you to cover corners using curved panels. Due to this, the installation process is significantly simplified and allows you to evenly cover the entire area of the room.
The process of installing MDF panels is very simplified, since they can easily be drilled, sanded, planed and other types of machining.
The material perfectly protects walls from high humidity or sudden changes in temperature, and is also resistant to the formation of mold or fungi.
Do-it-yourself balcony finishing with MDF panels
The panels are joined using the tongue-and-groove principle. Therefore, finishing can be done by an inexperienced craftsman if he follows the recommendations and instructions. You should have the following tools in your arsenal:
- roulette;
- marker;
- electric jigsaw or hand-held circular saw;
- laser level or plumb line;
- metal square;
- screwdriver, hammer, screwdriver;
- stapler;
- pliers.
Before finishing the balcony with MDF panels, the surfaces are prepared. The walls are dried by ventilation or electrical appliances. If you cover a damp surface with finishing and insulation, then fungus and mold will appear underneath. Old wallpaper is removed, because cellulose is a breeding ground for parasites. Facilitates the process of wetting with a soap solution. If mold is present, the surface is treated with an antiseptic. “Whiteness” is used as the latter. Visible damage is removed with a wire brush. Respiratory organs, eyes and skin are protected with individual means. Spores that enter the body cause poisoning and weaken the immune system.
In case of deep damage, remove the plaster to the brick or concrete base. The finishing is packed into bags and taken away. The plaster is also removed when it begins to move away from the walls. If this is not done, then when drilling holes for fasteners, the cladding will crumble. Deep cracks and potholes on the balcony are sealed with cement-sand mortar to block the path for cockroaches and moisture. Cracks reduce the effectiveness of the insulation that is installed under the MDF panels. The damage is expanded so that the putty does not peel off.
The last stage of preparing the balcony walls before finishing with MDF panels is primer. The surface is treated with a deep penetration compound. It is applied with a roller. Select material with antiseptic additives, which after absorption protect the walls. If the liquid is absorbed quickly, then apply two or three layers with a break.
Installation of a metal profile frame
A metal frame is more reliable than a wooden one, but its cost is also higher. To assemble it you will need:
- UD profile;
- CD profile;
- pendants.
If the walls of the balcony will be insulated before covering with MDF panels, then basalt wool or polystyrene foam is fixed before installing the frame. This is necessary to close the cold bridges that form in the metal racks. Hangers are placed under the insulation to hold the profile. Vertical lines are drawn on the wall. The distance between them is 60 cm plus half the profile width. This will make the middle of the bar. Holes are drilled at a height distance of 1 meter and hangers are attached. The elements are bent in a “P” shape so that the distance between the ends is equal to the width of the profile.
Slots are made in the insulation for holders. Polyurethane glue is applied to polystyrene foam and cotton wool. The plate is pressed tightly against the wall. Additionally, the material is fixed with plastic mushrooms; this is not necessary, since there are no loads on the balcony from decorative plaster. An insulator is laid with ligation of the seams, which are filled with glue for tightness. After the glue has set, continue installing the frame under the MDF panels on the balcony. They wait time to identify weak points and glue the loose insulation.
The UD profile is attached parallel to the walls at a distance equal to the thickness of the insulation. The planks are screwed to the ceiling and floor of the balcony. Their task is to provide rigidity to the CD profile. They are aligned in the same plane so that there is no distortion in the vertical slats. This is achieved using a plumb line. The CD profile is inserted into the UD profile and between the curved parts of the suspension, the elements are secured with self-tapping screws. Horizontal jumpers under MDF panels for balconies are attached at the level of feet, knees, hips and elbows.
Note! The horizontal profile is not attached to the ceiling, since the surface does not experience loads.
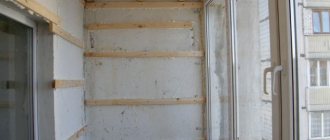
Installation of a wooden frame
The sequence of assembling the wooden frame before covering the balcony with MDF panels is different. For work, a beam with dimensions of 3x3 cm is used. To compensate for the unevenness of the walls when attaching the planks, a laser level is used. Select a zero point on the ceiling, at a distance of 3 cm from the wall. project the beam parallel to the wall with alignment at the point. A plank is placed along the line and attached to the wall. In places where the timber lags behind the wall, pads are made for rigidity. The distance between vertical risers is 60 cm. Horizontal ones are placed following the example of a metal frame under MDF panels.
Since wood has lower thermal conductivity than metal, insulation is carried out after assembling the sheathing. Mineral wool or expanded polystyrene is placed between the bars. The distance between the racks and their thickness vary depending on the insulation. The insulator is mounted on glue and the seams are sealed.
Advice! The timber under the MDF panels on the balcony is treated with an antiseptic. If this is not done, pests will destroy the foundation.
Installation of MDF panels
- MDF panels are cut to height. A gap of 5 mm is made from the floor and ceiling. It is necessary to compensate for temperature expansion. The first plank of the balcony cladding is set according to the level, since the rest are oriented along it. The tenon of the MDF panel is turned into a corner or cut off so that the plank is flush against the wall. If the tenon is left, then it is attached to the sheathing in three places with screws or nails. Claypers are inserted into the cladding lock and secured to the vertical posts of the sheathing for finishing. The next MDF strip is inserted into the lock and tapped with a rubber mallet so that the tenon sits. Perform level correction and fixation with clamps.
- Finishing continues until the end of the wall, door or window opening. If the distance from the last plank to the opening or corner is less than the width of the solid MDF panel, then it is trimmed. The element is nailed or fixed with self-tapping screws, the heads of which will be hidden by a decorative overlay. An expansion joint of 5 mm is left up to the corner. Trim elements are oriented for the desired visual effect. If the balcony needs to become wider, then the cladding is placed perpendicular to the larger wall.
Advice! Before attaching the MDF panels to the sheathing on the balcony, they think about the electrical wiring. The cable is laid in non-flammable plastic or metal corrugation. Marks are made on the finishing material where the cable should come out. The socket box is attached to the sheathing or wall.
Slope finishing
If the width of the door or window slope on the balcony is equal to or less than the width of the MDF panel, then the element is mounted vertically. A corner profile is fixed close to the door frame or window. The plank is cut to the width of the slope, inserted into the corner profile and covered with a corner on the other side. If the width of the slope is more than one plank, horizontal laying of the finish is performed. The panel is cut into pieces equal in width to the slope. They are drawn into the plane from the bottom up with a tenon into the groove. The ends are covered with a corner.
Finishing corners
For finishing MDF panels on the balcony, corners are used. There is no division into external and internal, since they bend under the docking unit. The element is selected to match the color of the finish. If the corner is adjacent to the baseboard at the top and bottom, then its edge is cut at 45 degrees. The reverse side of the lining is lubricated with glue. The surface of MDF panels is degreased. The corner is applied to the docking unit and pressed. The exposed glue is wiped off with a damp cloth. There is a video with instructions below.
Balcony finishing: what materials can be used
Repairing a balcony with MDF panels with your own hands helps make it warmer. The material protects the room from dampness and makes it possible to implement different design ideas.
To work you need to use the following tools and materials:
- panels;
- jigsaw or hacksaw for sawing;
- impact drill or hammer drill;
- screwdriver;
- screwdriver;
- cutter;
- metal scissors;
- hammer with hammer;
- stapler;
- putty knife;
- measuring instruments;
- leveling tools;
- wooden beam or metal profile;
- floor finishing materials;
- thermal insulation;
- waterproofing;
- self-tapping screws;
- clamps;
- dowel-screws;
- slats;
- pendants;
- cement;
- primer;
- polyurethane foam;
- sealant.
To ensure that walls sheathed with this material retain their attractive appearance for a long time, when performing installation you must follow the instructions:
- If the balcony is glazed, then you should waterproof it. First, the surface of the walls is cleaned and covered with a new layer of putty. They should not have potholes, crevices, or cracks. To eliminate them, you can use silicone sealant or polyurethane foam. Then everything is treated with a primer with a protective composition to prevent the spread of mold and mildew. It is more convenient to use coating waterproofing - it is easily applied to walls and does not require leveling the walls.
- A structure is installed to which the insulation material is attached.
- The sheathing is made of wooden beams or metal profiles. However, first markings are made for any type of frame using a level or plumb line. The recommended step between elements is 30-50 cm.
- The external elements that make up the grid must be laid at a short distance from each other. The remaining parts are attached parallel to them. At the end, all elements are treated with an antiseptic.
- Then you can begin vapor barrier and insulation of walls, floors, and ceilings. Mineral wool, polystyrene foam, glass wool or foil-isolon are suitable for this. Polystyrene foam and cotton wool must be placed under the sheathing, and foil insulation before installing the frame.
- A vapor barrier is applied on top of the insulation, which will prevent the formation of condensation inside the layer.
- Next comes the finishing with the material, which must first be adjusted to the parameters by cutting with a hacksaw or jigsaw. Fastening begins from the corner, fixing the material with clamps. To make the structure even, an angle is formed from two panels. The remaining elements need to be secured by aligning adjacent grooves with tenons. All fastening points are secured with clamps for reliability.
- The last step is installation of the plinth with finishing corners.
Before covering the loggia with MDF panels, you can watch the video. It describes in detail the process of how to decorate walls with this material so that the structure is neat and durable.
How to take measurements correctly
Correct calculation of the square meters that will be required to finish the balcony will save you from wasting time on remodeling and re-searching for suitable material.
MDF boards look like boards in appearance. They come in different widths and heights. For balconies and loggias, moisture-resistant varieties are used. The thickness of the product must exceed 6 mm. The plates are fixed using a tongue-and-groove method. The calculation of the amount of material is based on the area of the walls and ceilings where the installation will take place. Another 10-15% is added to the required number of square meters for adjustment.
Plastic corners connect the joints and form corners. They are purchased according to the footage of the balcony in accordance with the length of the joints. The insulation is calculated based on the square footage of the area that needs to be protected, taking into account the presence of beams.
For the sheathing you will need longitudinal wooden beams. Suitable size 20*40 mm. Variety - metal profile. They are measured in linear meters and will be fixed in increments of 40 cm over the entire finishing area.
Loggia finishing
Glazed balconies and loggias are unheated rooms. Unstable temperatures and high humidity are observed here. That is why the material for finishing the balcony must be resistant to these conditions.
The main materials are ceramic tiles, plastic panels, wood and MDF. It should be remembered that MDF itself is not a moisture-resistant material, but panels made from it have a moisture-proof film. As a result, the consumer receives products with the following qualities:
- ease of installation;
- beautiful appearance and a wide range of colors;
- not afraid of temperature changes;
- ease of care.
When the panels become dirty, simply wipe them with a damp cloth. Don't be afraid to use surfactant-based foaming detergents. MDF is covered with a laminating film and easily withstands the effects of such agents.
What you need for DIY installation
No complex installation equipment is required.
You will need to use:
- screwdriver;
- hammer drill;
- screwdrivers;
- jigsaw or saw;
- for metal - with a grinder;
- building level;
- furniture stapler;
- polyurethane foam;
- self-tapping screws;
- staples, glue, clamps.
Also stock up on a simple pencil, ruler, and tape measure. For safety reasons, wear safety glasses and gloves.
Preliminary work
The first thing you should pay attention to is the walls. There is no need to level them, but preparation will be required. External premises have direct contact with the street. The walls should be free of cracks, gaps, and places where moisture can accumulate. Their presence can lead to the formation of mold and subsequent dismantling of the entire structure.
Preparing the walls
Pre-cleaning of the previous finish is carried out. Unstable areas and cracks are covered with a layer of protective material (concrete, plaster). For treatment against parasites, an antifungal composition is used. The top of the walls are covered with primer.
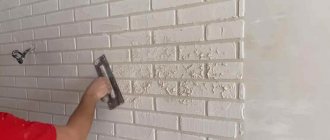
Installation
It is very easy to mount such parts on walls. True, unlike PVC analogues, you will have to use a frame or lathing, but this does not complicate the task too much. A primitive sheathing is assembled in such a way that each of the attached parts is fixed at least at two points. This is enough to create a strong and reliable structure.
The remaining details of the installation of such coatings can be seen in the illustration presented and no additional explanations are required - everything is very simple and anyone can cope with such operations.
Thermal insulation device
A balcony decorated with MDF panels with your own hands needs thermal insulation. Its installation must begin even before the construction of the frame. First of all, a layer of waterproofing is attached to the wall, and on top of it is a layer of foamed foil polyethylene. This material reflects thermal radiation well and is an excellent flexible heat insulator. After this stage, the frame elements are attached.
The insulation is placed in the cells of a fully assembled frame. Mineral wool or foamed polystyrene of the required thickness is used as insulation.
Thermal insulation with mineral wool
When using mineral wool, a layer of vapor barrier is laid on top of it. At this point, the preparatory stages are completed, and the panels can be installed. With high-quality thermal insulation, heat loss will be minimal, and PVC panels can also be used.
Installation of sheathing
The presence of a holding frame is an optional condition for cladding a balcony. It is possible to install the material with glue directly on the wall. In this case, experts recommend installing the sheathing only on the outer surface that is in contact with the street. It has direct contact with the street and needs insulation.
Grilles allow you to fill the space with insulation, which will maintain a pleasant indoor climate. Another advantage of having insulation is that the cladding will retain its original appearance longer at room temperature on the balcony.
Why wooden sheathing is preferable to metal sheathing:
- easier to install;
- according to its characteristics, it has the same moisture absorption system as cladding panels, the possibility of warping of materials is significantly reduced;
- it weighs less, which is especially important when installing external structures (balconies).
The location of the sheathing bars directly depends on the design of the cladding. They can be positioned horizontally, vertically or diagonally, as the owners of the room decide. According to the rules for installing the structure, the lathing is installed perpendicular to the direction of the MDF panels, in particular:
- horizontally if the panels are vertical;
- vertically if the slabs are horizontal;
- diagonally – it doesn’t matter.
horizontal direction of siding - vertical sheathing
Lathing installation steps:
- Measure equal sections on the wall in increments of 40-60 cm. Make marks using a marker and ruler horizontally and vertically.
- Install hangers according to the marks. They will help smooth out the unevenness of the wall if necessary, and even out the sheathing bars.
- Attach the beams and check that they are installed evenly. If necessary, adjust the tabs.
- Securely fasten the sheathing.
- Treat the timber with an antiseptic.
- Cut pieces of insulation according to the size of the logs and insulate the walls.
After this, you can begin installation.
Lathing and insulation
Before installing the sheathing, special attention should be paid to the surfaces of the walls.
There is no need to level them before work, but a number of preliminary works still need to be done. This is due to the fact that balconies and loggias are very specific spaces, they are characterized by high humidity and temperature fluctuations
It is very important to make sure that moisture will not accumulate under the cladding and that there will be no sources of infection by fungal and mold spores. To do this you need to do the following:
- clean the walls from the remnants of the previous finish;
- seal all loose places and cracks;
- coat with special fungicidal and antifungal impregnations;
- treat with primer.
However, when cladding balconies, it is advisable to install it at least on the outer wall - in this case, insulation can be placed in the cells of the frame and how to create the most comfortable conditions for using the balcony as an additional living space. On an insulated loggia, thermal insulation and cladding materials can retain their functional and decorative characteristics much longer.
As a rule, wood sheathing is constructed to decorate balconies and loggias. It is easier to install than metal, and lighter - this is especially true when it comes to arranging balconies with weak slabs. At the same time, wood has the same absorption parameters as MDF material. Therefore, warping when exposed to humidity and temperature fluctuations will be less than with rigid fixation on a steel sheathing.
Finishing slabs can be placed vertically, horizontally, and also diagonally. Moreover, if the sheathing is vertical, then the panels should be directed horizontally. And, accordingly, vice versa - with horizontal sheathing, the panels should be directed vertically. When the panels are directed diagonally, the direction of the sheathing does not matter much.
Installing the frame involves several sequential steps.
- Using a pencil and ruler, markings are made in increments of 50-60 cm.
- Canopies are attached along the drawn lines; they will allow you to further level out any defects in the walls and bring individual parts of the sheathing to a single level.
- Next, you need to install the beams and check the evenness of the entire structure. If necessary, the distances from the wall should be adjusted.
- Next, all that remains is to firmly fix the sheathing to the base. After this, the wooden surface is treated with antiseptic impregnation, the insulation is cut according to the size of the cells and fixed between the logs.
Color range of MDF panels
Today there are almost no restrictions on the color schemes of PVC panels; you can choose any format and structure, doing the finishing yourself or in tandem with a designer.
In addition to wall panels, other decorative elements are used: platbands, corners, fillets, plinths. For the lamination of these finishing strips, the same films are used as for MDF panels, thus it is possible to achieve a holistic perception of the room and visually expand the space. Of course, you can take decorative details in other colors that differ from the tone of the panels.
Various MDF wall panels are suitable for cladding balconies and loggias, the price of which depends on the size, finishing option and manufacturer.
Installation of MDF panels
Installation of decorative finishing is the main stage of cladding. There are several options for attaching material to the sheathing:
- glue-based, suitable for thin slabs for placement on small balconies; large areas require a different level of reliability;
- on staples or screws, suitable for warm rooms where the material is protected from temperature changes and will not change its physical properties;
- on clamps (special devices that connect the sheathing and the panel), the optimal method for external rooms.
Step-by-step instructions for installing slabs:
- Cut the material according to the height of the walls. Take into account the 3-5 mm that must be left for installing the corners. Create the necessary openings for electrical outlets.
- It is recommended to start installation from a window. The first panel is installed from top to bottom.
- The next one is mounted in the grooves of the previous one. On the reverse side it clings to the sheathing with clamps.
- At the corners, in order for the material to fit evenly, you will need to trim them. To maintain uniform placement, the corners on which the eye falls when entering the balcony are connected first and as smoothly as possible, invisible to the eye.
If there is a window sill or projections, the panels are cut according to their size.
Photo of finishing the balcony with MDF panels
Please repost
Glue mount
There is another way to attach the panels - using glue or liquid nails.
This method is the fastest, but the quality of fastening does not suffer at all.
It is ideal for those who do the cladding themselves, as it does not require special tools and significantly reduces repair time.
The algorithm for adhesive fastening of MDF panels includes:
- Preparing the walls of the balcony, dismantling the old covering, cleaning from dust.
- Treating walls with cement-sand mortar, paying special attention to cracks and depressions.
- Covering the leveled walls with a layer of primer.
- After the primer layer has dried, putty should be applied to the surface.
- Attaching MDF panels: apply construction adhesive to the panel and press it firmly against the wall, starting from the corner of the balcony, gradually moving along the wall. The panels should be glued without gaps; excess glue can be removed with a knife.
Fastening panels
Cabinet made of MDF panels
Fastening of the panels is provided at the stage of their production and is a tongue-and-groove connection. On the side where the groove is located, the panel has a protruding edge. It is this that serves to secure the panel to the frame. For fastening, special curly brackets are used - clasps, which fit into the groove on one side and are attached to the frame elements with the other. Clamps are attached to wooden slats using small nails, but for a metal frame the use of self-tapping screws is required.
Fastening with clamps
The lining of the loggia with MDF panels is carried out along the contour of the room in one direction, starting from one of the corners. The first strip is placed in such a way that the side with the protrusion rests in the corner, then the opposite one can be attached to the supporting rails: top, bottom and middle. After securing the first strip, insert the next one into it and continue further.
In the window areas, the slats are shortened to the required length, and those that protrude beyond the window opening are sawn lengthwise according to pre-made markings. The fastening here will have to be done without clamps, directly through the panel.
Finishing a balcony with MDF panels requires hiding the attachment points of the outer panels. To do this, when decorating internal and external corners, each model of MDF lining is supplemented with special profiles, also made of thin MDF with a thinned middle. These elements can be bent along the thinning to any angle. Decorative elements are attached to the MDF board using glue. It can be either silicone sealant or liquid nails. The main condition is to securely fasten the element until the glue sets.
Decorative corner
At the end of the work, you can coat the surface of the cladding with colorless varnish, but such work should be done only in the summer, provided that the room is well ventilated.
Finishing a balcony with MDF-based materials requires minimal financial investment and can be done without proper qualifications. Only skills in working with the most common tools are welcome.
Dismantling
The panels are removed using the same steps, but in reverse order. You should start with the baseboards, which are removed from the joint by hand or using a nail puller/screwdriver. Dismantling the slabs themselves begins from the upper left edge. To do this, you need to slightly pry the corner and bend the plate. Unfasten it from the clamps along the entire length and then carefully remove it. Then the material will remain intact and can be reused if desired.
Subsequent slabs are removed one by one in the same way. After them, the clamps are removed and the sheathing is dismantled. The screws are removed from it and the timber is separated from the wall. The holes that remain from the dowels are closed using plaster. This way the wall will acquire its original appearance, and the materials will retain their properties for further use.
Dismantling of those slabs that are attached with adhesive is carried out using a pry bar. It will not be possible to save panels as a whole.
MDF panels are widely used for finishing balconies. This is an easy, inexpensive way to give the room a bright, well-groomed look. There are some disadvantages: during processing a lot of dust appears, a respirator is required. All holes in the material must initially be drilled; the material is quite hard. In terms of weight, an MDF board is heavier than a similar-sized wooden board.
But all these disadvantages are nothing compared to the excellent result after repair and ease of subsequent maintenance.
Did you like the article? Tell your friends:
Useful tips for beginners
If this is your first time making repairs on a loggia or balcony with your own hands, we recommend paying attention to a number of nuances:
- First of all, the walls must be thoroughly cleaned of remnants of the previous coating, and the surfaces must be leveled using sheets of moisture-resistant plasterboard.
- When choosing a finishing material, give preference to calm, monochromatic shades or coatings with imitation wood texture; this color scheme is universal and harmonizes perfectly with various interiors. It’s worth taking a closer look at the textured surface - if it matches the interior of the room, it automatically turns a simple DIY renovation into a unique design work.
- Pay attention to the width of the panels, as hardware stores offer several options - standard and narrow. For cladding a balcony, wider panels are optimal; they cover a larger area, so with their help you can significantly simplify the cladding process. It is also recommended to buy materials with a small reserve, because with such work there is always the possibility of a small defect.
- Since it is very convenient to have a full-fledged lighting system on the balcony, take care of a sufficient number of switches and electrical sockets. All wires must be laid up to the wall sheathing, a hole must be cut in the selected panel, a mounting box must be inserted and the wires must be brought out and then connected. However, if you have no experience in this area, it is better not to install electrical wiring yourself, but to invite a specialist.
- The panels are adjusted in height and cut according to the openings directly during the installation process, but if you are determined to make markings in advance, then take into account the natural shrinkage of the panels along the width.
- To cut MDF, it is best to use an electric jigsaw.
At the moment, there are many opportunities for improving the interior of the balcony space.
The optimal material to use for this purpose is MDF panels. Simple installation procedures that you can do yourself will allow you to turn your balcony into a beautiful, cozy room.
Source: economotdelka.ru/balkony-i-okna/otdelka-balkona-panelyami-mdf.html
Characteristics of MDF boards
Construction MDF panels are a fairly universal element of modern cladding, attractive both in terms of their external qualities and ease of use.
MDF itself is considered a modification of the well-known fiberboard (fibreboard), but is manufactured using a different method and has an additional quality - increased resistance to moisture. This is facilitated by a special laminating film, which, in fact, is the main difference between the two building materials.
MDF is produced according to certain standards, intended for construction work in the form of finishing premises (walls, ceilings), manufacturing frame furniture. If the material is needed for wall cladding, then it is advisable to use standard panels - this simplifies the finishing itself and increases the speed of installation.
MDF boards have a number of serious advantages:
- The material looks like natural wood, but has flexibility and elasticity unusual for it.
- Suitable for covering complex and not perfectly straight frames.
- Using MDF, you can cover various defects in walls or ceilings; the panels do not require mandatory leveling of the surface before installation.
- The material is relatively easy to install and inexpensive.
- The laminated surface of the MDF panel allows you to apply decoration. It can be a pattern, texture or imitation of any complexity, for example: natural stone, wood. You can see the imitation options in our photo.
MDF panels This universal finishing material has only one serious drawback.
Although MDF has increased resistance to a humid environment, laminating film is clearly not enough. Like any fibrous or wooden material, MDF is afraid of constant dampness, therefore it is not recommended to install such material in such rooms. The interior decoration of a balcony with MDF panels requires maximum insulation from steam and moisture; it is desirable that the balcony be high-quality glazed and insulated. If there is a risk of increased moisture, for example, on the top floor of a multi-story building, then ventilate the balcony space more often.