In this article I will present detailed step-by-step instructions for installing a stretch ceiling with a harpoon fastening system.
The ceiling has the shape of a rectangle with sides of 2.0 x 5.3 m and its installation is quite simple and straightforward.
Required tool:
- Laser level;
- Painting (beating) cord;
- Hammer;
- Screwdriver;
- A hacksaw for metal or an angle grinder with an abrasive wheel;
- Heat gun;
- Special spatulas.
Thermal gas gun for heating the stretch ceiling
material Materials:
- Custom ceiling fabric;
- Special profile – baguette;
- Fasteners (screws and dowels);
- Punched paper tape;
- Chandelier base;
- Ring;
- Super glue.
1st stage. Applying markings along the perimeter of the ceiling
At this stage, we need to decide how much the suspended ceiling will be lowered. The following principles should be followed:
- The suspended ceiling must be at least 10 mm lower than protruding obstacles. These obstacles will be: distribution (socket) boxes, platforms for lighting fixtures;
- It is also worth considering that when installing the ceiling, a special profile is used - a baguette, which must be securely fastened along the entire perimeter of the site, that is, you need to evaluate the possibility and convenience of installing the baguette;
- In rooms with small wall heights, every centimeter is precious, so you need to “lower” the ceiling very carefully, otherwise the new stretch ceiling will simply “press” and cause discomfort. Therefore, in small rooms it makes sense to use glossy stretch ceilings to create the effect of expanding the space.
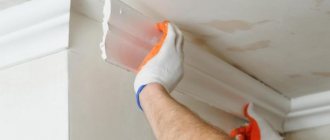
When we have decided on the height of the ceiling, it is necessary, using a laser level and a painting cord, to draw a line along the entire perimeter of the area.
Applying markings using a tapping cord
Fastening a stretch ceiling to a plasterboard wall without mortgages
First of all, you need to check how reliably and efficiently the plasterboard is installed on the main wall, especially in its upper part, along the entire perimeter of the room. In this case, you need to pay attention not only to the fastening of plasterboard sheets, but also to the quality of assembly of the supporting frame. When examining the surface, no deflections, rattling, play, cracking or delamination of the plasterboard wall should be detected.
Installing a fabric sheet requires a significantly greater tensile force, so all methods described in this section are recommended to be used exclusively for installing vinyl stretch ceilings. I would also like to draw your attention to the fact that for normal fastening of the load-bearing profile, the thickness of the plasterboard sheets on all walls must be at least 12.5 mm. Naturally, it is very important to find a load-bearing profile in the wall and attach it to it.
To determine the exact location of the vertical studs behind drywall panels, you can use a handheld metal detector or a powerful neodymium magnet.
We fix it into a plasterboard sheet with self-tapping screws at different angles.
A simple option is to attach a stretch ceiling baguette to plasterboard at an angle. Pre-drilled a hole for the screws.
If the baguette is PVC, then I use the usual 41 wood screws, I twist them through the starting baguette at an angle of 45% crosswise in increments of 5 cm. 1-45 to the left... 5 cm... 1 – 45 to the right... Holds even 25% shrinkage without dowels, drilling, holes and directly into drywall.
We also fasten it with either a Christmas tree or a 5mm drill, then a 6mm chop, and a 32-35 self-tapping screw, between them at an angle of 45-55mm, it has never pulled out. And if there is a water breakthrough, the plaster gets wet and nothing will help except window anchors into the wall (this was practiced).
Screw in the wood screws “crosswise”. Those. screw in one screw at an angle of 45 degrees, and the second screw close to it, also 45 degrees, only in the other direction. And you need to screw it into an undrilled baguette. Holds tight. Drill through the front wall with a drill. Through this hole you screw two self-tapping screws crosswise.
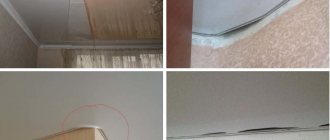
A small self-tapping screw screwed just straight into the drywall will not hold. More than once I have had to see and redo ceilings where everything seems to be fine at first, but after a while gaps appear between the wall and the masking tape, through which you can climb between two ceilings and use the second one as a hammock. The ideal option is a mortgage made of timber, it holds it dead, but in 98% of cases they are not available. Then comes the butterfly dowel, also durable, but expensive. And no one wants to pay for it. Then I simply drill holes in the gypsum board with a pen and hammer in a regular dowel, but not all the way, and a 35th wood screw, step 4-5 cm. It even turns out very strong.
I twisted the screws in a herringbone pattern every 5-7 cm at an angle. I don’t see any problems, there are problematic places, but just like with a brick, I installed a spacer and I’m happy.
In general, the main trick is to screw it at an angle and not overtighten!
Using dowels
There are different types of drywall fasteners, let's look at the most popular ones that are used. The only thing is that the cost is high for a large volume, but if the owner is willing to pay extra, then there is no problem.
If the fastening strip is installed on drywall and you cannot determine where exactly the metal profiles are located in order to screw the screws into them, use moths for wall or ceiling plasterboard.
Butterfly mount
The downside is using butterfly plasterboard fasteners. Such fasteners will not ensure a tight fit of the mounting strip and will cause cracks to appear later. But as an option, we attach it to the drywall using a butterfly dowel, as in the photo. If the profiles are 40 cm apart, then we insert two of these dowels between them (one, in my opinion, will not be enough). It seems to be easier than dowels in concrete, but it also takes a long time.
We do this: first we apply the profile and mark the places for the holes. Drill with a 4 mm drill. Then we attach the profile, screw it to the profile in 2-3 places, and use a 4 mm drill to go through all the holes where the dowels will be. We remove the profile, go through the holes in the drywall with a 10 mm drill, insert dowels into them and again finally screw the profile.
Threaded screw dowels
Dowel-nails, as they are commonly called, consist of an expansion dowel and a nail with a screw thread. They are often used for ceiling hollow structures.
Dowel nails for plasterboard should be screwed in well, but not twisted, so compare the size and complexity of the work and there are incidents when attaching a stretch ceiling to plasterboard.
Screw dowels for drywall
View of a ceiling with screw dowels
Metal anchor fastener MOLA
As an example, I can offer metal expansion anchors MOLA 5x13 with profile fastening with M5 screws, or plastic expansion anchors OLA 8x13 with profile fastening using 3.5x60 mm screws. Such fasteners are intended for single-layer plasterboard sheets with a thickness of 12.5 mm;
Metal anchor fastener MOLA
When installing a load-bearing profile, I advise you to install expansion anchors in the drywall as often as possible, at a distance of at least 100 mm from one another. To increase the reliability of fastening, you need to try to make sure that the anchors catch on each vertical rack profile of the supporting frame.
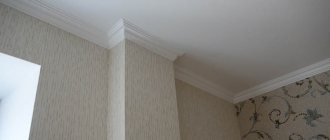
2nd stage. Installation of baguette
There are several types of baguette, in this case I used a PVC baguette. During installation, we align the bottom of the baguette along the line obtained in the previous step.
Installation of baguette around the perimeter of the ceiling
The following rules should be followed:
- The baguette must be securely fastened; it is advisable to twist the screws into all the holes in the profile;
- The joint of adjacent baguette slats should be smooth, without differences.
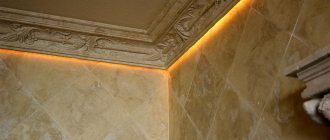
To avoid damage to the tension fabric during installation, it is advisable to glue the joints of the baguette with tape
Also, when installing a PVC baguette, the question arises - which side should the profile be adjacent to the wall? You need to mount the baguette as shown in the figure below:
Installation of baguette in corners
In my case, the installation area has four internal corners, so the baguette is cut as shown in the photo below:
Installation of a baguette - internal corner
That is, in the corner of the room the baguette is not completely cut off, but cut from the back side in order to be able to carefully bend it.
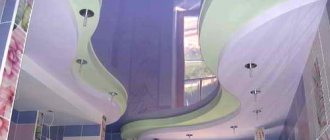
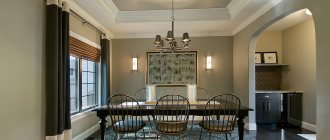
Example of an internal and external ceiling corner
A small digression. If our ceiling had a complex shape and had an outer corner, as in the figure above, then the baguette would be mounted on the outer corner in the following way:
Cut out part of the strip from the inside of the baguette, and then bend it:
Fastening the baguette
In my case, the baguette is attached to a concrete wall on two sides, and on two more sides to a step made of plasterboard and profiles (diagram below):
When attaching to a concrete wall, we use a hammer drill, a screwdriver, screws and dowels.
The question immediately arises - which fastener to choose for the baguette?
? I can recommend a universal and inexpensive solution: a polypropylene dowel 6x40 mm + black wood screw 3.5x45 mm.
fasteners for baguette (dowel 6x40 mm and self-tapping screw 3.5x45 mm)
The technology is simple: using a hammer drill (use a ⌀6 mm drill) we drill a hole in the wall directly through the hole in the profile (baguette), then install a plastic dowel and screw the screw into it with a screwdriver .
In the place where I installed the gypsum plasterboard step, I first laid a metal profile, as shown in the photo below:
Additional metal profile in gypsum plasterboard steps
To attach the baguette to the gypsum plasterboard step we use a screwdriver and metal screws about 30 mm long.
When attaching a baguette to a gypsum plasterboard structure, it is very important to provide embedded parts or use special fasteners.
In general, there is nothing difficult about installing a ceiling molding. You can move on to the next step.
Fastening
Installing a baguette should start from the most inconvenient or hard-to-reach corner. It is not allowed to join the profile in the corners, even if it is cut at 45°. When the canvas is stretched at an angle, the greatest load is applied, and the film will simply tear at the joint. Therefore, the baguette on the inner corners is sawed as follows: only the back wall is sawed, while the front wall remains intact, after which the profile is bent at the place of the saw.
Having secured the first baguette whip, we move on to the second. It is mounted end-to-end with the first one, and it is important to adjust the joint horizontally as best as possible; you should not get any steps. Having reached the next inner corner, we need to measure the distance. This can be done in two ways: using a tape measure or using a whole strand of baguette. The second option is more convenient and much faster. Turn the profile with the back wall outward, so that the groove for the harpoon is located at the bottom. Place one end against a corner, and direct the other along the level line, overlapping onto the secured baguette. Place a mark at a distance of 1 cm from the future joint, you need to move it towards the corner. Follow this mark and file the back wall. It is also not difficult to prepare the outer (or outer) corner. Press the end of the profile against the end of the already secured baguette and draw a line along the back wall, right at the corner. This will be the first cut. Further along the fastening path, place another mark at a distance of 2 cm from the first one. This will be the second cut. Saw through the back wall along both marks. Now we need to cut out the remainder between the cuts. For PVC profiles this is done with a regular construction knife; for aluminum it is easily broken off with pliers. After all this, fold the baguette exactly in the middle of the resulting recess.
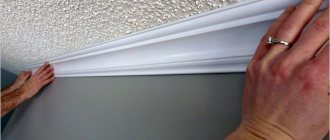
After you have securely fastened the entire sheathing, be sure to seal the joints with tape. You can use gray utility tape sold at any hardware store. And for aluminum profiles, metallized tape is also suitable. It is important to be careful at all stages of installing a stretch ceiling.
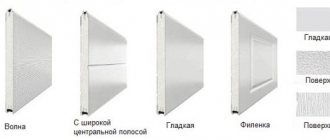
Ceiling baguettes are divided according to the type of material
- gypsum - these are classic stucco products;
- wooden - beautiful natural elements, used mainly in wood finishing;
- aluminum – used for suspended ceilings;
- foam plastic – used for finishing plastered and painted surfaces of walls and ceilings, suspended plasterboard ceilings and others;
- polyvinyl chloride (PVC) - baguette - a profile used for finishing with plastic, MDF, suspended ceilings;
- polyurethane - for finishing almost any surface, curved too;
- polystyrene foam, as well as foam plastic, are used when finishing ceilings with both putty and plastic panels, suspended ceilings.
Each ceiling molding has its own fastening technology, area of application and different installation methods. I would like to consider in more detail the issue of where plastic ceiling moldings are used. It is used for the installation of plastic, MDF ceiling and wall panels, stretch ceilings. Since you can do the installation of plastic panels and ceiling moldings yourself, let’s talk about it.
The panels differ from each other in thickness - the ceiling panels are somewhat lighter. Plastic ceiling plinth is the same profile that fastens PVC panels and at the same time hides the gap between them (ceiling - wall).
1.3. Ceiling panel installation
Operation 3: unpacking the ceiling panel
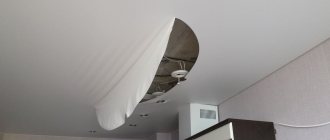
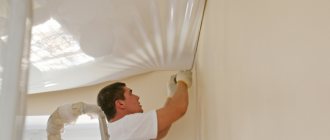
3.1. Before unpacking the ceiling sheet, it is necessary to hang holders in the corners of the room, securing them with stationary rope loops threaded into the holes of the holders 3.2. Turn on the heat gun, warm the room to 25-30 C, then open the ceiling packaging, remove the canvas and carefully, slowly, warm it up in a stream of warm air.
Note 1: it is prohibited to bring the canvas closer than 1.5 m to a working heat gun to avoid thermal damage to the canvas.
Note 2: you can fully unroll the canvas when the room temperature reaches 40-50 C.
3.3. Orient the ceiling canvas in the room, for which use the manufacturer’s drawing, which is usually included in the package along with the ceiling canvas. T.N. The “base” angle in it is marked with the symbol “A”. In this corner of the room you should place the corner of the canvas into which the paper mark is glued.
Operation 4: installing the ceiling panel
4.1. Stretch the ceiling fabric onto the holders, having previously wrapped their jaws with 2-3 layers of ceiling gasket to avoid mechanical damage to the fabric. It is better to cling the jaws of the holder not directly to the canvas, but to the harpoon.
Attention:
You can start stretching the canvas when the room temperature is about 50 C. External signs of achieving the required condition are the transition of the harpoon from a hard state to a soft-elastic one.
4.2 The stretching of the ceiling fabric begins from the corners. The order of tightening the corners is difficult to algorithmize - it is a matter of taste and experience.
4.3 When working, a straight or narrow blade is used, the blade is hooked onto the baguette from below, by inserting the harpoon into the working cavity of the baguette, it is necessary to ensure that the harpoon hook hooks onto the baguette shelf at least 20 - 30 cm in each direction from the corner. If this is not achieved, over time the canvas will jump out of engagement with the baguette.
4.4 Next operation 4.3. repeats with diagonally opposite corners until all corners of the canvas are caught on the baguette.
4.5 Continue installing the canvas in the manner already described. At the same time, in order to avoid the occurrence of folds, installation of an unidentified section of the canvas should begin from its middle.
To do this, as in operation 4.3, insert a straight blade into the groove of the harpoon and manually tension the canvas until it can be hooked onto the baguette
4.6 Having hooked the canvas to the baguette in the middle of one wall, you should go to the opposite wall and repeat operation 3.5.3 on it, and then on the remaining walls crosswise.
4.7 Now you need to divide the long sections of unhooked fabric (if there are any) in half again, hooking them in the middle and do this until you are sure that the fabric is evenly positioned and the seams are not pulled to the side, then finish installing the fabric by hooking the harpoon around the entire perimeter. If there is such a possibility, after installing the corners, it makes sense to hook the canvas in places where the seams adjoin the walls. This will reduce the likelihood of the seams becoming bent.
This is especially important for canvases glued together from different colors. Canvases made up of different textures should be ordered separately and placed through a divider. If this is not done, the seams will most likely be crooked (different textures have different tension forces) and it will be almost impossible to correct this curvature.
Note 1: It is more convenient to attach protruding corners last. In this case, you should make sure that the corner marks on the harpoon coincide with the real corners to avoid wrinkles. If all stages of the operation are completed correctly, as a result of your actions you will receive the ceiling canvas installed in its place. Check visually whether the canvas is adjacent to the baguette along the entire perimeter - visual inspection is done from below - the unhooked harpoon hook is usually clearly visible - it should be tucked. If everything is fine, the last operation remains:
4.8 Cleaning traces of installation from the canvas and baguette is done with a soft cloth or sponge using a branded ceiling cleaning liquid or pure alcohol.