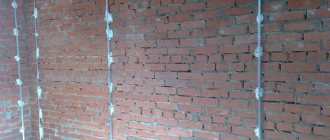
In the interior of the apartment
Brick is a common building material, but now it is used not only to create buildings, but also to decorate rooms.
In modern apartments it is not always possible to make original brickwork, but if you want to diversify the interior with it, you can do an imitation.
There are several alternatives to the original brickwork: brick tiles, wallpaper, plaster, polystyrene foam, decorative panels, all of which allow you to very accurately imitate a brick wall.
This element can be used when decorating various rooms of your home:
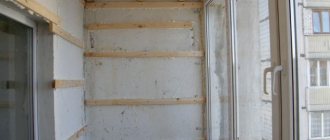
On the balcony
Here the brick wall introduces a street element. You can imitate it using tiles, which are light in weight, so they do not weigh down the walls and do not take up free space on the balcony. Imitation in the interior of a balcony in the photo below.
The glue must be of high quality, otherwise the constant vibrations that occur when closing the doors may cause the tiles to fall off. An alternative in the form of wallpaper that imitates the texture and appearance of brick looks good.
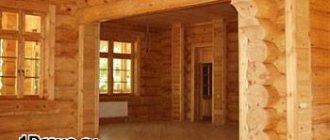
Living room
Brick is combined with both classic design and ethno-style, minimalism and others. Brickwork can not decorate the entire wall, but only its individual elements.
Kitchen - dining room
The natural look of the brick brings a country touch to this room, and if it is painted white, the kitchen and dining room will take on a Scandinavian style. For imitation, ceramic or clinker tiles are most often used. In this way you can decorate one of the walls or just the apron.
Bedroom
Modern designers also use brickwork when decorating bedrooms. It allows you to create a more brutal design, while the brick looks good with textiles.
The wall can be left in its original form or painted in a certain color. Cream, blue and white shades are suitable for Scandinavian style, and brighter ones are used when decorating a bedroom in an eclectic design.
In the hall
Unlike the living room, in the hallway or corridor you can cover all the walls. But it is important to understand that such material has the ability to make the room heavier and visually reduce its space. Therefore, for small hallways it is still better to make accents, and give preference to light colors.
You can emphasize the overall style by covering a doorway, a mirror, or a small passage with masonry. Both fully finished walls and focusing on individual fragments look elegant. White brick goes well with furniture and doors in dark shades, such as wenge. A large mirror, lamps in the shape of street lamps, and a large clock with a Roman dial will help to emphasize the brick finish.
Bathroom
This room is also often decorated with brickwork, but the material must be treated with products that will protect it from mold.
It is best to imitate such a surface in the bathroom using ceramic tiles or you can use moisture-resistant vinyl wallpaper.
In the nursery
Even in a children's room you can effectively use decorative brickwork. Such cladding can turn an ordinary room into a real castle, a mysterious cave, a dungeon, an underwater kingdom. The material is also suitable for arranging the room of a teenager who
An excellent design solution is finishing the edges of photo wallpaper. This will significantly expand the space of the room. Accented brick walls in a nursery are most often painted in bright colors; in a teenager’s room these can be darker shades.
A brick wall will also fit well into the interior of the playroom. If the room has a large area, you can cover several walls with decorative bricks. With the help of such finishing material you will get an excellent accent that can be further decorated in all sorts of ways.
Finishing processing.
When the decorative coating becomes durable, you can make it look chic with sandpaper, but this is not necessary, it depends on your preferences. The final stage is the removal of everything unnecessary, i.e., remnants of plaster that disrupt the design. Further processing depends on which mixture was used - colored (dyed) or regular, without adding pigment.
It is clear that decorative brick plaster should not have a white-gray color, so an unsightly colorless wall needs to be painted. You can mix several different dyes to achieve maximum resemblance to natural brick, or limit yourself to a ready-made suitable color if you find what you need on sale. Brick can have different shades, so you have some freedom of choice.
A successful design technique: apply dye of one color as the first layer, and after a couple of minutes - another. It would also be a good idea to paint individual “bricks” in a bright shade. After all, real masonry often amazes with its variety and variegation, so a do-it-yourself brick wall made of plaster has the right to be not monochromatic. Creative people can experiment with colors, because now it is not uncommon to find products in a variety of colors, from bright yellow to black. Guests will not guess that the “masonry” is not real!
Consider the surrounding environment, lighting, color of the floor, ceiling and doors, as the overall impression of the interior will be created by the combination of all shades. Neighborhood with furniture of the wrong color or, say, with a floor covering of the “wrong” material can ruin the whole impression.
Advantages and features of brick imitation plaster
Any type of decorative coating has its own distinctive features and advantages. Imitation of brickwork has the following advantages:
- It is quite easy to create a brick imitation with your own hands, so it is possible to save money on the work.
- Decorative bricks have increased strength; such a coating will reduce the degree of wear and tear on the walls.
- Brickwork weighs quite a lot, but decorative imitation has little weight.
- The use of decorative coating is suitable not only for decorating the facade of a building, but also for interior decoration of room walls.
Tips and tricks before coating
Before you begin work on creating a decorative plaster coating, you should prepare. To do this, it is recommended to watch training videos, as well as prepare all the tools and materials in advance. For convenience, we recommend using our selection tips:
- For indoor use, you should choose an environmentally friendly composition.
- In buildings with high humidity, it is recommended to use moisture-resistant materials with antifungal coating.
- It is better to create a facade from mixtures with increased strength.
- It is better to choose a quality option, even if it is more expensive.
- The color scheme should fit harmoniously into the interior.
Using a spatula, brush or broom you can create texture on the bricks
What tools will you need?
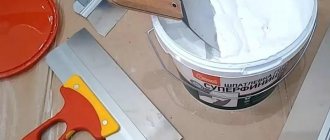
Any work begins with the preparation of tools and materials with which the room will be decorated. In this case, you will need to purchase the following set:
- A solution suitable for a specific type of wall to create an imitation of brickwork.
- A container for preparing the mixture, as well as a construction mixer for mixing the material.
- Several spatulas of various shapes and sizes for applying the material.
- To level the coating you will need a level.
- To create seams, prepare masking tape or string.
- If you want to add color, you should purchase color or paint.
Depending on the chosen method of work and type of material, the set of tools may differ slightly; select those tools that will be convenient for you to work with.
You can use brushes or rollers instead of a spatula, and use adhesive tape instead of tape. It is also worth providing yourself with personal protective equipment so as not to get dirty while decorating.
Selecting a material to create an imitation
The range of materials for creating decorative coverings is limited only by the imagination of the residents, but there are several tips for choosing the right one. You can purchase a regular mixture or a composition with additional properties that increase the strength of the coating and its resistance to mechanical damage.
How to paint brick trim
The paint must be chosen correctly. Among the available options that can be applied to putty are:
- acrylic paint;
- latex compounds;
- water-based paint.
The color is selected individually to suit the planned design of the room. The most popular shades are white, red-orange and brown. Almost all types of plaster can be finished well with paint, so the end result will be high-quality and effective.
Before painting, you need to clean the surface of debris and dirt.
If bricks are painted in several layers, then you need to wait about 5-7 hours before applying a new layer. The result will depend on the quality of the painting. Be sure to apply varnish at the end to protect and increase the life of the decor.
Types of brick panels and their features
Various materials are used to make panels, but most often you can find two types.
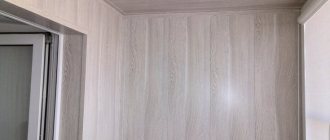
PVC panels
Made from modern artificial material - polyvinyl chloride - with the addition of softeners. The untreated material is white. After giving the product a textured pattern that matches the brickwork, a special technology is used to paint it in the desired shades. Polyvinyl chloride has excellent sound-proofing and heat-insulating properties.
Decorating the walls with PVC brick panels allows you not to think about extraneous sounds and noises.
The material is absolutely safe for the health of others, which is why brick-like wall slabs for interior decoration are gaining popularity. The surface of PVC panels is easy to clean, which allows them to be used for finishing work in the kitchen.
MDF panels
Such products are made from wood chips, which are pressed under high pressure. Processing under high temperature makes the material more durable and reliable. Thanks to this, MDF panels have high quality characteristics. This finishing material is not afraid of temperature changes and even moisture accumulation, therefore it is considered an ideal option for cladding the kitchen area, hallway and bathroom.
Gypsum products
Gypsum panels that look like brick look especially good in the interior; they most accurately convey the texture of this material, so such an imitation is practically indistinguishable from a real brick wall. Another advantage of gypsum products is absolute fire safety.
However, it should be remembered that gypsum is afraid of moisture, so this finish is only suitable for dry rooms.
Another feature of gypsum boards is their fairly considerable weight. So, for example, a 50 × 50 × 3 cm slab weighs 4 kg.
Variety of shapes
Brick wall panels can be of different shapes:
- The typesetting form of products imitating brick is a rectangular tile. Ideal for partial wall cladding when precise selection of patterns is required.
- The slatted panel is available in the form of planks of various widths.
- Sheet products are produced in the form of slabs with an area of 3 to 8 m2. This option is more technologically advanced during installation, as it allows you to simultaneously cover a larger area.
Features of choosing panels for brick
When using the described products that imitate brick, it is important to take into account the advice of experts:
- Brick-like wall panels are often used when decorating recreation rooms. However, the brickwork of an ancient castle can exert emotional pressure due to the lack of comfort.
- In one-room apartments, one wall is lined with materials imitating brick, choosing soft, non-aggressive tones. This option does not overload the interior.
- When partially cladding walls, you can use brick-like slabs in bright colors. This will help highlight any area and create an interesting accent in the room. It is worth remembering that you should not use products made of MDF and PVC when finishing fireplaces in order to avoid deformation of the material.
- It is not recommended to use red brick cladding material for finishing living rooms. This can disrupt the calm emotional atmosphere in the apartment.
- Brick wall panels in white and light gray shades fit perfectly into an interior dominated by pastel colors. However, in the bedroom, the walls of which are lined with such panels, you will feel “chill”.
- When choosing a finishing color, you should take into account the area of the room, its lighting and the chosen style solution.
Advantages and disadvantages of wall panels
The popularity of brick panels for interior wall decoration is explained by their high quality characteristics, including:
- Resistance to high humidity.
- Ability to withstand sudden changes in temperature.
- Resistance to solar radiation, the color of the facing material does not change even when directly exposed to the sun's rays.
The listed parameters provide many advantages to finished products:
- Acceptable price.
- High-quality imitation of real brick.
- Versatility of application, which makes it possible to organically combine panels with different facing materials.
- Easy and simple installation.
- Maintainability.
- High sound and heat insulation.
- Long-term operation.
But, like all building and finishing materials, brick wall slabs have their drawbacks:
- At high temperatures, the material can be deformed, so you should not use such cladding near sources of open fire.
- Despite the declared strength, brick slabs are not able to withstand strong mechanical stress, which can lead to dents or scratches.
Preparing for work
Calculation of plaster consumption. Take measurements of the wall you will decorate and calculate the area. Next, when purchasing plaster, pay attention to the consumption characteristics per m2 indicated by the manufacturer
Important: Manufacturers usually indicate consumption for a layer thickness of 10 mm, but we will need a layer from 3 mm to 6 mm. Take this into account in your calculations.
Also pay attention to the “working time” of the mixture. The longer the mixture does not dry out, the more convenient it will be for you and the better the result will be.
For example: the length of the wall is 3 m and the height is 2.7 m, then the total area will be 8.1 m. Let’s say the manufacturer of our plaster indicated a consumption of 8.5 kg per m2, therefore we will need (8.1 * 8.5 )/2 = 34.4 kg, but let’s round for margin and take 36-38 kg.
Using the same scheme, you can calculate how much primer is needed.
Next, use a stationery knife to cut a roll of 30 mm tape lengthwise to obtain 2 rolls 15 mm wide (this width allows you to more naturally imitate an inter-brick seam). Don't be afraid if the edges turn out a little torn, the seams will turn out even more natural.
Read also:
How to register ownership of real estate: an apartment, land or house.
In the photo, masking tape with a width of 50 mm can also be used, but it is most convenient to take reinforced tape.
If your wall has already been covered with wallpaper (lime, paint, etc.), then first, of course, you need to remove it down to the concrete base of the wall. Without quality wall preparation, all your work may simply fall off in a month.
It is necessary to spread film or newspapers near the wall to protect the floor, after which you can proceed to the next step.
Imitation brick from soft tiles
Ease of installation and surface treatment are two main features that characterize soft tiles. The material has a relief texture reminiscent of natural stone. That is why imitation brick on the wall is practically no different from real masonry.
It is important to know! Soft tiles are also used for exterior decoration. Due to its resistance to temperature changes, it is used, for example, on building facades, etc.
Another advantage of the material is its flexible structure. These tiles are laid on smooth and rounded walls. It is also suitable for cladding small architectural forms. The buyer is given a wide color palette to choose from - by combining different shades, original compositions are created.
Alternating colors of soft brick tiles refresh the interior
Making a decorative brick wall from polystyrene foam
- This imitation sticks well on the wall.
- Foam is easy to cut and process.
- It does not generate dust, which is important for interior work.
- Cheaper than plaster.
- The main disadvantage: low impact resistance, it wrinkles easily and breaks when impacted.
In this case, it is better to purchase dense foam with fine grain; it does not break or crumble when cutting.
It is most convenient to use liquid nails as glue for single bricks, and polyurethane foam for a solid sheet.
Creation technology
Both professionals and amateurs need to know that decorative plaster in the form of a brick surface is performed in various ways.
For example, to create rustications on the base, stuffing is done using a metal strip, the thickness of which is from 5 to 15 mm:
- The applied facade plaster made of cement-sand mortar is marked;
- A strip is placed on the line and pressed into the surface with blows of a mallet hammer;
- Then the rail is removed very smoothly and carefully;
- The surfaces of the resulting large “bricks” are given the texture of stone before the plaster dries.
There is a technique in which a brick wall is created with your own hands from plaster by applying a grid of seams using beating with a thick cord. To do this, the cord is pulled along the future seam (two assistants are needed), the middle of the cord is pulled back and released. A strong blow to the joint with the cord creates a depression.
The methods described above are rarely used; there are more common and less complex techniques:
- Drawing or punching a seam (with a sharp object - a knitting needle, scraper, wooden stick, etc.);
- Forming seams using tape;
- Applying an imprint.
General step-by-step instructions:
- First of all, we prepare the base on which the brickwork will be done with our own hands.
- We mark the wall necessary for the chosen method.
- We prepare a solution for imitation from putty, a ready-made mixture, or we make up a paste mass ourselves. The mixture, ready for use, should be thick enough so that it slowly slides off the spatula, but does not flow or fall off in pieces.
- If necessary, color the mixture by adding color.
- We apply the mortar mass to the prepared section of the wall and process the layer using the chosen method. We plaster the area only of such an area that we can fully process it before the layer dries.
- Let the layer dry and apply the finishing touch.
We will tell you about each stage in detail.
Wall marking
Imitating a brick wall with your own hands using plaster, plaster, tile adhesive or putty requires preliminary marking. Usually, for imitation, the width of the inter-brick joints is 10-15 mm, the dimensions of the bricks themselves are close or equal to the standard ones. But you can imitate masonry with other basic dimensions.
Sometimes preliminary calculations are required. This is done when it is necessary to fit entire rows in height, or to imitate masonry on protruding corners. Then on one wall there should be a long side of the brick, and on the adjacent wall there should be a short (butted) side.
After calculations, a grid is drawn on the base. This can be done with a pencil. As in a real wall, the longitudinal rows must be strictly horizontal. Therefore, when marking, horizontal and vertical seams are ensured by using a bubble level.
The marking work also includes sticking tape. More details about it below. To work with gypsum plaster, stationery tape is suitable. For other compositions, a painting agent is used.
Imitating a brick wall using masking tape
- The surface is prepared (small irregularities do not require cleaning), primed, marked, and masking tape is applied (horizontal, then vertical).
- Mix the plaster mixture or a plain or colored putty solution.
- The solution is applied to the resulting mesh. It is smoothed out and textured.
- When the joint dries a little, the tape is removed and scratches remain on the layer - interbrick depressions. Irregularities are corrected.
- When the layer is completely dry, the finishing is done - painting, waxing or varnishing.
In this way, imitation of brickwork is performed without a special tool - the method is accessible to everyone without exception and requires only perseverance and accuracy.
Video of the entire process.
Brickwork made of gypsum plaster in loft style
In a cheap and fairly simple way, a finish is created in which decorative stone made from gypsum plaster is similar to brickwork. This method is similar to that described above, with the difference that ordinary tape and a quick-drying gypsum mixture are used for finishing.
To do this, the primed wall is lined out “to fit the bricks” of natural sizes (250 x 65 mm, necessarily taking into account the 1 cm seams between the bricks), using a bubble level.
To create seams, strips of packing tape 1 cm wide are used.
To do this, you can cut a roll of adhesive tape into 4 rings using a grinder with a disc for concrete or ceramics (the metal disc overheats and melts the adhesive tape).
The edges of the ribbons should be uneven to obtain a natural texture. First, horizontal tapes are glued to the wall, leaving spare ends for ease of subsequent removal. Vertical strips are glued on top of them (this is mandatory).
To control the thickness of the gypsum mixture layer, beacon strips are attached to the wall on plaster strokes.
Plastic gypsum mixtures with microfiber are best suited. It is advisable to avoid diluting excess solution. The consistency of the solution should not be too liquid or too thick.
The applied gypsum mass is leveled by the rule, the beacons are removed and the voids after them are also filled with gypsum. A smooth surface is not required. On the contrary, you will need to add additional texture, which is done using a plastic bag crumpled into a ball.
After a short period of time (it is necessary for the plaster to just begin to set), the tape is pulled out perpendicular to the surface. The resulting bricks are rounded with a dampened brush, trying to avoid sharp corners. After drying, the gypsum plaster is painted with PVA in 2 layers.
The entire process is shown in detail in the video.
Using a stencil
A simple but expensive way to imitate brickwork using plaster. Requires a rubber or plastic stencil. concentration and accuracy, because you need to make sure that the horizontal lines are connected and there is no vertical displacement.
The work is done like this:
- A layer of plaster with a thickness of at least 4-5 mm is applied to the base to obtain an expressive texture;
- The stencil is moistened with water so that it does not stick to the solution, applied to the surface of the solution and pressed, carefully removed from the solution with a smooth movement; It is wetted again, applied, pressed in and removed (if necessary, the impression is immediately corrected);
- Finally, the resulting masonry is primed, painted, and waxed.
The second method is to use a "middle" stencil (a bit like the masking tape technique). The stencil itself is cut out of linoleum. The cut mesh is attached to a wooden frame so that it can be used to remove the mesh from the stack. A layer of solution is applied to the base. Align. A stencil is placed on top of it so that the linoleum mesh is adjacent to the surface. A new layer up to 0.5 cm thick is applied on top of the stencil. Smooth and give the surface texture (with a brush, a bag, or your hands). Carefully remove the stencil and correct any flaws. After the solution has dried, the layer is smoothed with a trowel, removing burrs with a brush or grater.
You can make a brick stencil for plaster with your own hands.
A special feature of brickwork is the deepened lines of masonry joints. The stencil for brick plaster should leave them behind.
When making a stencil, two mandatory conditions must be met:
- the seams between the rows of bricks must be strictly horizontal;
- bricks in adjacent rows should be placed with a bandage.
Thus, a stencil imitating a brick wall is a grid of horizontal and vertical stripes. The width of the strips is no more than 10 mm. The dimensions of the bricks can be chosen arbitrarily.
For production you will need sheet plastic (there is a backing for adhesive film, the dimensions of which are sufficient for making a large stencil). The design is transferred to plastic and the “bricks” are cut out using a scalpel or modeling knife. At the end of the work, a mesh remains, which is used as a stencil.
You can cut a stencil from thin linoleum. But such a device cannot be mounted on the wall. Therefore, it is mounted on a wooden frame (in the form of a low-walled box). You will need two people to apply the solution: one to hold the frame, the other to spread the solution.
Brick plaster using a homemade stencil: execution sequence:
- The wall is primed and dried.
- A stencil is attached to the surface of the wall.
- The solution is applied with a spatula over the stencil mesh.
- The surface of the bricks is “shaped” using a sponge, brush or other auxiliary means, giving the desired texture.
- After this, the stencil is removed without waiting for the solution to set.
- The fringed ridges that appear along the edges of the bricks are smoothed with a damp brush while they are damp. You can take your time and clean up the frozen solution later with sandpaper or an abrasive mesh.
If there is a break in work, the stencil is cleaned of any remaining solution. Plastic and linoleum are washed so that subsequently frozen lumps of the solution do not become a hindrance.
Formation of individual bricks
Brick plaster can be done by excavating the joints using a scraper. This finish is very similar to creating wild stone. Formation using a scraper is carried out after a short break, when the applied layer dries a little. You can first mark the seam lines with a pencil using a rule or a strip, or you can make notches right away by applying the rule to the surface and running a scraper along it.
It is recommended to start cutting seams with horizontal lines. Then make vertical seams. Having finished the excavation, remove the remaining mixture from the edges of the bricks with a dry soft cloth.
For this type of decoration, the working composition can be applied to the entire surface of the wall. You can use a narrow chisel as a scraper or make a device by bending a steel strip and attaching it to the handle.
Using a special roller technology + video
Another way to imitate brickwork is to emboss it using a decorative plaster roller. A specific texture is applied to the wall by horizontal rolling of a roller. In one pass, recesses in the form of seams from 2 to 4 rows of masonry can be obtained.
The force when pressing the roller and the speed of movement must be uniform, then a solid canvas is obtained. For better rolling, you can moisten the solution with water before the roller using a spray bottle. When rolling, make sure that each subsequent row has the required offset of the vertical seams. You can purchase a decorative brick roller or make it yourself.
Working with a roller requires a “stuffed”, steady hand. Practice before working on large areas.
Making a brick roller with your own hands
Brick plaster can also be formed using homemade tools. It’s quite simple to make a simple tool for simulating brickwork with your own hands - a decorative roller to imitate a brick. Such a roller will cost less than a branded one, and production will not take much time. After familiarizing yourself with the manufacturing methods, perhaps you can figure out how else you can make a device from what you have at hand.
Method 1. To make a brick roller, you need ordinary sealant and a roller (new or used), a glass of soapy water, and an auxiliary rod while working with the roller.
- Remove the tubular part of the roller from the handle. We put it on the rod and place it on two supports.
- Apply a layer of sealant to the roller, which is distributed evenly over the roller. You can use a plastic card for this. Having spread the sealant, wet your fingers in soapy water and press down the slightly sharp protrusions of the sealant.
- Having outlined the middle of the cylinder, we apply a strip of sealant that will imitate a masonry joint. We apply two similar strips along the edges of the cylinder. Wet your fingers and smooth out any sharp edges.
- We draw two longitudinal lines, one between the first two rings of the seams, the second - on the diametrically opposite side of the cylinder in the second space between the rings. We also soften the protrusions.
Let the product dry. Remove it from the rod and install it on the handle. Now we can get to work.
Method 2. Purchase a wallpaper (pressure) roller. To work, you will need a metal ruler, a marker, a stationery or breadboard knife. We remove the cylindrical part of the brick roller from the handle, put it on the rod and install it on the supports.
- First, we mark the cylinder, drawing lines of masonry seams and jumpers between them. As in the previous case, the lintels need to be marked on opposite sides to imitate brickwork with a bandage.
- Using the sharp tip of a knife, we make slits 2 mm deep, without going into the jumpers. Our task is to remove the top layer where the brick imprint will be.
- Carefully cut the layer at an angle to begin cutting off the top. Grabbing the edge of the material to be cut and bending it away from the roller, we cut off (like 2 mm thick sandpaper) the plate in place of the brick. We also “remove the skin” at the site of the second brick.
- We correct the place of the cut (remove particularly intruding sharp tubercles).
After installing the homemade product on the handle, the roller is ready.
To apply a pattern to the wall, moisten the roller with soapy water so that the plaster solution does not stick to the stamping part.
Method 3. Prepare a rubber roller, sheet rubber 10 mm thick, and rubber glue for work. The length of the cylindrical part determines how many “bricks” will fit on it. For example, let’s take a roller that can accommodate the prints of two bricks.
- We degrease the rubber surface of the cylinder so that the glued strips hold tightly. We do the same on one side of the rubber sheet.
- From a sheet of rubber we cut 3 strips up to 10 mm wide (for seams). The length of the strips is greater than the circumference of the roller cylinder. Two more strips (shorter) will be used to form jumpers.
- Using a ruler, find the middle of the roller and draw the line of the middle masonry seam. Glue long strips along this line and along the edges of the cylinder. At the junction of the strips, we ensure that the upper part of the strips does not stretch, but joins without tension (we cut off the ends of the strips at a certain angle).
- Glue the jumpers.
- To ensure that the rings and bridges easily come out of the plaster composition when rolling, we cut off the edges of the strips at an angle with a sharp knife.
After the glue gains strength, we can use the roller.
Hard tile bricks
The most commonly used are gypsum, cement and clinker tiles. Due to the natural color of the gypsum material, an ideal white brick wall is obtained, however, such a surface has a significant drawback - water permeability. That is why before purchasing it you need to make sure that there is an additional protective layer. It is also worth keeping in mind that such “bricks” need to be glued onto a solution containing gypsum.
Advice! If you want to save money, then instead of buying cement tiles, you can make them yourself. To do this, you need to mix cement, sand and water in equal quantities, and then pour it into the mold and wait for it to dry.
The most expensive option is clinker tiles. But the qualities of the material are worth it, because it is an environmentally friendly clay product, subject to pressing and heat treatment by firing. Stoves and fireplaces are finished with clinker bricks.
Wall mounting technology
The process of laying solid tiles is no different from each other. The only point is the choice of fastening composition. To choose the right mixture, you must rely on the instructions for using a particular material.
It is important to know! Regarding the tools used, they are similar to those indicated in the section on laying soft tiles. Only equipment for cutting stone is added here (grinding machine with disk or hand-held circular saw).
The fastening technology is also practically no different from soft tiles. The difference lies in the use of calibrators, which are inserted between the bricks and prevent them from sliding, as well as in the final sealing of the seams.
Properties of gypsum tiles
Gypsum tiles have positive properties:
- The tiles are made from gypsum, which is a relatively cheap material.
- Gypsum is non-toxic and does not affect human and animal health.
- When making tiles with your own hands, you save money.
- When you make your own gypsum tiles, you can paint them yourself in the desired color, as well as give them the desired shape.
- Tiles can be made at home in various sizes, widths and thicknesses. It all depends on the future location.
- When making tiles at home, a polymer is added to its composition, which serves as a water-repellent ingredient. This is an important factor when there is high humidity in the house, for example, tiles on plasterboard in the bathroom or on a balcony finished with plasterboard. Gypsum tiles can be made at home
Return to contents
Tile adhesive cladding
Decorative bricks can be made from dry tile adhesive.
First step. Dilute the dry component in water until you obtain a mixture with a consistency close to very thick sour cream.
Second step. Divide the resulting mass into 3 approximately equal parts and add a small amount of paint to each of them. Coloring components must have different shades.
Stir each pile thoroughly. As a result, you will get a mass with beautiful and interesting patterns.
Third step. Roll each pile into a “pancake”, and then cut the resulting product into equal bricks. Let the elements dry.
Repeat the above steps until you have the required number of bricks.
Fourth step. Cover the wall with ready-made bricks. To fix the elements, use tile adhesive.
Tile adhesive cladding
Fifth step. Fill the seams with a composition specially designed for this purpose. It is better that the filler is slightly darker than the cladding elements.
Sixth step. Apply a couple coats of varnish to the trim.
Applying decorative putty
The product is applied in a small layer, but at the same time covering the previously applied markings.
When preparing the solution, mix thoroughly. Its consistency should not be too dry or liquid. The ideal solution is one that has a plastic shape, but does not flow down the wall.
Use smooth movements to spread the mixture over the entire surface.
Application is carried out with a spatula. The putty spreads evenly over the entire surface. It is important to wait for the material to dry completely. Only after this is it possible to delete the template or markup.
Wood bricks
Imitation of brickwork can be very easily made from wood.
Decorative wood bricks
First step. Buy material for making “bricks”. You can use, for example, plywood.
Second step. Cut the workpiece into the required number of rectangular elements of the same size.
Third step. Sand the front side of each element.
Fourth step. Prepare markings on the wall.
Wooden bricks
Fifth step. Lay out the bricks according to the markings, starting from the bottom opposite corners. Attach the elements at the same distance, corresponding to the seam thickness you have chosen. A gap of a couple of millimeters will be enough. Lay out all the bricks.
Sixth step. Paint or varnish the finished masonry.
The advantage of imitation brick walls made of wood is environmental friendliness and impressive durability.
Decor and painting of brickwork
If you are tired of the too “New” look of a brick wall, or you want to make “Secret Drawings” on old brickwork.
Brick designs are becoming more and more popular. The Loft style has long been known to many, but painting can bring this style to perfection, adding mood and personality. Moreover, the painting can be both miniature and large-scale! We also decorate various brickwork, including tiles that imitate bricks.
Here are a couple of simple miniatures, the plot was chosen randomly, you can take any pictures.
Materials: acrylic paints and brushes, wall primer, rotbow, glissal and decorative varnish (optional)
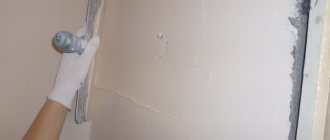
First, using a sprayer, apply the diluted primer to the brick wall. We wait for it to dry.
We dilute a little rotbant with water, and using a spatula, thoroughly coat the seams, the more carelessly, the better.
The brick can also be sanded down with sandpaper and tinted with diluted acrylic paint.
Using chalk or a simple pencil, draw the outlines of the figure. In our case it is a mouse and a bird. Next we outline with acrylic paint. Darken the background around the picture.
Thank you all for your attention! There is no limit to your creative imagination! I wish you good luck and creative inspiration!