When we hear the word “palette”, the image of an artist appears in our imagination who performs some kind of magical ritual with paints, as a result of which new colors appear. And indeed, the process of mixing dyes is impressive, especially when, when combining two completely different shades, a third one is born, unlike any of them.
You can mix a larger number of paints in different ratios, which allows the artist to obtain any color tone that the human eye can perceive. Thus, the palette is one of the main attributes of an artist using standard painting methods. However, there is an alternative and, as practice shows, more effective way to obtain new shades. We are talking about the technology used by Renaissance artists, whose paintings are the standard of color harmony and realism. What is the difference between the traditional method and the technique of the Old Masters, and why does the second one allow you to accurately convey shades and achieve coloristic unity?
Types of palettes
Translated from Latin, “paleterum” means “plate” or “tablet”. However, today palettes are made not only from wood, but also from plastic, glass, canvas paper and other materials, so everyone can choose the best option for themselves.
Oil painting palette
The classic palette for oil painting is a thin sheet of wood coated with varnish. The industrial version is plywood that is light, rigid and durable, but if you decide to make the palette yourself, do not forget to varnish the front surface. Otherwise, the oil will seep into the wood and the paint will become too thick, which will lead to inconvenience in work and deteriorate the quality of the covering layer.
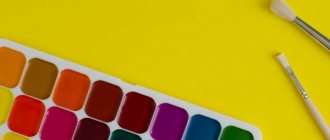
Palettes for watercolors and other water-based paints
Many artists, when painting with water-based paints, prefer white paper as a palette. The dye adheres well to the paper base, mixes easily and allows you to see a result close to what it will look like on the canvas of the future painting. The front surface of the sheet is impregnated with a water-repellent layer that prevents the palette from getting wet. In addition, the paper is a disposable palette, so there is no need to wash it.
Plastic and glass can be used to obtain the desired color by mixing water-based paints. The main advantage of plastic and glass palettes is their smooth surface, which is easy to clean. True, this is not the best option for watercolors, since drops can form when mixing watery paints. As an alternative to glass, plastic and paper, you can use canvas, which should be pre-painted to level out the graininess.
How to make a palette for acrylic paints with your own hands. Advice from Walter O'Neill
And now we will learn in detail how to make a palette for acrylic paints with your own hands . If novice artists have a question: “Why?”, then you have yet to fully discover the rich world of acrylic paints. And then, you will certainly use this lesson.
Special palette for acrylic, art materials
Acrylic paints were invented relatively recently and quickly gained great popularity among artists. After all, they have many interesting features. They resemble oil ones in properties, but are much cheaper. If acrylic paints are greatly diluted, they can be painted like watercolors and will be brighter than watercolors. But you won't be able to wash the bottom layer because acrylic hardens quickly and irreversibly. This is its distinctive property, to which one has to adapt.
It is precisely because acrylic paints dry quickly on the palette, and even tightly, that you always have to do some special manipulations with them. Artists will undoubtedly appreciate the convenience and cost-effectiveness of a homemade palette for acrylic paints.
- Step 1 .
The usual white tiles and plastic palettes are out. The principle of this palette is that acrylic paints do not dry out on it! And to make it, we will need, first of all, a special container. This should be a shallow rectangular container. About the size of a sheet of paper. It is better to take at least A5 format. With a flat bottom and sides approximately 2–4 cm high. This could be some kind of food tray, or baking dish, or tray. Moreover, your dish does not have to be white, as in the photo. Change the color of the palette later as needed.
Base for a homemade art palette for acrylic
- Step 2.
The second thing we need in order to make a special palette for acrylic is ordinary paper towels.
Line the bottom of your container with paper towels. You will need at least 6 layers for the palette to work well. Whatever color your towels are, that color will be your palette. Napkins must be laid out very carefully. The surface must be smooth, without humps, pits or folds. If there is any excess, cut it off; where there is something missing, add pieces of suitable size.
Special palette for acrylic paint - line the bottom
- Step 3.
Here, the bottom is carefully covered with soft napkins or paper towels. Now you need to carefully wet the paper. Pour in enough water to get it completely wet. Carefully drain off excess water so as not to move the layers of napkins. We don't need paper mush, we need wet paper. The palette should not be too wet, otherwise the colors on it will spread during work and become thinner than expected.
Carefully drain excess water from the palette
- Step 4.
Now we need to do one very important operation. You need to very carefully and thoroughly squeeze out all the air from the palette. Using your hands, smooth the paper from the center to the edges, squeezing out any air that may be trapped between the layers of paper. As a result, you should have an even and smooth base for the palette.
DIY art materials palette
- Step 5.
And the third thing we need is a sheet of tracing paper. Which we will cut to fit the palette. It is better to purchase a good, high-quality tracing paper. In general, it can be used in many places, and any person who draws is strongly recommended to always have a good tracing paper in their arsenal. To create such a palette, the author of this master class, Walter O'Neill, recommends using Clearprint tracing paper. It is not cheap, but dense, reliable and high quality.
- Step 6.
We will use tracing paper to make the working surface of the palette. We adjust the sheet of tracing paper to the size of the bottom of the container and lay it on our wet workpiece. The tracing paper will be saturated with paper and settle well. And then it will be necessary to expel the air from under it again. Carefully smooth the surface of the paper.
- Step 7
You should end up looking something like the photo below. That's it, the palette is ready, you can take it and use it. A backing of wet toilet paper will keep the paints evenly and constantly moistened. And when it starts to dry out, drip a little water into it. But this will not happen soon: you have a few days of quiet work with acrylic. When necessary, simply bend the corner of the tracing paper and pour water into the hole. Keep your palette damp at all times.
- Step 8
Now everything is ready to draw! The photo shows how the colors spread slightly on the palette. Here is an example of grayscale that the author of this lesson created when he painted a black and white picture.
DIY art materials palette
So, as you can see, it is not difficult to make a special palette for acrylic paints with your own hands and is very financially profitable. What did we need for this? Just:
- tray
- paper towels
- sheet of tracing paper
- some clean water
And it will last for a long time. When it gets very dirty, you just need to replace the sheet of tracing paper.
➡ When there is a pause in drawing, the palette should be placed in the refrigerator, covered with a plastic lid. Or you can cover it with cling film if there is no lid. This way the paints can stay fresh for months.
Author of the lesson and original text of the lesson in English: Walter O'Neal
Similar articles
Master class “Abstract painting with gold leaf”
Let's paint a magnificent winter landscape with watercolors with an original plot. Master Class
Watercolor lesson: painting trees with a sponge
How to draw an avant-garde picture for a beginner
Master class: how to paint a watercolor still life
Artist Jack Tia Kee Woon
Palette sizes
The optimal size of the palette is 30-40 cm. The small surface is not very convenient, since it has to be constantly cleaned to make room for new mixtures. It’s especially frustrating when you accidentally delete a combination that you’ve carefully and long-selected, and you have to “suffer” all over again. Artists who prefer creative space use boards up to half a meter in size, and when working standing they use two palettes - a stationary one, located near the easel, and a mobile one, which is held in the hand when you have to often approach and move away from the painting.
Disadvantages of the palette
Despite the fact that the palette is a fairly simple tool, it plays a key role in the artist’s work, relieving him of the need to buy a huge amount of paints. To get an alternative color, it is enough to have several basic dyes - the main thing is to choose the right proportions. At first glance, it’s nothing complicated, but in fact this is the “stumbling block” that does not allow you to convey the desired shade.
The problem is this. Firstly, paints from different manufacturers give different color tones when mixed. Secondly, there is no formula to get the exact color. Even when using a color wheel, the artist has to act intuitively and add dyes virtually “by eye.” Thirdly, paint transferred from the palette to the canvas often looks different, and the artist has to “play” with color again, which leads to dirt. It takes a natural flair and great talent to overcome all these limitations, so it is not surprising that most painters, even after spending decades, cannot figure out the “secret” of mixing paints.
Monochrome style
If you notice obvious problems with your color palette, try playing with shadows. A thing that is very difficult to spoil is monochrome. Choosing an additional one color will complicate the task a little. But this method will also prevent confusion.
Of course, painting schools have more precise rules. You may be shown examples of one artist, but if you try to write in that style, your work may be subject to harsh criticism. Well, if you start painting at home yourself, then you have nothing to fear. Feel free to mix colors, get inspired and create. Don't stop if it doesn't work out the first time. This will all serve as a wonderful experience. Mistakes from which you will learn. After 100 attempts, 101 will definitely come out amazing.