You can change the design of a plasterboard ceiling in different ways, and this includes painting, lighting, and also the installation of multi-level figured ceilings. And in order to understand how figured ceilings are made, you need to understand how to make a circle of plasterboard on the ceiling and having such knowledge, you can make any shapes, since you will understand the very principle of producing an oval caisson.
Surface marking is a critical step
Making a circle of plasterboard on the ceiling yourself, especially when you have no experience working with rounded elements of ceiling structures, can only be done after making the correct markings.
They start with an analysis of the room. If the ceiling and wall meet with a small curve that imitates a cornice, it is removed with a hammer drill.
Only in this case will it be possible to fix the UD profile as close to the ceiling surface as possible.
At the next stage, the contours of the frame of the first level of the structure are outlined. This must be done, taking into account that a circle or semicircle of plasterboard will be attached at the second level. Start from marking the lowest point of the ceiling covering. Having dropped 25 mm from it, place a mark on the surface of the wall, repeating the steps in each corner of the room (you will need a level to control the measurements).
The marked points are connected by a line (chockline). They are guided by it when attaching the UD profile.
The next stage is marking the ceiling surface directly. Taking into account the direction of installation of plasterboard sheets, marks are placed on opposite walls in increments of 50 cm. Lines are drawn between the marks on the ceiling using a chockline.
Design Rules
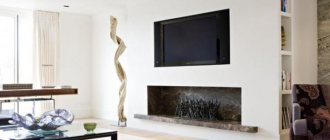
Any geometric shapes at the top of the room affect the perception of space. They can subjectively change its shape, increase or decrease its volume. A circle is a symmetrical figure that can make a space compact, attracting and uniting all other objects.
Design in a small room
An interior with a radius figure and furniture, the design of which has a minimum of right angles and lines, will be perceived as soft and comfortable.
At the same time, a circle is a simple and laconic shape that fits well into an interior with straight lines and sharp corners.
Important! The recommended minimum room height in which a multi-tier structure will not put pressure on the interior is 2.5 m.
A figured stretch ceiling will fit well into the interior if the following nuances were taken into account in the process of designing the shape of the structure, its localization and selection of material:
- Room area. In small rooms it is generally not recommended to install multi-level structures. If you need to make a platform for a chandelier, then use a single-tier stretch ceiling with a colored insert. The circle is made proportional to the size of the room so that it does not depress the interior with its size or get lost in a large area.
- Room shape. In square rooms, the circle is placed in the center. In rectangular rooms, you can create not only a conventional suspended round ceiling with the correct radius, but also in the form of an ellipse. In elongated rooms, you can make two circles that have different levels and are located in different directions.
- Zoning of space. If the room is divided into functional zones, and they are separated along opposite walls, then the suspended round ceiling can be shifted along the central axis towards the dominant zone. When angular zoning of square rooms, the circle is shifted to the corner, or a semicircular corner step is made.
The figure is located above the table in the hall
Important! Often a suspended round ceiling highlights some object in the interior. Usually this is a table. In this case, the radius of the circle should be slightly larger than the selected object and cover the space adjacent to it.
- Interior color palette. Taking into account the colors of furniture, flooring, color and texture of walls, elements of similar colors must be included in a multi-tiered structure.
Typically, the design of multi-colored multi-tiered ceilings uses contrasting colors.
Features of independent frame design: where to start?
You can find a lot of materials about the process of creating a profile structure, methods of fastening guides and methods of connecting profiles together. There are enough photos and videos of works on the Internet that give a general and very informative picture. But as for creating a multi-tiered structure, mostly ready-made works are presented. In rare cases, general photos of individual stages are displayed.
Such careful attitude to the secrets of craftsmanship is partly understandable - truly beautiful interiors are the result of the work of not only builders, but also designers and interior architects.
Frame installation
But at the same time, making an interior project with a round or oval insert in a plasterboard structure is not difficult. To independently create a multi-tiered ceiling in the form of a circle made of plasterboard with LED lighting, you need to carefully study the features of such a design. To do this, just view photos and video materials. This will allow you to properly organize the work process and get the desired result, an aesthetic circle on the plasterboard ceiling. But the process of developing such a solution can be represented as follows:
- make a sketch of the future project on a sheet of paper;
- for clarity, a model or layout of the upcoming structure is created from paper;
- a preliminary calculation is carried out and all values are measured: lengths, angles, radii, then the main electrical wiring lines are marked on the floor;
- at the end it is necessary to make a working draft, with a detailed study of all frame connection nodes without exception.
Marking a circle on the ceiling
Attention! The essential point is to draw an even circle.
The simplest method for creating a perfectly even circle is to draw it using a regular wooden plank or a section of profile of the required length. One end of the plank is fixed in the center of the future circle with a dowel, and then a straight line is drawn. To obtain an even oval, two points are fixed on the plane so that the distance between them is equal to half the width of the figure. Next, using a thread draped over both points and a pencil, a line is drawn. The dimensions of the oval can be adjusted by decreasing or increasing the length of the thread.
Features of the composition
Rounded shapes on the ceiling allow you to visually transform the space of the room. Depending on the composition, the ceiling may appear closer or further away. This is explained by design features: the circle can be a convex part or a recess. Both options can be created using tension coverings and such work is not particularly difficult, unlike work with gypsum plasterboard, where it will be necessary to assemble a complex frame and additionally bend blanks made of poorly bending plasterboard.
This detail fits very organically into rooms of any shape and allows you to create a beautiful interior. However, this will not be the only opportunity to use this geometric shape in a design. In addition, using circles you can:
- Highlight the semantic center
- Visually smooth out unevenness of surrounding walls
- Zoning the area
- Emphasize curved furnishings
- Create a sense of height with a recessed figure
- Reduce the not-so-pleasant visual effect of a very high ceiling in a small room
At the same time, a circle is a figure that is involuntarily associated with the sun and it creates a more positive atmosphere in the room.
Required tools and materials
Before you make a round ceiling, you should make sure that you have the following tools:
- scissors for metal work;
- sharp knife;
- perforator;
- jigsaw;
- level and a simple pencil;
- thin flexible wire.
To carry out installation work, you need to purchase finishing materials:
- plasterboards;
- metallic profile;
- screws and dowels;
- pendants.
First level installation
As you understand, the round ceiling consists of two levels (in the photo), so we need to initially install the first level. For this:
- We take the UD guide profile (a classic of the genre UD 27/28, if you are an artist of an original genre, you can use another profile) and screw it along the drawn line using self-tapping screws and dowels, a drill or a screwdriver to the wall. We screw the screws in half-meter increments. If the wall is concrete or brick, you will have to pre-drill holes and insert dowels into them. The dowel must have a diameter of at least 6 mm, and the self-tapping screw must have a diameter of at least 5 mm;
- Using a marker, we make marks along the entire perimeter of the room on the UD profile in increments of 60 centimeters (note that this distance is only relevant if the ceiling profile CD 60/27 is used). The marks will indicate the middle of the CD 60/27 profile during installation (there is a groove in the middle on the profile, so aligning it with the mark will not be difficult).
- We install the guide profile CD 60/27, focusing on how the drywall will be installed. For example, a room has a wall width of 2.50 meters and a length of 5 meters. The profile is installed in walls 2.50 meters long, since the length of a standard gypsum board sheet is 2.5 meters, that is, when installing, be guided by the fact that the drywall can be cut as little as possible, in the direction of laying the gypsum board and install the profile;
- Screw the inserted ceiling profile CD 60/27 to the guide profile UD 27/28 using special “bug” screws (there are different ones, you can read a whole lecture, but we won’t go into details - it’s a matter of taste, habit and adherence to technology);
- You have a structure made from the CD 60/27 profile, now we need to cross-screw the CD 60/27 sections to it to make a checkered ceiling. To do this, starting from the wall, insert the first section with one end into the guide profile UD 27/28, focusing on the marks, and the second end is brought close to the transverse profile. The profiles are connected to each other using crabs, which are snapped onto the main one and screwed to the additional one. The second section is connected at both ends to the main profile with crabs. We insert the last segment with one end into UD 27/28 on the opposite wall, and fasten the other end with a crab to the main profile. The point, I think, is clear. Refer to the photo.
- We take straight hangers and screw them over the installed CD 60/27 profile to the ceiling. Some craftsmen first mark profile installation lines on the ceiling, screw in straight hangers, and only then install the profile. There is no friend to taste and color, and the author saves time by not drawing lines on the ceiling, which is difficult to do on your own; you need second hands to use a tapping cord. In order to screw the suspension, it is advisable to use flared dowels if the ceiling is a reinforced concrete slab;
- The jewelry work begins. The installed CD 60/27 profile must be located strictly in the same level and horizontal plane. We take a level, set the horizontal and fix the profile with hangers (the hangers are screwed to the profile with “bugs”). We bend the remaining “ears”. Craftsmen still use thread to level profiles, but the UD profile level is often enough to reach the ideal horizontal line and tighten or lower the CD profile;
- At this stage the methodology diverges. There are two options. Install the frame of the second level or take drywall and sew up the first level, and then move on to the second level to make a round ceiling, in this case it is necessary to install the wiring to ensure the functionality of the backlight. There is no general opinion. If you decide to twist the plasterboard, take 25-30 mm metal screws with a cross-shaped recess. One sheet requires 60 screws. It takes two people to spin the drywall, although one can do it alone. There will be a separate conversation about this.
Carrying out preparatory activities
To install a circle of plasterboard on the ceiling, you need to remember that the height of the room must be at least 250 centimeters. Taking into account the fact that installation involves two tiers, the depth of the structure will be at least 7 centimeters.
First of all, you need to prepare the foundation for creating a ceiling system. Before you begin installing the plasterboard circle, you should pay attention to the condition of the contact points between the surfaces of the ceiling and walls. If there are any irregularities, they are removed with a hammer drill so that they interfere with attaching the profile.
What problems does a round stretch ceiling solve?
Using stretch ceiling fabric you can solve many problems:
- A separate part of the ceiling may look larger and deeper;
- Smoothing out sharp corners, emphasizing certain interior elements;
- Focusing attention on individual areas of the room, emphasizing their importance;
- Conventional division of a room into several zones. In this case, various curvilinear transitions are appropriate;
- Creating decorative lighting on the main ceiling structure.
Designers believe that a circle is a conventional sun that can look harmonious in any room, regardless of its purpose.
How to assemble it
If you just come up with the general design and entrust the work of bringing the idea to life to hired craftsmen, then there is nothing to worry about - you just need to think through everything carefully. It's another matter if you are going to assemble a round plasterboard ceiling with your own hands. You will need some skill, material to make the structure and a lot of desire. An approximate scheme of work will look like this:
Tip: to bend the profile to the desired radius, many cuts are made on it, allowing the part to bend. They are made from the inside of the bend.
- The lower part of the frame is attached to the attached sections of the profile - at the distance provided by the composition for the lower plane.
Important: the lower plane should be strictly horizontal, and on a figured composition, a nylon cord stretched in the required plane and level will help control the process.
- The last stage of assembly will be covering the assembled frame with parts cut from a plasterboard sheet. They have to be bent and therefore also need to be prepared in advance.
To ensure that gypsum board parts do not break when trying to screw them to the base, but bend to the required radius, they can be moistened with water, having first made many punctures on the surface with a needle roller, or several transverse cuts can be made on the inside or outside of the part. After the part is in place, it is covered with a layer of putty that hides all defects.
You can understand in more detail how to make a round ceiling from plasterboard by reading the relevant material dedicated specifically to the installation of such structures. This material describes only the general progress of work in order to get an idea of the upcoming task.
Installation of drywall and bending methods
Now the structure is carefully sheathed with plasterboard sheets of appropriate sizes, using a drill and self-tapping screws. When performing work, pay attention to the following:
- To prevent the installation joints of the sheets from being noticeable, install the gypsum board along the window;
- Hide the screw heads in the material; it is unacceptable for them to be visible on the surface.
Next, bend the gypsum board into a semicircle.
You can see in detail how to make a semicircle on the ceiling yourself using the following video as an example:
You can bend drywall into a semicircle using one of two methods of bending gypsum board sheets: dry or wet. But remember that you need to work carefully, as there is a danger of damaging the material.
The dry method is suitable for structures with large radii. One side of the sheet is attached to a pre-made frame, and the other is pressed against it. This gives the sheet the required shape. Finally, the sheet is fixed to the frame.
To bend a sheet using a wet method, take a roller (or brush) and an awl. GCR is pierced in several places, but only the top cardboard covering. Then, using a roller, the material is moistened with warm water until moisture stops being absorbed into the sheet. Thus, drywall saturated with moisture bends well.
When the structure is completely covered with plasterboard, cover with putty all the places where screws are screwed in and joints, and finally prime with a deep penetration primer and paint the ceiling. The work is finished.
A round plasterboard ceiling is not difficult at all!
Modern finishing material plasterboard (gypsum plasterboard) allows you to bring your wildest ideas to life. Knowing the secrets of the technology for making curved multi-level suspended ceilings, you can create waves, ovals and circles. Let's take a closer look at how to make a circle of plasterboard on the ceiling.
Round ceiling with LED lighting
Options for round suspended ceilings
If you simply draw round patterns on a perfectly flat ceiling, they will look great, but you need to understand that you cannot achieve a three-dimensional image in this way.
There is a large selection of materials for suspended ceilings, with which you can install three-dimensional structures of various shapes. The most common options for creating round ceilings include:
- Recessed or, conversely, convex rings framed by spotlights;
- Rounded recesses on a flat ceiling with directional lighting;
- Ceiling structure in the form of a convex drop;
- Hemispheres protruding from the main structure, with external and internal lighting;
- Disc shape with side lights.
You can come up with a project for your future ceiling yourself or look up an idea on the Internet.
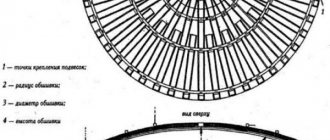
Height of the circle.
Usually the difference between the marks of the 1st and 2nd levels of a suspended ceiling is 10-15 cm, sometimes 20 cm. The main limiter here is not so much aesthetic requirements or technical capabilities, but the height of the original ceiling. Not all people live in apartments with a ceiling height of 3 or even 4 meters, more often in apartments with a ceiling height of 2.5 meters, and sometimes less, and therefore it is not advisable to lower the ceiling in such apartments. But even if you make a circle 10-12 mm high, i.e. according to the thickness of the sheet being hemmed, then the suspended ceiling will already become embossed. And if 3-4 sheets are sewn at the transition point between the first and second levels, then in addition to the height difference of 30-50 mm between the ceiling levels, a rather complex shape of the wave end will be achieved, partially similar to that shown in Figure 1:
Figure 6 . General plan and section of the ceiling with a circle in 3 levels, formed only by the thickness of the plasterboard sheets.
The advantage of this version of the ceiling is that the side surface of the circle does not have to be sewn up and, accordingly, there is no need to make a rather complex frame for sewing up the side surface of the circle, and there is no need to bend plasterboard sheets. Nevertheless, it will not be easy to properly putty such a ceiling. In all other cases, you will have to make an additional frame to cover the side surface of the circle.
Installation procedure
Having completed the markings, proceed to install the structure. To begin, mount the frame, for which you need:
- Guide profile 27 x 28 mm, attached to the wall;
- Ceiling profile 60 x 27 mm;
- Special “rivets” – crabs;
- Straight (or U-shaped) suspensions or strings. Direct hangers are used if the distance from the main ceiling to the suspended structure is no more than 11 cm, and string hangers are used when this distance is exceeded.
Materials required for the frame
Now cut the UD profile to a length slightly larger than the circumference. It is necessary that there are two such parts - for the floor and the ceiling. Using dowels, mount guides through the holes in them approximately 10 cm from the ceiling. If there are no such holes, make them yourself with a distance of 50-60 cm. Then vertical guides from the profile are installed between them, which are fastened with crabs at the joints of the profiles. The distance between them is one meter. Be sure to secure the crabs with self-tapping screws on all sides. Pay attention to the rigidity of the suspended structure.
Ready frame
The last thing to do is distribute the wiring inside the frame. After this, proceed to installing the gypsum board on the horizontal surface of the ceiling structure.
Tools and materials, installation of structure
The installation process looks quite realistic both in photos and videos, but you should also know the theory of installation. First of all, you should familiarize yourself with the list of necessary tools:
- marking and measuring tools: pencil, tape measure, long ruler, marking cord, level;
An example of a round ceiling made of gypsum plasterboard
- perforator;
- Screwdriver, mains or with spare batteries;
- hammers, files, knives, brushes, spatulas, etc.;
- grinder with thin cutting wheels 1.2 or 1.4 mm for cutting profiles;
- metal scissors for working with tin and for plasterboard profiles.
Advice. When purchasing materials, as practice shows, it is better to take self-tapping screws and screws with a reserve. In addition, it is recommended to have 2-3 spare drills for a basic hammer drill - 6, 8, 10 mm.
An important stage in creating a ceiling space is the work associated with the installation of a lighting system. Electrical cables must be laid in compliance with all safety rules. When placing special lighting fixtures under the surface of a stretch ceiling, it is recommended to do this in the following order. First, all lighting elements are checked on the floor, and after being fixed to the frame, they are tested together with other devices.
Screwing screws into gypsum board sheets
Today, many videos on the Internet are devoted to the problem of installing electrical lighting devices. Each of them places an emphasis on the issue of safety. Mandatory condition: regardless of what stage the installation is carried out, at the terminal points of lamps, chandeliers, hidden boxes and control devices, all ends of the wires are marked in accordance with the diagram and insulated with insulating tape.
Required Tools
In addition to the necessary materials, special construction tools may be required to carry out markings, fastening profiles and drywall, as well as for further finishing of the ceiling structure.
The following tools will be required:
- screwdriver and screwdrivers with a set of bits;
- drill with wood bits, for making holes in sheets for lighting fixtures and wiring;
- Bulgarian;
- metal scissors;
- spatulas;
- sandpaper;
- serpyanka, masking bandage;
- level and painting cord;
- wide brush.
All these devices and tools will allow you to install the structure very quickly and efficiently.
Examples
The diameter, height and even the location of the circle relative to the walls can be important when creating a beautiful and harmonious interior; it can be difficult to come up with your own hundredth design option and therefore, below are several examples of such ceiling design. Based on the ideas shown, it will be much easier to come up with your own decor option.
Design and installation options for lighting
To make the circular ceiling look even more impressive, you will need lighting. These can be spotlights, LED strip. Lighting fixtures are installed in pre-cut holes, and the wiring is hidden in the circle design. The power supplies for the LED strip are also hidden there.
Advice! Connecting the tape to one powerful power supply in a sequential order will not allow all segments to burn equally brightly - each subsequent segment will produce a dimmer light. Therefore, it is better to install several small blocks, connecting the tape in pieces.
How else can you decorate a round ceiling:
- make a photo print of “sky and clouds”;
- paint with glossy paint and add white lighting - this will visually expand the room;
- decorate the ceiling with convex zones flowing from the corners to the wall, where the lighting is also located;
- make not monotonous light, but use bright multi-colored light bulbs;
- use drawings, calligraphy, hieroglyphs as a decorative element;
- create patterned elements from spotlights;
- hand-paint the ceiling from “liquid paper” and highlight convex formats.
There are countless decor options. Such round structures, like a standard gypsum board ceiling, will successfully hide communications and wiring. In addition, plasterboard has high sound and heat insulating qualities, which will add comfort and coziness to the room.
Creating a second level
After installing the structure of the first tier, the second one is installed. In order to end up with a backlit circle of plasterboard on the ceiling, you need to once again draw a circle on the ceiling surface or on the first-level finishing material. Again you will need to use a screw with wire and a pencil.
Next, you should determine what exact shape the circle is required - protruding or in the form of a niche. Then a guide profile is installed, attached to the ceiling or to the first tier.
Using scissors, cuts are made on it, taking into account the planned shape of the suspended ceiling:
- when the circle serves as a niche, then the side parts should be cut;
- if a protruding structure is designed, then the side part and the adjacent profile back are cut.
Then the profile is bent and attached, focusing on the drawn line, taking into account the intended shape. When a protruding circle is needed, then the profile is fixed with the backrest. If a niche is required, then it is attached to the first level with a side edge.
Do-it-yourself box and other plasterboard figures on the ceiling
The reason for this is the following advantages of drywall :
- Environmentally friendly material.
- High sound insulation.
- Strength.
- Water resistance.
- Fire resistance.
- Light weight.
- Ease of installation.
The appearance of any room is spoiled by the bulkiness and sloppiness of the wires of lighting fixtures, gas and water pipes located on the ceiling. A plasterboard box is an excellent option for hiding all shortcomings and implementing design solutions to this problem. The plasterboard structure will be an ideal addition to the overall interior.
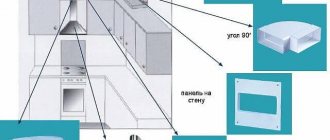
Panel ceiling
Plastic panels can also be used to construct the ceiling. Designs made from such material with rounded corners are rare, but they look quite good.
Assembling the structure for a round ceiling is simple; it is carried out according to the same principle as in the case of plasterboard sheets, only this material will be attached differently.
Decorating the outer round corner will also be done differently. To make the ceiling look neat, it is recommended to buy a bendable corner to mask the joints.
Covering the frame with plasterboard
Cutting sheets into elements of a certain size to create a circle of a suspended ceiling is done using a jigsaw. Drywall is fixed with self-tapping screws, not forgetting to recess their caps. To bend the gypsum board strip along the frame and give it the desired shape, it is moistened with water, allowed to absorb the liquid and carefully bent in the required direction. At the same time, they are installing spotlights.
Fastening drywall to a pre-rounded partition
To correctly answer the question of how to make a semicircular partition from plasterboard, you should understand that the quality of the process performed depends on the correct preparation of the wall and the plasterboard sheet.
Before gluing drywall, the wall must first be rounded. If the wall is made of brick, then knock down the outer corner with a hammer drill and level it well. With a concrete wall, proceed in the same way, but it should be taken into account that concrete is much stronger and there are reinforcing elements in it.
To prepare the plasterboard sheet, you need to bend it. To do this, you need to make a template in accordance with the shape of the wall and choose one of the bending methods.
Dry bending
On one side of the plasterboard sheet, cut the cardboard, trying to draw the strips parallel to each other. The material is laid on the template, and the space created by bending between the parts of the sheet is filled with putty. The edges of the sheet can be pressed with bars to maintain its shape. The workpiece is left for 24-48 hours until dry. After this time, the material can be used for its intended purpose.
Jpg" alt="how to make a semicircular wall from plasterboard" width="500″ height="415″ srcset="" data-srcset="https://remontcap.ru/wp-content/uploads/2017/09/13e9e16fbce8992ec94da8c864de25e0 ..jpg 300w" sizes="(max-width: 500px) 100vw, 500px">
Wet bending
With this method, one side of the sheet is rolled with a needle roller so that water can get to the core of the material. Then the sheet is moistened with water and left for 15-20 minutes to soften the gypsum in the middle layer. The workpiece is placed on the template, the edges are fixed and left to dry completely. This takes approximately 24 hours.
The use of this method has a limitation: the minimum bending radius is 30 cm. Therefore, to create more round shapes, it is better to use the dry method.
Jpg" alt="how to make a semicircular wall from plasterboard" width="502″ height="458″ srcset="" data-srcset="https://remontcap.ru/wp-content/uploads/2017/09/fda7642e655f4682e99b0ab1e95f1dcb ..jpg 300w" sizes="(max-width: 502px) 100vw, 502px">
To glue the bent sheet, the rounded plasterboard wall must be coated with a primer and dried. Then you need to apply mounting adhesive to the wall in separate strokes, attach the workpiece to it and gently press it.
In the process of gluing the wall, you need to make gaps between the floor and the material of about 1 cm. This will allow air to circulate freely, creating optimal conditions for the glue to dry.
Using drywall, even a simple home craftsman can make a rounded wall with his own hands. This is possible if you follow the installation technology, as well as with the correct application of the tips and recommendations of experienced craftsmen.
Preparatory work for installation
Since this type of ceiling covering is installed for more than one year, preparation should be taken responsibly. Preparation of the room and work surface will be as follows:
- the room should be cleared of unnecessary furniture and interior items, including lighting fixtures, and there should be no exposed wiring;
- you need to decide on the zoning of the room, hide electrical wiring and ventilation;
- level the surface and seal it with sealant if necessary, treat it with an antifungal agent;
- Pre-precise markings of the first level are made;
- purchasing the required amount of drywall and installing guides around the perimeter using screws and dowels.
Installation of hangers
Design options
In recent years, two-level plasterboard ceilings with lighting have become popular, in which the lower tier is suspended, made from sheets of this material, and the upper one is made of a suspended ceiling on a round plasterboard ceiling. Between the levels there is a space where lighting equipment is installed.
Also interesting are designs where both tiers are made using only drywall:
- Create an image of the sky with floating clouds.
- Arrangement of a white ceiling with bright white lighting.
- Using lots of bright colors or whimsical elements.
- Application of elements of Chinese calligraphy.
- Making patterns from small spotlights in a plasterboard ceiling.
Drywall is an environmentally friendly, easy to process and install, fire-resistant material. Using gypsum boards you can create multi-level structures of varying complexity.
Round suspended and plasterboard ceilings have excellent sound and heat insulation characteristics, as they help retain heat by preventing warm air from leaving the room through cracks in the ceiling.
What should the texture of the material be?
A round stretch ceiling can be made from the following materials:
- Glossy film will help create a surface design that will have excellent reflectivity and a good degree of light dispersion. From varnished vinyl film you can make a round ceiling shape, which will be framed in a base made of matte film. The result is an original two-level ceiling;
- Compared to the first version of the material, the matte canvas does not reflect light and objects. This film is most often used as a base or frame for interesting shapes and patterns of the ceiling;
- Satin fabric is something between varnish and matte film. The shiny coating ensures excellent light diffusion without disturbing glare. A pearlescent glow emanates from such a surface. Satin is great for framing figures on the ceiling and can be used as a background;
- Metallic fabric looks like precious metal. Commonly used colors are gold, silver and bronze. It is impractical to make the ceiling entirely from this material. Typically, a separate fragment is placed in a structure made of a contrasting color;
- Perforated film is often used to install hidden lighting, as well as to create a “starry sky” type ceiling.
Also, vinyl film for ceilings can be transparent or translucent, which can be useful for installing lighting fixtures.