If you want your room to have a beautiful and perfectly even ceiling, try making it yourself. Show your imagination!
Drywall is perfect for implementing the most complex and unusual ideas.
With its help, you can assemble various types of ceiling coverings, among which the following designs are especially popular:
- double (an excellent solution for obtaining soundproofing properties);
- two-tier (ideal for spacious rooms with high walls);
- figured (allows you to add dynamics to the interior, used for additional decoration of rooms);
- tension (an alternative for those who do not want to work with joints).
Drywall - composition and characteristics
Plasterboard is usually called a gypsum building board, which, in fact, is a sheet material containing a layer of pressed gypsum, lined on the sides with two layers of cardboard.
From the description it follows that this material is 100% environmentally friendly. Plus, it’s not expensive, it’s smooth, and during the installation process it produces less waste and dirt than the same plaster. The simplest single-level plasterboard suspended ceiling is quite simple to make. It is enough to have two people who understand at least a little about construction processes, at least at the everyday level.
Drywall is produced in various types, sizes, colors, thicknesses.
The most common sizes are:
- standard – 250*120 cm;
- extended – 300*120 cm;
- small format – 150*60 cm.
The most common thicknesses are:
- standard – 12.5 mm;
- reinforced – 15 mm;
- for bendable structures – 9.5 mm.
There are different types of drywall:
- ordinary (gypsum plasterboard) - in light gray color;
- moisture resistant (GKLV) - in gray-green color;
- fire-resistant (GKLO) - in a gray-pinkish tint.
Features and areas of application of different types of drywall Source ispovednik.ru
Types of frame
According to the structure of the profiles, the following types of bases are distinguished:
- Cellular - when the profiles and accompanying jumpers form one-dimensional cells - 60x60. This type of installation of a hanging frame is suitable for those who doubt that they can install a reliable simple frame under drywall with their own hands. It will be somewhat more expensive in cost, but it is easy to install and there is practically no need to calculate the load-bearing properties. Also, this design is very durable;
- Transverse - when gypsum board sheets are attached exclusively to transverse profiles. However, it is worth performing such work only when the master is confident in his calculations and abilities.
Based on the number of tiers, you can make a frame:
- Single-level - the easiest to assemble, as well as the location of the profiles, since in this case, they will all be in a single plane;
- Multi-level - more difficult to install, since you will have to install and calculate 2 or several tiers of the frame at once. at the same time, a multi-level design is also called an independent structure when the mounted area is not entirely covered with gypsum board. That is, you can attach the planned elements to the base ceiling without covering it completely, but only partially covering it with a geometric figure;
- With a box - in fact, this is the same two-level design, only the elements protruding onto the 2nd line are often of a rectangular perimeter type, usually used as camouflage for wiring and hiding other communications. Also, the installation of a plasterboard box on the ceiling can be done solely for decorative purposes, for example, when installing lighting around the perimeter.
The nuances of installing such a ceiling
Plasterboard ceilings, as a rule, take up to 10cm of height from a room. This distance may be slightly smaller, and is determined by the presence of hidden heating and ventilation communications, lamps and other equipment.
For this reason, installation of such ceilings in small-sized “Khrushchev” buildings is not recommended.
Generally accepted standards consider 270 cm to be the optimal room height to install a simple single-level plasterboard ceiling. For a two-level one, at least 300 cm of room height will be required, and for a multi-level one - 330 cm or more.
When is it necessary to cover a wooden ceiling with plasterboard?
Let us immediately note that installing plasterboard on a wooden ceiling is a pressing issue specifically for private wooden houses. Unlike apartments with their concrete floors, wood has a certain mobility and can shrink/swell - a clean gypsum board coating allows you to minimize damage due to deformation and movement of the wood. And yet, why do you need a plasterboard ceiling in a wooden house, why cover the area with sheets:
- level the ceiling space for any finishing;
- improve the sound insulation performance of the room;
- disguise communications passing under the ceiling;
- improve the thermal protection qualities of the building.
It is not difficult to install gypsum board sheets, the price of the material is affordable, you do not need expensive professional tools or extensive experience. A combination of factors makes ceiling finishing with sheets one of the most optimal coating methods.
Strengths and weaknesses of the material
A suspended ceiling made of gypsum plasterboard has a lot of positive qualities :
- can last from 20 to 30 years;
- sufficient strength so that it does not deteriorate from contacts and scratches;
- installation is quite simple and there is no need for special tools and skills;
- high levels of noise and heat insulation of the material, which can be greatly increased by using additional insulation;
- easy to maintain - periodic use of a vacuum cleaner and a damp cloth will be sufficient;
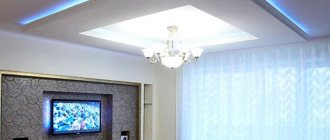
Plasterboard ceiling design option Source yandex.net
- the possibility of realizing any design idea, thanks to the material, which can be cut into any shape and given the desired shape by first wetting it and then drying it;
- affordable price;
- absolute environmental friendliness;
- It’s easy to mount a ceiling with lighting of almost any type.
However, the material also has disadvantages :
- Regular (every 6-7 years) repainting of the ceiling will be required;
- significantly reduces the height of the premises;
- quite labor-intensive and meticulous work on finishing joints and seams;
- deteriorates quickly in high humidity, especially when water gets in as a result of leaks and flooding;
- not durable if errors are made at the calculation stage;
- Installation cannot be done alone; at least two people are needed.
The above qualities characterize drywall on the positive side. However, the choice is entirely individual and depends on the tasks assigned to the ceiling in each specific room.
It is quite difficult to install a ceiling without the help of a partner. Source ytimg.com
Subtleties of making wooden sheathing
When assembling sheathing for drywall made of wood, you need to select lumber with the appropriate cross-section. If you do not plan to insulate the walls with plasterboard, then a batten with sides of 40x40 millimeters is suitable. When laying insulation, the width of the frame should allow this to be done, that is, use timber 50-100 mm wide and 40-50 mm thick. For fastening, plastic dowels and screws of suitable length are used. Fasteners are purchased based on the thickness of the lumber, so that at least 30-40 mm of dowels fit into the wall.
Diagram with dimensions of wooden beams for sheathing It is important to take into account the material of the walls. Gas or foam concrete blocks are very fragile, and a standard plastic dowel will not provide reliable fixation; it will simply fall out or have significant play. The same applies to anchors. For fragile walls, a metal dowel with teeth, the so-called “crocodile”, is used. The technology for assembling the sheathing can be in the form of two designs: with fastening the slats directly to the wall (if it is flat without significant differences) and with installation on guide bars laid on the floor and ceiling.
An example of installing a sheathing on a wall. In the second option, the diagram is similar to assembling a frame from a profile on a wall. The guides are mounted, the frame posts are attached to them using mounting angles, and then the cross rails are added. This embodiment is applicable when the walls in the house have very large unevenness and need to be leveled with plasterboard.
It is important that the holes for the dowels are drilled in advance, otherwise it will not be possible to drive in the dowel; the same applies when screwing in self-tapping screws “directly”, they can simply split the board.
Lathing installation diagram
An example of attaching a wooden sheathing under plasterboard. If the walls are smooth, the sheathing is assembled as follows:
- mark the surface for the vertical posts of the frame;
- The slats are installed along the lines and holes are drilled directly through them in the wall to the diameter of the dowel. The pitch of the attachment points is maintained within 500-600 millimeters;
- drive in dowels and screw in self-tapping screws.
Preparatory stage
The direct installation of a suspended ceiling must be preceded by preparatory work. They include:
- Preparing the room itself.
- Design.
- Calculations for required materials.
- Applying markings on the ceiling and walls.
- Purchase of materials.
All these stages are described in more detail below.
Preparing the room
Preparing a room in a new building is limited to the banal removal of construction waste. Residential premises will require:
- cleaning all furniture for unobstructed access throughout the entire ceiling area;
- if problems arise with the implementation of the first point, then the furniture is pulled into one part of the room and then covered with polyethylene (in the future, repeated dragging of this furniture and further cleaning of construction dust will be required);
- cleaning the ceiling surface from traces of old paint, fungal spores, and soot.
Protecting furniture with polyethylene Source mosokna.ru
See also: Catalog of companies that specialize in finishing materials and related work.
Design
You don't need much for this. It is enough to arm yourself with a tape measure, a pen or pencil and a double sheet of notebook paper. First of all, you need to measure the length of each wall separately and the perimeter as a whole. This is necessary for subsequent calculations of the required number of ceiling profiles and establishing the size of the guide profile.
Then all measurements are transferred onto a notebook sheet schematically while maintaining the scale. The result should be a drawing of the ceiling. Next, you need to think through and schematically map the locations of the frame and suspension fastenings.
When drawing up markings for the frame, you need to take into account the following points:
- The longitudinal profile is fastened at intervals of 40 and 60 cm due to the weight of the drywall. The decision is made individually. The frequency increases in proportion to the size of the material. Those. for a thin gypsum board of 9.5 mm, a step of 60 cm will be enough, and for a thicker one it is recommended to reduce the step to 40 cm. It is recommended to set the step in numbers that are multiples of the sheet width (120 cm), this will greatly facilitate the calculations.
- It is better to fasten the transverse profile in increments of 50 cm. This size will be a multiple of the length of any sheet of drywall and will also make calculations easier.
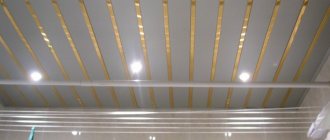
Option for mounting a plasterboard ceiling frame Source prorab.help
- The wiring diagram and the location of the future placement of the lamps are immediately noted on the diagram.
Calculations for required materials
The calculations are quite simple and even a schoolchild can do it. But they need to be carried out so as not to spend extra money on materials.
- To determine the number of guide strips that will be attached to the walls under the ceiling and serve as support for the frame, you need to divide the length of the perimeter of the room by the length of the profile. Conventionally, if the perimeter is 22.4 m and the profile length is 3 m, then 7.47 pieces will be needed. profile. Accordingly, you should buy 8 strips.
- To determine the number of lines of longitudinal and transverse profiles, it is necessary to divide the length and width of the room in turn by the step size of the longitudinal and transverse profiles, respectively, and subtract one. Round the resulting figure up. Conventionally, we divide the length of a room of 5.6 m by a step of 0.6 m and subtract one. We round the resulting result of 8.33 to 9. We do the same with the width of the room, only we substitute our 0.5 m.
Parts for attaching a plasterboard ceiling Source yandex.net
How to find a profile under drywall?
In order not to miss and get the fastening equipment exactly into the metal frame, we recommend using powerful neodymium magnets.
Using it, you can easily find a rack, guide profile or auxiliary metal jumpers under the plasterboard surface. Finding a profile ceiling frame is necessary in order to hang lighting fixtures or other decorative interior elements.
If there is an error in the calculations, the entire structure will sooner or later collapse on the floor, so it is very important to determine the correct point for fastening. To do this you need:
- Select an approximate location for future mounting.
- Place a thin sheet of paper or fabric on the ceiling to prevent the magnet from scratching the surface.
- Place a neodymium magnet on the fabric and begin to slowly move it along the intended search area.
- When a magnetic reaction occurs, mark the location with a pencil.
Please note that for the most effective search for a metal profile, it is better to use a large magnet. It is capable of covering a larger radius at a time, which means detecting metal will not take much time.
Video description
Detailed calculations of the necessary materials with specific numbers can be seen in this video:
Marking the ceiling and walls
Using a hydro or laser level to help, you should determine the lowest point of the ceiling. From it you need to measure a distance of 5 cm (if you are planning a plasterboard ceiling with lighting, then the whole 10 cm) and draw the line of the future ceiling on the walls.
Along this line you need to make marks for laying the longitudinal profile at intervals of 60 cm (or 40) on one wall. On the opposite wall, carry out similar actions and connect the resulting points in a line. The result will be several lines parallel to each other and adjacent walls, spaced 60 (40) cm apart.
Carry out similar work with the second pair of walls, only change the step to 50 cm.
Then you should mark the mounting points for the plumbs. Longitudinal ones are marked at a distance of 60 cm from each other, and the outermost one is 30 cm away from the wall. Transverse ones are placed at a distance of 50 cm and not reaching the wall 25 cm. Simply put, after applying the grid to the ceiling, a place should be marked in the middle of each side of each rectangle for plumb lines.
Creating a reliable metal frame for a gypsum board ceiling
The production of the ceiling begins with the installation of the load-bearing base. The guide to creating a metal frame includes 5 main points.
Holes are drilled on the prepared line at the previously designated points. A UD profile is attached to the rough ceiling, which is fixed using dowels and nails.
Installation of hangers is in progress. Their main purpose is to fasten the main longitudinal metal profiles. They are not needed for transverse structural elements. The hangers are fastened with ordinary dowel nails. If voids are detected, it is rational to use a wedge ceiling anchor.
The next step is to install a CD type profile. Before hanging them, it is necessary to determine a flat horizontal plane running across the entire area of work. To do this, just pull the nylon thread.
The longitudinal CD profile is initially fixed between opposite UD parts (specifically, it is inserted into grooves specially designed for this purpose). Then it is sequentially mounted into prepared hangers. The free ends of the hangers are bent vertically downwards, completely encircling the profile and secured with small universal screws.
The final stage of creating the frame involves the installation of transverse profiles, which are recommended to be placed at a distance of half a meter from each other.
The finished frame must be carefully pulled down on each side. This technology allows all suspensions to be aligned to the same length and helps identify possible irregularities in the horizontal plane of the frame.
Ceiling installation process
Installation work, or rather its speed, depends mainly on the height and area of the room, as well as the planned complexity of the ceiling.
So, to lay a straight ceiling without any frills, two skilled specialists will need time at the rate of 30-60 minutes per 1 m². A two-level plasterboard ceiling will require much more time and labor. If plasterboard ceilings are installed on two levels with lighting, then it will be necessary to add the necessary time for high-quality installation of electrical wiring and aesthetically beautiful embedding of the lamps themselves into the slabs.
Alternative lathing option
The frame base can also be made of metal. The cost of a metal frame is slightly higher compared to its wooden counterpart. But at the same time, the metal profile is strong, durable and reliable. If you already have the skill to install a wooden frame, then installing a metal frame will not be difficult.
Initially, you need to decide at what distance from the base of the ceiling the gypsum boards will be located. The distance must be sufficient to accommodate lighting elements, electrical wiring and other communications.
Video description
An option for assembling a frame for plasterboard on the ceiling can be seen in this video:
Strengthening heat and noise insulation
If there are noisy neighbors or the room is located on the top floor, it is recommended to additionally lay mineral wool or other insulation.
Drywall installation
Step-by-step installation process:
- First, the sheets must be brought into the room where they will be installed and left for several days in a horizontal position. During this time, drywall adapts to new temperature and humidity conditions.
- The sheets are cut to size - shortened, and notches are cut out for the protrusions.
- Next, you need to chamfer the edge of the cut using a construction knife, maintaining a slope of 45 degrees.
- The installation of the first sheet from the wall is carried out leaving a small gap of a couple of millimeters for high-quality ventilation of the inter-ceiling space. Drywall is attached to the profiles and along the edges, according to the drawn up diagram, using self-tapping screws.
Features and disadvantages of wood lathing
The construction of a wooden frame under gypsum boards is attractive due to its low cost and ease of operation. Especially if during the repair there are a small number of boards left that can be used as slats for the supporting structure. In this case, you will not have to spend money on purchasing metal profiles, as well as the necessary fastening elements, such as direct hangers.
But you should also remember about the properties of wood that limit its use in construction:
- Wooden structures are subject to changes in geometric dimensions due to excess or insufficient moisture. The drywall attached to such a sheathing will move with it, resulting in cracks appearing at the joints of the sheets. This is a constant process, as wood releases moisture when the room is dry or absorbs when there is excess humidity.
- Leveling walls using gypsum plasterboard is often combined with insulation. Ventilation of the wooden parts of the sheathing under these conditions is minimal, which leads to their rapid rotting.
- The bars are not suitable for leveling walls. It is unacceptable to use wedges for lining: over time, the wood may bend under the influence of moisture and temperature, and weak areas will form in the areas of such linings.
- It is not recommended to use a wooden frame when finishing plasterboard ceilings. This design does not have a sufficient safety margin; it is better to use a metal profile for this purpose.
- It is unacceptable to use a wooden frame in rooms with high levels of humidity or temperature. Strictly speaking, lathing made of this material is only suitable for rooms with constant microclimate parameters.
- If it is planned to place electrical wires under the surface of the plasterboard, then metal guides must be used: wooden elements do not have a sufficient level of fire safety.
USEFUL INFORMATION: Drywall slopes: do-it-yourself installation
Everything about installing and repairing ceilings with your own hands
If you use a water level, then find a reference point at the lowest point of the ceiling and start from it when making the following marks. This profile has sides bent inward, as shown in the photo. Because of this, they are much stronger and provide greater frame rigidity. Take measurements in advance and place marks in the middle of future profiles.
This way you will have clear guidelines and you won’t have to constantly measure the indentations. You need to constantly shift elements and arrange them in a checkerboard pattern. This will make your ceiling much more resistant to cracks.
- The element is aligned along a stretched cord, or using a building level;
- 1-2 self-tapping screws are screwed in on each side; there are many holes on the suspension, so finding the optimal fixation points is not difficult;
- The excess ends are simply bent upward; they will not interfere with further work.
Material selection
The type of drywall used in the firmware is of great importance:
- normal - used in offices, industrial warehouses and apartments (suitable for rooms where there are no sudden changes in temperature and humidity);
- waterproof - does not allow moisture to pass through (if there is an excess of it, then this type will not delaminate, and the hated mold and fungi will not appear on it);
- fire-resistant - this option is used in rooms where there is a high probability that a fire will occur (ordinary drywall,
, fully complies with fire safety standards); - fire and moisture resistant - the most expensive type, its protective level is required exclusively in industrial warehouses.
Rough ceiling finish
There are many durable materials for lining a rough ceiling, embodying the intended interior, a special design of the room, even without cladding, in an antique style. Depending on the purpose of the interior of the room, finishing and decor are selected.
Filing the rough ceiling
For example, for rough renovations, interior design, when planning a design or decor in a bathhouse, you cannot use the following elements:
Various wooden ceiling panels: chipboard, fiberboard, plywood, because with high humidity they will deform. Plastic, it can be used to decorate a rough base, a ceiling with a wood and antique look, to emphasize the design even without facing cladding, but it has poor thermal insulation properties, condensation will form, and then mold on the finish. Timber containing resins that will drip when heated
This can be lath or MDF, it is important to check before purchasing.. https://www.youtube.com/embed/LeOoQZaFNc0
Installation of hangers and fastening of profiles
UD guide profiles are installed along the lines broken off with the painting cord. They are fixed using self-tapping screws. After this, marks are made on two opposite walls for the installation of load-bearing CD profiles, maintaining a step of 40-50 cm .
The supporting profiles are inserted into the guides and secured with metal-to-metal screws. In accordance with the pre-made markings, hangers are installed. CD profiles are fixed in them and the plane is checked with a thread stretched under the ceiling.
Craftsmen do not recommend installing load-bearing profiles close to the ceiling, as this makes work difficult. A gap of 1-1.5 cm allows you to keep the profile on top, making it easier to align. In those places where reinforcement of a single-level structure is needed - under boxes, installation of a lamp - cross members from load-bearing metal profiles are mounted.
Marking
It is necessary to start drawing landmarks from the lowest corner in the room. This will allow you not to be afraid that any of the edges of the resulting structure will not fit into the geometry of the room.
The indentation is made in such a way that you can place the inside of the lamps, wiring and everything that needs to be hidden in the ceiling space. Usually, five centimeters is enough for this.
Having placed a mark in one of the corners of the room, using a hydraulic level, it must be transferred to the other corners. It wouldn’t hurt to make intermediate marks on the walls in order to draw straight lines through them.
It is easy to draw a straight line on the wall using a marking cord, which is sold at any hardware store.
On the surface of the ceiling slab, it is also necessary to mark several points. These are the places where hangers for the remaining components of the frame will be attached to it.
Here, too, you need to draw straight lines, which will serve as a guide for the installation of parts. And for this, you can also use the marking cord that was used on the walls.
After all the marking elements have been applied, the ceiling slab should form a kind of “zebra” of parallel lines.
Fastening drywall sheets
After installing the frame, the question naturally arises of how to properly sheathe the ceiling with plasterboard. The answer to this is the following scheme of work.
- The sheet material is processed with an edge plane. In the future, this makes it easier to process gypsum board joints.
- Attach drywall to the frame using self-tapping screws. The edges of the sheets are located in the middle of the profiles. There is a groove there for orientation.
- Make holes for lighting fixtures.
- GKL joints are puttied.
Please note: a compensation gap is left around the perimeter of the room - between the cladding and the walls. This is necessary so that when the temperature and humidity conditions in the room change, the drywall expands without consequences in the form of deformations.
Scandinavian style - practical simplicity
The use of natural materials, light and a minimum of things – this is what defines the style of Scandinavian minimalism. Plasterboard ceilings meet all the requirements of the direction: environmentally friendly components are used in production, the cladding is decorated in any shade, and the clarity of the lines of the lamellas remains stable throughout their entire service life.
To diversify the decor, use light accessories in the form of ceiling skirting boards, laconic false beams painted in walnut color. Also in this style there should be a lot of light, but it is better to use not massive chandeliers or LED strips, but spotlights; they visually increase the space without burdening the structure.
Designers equally welcome single- and multi-level ceilings: the former make the style more laconic, and the latter allow the formation of voluminous ceilings with beams. The main thing is not to overload the space with accessories and furniture.
Transverse single-level frame. Installation features
Among the advantages of this method is the absence of the need for some elements - crabs and jumpers, which reduces costs. This method is also called rail due to the parallel running profiles.
- At stage 1, the frame of a two-level ceiling is also shown schematically with a step of transverse profiles of 50 cm;
- In the corner with the lowest height from floor to ceiling, a mark for the location of the structure is placed and a line for the passage of the guides is marked along the perimeter from it. It is difficult to do it with your own hands without help, it is better to use the help of a second person or use a level, marking the lines with a pencil;
- Guides are installed along this mark, with pre-glued sealing tape;
- Next, load-bearing transverse profiles are inserted into their grooves, fixed to hangers and to the starting ones themselves.
Just as in the case of a cellular frame, it is necessary to constantly check the level of maintenance of the structure.
So you can quickly, independently, install a metal frame under plasterboard sheathing on the ceiling using one of the methods.