What is it and when is it used
Many people mistakenly believe that this is a type of decorative plaster. Liquid wallpaper is, indeed, applied to the base like a regular solution. That is why they are also called silk plaster or plaster wallpaper. But unlike ordinary plaster, liquid wallpaper does not contain sand or cement hardeners among its components. The finished coating is not hard and cold, but pleasant and silky to the touch. The composition includes only natural derivatives, which makes this material absolutely environmentally friendly:
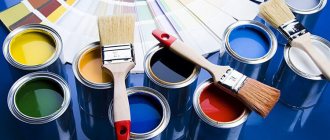
- the bulk base consists of synthetic acrylic or plant fibers (cotton, cellulose), wool yarn, silk;
- colorless high-quality wallpaper glue (bustilate or CMC) is used as a fixing composition;
- The color of this entire mass is given by a water-soluble dye;
- if desired, designer inclusions are added - mica threads, flocks (colored textiles), mineral chips (quartz or marble);
- for the durability of the applied coating, an antiseptic is integrated into it;
- Plasticizers provide convenience in working with the material.
All these components can be sold as a dry mixture in one general package or in separate dosed bags. This makes it possible to create your own individual composition.
The structure of silk plaster determines its advantage over many finishing materials:
- easy to apply in hard-to-reach places;
- can be used on curved surfaces;
- withstands constant temperature changes;
- has a huge selection of colors, patterns and textures.
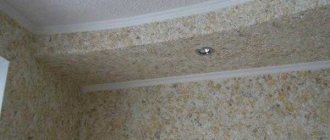
All of the above allows you to compete with other designer coatings and serve as decoration for all types of rooms in homes or offices. Liquid wallpaper looks especially colorful in children's rooms, and recreation areas are covered with an additional layer of sound insulation. In living rooms, for example, a reflective soundproofing layer can repeatedly shield the audio signal of a TV or player, which makes the sound especially rich.
Even in country houses and cool attic spaces, silk plaster will hold up well and remain presentable. The only places where she will feel unwell are bathrooms and damp kitchen walls. Moisture is the number one enemy of such a coating. This drawback can be mitigated if the dried wallpaper is varnished.
Attention! The layer of protective varnish should not interfere with vapor permeability, otherwise a greenhouse effect may occur in the house.
Liquid wallpaper can cope with any coating; it can be applied to:
- bare surface of concrete slabs;
- brickwork;
- plaster or putty;
- any wood - OSB, plywood, fiberboard;
- various paints;
- ceiling surfaces.
You can quickly get acquainted with the features of liquid wallpaper in this video:
Recommendations for choosing a pattern
Often, drawings are applied in children's rooms or bedrooms. It is practiced less often in living rooms. Liquid wallpaper is also very popular in the kitchen, because it can withstand changes in temperature and humidity very well. For each room the design will be individual.
If you need to visually enlarge the room a little, then use drawings in cool colors. And warm shades will give comfort and a calm atmosphere.
Review of gray tones in bedroom design.
To choose a drawing for a nursery, consider the child’s gender, age and hobbies. It is best to discuss the options with your child so that he enjoys being in the room and the composition does not cause dissatisfaction. For kids, as a rule, they choose compositions with fragments from cartoons, fairy-tale characters, a marine theme or a pink doll. In this regard, psychologists recommend not using too bright colors so that it does not affect the child’s psyche.
The best ways to prepare walls for liquid wallpaper
Reflections on the topic: is it necessary to make a girl’s room pink?
Various still lifes of fruits and vegetables or images with cups and kitchen utensils are suitable for the kitchen.
Advice! Don't use massive, large images. They visually make the room smaller.
First, choose or come up with a sketch of the drawing. The design can be smooth or have three-dimensional shapes, with simple or intricate lines. The simplest ones include two-color compositions. The more colors you want to use and the more fine detail the design has, the more difficult it will be for you to implement it. However, you need to think through everything first, calculate the number of colors in order to purchase all the necessary materials.
Main types of liquid wallpaper
Depending on the fillers included in the wallpaper plaster, its cost, performance, and aesthetics of the applied layer will vary. Therefore, liquid wallpaper is divided into 5 groups according to its main components:
- paper or cellulose;
- silk plaster;
- cotton;
- silk-cellulose;
- waterproof.
Paper. This is the most budget option, since its main component is recycled sawdust. The general appearance of the coating resembles ordinary roll wallpaper, only without joints and cutouts for communications. Their service life is approximately the same as that of the classics pasted in our rooms. They are easily damaged, but also easy to repair. They are afraid of moisture because they are washed off and lose their color in open sunlight.
Typically, they are chosen for dachas, unheated premises, non-residential buildings or when there are uneven walls. After all, a budget composition can be applied in a thicker layer and cover all the unevenness.
Cotton. Since the wallpaper contains cotton, this option already belongs to the middle price category. However, it is exceptional in its effectiveness. The showmanship and rich color are complemented by the velvety structure and the patterns created. Soft tones look specific on walls. They can no longer be confused with other types of finishing coatings. Light colors appeal to offices and study rooms, warm colors suit children's rooms, and cool tones create an atmosphere of calm in the bedroom.
This material is good for ceiling surfaces, as it is quickly fixed and holds securely for a very long time. Designers create entire compositions with the same tinting of walls and ceilings, into which stucco elements are inscribed for contrast. The overall picture is complemented by decorative designs.
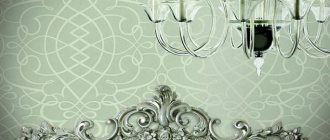
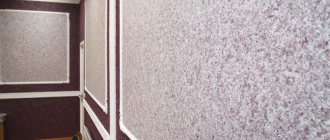
Silk plaster. This type of liquid wallpaper is truly a royal choice. The prototype of this coating was used back in the 18th century in the palaces of the French royal family.
The texture, reminiscent of expensive fabrics, will decorate the most sophisticated interior and satisfy the requirements of sophisticated customers. Silk liquid wallpaper has a lot of positive qualities:
- versatility - suitable for all types of premises (offices, living rooms, kitchens);
- make up a successful composition with the interior and other design solutions (suspended ceilings, stucco elements, etc.);
- good performance - they do not fade, are resistant to damage, durable and can be quickly repaired;
- high decorative qualities;
- ease of preparation and application.
Special types. Silk-cellulose and water-resistant material options have appeared under the pressure of user requests. So, to obtain inexpensive silk wallpaper, packs were often mixed with paper compounds and silk plaster. This reduced the cost significantly, increased performance characteristics and maintained a high status. And, in damp rooms, the decorative layer was covered with layers of protective varnish to obtain a vapor-proof film.
Now, manufacturers themselves produce these types of wallpaper, slightly improving their quality. Thus, long fibers appeared in the silk mixture; now they not only decorate, but also firmly bind the applied mass. Options for moisture-resistant wallpaper have been endowed with adsorption qualities, which will help the air in showers quickly become dry and the walls to “breathe.”
Also, liquid wallpaper is classified according to application methods:
- on the ceiling;
- using stencils and drawings;
- in wet rooms;
- by type of room (office; living room, children’s room, etc.).
Advantages and disadvantages
When choosing which finish to buy for renovation, you need to take into account the positive and negative qualities of liquid wallpaper. It is better to compare the liquid version with traditional material.
Advantages of liquid wallpaper:
- When working with liquid wallpaper, you should not be afraid of damaging or tearing it, since it is sold in powder form, and preparation for work only involves diluting the composition with water
- No need to worry about which side of the room gets the light, because they leave no seams
- After preparation, you can use the composition not only on the walls, but also on the ceiling, and the work will not seem so tedious compared to gluing ordinary wallpaper. During the work, you don’t even need the help of an outsider - you can manage the work yourself.
- Another advantage is that there is no need to carefully prepare the surface, which cannot be said about traditional wallpaper - after gluing it will reveal all the irregularities. With silk plaster, on the contrary, if there are small irregularities on the walls, then you can get rid of them by using a composition with a pattern.
- If liquid wallpaper cannot cope with unevenness, it can be applied in two layers. The first will be the primer and the second the topcoat.
- The natural materials included in the mixture allow air to pass through. This feature makes liquid wallpaper vapor-permeable, which will improve the microclimate in the room, unlike heavy vinyl wallpaper.
- After the repair there is no waste or discarded trimmings - this reduces the cost in relation to the area applied.
- The main advantage is aesthetics and uniqueness. There will no longer be rooms that look like your neighbors' or friends' decor. The uniqueness of the design is created by personal composition.
- Moreover, this design solution increases fire safety and fights static electricity, repelling dust. This low quality makes the material preferable for allergy sufferers.
- It is not afraid of shrinkage due to its elasticity.
Main disadvantages:
- They do not tolerate moisture, and bath options are much more expensive.
- The cost of the material is above average.
- A very long drying period - more than two days.
- Interruptions in applying the mixture are unacceptable, as the diluted residue dries out and changes color slightly.
- When the surface of liquid wallpaper gets dirty as a result of children's pranks or from the paws of animals, they cannot be washed. If the damaged area is removed and patched, it may begin to stand out due to the effects of rubbing and burning.
Application to walls
The technique of applying liquid wallpaper is easy to use. How to apply them? Take part of the prepared mixture and throw it on the wall. Then use a spatula or roller to level the surface. On sale you can also find special equipment for working with liquid wallpaper - these are plastic or stainless steel trowels.
It is best to have two tools at once - both a roller and a trowel. With a roller you can immediately level the maximum of the composition on the wall, and then use a trowel to complete the application - you will get a smooth and even layer.
Detailed instructions for applying liquid wallpaper to the wall.
The procedure for applying wallpaper to the ceiling is not exactly the same as on the walls. For the ceiling, first we take a trowel, use it to pick up a little composition and then throw this composition onto the ceiling. If you use a textured roller, you will get a more textured surface.
It describes in detail how to apply liquid wallpaper to the ceiling.
Liquid wallpaper comes in various types and, accordingly, the thickness of the layer may vary. But this information, as a rule, is always indicated on the packaging.
Is it possible to use liquid wallpaper for the bathroom?
It is worth noting that liquid wallpaper is not picky about temperature conditions, but they should not be used at temperatures below 15 degrees. Liquid wallpaper can be easily applied in winter. In this case, you just need to think about the conditions under which the surface will dry quickly. They are not afraid of drafts, so you can work and open the room for ventilation.
Preparing the base for applying liquid wallpaper
The main thing to focus on during preparatory work is creating a smooth, durable and white surface. The entire final result can be spoiled if a dark base appears through the compositions and patterns. The base can be tinted in other colors only if the range of future finishing requires it.
The composition and technology for performing the work may differ slightly, depending on what material the liquid wallpaper will be applied to. This could be: concrete or brickwork, wood, plywood or OSB and, of course, plasterboard.
Work algorithm:
- All types of coatings, except drywall, must be sanded using a sanding machine with a P-180 sandpaper attachment or by hand. This is how leveling is carried out, the remains of the old cladding, dilapidated areas with weak adhesion, dust and mold are removed, and the protective paraffin layer is removed from the OSB panels.
- You need to try to remove old nails and hardware and hide all metal surfaces, and if this is not possible, paint them over with white enamel.
- Treat areas where fungus may develop with an antiseptic solution.
The most likely places for mold and mildew to form.
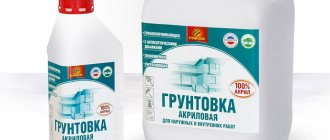
- Apply adhesive primer. The primer should provide the best conditions for adhesion to the future layer of putty, therefore, it is preferable to use concrete contact, and an acrylic composition is suitable for wood. The mixture can be applied with a brush, roller or spray.
- Carefully seal holes, cracks and crevices using a suitable thick putty solution. You can use gypsum mixtures on stone and plasterboard sheets, but for MDF, OSB and wood it is better to use elastic acrylic putty. It is better to reinforce wide potholes using nets or improvised materials.
- To level the surfaces and give the base a uniform white shade, it is necessary to create a thin and even layer of putty over the entire area. This will not only paint any walls better than any paint, but will also protect the materials from damage. For example, an OSB board will swell when liquid wallpaper dries for three days; in addition, it can release resinous inclusions and leave stains on the finish coating.
- If the wooden coverings are smooth and well primed, then you don’t have to spend money on expensive acrylic putty, but go over them with white oil or alkyd enamel in several layers, with the obligatory application of an acrylic primer at the end.
- The last step is the application of protective and adhesive layers. If gypsum putty was used on stone bases, then you need to protect it from moisture using tinted water-based paint. Then, when applying wallpaper, the plaster layer will not become soggy.
Surface preparation
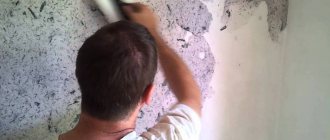
Liquid wallpaper will hide unevenness and cracks, but only barely noticeable ones. Therefore, the walls must first be prepared in the same way as before gluing ordinary wallpaper. The old coating must be completely removed so that the liquid wallpaper does not peel off over time.
Before applying liquid wallpaper, the surface must be well leveled.
All gaps are carefully hidden using putty; large cracks should be especially well sealed and protrusions leveled - too much material may be required to level out these defects using liquid wallpaper.
Attention! Before applying designs with liquid wallpaper, the surface of the wall must be primed.
Applying liquid wallpaper over old coatings
Some craftsmen do not remove the remnants of old coatings, which can be layers of paint, paper wallpaper, plaster, or liquid wallpaper. This saves effort and time on repairs, and money that is invested in materials for preparatory work. Such a decision is not always justified and, if you are lazy today, tomorrow you may have to work twice as hard. How different types of old coatings behave.
Dye. If the layers of old paint adhere well and do not peel off, then there is no need to remove them along with the plaster. It is enough to lightly clean them from dust and grease inclusions, and then paint them in a white acrylic tone and you can begin cladding.
Particular care should be taken with oil paints. Their components are able to appear through the cladding layer, giving it a green or yellow tint. Therefore, it should be cleaned with special care until it is completely removed.
Liquid wallpaper. In this case, you can leave the cladding - it will act as putty. The main thing is to check the quality of its adhesion with a trowel and repair defects. This is very simple to do: you need to slightly wet the edges of the damage and smear it, masking the place of the tear. Then the old coating must be covered with a layer of white acrylic paint. That's it - the foundation is ready.
When the tinting and composition of the new wallpaper plaster are different, it is better to remove the old coating, because it is easily washed off with water.
Roll wallpaper . But you can’t stand on ceremony with old paper wallpaper - they need to be removed. When applying silk plaster, they will get wet and move away from the base, negating the entire result of the work.
A special liquid with good penetrating properties is now being sold. With its help, you can peel off old wallpaper even from drywall and wood.
Features of gluing liquid wallpaper to the wall
Before applying liquid wallpaper to the surface, the walls must be well prepared for further work. This is the main feature of finishing with this material.
Other features of the gluing include:
- Working with such material is a pleasure. It does not cause any particular difficulties even for novice masters. Therefore, you can hang such wallpaper yourself.
- This finishing material is universal. They can be used to cover both the kitchen and the living room, as well as the bedroom. At the same time, the assortment in stores is always large, and you have the opportunity to choose the most suitable wallpaper to suit your interior.
- They are sold in the form of a mixture that must be diluted with liquid. But there are also ready-made solutions intended for application.
- It is possible to add coloring pigments and all kinds of glitter and various decorative elements into the mixture.
- Sometimes liquid wallpaper is confused with decorative plaster. However, there is no cement there.
- This material is very safe. Therefore, it is successfully used in children's rooms.
They are sold in the form of a mixture that must be diluted with liquid.
Step-by-step instructions for applying liquid wallpaper manually
First of all, prepare the mixture:
The total quantity of the required mixture is determined based on the area to be finished and the consumption of one pack of liquid wallpaper, which is indicated on the packaging itself. You can estimate the required liquid wallpaper using the materials in a separate article: consumption of liquid wallpaper.
- The required amount of warm water is poured into a wide plastic container.
The entire contents of one package are added entirely to the water and mixed. For mixing, you cannot use mechanized means - it is best to do it manually; you can only use a construction whisk. The resulting creamy solution is wallpaper plaster. According to technology, the mixture should stand for 15-20 minutes.
The entire batch must be mixed again, breaking up large lumps of glue. You can add half a liter of water to the finished mixture, taking into account evaporation, and leave for 8-12 hours for swelling.
The prepared liquid wallpaper must be applied at one time to the entire surface of the room in order to ensure a uniform shade.
The technology provides two ways to apply the finish: by spraying with a special gun or manually, using a plastic spatula or a transparent trowel and a knurling roller.
Manual application:
- Using a trowel, take a little of the prepared solution and distribute it over the surface so that there are no bald spots, bulges or voids underneath it
At the same time, you should choose the most convenient grouting pattern: herringbone, bouquet, zigzag, etc. It is more convenient to start from the corner and move to the next one.
- After the first portion is leveled, the second part of the mixture is applied to the surface, and so on until the work is completed. You need to try to ensure that each stroke smoothly transitions to the next
Do not press the tool too hard - otherwise the coating will become flat and lose its texture. The applied layer should be 2-5 mm, otherwise it will begin to fall off and float down.
Once application is complete, you can use a knurling roller to create three-dimensional impressions.
Liquid wallpaper should be glued at temperatures higher than +10ºС.
During drying, the most convenient moment comes to correct various flaws in the applied layer. Unevenness and bumps are smoothed out with a plastic float, and the flat texture is given volume using a fleecy roller.
Complete drying time lasts up to 3 days. At the same time, it is necessary to ensure good ventilation and additional heating during the cold season.
The best way to mix and apply liquid wallpaper manually is demonstrated in detail in this video:
Automated application methods:
Mechanized devices for spraying them will help to significantly speed up the entire process of applying liquid wallpaper, especially when covering large areas:
- mini-compressor creating pressure up to 5 atmospheres;
- receiver 20 liters;
- hopper or gun with a nozzle diameter of 6-8 mm;
- roller for smoothing the sprayed mixture;
- protective equipment (glasses, gloves, overalls).
Not all types of wallpaper are suitable for this method. Silk and silk-cellulose plasters contain long fibers that will get stuck and tear in the gun nozzles. It is best to use cotton types, then the coating will be especially textured and, at the same time, thin - this way you can save on material consumption per square meter. The convenience of this method is especially felt when spraying onto the ceiling covering.
Work order:
- cover doorways, windows, furniture with film;
- an additional 20% of the recommended amount of water is added to the wallpaper solution and the mixture is thoroughly mixed;
- the resulting composition is loaded into the hopper bucket by 2/3 for application to the walls and 1/3 to cover the ceiling;
- the compressor turns on and under pressure the composition is evenly sprayed from top to bottom, moving along the perimeter;
- It is better to apply wallpaper in several layers with each layer partially drying, this way all bald spots will be reliably covered;
- If the texture turns out to be too loose, you can roll it with a roller.
Wallpaper coating technology
Many apartment owners would like to know what they can use to cover liquid wallpaper when using it to decorate different rooms in the house. But first you need to find out how to properly apply them to walls and ceilings.
Preparation of working solution
The cladding process itself includes:
- preparatory work related to cleaning the surfaces to be finished;
- preparation of the working solution;
- applying liquid wallpaper to walls or ceilings;
- painting a hardened surface with varnish or paint.
Before finishing, the surface of the walls and ceiling must be thoroughly cleaned of dirt and loose pieces of plaster. Liquid wallpaper can only be applied to a solid base that will not absorb moisture and change the color of the front covering.
Liquid wallpaper can only be applied to a solid base that will not absorb moisture and change the color of the surface covering.
Before applying liquid wallpaper, the surface needs:
- clean off the old facing layer;
- plaster large cracks;
- prime;
- create a rough texture on the surface so that the liquid wallpaper sticks better and does not slip.
After this, you can begin preparing the working composition. The dry mixture is diluted with plain water to the consistency of heavy cream or sour cream. Before doing this, you need to shake the bag with the dry mixture thoroughly to get rid of any lumps. The working mixture is prepared in a deep container so that it can be stirred well until smooth. Proper preparatory work will allow you to achieve high-quality application of the liquid wallpaper itself.
Apply the working mixture using a simple smooth spatula without much effort.
The finished mixture should then be applied to the prepared surfaces using conventional plastering tools. People who do not have experience working with this material can watch a video on how liquid wallpaper is applied to walls and ceilings. It is very simple, even a beginner can master this technology.
You need to apply the working mixture with a simple smooth spatula without much effort. And you need to try to press the resulting finishing layer. It should be loose and embossed. If the walls or ceiling have a large number of irregularities, then you need to be prepared for the fact that you will have to spend more consumables to finish them, creating certain patterns from liquid wallpaper on the walls and ceiling.
Modern wall decoration with liquid wallpaper
In order to obtain a smooth and uniform surface, the material must be applied from one corner to another at a time. This will avoid unevenness and joints.
Liquid wallpaper in the bathroom
Recently, liquid compositions have appeared on the construction market that are adapted for rooms with high humidity levels. They are suitable for bathrooms, kitchen walls with increased steam generation and entrance areas into which moisture comes from the street.
They include:
- fungicides to prevent the spread of fungus;
- silk and glass fibers (on cellulose and cotton inclusions, over time, mold develops faster);
- glitter;
- moisture-resistant glue.
Liquid wallpaper of this composition belongs to the highest price category among silk plasters. The experience of users who have applied these solutions in their home shows that for a good result, certain conditions must be met:
- the room should be spacious enough or with good forced ventilation to quickly remove moisture vapor after bathing or showering;
- surfaces that are constantly exposed to water must be covered with a protective apron made of tiles;
- It is better to apply a coating of vapor-permeable, moisture-resistant varnish on top of the wallpaper layer, then the surfaces can be washed periodically;
- Bathroom walls covered with liquid wallpaper retain their original quality longer than ceilings.
Otherwise, the technology for using wallpaper plasters will be the same as under normal conditions.
On which walls can liquid wallpaper be glued?
The indispensability of liquid wallpaper is that it easily adheres to absolutely any surface. After all, they have high adhesive properties. This type of finishing material can be applied to:
- Concrete;
- Plywood;
- Tree;
- Concrete;
- Drywall;
- Chipboard.
Of course, you will have to work with all these surfaces before gluing.
In addition, liquid wallpaper is a moisture-absorbing material. Therefore, other moisture-intensive surfaces that interact with them must be isolated from exposure to water.
The indispensability of liquid wallpaper is that it easily adheres to absolutely any surface.
Drawings with liquid wallpaper
The set of purchased dry wallpaper mixtures does not contain any drawings. If you simply apply them to the base, you will get a monochromatic textured coating. This can be done well, since the liquid wallpaper itself looks aesthetically pleasing and self-sufficient.
However, the full potential inherent in this design coating is fully revealed only with the use of artistic techniques. Creating different compositions helps:
- significantly decorate the room and dilute plain colors;
- make your own unique and inimitable design;
- harmoniously transform irregularities and protrusions into an advantageous part of the interior;
- create emotional themes in the room (children’s room with animated drawings, fitness room with yin-yang symbols, etc.)
Selection of color palette.
It is not recommended to paint with varnishes and paints on the applied wallpaper, as they may lose their positive unique properties. To create artistic compositions, they use ready-made dry mixtures of different colors, combine wallpaper of different textures, make three-dimensional drawings and use a color gradient.
It is better to choose silk plaster of the desired color than to tint it later, then the color scheme will retain its soft and unobtrusive character. Usually, they buy mixtures of two or three shades and use them. But, the opportunity to tint the material at will is present. To do this, you need to use pure white liquid wallpaper and the desired color dye, preferably from the same company as the dry mixture.
The dye must be suitable for manual tinting, be compatible with water-soluble paints and be synthetic, since natural ones fade quickly.
Compositions of different colors must be applied with a break to dry, then mutual coloring will not occur and the image will be contrasting. To enhance the contrast, you can use a dark outline, which enhances the visual perception of the finished picture and gives it volume.
Often, there is an inverse problem when you need to get a color gradient with a smooth transition from one shade to another. In this case, it is better to use the mixtures simultaneously, with gradual mixing of one of them into the other. This way you can achieve the effect of the morning sky or a city in the rain.
How to apply pictures with liquid wallpaper
- Drawing a sketch. The outline of the future image can be drawn in one of three possible ways. The first option involves manually copying from a sketch or painting by the artist directly on the wall. The master draws an outline with a pencil and marks all the colors on it. The second method is stenciling, which is suitable for two-color designs. To apply wallpaper, simply attach a paper stencil, printed in full size, to the wall surface using double-sided tape. As soon as it has been treated with liquid wallpaper on all sides, the stencil is carefully removed and the free areas are filled with a different color. The third option is to draw a sketch.
Before applying wallpaper, be sure to complete a sketch.
This method is considered the most accurate, as it allows you to transfer all the contours onto the walls without the slightest error. Drawing is carried out using a piece of glass and a lamp that directs the light onto the wall. The emerging shadows of the picture are simply outlined with a black marker on the wall, thus marking the contours of the future picture. - Applying liquid wallpaper to areas distant from each other. First of all, areas of the same color that are not touching each other, that is, located at some distance, are filled. The mixture of liquid wallpaper is distributed in small portions using a spatula and laid in a layer approximately 2 mm thick. If liquid wallpaper is applied directly to adjacent areas that have not dried, the contours will be unclear and the colors will mix.
Applying liquid wallpaper of different colors to individual areasAdvice. To make applying liquid wallpaper more convenient, it is recommended to go around the outer contour of the pattern with masking tape.
- Trimming the edges. Areas where the mixture has gone beyond the contours are tamped with a spatula.
- Drying liquid wallpaper. After applying the mixture, you need to give it time to dry - usually the process takes at least 1 day. You can speed up drying by using a hair dryer.
- Filling the remaining areas. All colors are adjusted closely to each other to form one solid canvas. In this way, after drying, all the free areas of the picture are filled sequentially.
- Outlining contours. For greater clarity of the contours of the drawing, its contours can be outlined with colored felt-tip pens or wax pencils, which will emphasize thin and complex lines.
Carrying out the drawing
Drawing technology
There are two main technologies for the artistic use of liquid mixtures - under a stencil and according to a sketch. The first option is more suitable for people who find it difficult to create wall images themselves, and they use templates of patterns and ornaments that they buy in a store or cut out of paper themselves. The second method gives free rein to imagination, but assumes that the user has developed artistic talents.
Wallpaper is applied under a stencil in the following sequence:
- The entire surface should be covered with a single-color initial layer of liquid wallpaper. More often, very light or, conversely, dark colors are used as a base.
- Then you need to let the first layer dry completely for 2-3 days.
- Attach purchased or homemade templates to the dried material. They can only be fixed with oil tape, which comes off easily and does not leave stains behind.
- Apply a secondary layer of wallpaper plaster of a contrasting color or texture to the cutouts in the forms.
- After waiting for the drawing to dry incompletely, the templates can be removed and any flaws can be corrected.
The main condition for the successful use of this method is to ensure a tight fit of the cardboard with the pattern, so that the applied solution does not fall under its plane, otherwise the image will be greatly deformed and will be sloppy.
You can use anti-stencils when the entire wall is covered with wallpaper, except for the pasted form, and then the blank is removed and a different color is applied in its place.
Such templates are sold ready-made, in the same place as liquid wallpaper. You can try making them yourself. Ideas for images are easiest to take and print from the Internet or transfer illustrations from printed publications. There are no problems with small drawings that are made on a one-to-one scale, but large ones need to be enlarged. To do this, you can print out their fragments and glue them together, or scale the drawing manually on graph paper, which requires more time and perseverance.
After the paper version of the image is ready, you need to transfer it to a thick medium, usually cardboard or a sheet of plastic. It is better to cut through the contours of the template with a sharp knife, then everything can be done in accordance with the plan.
Applying wallpaper according to a sketch:
- On the prepared wall, using a pencil or marker, a sketch of the future panel is drawn.
- The first color used is the color that is in the predominant amount in the image.
- If liquid wallpaper of other shades does not touch adjacent areas, then you can apply it immediately, otherwise you need to wait for part of the pattern to dry.
- Finally, some areas are corrected and shaded with black acrylic paints, and the entire picture is covered with glitter and varnish, if such was the artistic intent.
This work is painstaking and long; with a complex composition, it will take more than a week to complete it. However, you can create simple images yourself, without the expense of craftsmen and artists. Thus, it is easy to depict a sketch on the wall using projection. To do this, you will need a lamp and figures for the shadow, and if you have a video projector, you can resort to its help.
Then, you need to note where and what tone will be applied. You can even paint the entire picture with acrylic paints and only then move on to working with silk plaster.
The following video shows how a real master creates an image:
How to make a drawing?
First of all, we prepare the working area, that is, the walls. Be sure to have the following tools: a spatula, a roller, an acrylic float and, if necessary, a spray gun.
Let us draw your attention to the fact that liquid wallpaper with a pattern does not exist in nature. There are liquid wallpapers, and you can use them to create an ornament, but only with your own hands. The advantage is that you can depict any design and not only in different colors, but also in different textures.
There are 2 drawing techniques:
1. Stencil application; 2. Arbitrary combination (independent).
The techniques are quite different from one another, but you should always start the same way - prepare the walls. And then use your preferred drawing technique.
As mentioned earlier, you can slightly adjust the surface, hiding small flaws or cracks. But maximum attention should be paid to the cleanliness of the walls. The surface for liquid wallpaper must be clean, without any remnants of old wallpaper or paint. After cleaning the walls, we apply primer or use deep penetration impregnation. We wait until the surface dries. And only then can you start working with liquid wallpaper and drawing.
Liquid wallpaper in the form of stone
Silk plaster is such a unique material that it can be used to give paintings real volume. It’s quite easy to make small reliefs - just let one layer of coating dry slightly and apply the next one on top.
However, you need to have the skills of a sculptor to create large volumetric masterpieces from liquid wallpaper. With their help, you can convey the relief of the earth, skillfully carve sculptures, creating the illusion of stone:
- To achieve a stucco effect, it is better to choose special plain white cotton wallpaper.
- The entire volume of the dry mixture must be divided into two parts.
- Dilute the first part and tint with beige dye.
- Apply a flat layer of liquid wallpaper, smoothing it firmly with a spatula. While the layer is still wet, you need to smooth it again with a spatula to hide the texture and give it the illusion of gypsum plaster.
- Apply a sketch drawing or stick stencils onto the dry coating.
- Dilute the second part of the composition and tint again with beige dye, adding PVA glue (two tablespoons per liter of mixture).
- Apply a few millimeters of wallpaper plaster along the contours of the lines or under the existing template and let it dry.
- After a few hours, smooth the coating firmly with a spatula, depriving it of its textured surface. It is necessary to form the required relief by removing excess volume and adding in other places.
- When the coating is dry, you can spray light brown acrylic paint from a can over the entire surface of the painting.
- Immediately, using a sponge, you should remove the layer of paint from the protruding parts of the entire panel. Then the raised elements will appear lighter, and the illusion of the stone will intensify even more.
Flat drawing
Let's consider the above using the example of a flat drawing:
- Draw a sketch, for which there are several options:
- multi-color compositions - manually copied from a picture, while the outline should be divided into colors, reminiscent of a children's coloring book;
Flat designs made from liquid wallpaper
- for single-color ones - attach a paper template to the surface; it can be drawn by hand or printed and then cut out. After attaching, it is treated with liquid wallpaper on all sides, then removed, and the space is filled with a different color;
- To accurately draw a sketch, use glass and a lamp. Draw an outline on the glass with a black marker, then place it under direct light so that a shadow of the desired size appears on the wall, and draw lines along its boundaries.
Tip: to make it more convenient to apply the drawing, cover its outer borders with masking tape.
- Fill in the spaces that do not touch each other after drawing the outline on the wall. To do this, use the mixture in small portions, spreading it with a spatula or trowel up to 2 mm thick. Start filling areas of the same color and remember that you cannot simultaneously process adjacent fragments with different colors. This will help create a clearer outline and avoid tones mixing with each other.
Step-by-step application of the mixture to the wall
- Trim the edges. During the process, spread the mixture so that it extends a few millimeters beyond the boundaries of the marked area. Then it should be tapped back with a spatula, aligned along the contour. Use a trowel to smooth the material.
- Drying of autonomous areas filled with the mixture should be done within 24 hours, and to speed up the process you can use a hair dryer.
- Fill in the remaining fragments, adjusting the mixture to the dried hard contours. Join the material tightly.
If you want to create a three-dimensional pattern, you will need to go through all the above steps with the only difference being that you will need to form a relief from the mass of wallpaper. Also, this composition should not be made smooth; it should be in the form of a bas-relief, and the boundaries should be created by pressing grooves with a spatula.
Reviews of liquid wallpaper. Liquid wallpaper in use.
Many owners of apartments and houses are very satisfied when choosing liquid wallpaper; their reviews are most often positive. They note that this material is unpretentious and has high elasticity.
When applying there is no need to use an expensive tool - all that is needed is a plastic basin and a spatula about 350 mm long. Of course, you need to have a certain patience, but no special skills are required at all, everything is very simple. In the summer, it is much easier to carry out work with liquid mixtures than with rolls - you do not need to be locked in a hot, humid room, afraid of drafts, and be in a stuffy atmosphere.
Aesthetics, richness of tones and textures allow an individual approach to the design of each room, from the kitchen and bathroom to the hall and hallway. Many have noticed that it is much easier to work and achieve the desired result from silk types of wallpaper than from cellulose wallpaper.
Users liked the possibility of finishing arches, corners and even heating pipes with silk plaster. After some time, loose sheets and air bubbles do not appear, and if damage does occur, they can be easily eliminated.
In rare cases, yellow spots appear on the wallpaper. As a rule, this is due to insufficiently good preparation of the base. For example, untreated metal elements in the wall can rust and lead to darkening of the wallpaper. In turn, this problem can be easily solved by treating the base and reapplying wallpaper.
Important nuances
You can calculate the required amount of material by reading the instructions on the package. On average, one standard bag weighing 1 kg is enough to finish a surface of 4 to 5 square meters. meters. When working on preparing the mixture, it is important to remember that it is necessary to mix the solution using the entire volume of dry material that is in the bag. Otherwise, the stated characteristics of the wallpaper may change significantly. After combining the contents of the bag with water, you need to leave the mixture to swell for 6-12 hours. Another advantage of liquid wallpaper is that during the process of applying it to the wall, you can create any desired pattern in contrasting colors based on a pattern previously created on the surface.
The drying time of “wet” wallpaper depends on the microclimate of the room and the composition of the mixture - from 12 hours to three days. The disadvantages of liquid wallpaper are their insufficient moisture resistance and limited range of colors.