12200 0 0
Icer October 22, 2016Specialization: master in the construction of plasterboard structures, finishing work and laying floor coverings. Installation of door and window units, finishing of facades, installation of electrical, plumbing and heating - I can give detailed advice on all types of work.
In this review I will tell you how to make a doorway from plasterboard with your own hands. Moreover, we will not consider any separate option, as is done in most reviews, but we will deal with all the most popular types of designs; you must decide in advance which technology is best suited for your situation. The right choice will not only provide the best result, but will also simplify the workflow and reduce project implementation costs.
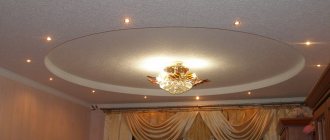
In the photo: perfectly executed openings are an essential element of any modern home
From the author
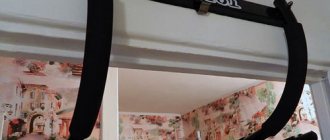
It will be possible to insert any interior doors into this type of partition: drawer doors, wooden doors, PVC doors, covered with veneer, film, enamel, enameled paint. For civil partitions there are no requirements for the type of door and method of installation. In the reinforced opening of the first year, you can install an interior door using polyurethane foam or self-tapping screws. There are restrictions on the weight of interior doors. It should not be heavier than 25 kg. With this weight, you can purchase interior doors of the following designs:
- Tsar doors, weight 10-12 kg;
- Doors combination MDF + wood, weight 15-20 kg;
- Doors with honeycomb filling up to 10 kg;
- Doors made of solid pine, weight 20-25 kg.
- Heavier doors require special reinforcement of the plasterboard partition.
Installation instructions for plasterboard partitions with doors
Modern apartments located in new buildings, as a rule, do not have any layout. Owners are invited to carry out all work on dividing the area into separate rooms themselves or invite specialists to do this. In most cases, metal profiles covered with gypsum plasterboard are used to construct partitions. This is explained by the fact that anyone who wants to make renovations in an apartment with their own hands can make a partition from plasterboard with or without a door.
Work stages include
I believe that work on drywall can be divided into two technological approaches.
- The first approach is professional. It complies with all technological maps developed by drywall manufacturers. The most famous technological sheets of the Knauf company.
- The second approach is amateur. It is possible due to the versatility of plasterboard profiles.
For example, a proper plasterboard box should be made from PS rack profiles. In an amateur approach to installation, the rack profile can be replaced with any other PN or PP profile, the main thing is that the structure is durable.
Next, I will show two options for making a doorway in a plasterboard partition:
- Professional doorway in a plasterboard partition on a frame made of metal and wood according to the Knauf technological map;
- Doorway in a partition made of HA in apartments, private houses, small spaces.
Doorway made of plasterboard in the interior of an apartment
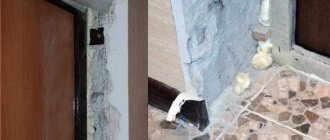
Despite the fact that gypsum plasterboard, when constructing a doorway from plasterboard, is attached to metal profiles, the structure under horizontal loads may lose strength and begin to loosen. Especially if the door leaf is heavy.
An example of finishing a plasterboard doorway
Important! When constructing a partition with a doorway, the structure must be strengthened at the installation stage. The main positive point when installing plasterboard structures is the ability to do everything yourself.
Installation of a frame with an opening Knauf technology
- The partition frame is mounted from rack (PS) and guide (PN) profiles. PN profiles are mounted horizontally; PS profiles are mounted vertically.
- When installing the guide profiles of the partition frame along the floor, they are interrupted at the border of the opening.
- Along the border of the opening, two vertical rack profiles (PS) are installed. They must be secured with additional steel corners from the floor and ceiling in order to strengthen the structure in this particular place.
- Particular attention is paid to the vertical threshold of the doorway. It is made from a guide profile (PN), having previously bent its edges, as shown in the figure. You can bend the edges of the profile not up, but down.
Arch made of plasterboard on a metal frame
The methods described above involve the installation of a straight doorway. But if you decide to make a plasterboard arch in the doorway, then the upper part needs to be made arched. The technology for arranging a direct opening is the same in all cases, so we will consider the arrangement of only an arched element.
Arch arrangement technology
You need to do the following:
- Decide on the design of the structure in order to make the markings correctly, and then not make mistakes with the installation of the structure. Once you have created a design project, you can install the base of the structure, which is made from a wall profile.
- The next step is to create a curved element or semi-arch. Take the guide element and make cuts along the sides at a distance of 4 cm. From such a profile you can make a curve of any shape. Important! The stronger the bend, the more often the cuts need to be made.
- Attach the cut profile to the opening and give it the desired shape. In order for both elements to be bent equally, you need to prepare two segments before installation.
Forming an arch from a profile
To simplify the work, you can use a special arched profile; it is flexible and takes on different curved shapes. This material is sold in construction stores in meter form. - Attach the prepared arched profiles to the base using small self-tapping screws. Install jumpers between the arched elements, so the structure will be rigid and durable.
- As soon as the structure is ready, you can begin attaching the gypsum plasterboard. You need to start from the side parts. It is important to accurately transfer the bend to the slab so that it fits neatly into the structure. As a last resort, you can slightly adjust the drywall to fit the structure with a construction knife.
- Now it’s time to sheathe the curved part of the arch. To do this, you need to cut a piece of material to fit the bend.
Drawing with dimensions for covering a plasterboard arch - Using a needle roller, you need to make small holes in this section without applying much effort.
- The surface is moistened with water and left for a few minutes to become wet. This way the material will bend without any effort.
- To install the element, it is better to invite an assistant who will hold the material, and you will start screwing it from the middle of the arch.
- Then install the arched perforated corners on the gypsum plaster at the corners. After this, the wall structure is puttied and finished according to the general design of the apartment.
Strengthening the opening
I want to note. The Knauf technological maps do not provide for additional strengthening of the opening, except for installing the corners at the top and bottom on the vertical guides of the opening.
Let me explain what's going on. According to Knauf technology, the door is placed not on the metal frame of the partition, but on a beam (board), which is attached to the frame with self-tapping screws or anchor bolts, and the door is fixed to this wooden lining of the opening. That is why the size of the opening for such technology should be increased by the width of the timber for the box.
In everyday construction practice, the frame of a doorway is reinforced with timber, but the timber is not placed outside the frame, but is inserted inside the profiles of the opening. That is, a frame is made with an opening the width and height of the door frame plus 20 mm gaps. And into the vertical posts of the opening, wooden blocks are inserted inside, which are secured to the posts with self-tapping screws.
Note. If you do not have steel corners to strengthen the vertical posts of the opening to the floor and ceiling, they are made from two PS posts, connecting them like a box (put one inside the other).
Types of openings
The conditions for constructing structures may be different, so you don’t need to listen to anyone’s advice about the advantages of this or that option. You should familiarize yourself with all the technologies for carrying out work and, based on the information received, make an informed and informed decision.
Option 1 – partition with opening
If you need to make a wall with a doorway, then this section will help you understand the technology and carry out the work quickly and efficiently. This method is very popular in new buildings, where you get a room in which there are no partitions, and you determine the layout yourself; you can also redevelop the existing space, of course, if you have agreed on everything in advance.
This option must be considered as a whole - from the beginning of planning the partition to its assembly, since it is impossible to first make a wall and then build an opening in the right place, everything is thought out in advance. It doesn’t matter whether it’s a plasterboard wall with a door or an arch, it’s important to make a durable partition that will serve you for many years.
The workflow consists of several stages, each of which is important. Therefore, all the recommendations outlined below must be followed. Let's start with the planning stage:
The scheme of this stage, although simple, requires care and consideration of all the details
- To begin with, you need to clearly determine the place where the future wall will go; you should think it over carefully so that it doesn’t later turn out that you missed some important nuances. Those who do the work themselves, due to lack of experience and haste, often make mistakes and miscalculations, so you shouldn’t determine everything by eye, it’s better to estimate everything using a tape measure;
- Once you clearly know the location of the wall, you can begin to determine the exact location of the opening. It all depends on the layout of your room, its configuration and the future interior. It is important that the end result is not only attractive, but also comfortable; think about where the location of the opening or door will be most rational;
It's important to think things through carefully
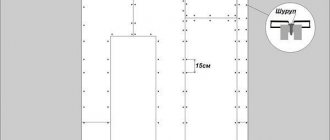
- If you clearly know the location of the wall and opening, then making a drawing will not be difficult. For the example above, an option is shown indicating the structural elements so that you can plan their position. The guide profile sets the position of the wall, the posts create a plane, and the lintels increase strength; naturally, a frame is made around the perimeter of the opening;
- The stage cannot be considered complete until you mark the position of the structure in the room. This will simplify your further work and allow you to see errors, for example, too small a space or interference in the form of communications. The markings are made along the ceiling, after which the lines are transferred to the floor using a plumb line - this option allows you to make an ideal vertical and eliminate errors that are necessarily present when working with a level.
A plumb line is a simple but very accurate device for marking
You can use a more modern marking solution - a laser level. This is what specialists most often use. If you have the opportunity to borrow such equipment, then you can work with it, the main thing is to ask for advice on the operation of the level, the opinion that anyone can use it is wrong.
You cannot carry out work without a certain set of materials, the list looks like this:
| Materials | Description |
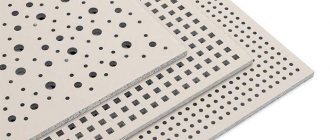
| Drywall | Use a wall option with a thickness of 12.5 mm; you should not use ceiling sheets, their strength is low and even a child can break through such walls. Naturally, if the design is made for a room with high humidity, then it is necessary to purchase moisture-resistant drywall, which is easy to distinguish by the green color of the outer covering |
| Metal profile | I strongly recommend not saving and purchasing a good-quality rack profile measuring 50x100 mm and guide elements 50x50 mm. Adapting a regular profile is not the best idea, its strength is low, and a wall thickness of 6 cm will not allow you to achieve good sound insulation and structural rigidity |
| Mineral wool | We will use it to fill the cavities for sound and heat insulation of the partition. Ordinary rolled materials are suitable; they are cheaper than specialized options, but, as practice shows, this option is sufficient for effective noise absorption |
| Fasteners | This includes quick-installation dowels and self-tapping screws of various types, with their help the structure is assembled into a single whole. The most commonly used dowels are 6x40, screws 3.5x11 mm and 3.5x25 mm |
The rack profile is much stronger than usual
As for the tools, you will need the following set for work:
- A hammer drill for drilling holes for dowels. If your walls and floor are wooden, then there is no need for this tool;
- A screwdriver - you definitely can’t do without this device; screwing a huge number of screws by hand is a bad idea.
- To cut the profile, use ordinary metal scissors, the main thing is that they are sharp;
- To control the position of each element, you need a level, and to take measurements and markings, you should have a tape measure and a construction pencil on hand;
- Drywall is cut with a regular construction knife; to simplify the work, you can additionally use a metal ruler, then the cutting line will be perfectly straight.
The material is cut very easily, and this is its undoubted advantage.
Now let’s figure out how to build the frame of the structure; the instructions for carrying out the work look like this:
- A guide profile is laid out along the previously made markings; if necessary, individual elements are cut using metal scissors. Moreover, at the corners it is not necessary to cut the element completely; you can make cuts on the side shelves and simply bend it, so the structure will be more rigid;
- Next, you need to mark the surface of the walls, floor and ceiling for drilling holes for dowels. The dowel spacing is 50-60 cm, the work is not difficult, but it requires a certain amount of time. The hammer drill is very noisy, so do not use it in the morning or evening;
- The guide profile is fixed using dowels; to do this, they are first inserted into the hole, and then impact screws are driven into them, everything is very simple and quick;
Individual elements at the joints are inserted into each other
- Racks are inserted into the finished structure along the perimeter of the partition and secured with self-tapping screws at a distance of 60 cm from each other. For work, so-called “bugs” are used; they allow you to reliably connect the frame elements.
Vertical posts define the plane of the wall
Now let’s figure out how to make an opening, because this is the main goal of our review, everything is simple:
- Two partition profiles are placed at the edges; if you are thinking of placing a door in the structure, then the width of the opening should be 5 cm larger than the door frame . If you have an arch, then keep in mind that drywall will be fixed to the surface, which needs to be finished with a decorative coating and putty; this also takes up some space;
- It is advisable to strengthen the opening; there are two main options: either insert the profile into the profile so that you get a square post, or insert a wooden block of a suitable size into the groove and secure it with self-tapping screws. Both solutions have worked well, strengthening has never harmed anyone, even if you make an arch, you can later hang a door, a reinforced opening will allow this;
Strengthening the profile allows you to make the opening much stronger
- The entire structure can be reinforced with transverse jumpers, their number depends on the size of the structure and its rigidity, sometimes reinforcement is not required at all.
If there will be wiring inside the structure, then it must be laid at this stage in special corrugations. Then the following work is performed:
- First, you need to line one of the walls with plasterboard, after which you can begin laying soundproofing material, it is positioned so that there are as few cracks and voids in the cavity as possible, this will ensure the best result;
Soundproofing material fits tightly into the structure
- After laying the material, the structure is completely sheathed; if there is a door inside the opening, then there is no need to sheath it along the inner perimeter; if there is an arch, then strips of plasterboard are attached to the surface.
Finishing works do not differ from ordinary ones, so we will not consider them. The corners of the opening must be reinforced with putty corners; they both level the joint and improve the appearance of the structure.
Option 2 – leveling the opening with plasterboard
This is a simpler solution, which is used in cases where you need to quickly and efficiently align the contours of the opening. There is much less work here than in the option described above, but you still need to carefully understand all the nuances of the technology.
To work we need the following:
- Drywall - its quantity is determined in advance, most often one sheet is enough;
- The adhesive composition for drywall is a special mixture based on gypsum, which dries very quickly and firmly fixes the material on various substrates;
- The tools you need are a knife for cutting drywall, a tape measure and a pencil for marking, a level to control the position of the elements, and a container for preparing the adhesive.
Gypsum mounting adhesive allows you to fasten the material without dowels and screws
The workflow consists of several stages:
- First of all, you need to prepare the surface of the opening: clean it of dirt, build-up of solution and other elements that interfere with work. If there is significant damage to the base, then it is easier to repair them with cement mortar; there is no need to perfectly align the planes; it is important to strengthen them and make them more or less even;
- Then the opening is measured to determine the size of the plasterboard elements. First of all, I advise cutting out only the top element and only after fixing it, cutting the sidewalls; the width should be equal to the thickness of the wall, the length should allow the material to be positioned freely in the opening;
When measuring, subtract 5 mm so that the element fits exactly in the opening
Before attaching drywall, I advise treating the surfaces with a strengthening primer, this will improve the adhesion of the adhesive and reduce the absorption of the base.
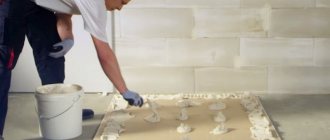
- The adhesive composition is applied to the material in massive dots or, as builders call them, slaps . The element is carefully pressed against the top of the slope, after which you need to use a level to set it to a perfectly level position. If you are concerned about the reliability of the fixation, you can use 1-2 spacers, they can be removed after half an hour, the glue sets very quickly;
Sometimes, for reliability, polyurethane foam is added around the perimeter, but this is not necessary.
- Next, measurements are taken of the side elements, pieces of drywall are cut out and glued in the same way as on the top part. It’s easier to work with side slopes; the most important thing is to remember to level them using a level; it’s unlikely that you’ll be able to correct the curvature later;
- When the composition dries, and this only takes a couple of hours, you can begin finishing the structure; the gaps between the wall and the ends of the drywall can be filled with the same adhesive composition . Corners are placed on the corners to strengthen and level this part of the structure. Lastly, the surface is puttied and painted or covered with decorative plaster.
The more accurately you draw the corners of the opening, the better it will look
The price of this option for finishing openings is low, but this solution has one significant drawback: the door cannot be fastened to such a surface, or you will have to drill a deep hole so that the anchor can reach the brick or concrete.
Option 3 – opening on a metal frame
If it is necessary to reduce the size of the opening or it is severely damaged, then the easiest way is to build a frame that will create structural rigidity and allow any base to be leveled. This option combines the two previous ones, since we will be working with concrete or other walls, and the plasterboard will be attached to a metal frame.
This option allows you to change the size of the opening
Let's look at the technology for carrying out the work:
- First of all, the plaster is removed from one or both sides of the opening at a distance of 15-20 cm to the edge, this will allow the material to be aligned with the main surface and thereby significantly simplify the leveling process . Do not worry that you are removing a layer greater than the thickness of the drywall - this difference is compensated by the adhesive composition;
- Then you need to use a level, tape measure and pencil to mark the position of the future structure; you need to make its outlines on the floor and the top of the opening so that when carrying out work you have clear guidelines and do not confuse anything. The markings will also help you decide how to strengthen the structure and where to place the frame elements;
Marking is an important part of the workflow
- The next stage is attaching the starting profile in the required places. Most often you need to cut small elements and fasten them with dowels or self-tapping screws. The markings made earlier serve as a guide; everything is very simple and convenient;
Guide elements are attached along the perimeter of the future structure
- If you need to reduce the opening in height, then the frame is made in the upper part, its dimensions depend on the thickness of the walls, but remember that plasterboard will be attached on both sides , which means that there must be at least 13 mm from the frame to the plane of the wall. That is, after sheathing the structure, the surface should be leveled;
This is what the frame looks like when the height of the opening is reduced
- If doorways are made of plasterboard, then on the side of hanging the canvas it is advisable to strengthen the structure as I described above. It is important to ensure the rigidity of the system, so it is better to play it safe and strengthen it so that it can withstand even the heaviest door;
- When the frame is ready, you can begin measuring the dimensions of the drywall, cutting and attaching them . Moreover, the material is not attached in the usual way: if it goes to the surface of the wall, then there it is placed on a gypsum adhesive composition, and in places where there is a frame, drywall is attached to it. The result is a very reliable design; the main thing is to monitor the placement of the sheets using a level;
- The last step is to putty the structure; there are a few simple recommendations: corners must be used; at the joints, the plane can be strengthened using a sickle mesh of the required width. It is important to make the plane level so that the joint between the plaster and the plaster is not visible at all.
It is important to make the plane perfectly flat
Option 4 – construction of an arch
All three of the above options differed in implementation technology and design, but all of them were a straight-sided opening of the required size. But if you decide to make an arch, then this section will help you get the job done. This technology is suitable for all the above cases.
To make an arch you need to spend a lot of time, but the result is worth it
I will not talk about the entire working process, but will dwell in detail only on the curved part. This is the most difficult element that you should understand as best as possible.
The workflow consists of the following steps:
- First of all, you need to figure out what your arch will look like; the dimensions of the frame and the installation of the structure depend on what shape you choose . When you decide, you can start attaching the base for the structure; it is made from a wall profile and is located on the top and side so as not to interfere with the curved elements that will be installed later;
- Then you need to make a blank for the curved element; for this, take a guide profile and make even cuts on it opposite each other at a distance of 3-4 cm along the entire length. The profile prepared in this way can be given the required shape later;
This is how arched elements are prepared
- Next, the element is bent the way we need it; here it is important to try on the finished product against the opening in order to control the dimensions and, if necessary, cut off the excess part . To simplify the work and improve the final result, be sure to make the second arched element in the shape of the first, and do not bend it separately, so you can get two identical parts;
It is important to make the bend as well as possible, this will simplify further work.
- The arched parts are fastened to a previously installed base; for rigidity, spacers can be installed at any angle in any place. The arched elements are connected to each other through lintels. You can also use hangers if you need to additionally secure part of the profile somewhere, it all depends on your design, it is important that in the end it turns out strong;
Arched elements need to be strengthened as securely as possible
- When the structure is secured, you can begin covering the front sides, that is, the sections of the wall at the top of the opening. Here it is very important to accurately cut out the oval side, since it will be very difficult to remove it with putty later. You must transfer the exact curve to the material and cut it out, after which the sheet is fastened with self-tapping screws, you need everything to match as best as possible;
It is important to veneer the side surfaces as accurately as possible
- First you need to cut a strip of drywall to the required length, everything is simple: we measure the width and length of the curved part using a tape measure and transfer these indicators to the material;
- Using a special needle roller, you need to make holes in the back side of the drywall; it can be easily identified by the inscriptions . You just need to go through this device, pressing it well, you shouldn’t be too zealous, otherwise you may ruin the piece and have to cut off another one;
This type of roller is sold in building materials stores.
- The punched surface is moistened with water and left for a couple of minutes, after which the material can be bent. This should be done carefully, it is important not to damage the drywall;
- Fastening is done with an assistant - one person holds the bent material, and the second fixes it with self-tapping screws . After drying, the structure will become rigid;
Wet material can be bent to the desired shape
- I recommend attaching a special arched corner to the outer corners of the curved areas, and it is advisable to first cover the entire surface with fiberglass for strength. After this, you need to carry out putty work, the end result will be durable and reliable if you follow all the recommendations described above.
Arched corner allows for perfect curves
People sometimes ask me, is it possible to make a door out of plasterboard? In fact, this is possible, but the reliability of such a product will not be very high; it is much more reasonable to buy a ready-made design.
Covering the frame with HA sheets
Covering the frame with sheets in the area of the doorway has several features.
- First, the seam between the sheets of civil code must not be allowed to touch the border of the doorway. This will lead to cracks in the future.
- Second, there is no need to join the sheets horizontally at the height of the doorway. Sheathing should be done in a single sheet.
Plasterboard finishing
Sometimes you only need to slightly adjust the contours of the doorway. In this case, the wall is often covered with a layer of plaster. Some irregularities require significant consumption of materials, and therefore it would be more advisable to use plasterboard to correct irregularities.
To do this with your own hands, you need to measure the required dimensions for the drywall and fix it on the slopes and inside the opening itself. Minor defects and seams will be hidden in the future by plaster. The corners are leveled with a special profile made of aluminum or plastic.
Drywall can be glued to a special compound or regular putty can be used.
Finishing the door slope with plasterboard
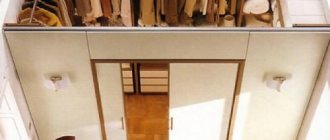
Sliding compartment door in a gypsum plasterboard partition
It is not uncommon for a new house to be purchased and the owner immediately begins remodeling and remodeling the rooms. Especially often, large rooms tend to be divided into two small ones. For this purpose, partitions made of two layers of plasterboard are actively used. A very important question when installing a plasterboard partition is which door to install? And quite often the choice falls on installing a built-in sliding wall. In its structure, such a door resembles a compartment and is ideal for installation in compact rooms where swing doors would take up too much space.
What is this article about?
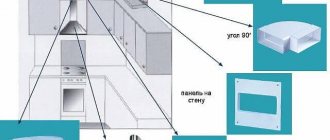
What types of slopes are there?
- in doorways;
- in window openings;
- from the inside of the garage door.
A variety of materials are used for these purposes. Let's briefly look at the advantages and disadvantages of each of them.
Brickwork can be used both on the indoor and outdoor sides. The material can be not only decorative brick, but also natural or artificial stone. Such slopes are reliable, but also the most expensive. Among the disadvantages are:
- the possibility of being destroyed over time under the influence of moisture and frost from the street;
- accumulate a lot of dust and dirt on its surface from the room side, which is difficult to remove from a rough surface;
- poor interior adaptability.
Ceramic tiles are perhaps the best option for finishing slopes, but inside residential premises they do not look entirely appropriate. It is quite expensive both in terms of the cost of the materials themselves and the work involved. In addition, the method of its installation, like brickwork, is quite dirty due to the need to work with mortar, which is not always acceptable in residential areas. The maximum place where it can be used for slopes is in the bathroom.
Plaster is becoming a thing of the past, although quite recently it was almost the only material for finishing slopes. It is practical and inexpensive, but working with it requires special skills that a beginner does not always possess. Again, the factor of the dirtiness of the work being performed does not speak in its favor.
PVC panels are installed quickly and are inexpensive, but extremely unreliable. Any minor impact on the surface will leave a scratch or crack, to repair which you will have to replace the entire sheet with almost complete disassembly of the slope, which is expensive and inconvenient. Moreover, plastic practically does not allow air to pass through and is a flammable material, and this violates sanitary and fire safety standards.
Laminate for slopes is only suitable for high grades and is moisture resistant. It has the same disadvantages as plastic, only because of the peculiarities of its coloring it conceals the volume of the opening, which is not always good.
Drywall is the most suitable material for non-professionals to work with. In addition, it is the cheapest and most practical. It is also used when finishing slopes with tiles, for example, if the construction of complex geometric openings is required. This feature of the material makes it very popular and indispensable at some stages of construction work.
Let's take a closer look at how to practically decorate a plasterboard doorway with your own hands.
Material selection
It is worth paying attention to the selection of the necessary materials, especially when choosing sheathing parts. There are the following types of profiles that allow you to create a frame for plasterboard walls:
- Guide (PN). This element is intended to create a structure that will serve to secure the rack profile. It is the fastening of this type of profile that will determine how the surface will look in the future.
- Rack-mount (PS). Used to create lathing or other partitions. It can be given various curvilinear options.
A special place is occupied by parts for ceiling structures: ceiling profile (PP), ceiling guide profile (CNP).
You should also consider using the following additional elements:
- Corner profile (PU). Maybe external and internal.
- Arched profile (PA). Used to create arches.
- Suspension (U-shaped). Used for fastening structures to walls and ceilings.
- Connector (“Crab”). Very convenient for fastening perpendicular parts together.
- Extension. Connects different profile sections together.
- Dowel and screws (for metal).
It is at this stage that many make a very important mistake. It consists in acquiring a non-specialized profile. Namely, they confuse ceiling elements with wall elements.
How to cover walls with plasterboard
First, let's consider the case when you need to level the surface of existing walls. There are three options for attaching drywall to walls:
- On a frame made of galvanized profiles. Allows you to obtain an ideal surface at any curvature. The profiles are attached to special clamps. A frame is assembled from them - racks and lintels - the front part of which lies in the same plane. Since the drywall is located at a decent distance from the main wall, communications and electrical wiring can be laid between it and the wall. Another advantage of this option is the possibility of installing insulation or sound insulation. The downside of a profile frame is that without insulation it conducts sounds very well: if you hit the wall sheathing, the sound is like hitting a drum.
- On a frame made of wooden blocks. It is assembled according to a similar principle - from racks and lintels, but is attached directly to the wall. It is more difficult to compensate for differences that are too large: you will have to look for the most protruding parts of the wall first. Then there are two options: the first is to focus on them, placing additional bars everywhere, the second is to try to reduce the difference by cutting off the most protruding parts. The main disadvantage of attaching to wooden blocks is that if you use ones that are not dry enough (with a humidity above 15-20%), they may “lead” when dry, causing the entire structure to become warped. There is also a possibility of wood being damaged by pests or fungi. Despite this, in some regions this method is more popular, since their prices for lumber are lower than for profiles.
Installing sheets directly on the wall. This is the installation of drywall with glue. They use special mixtures or something like “liquid nails”. This method is available if the walls are relatively flat - with a difference of no more than 2-3 cm. Glue is applied to the surface of the sheet or wall (in stripes if the wall is almost flat and in piles if there are differences), then the sheet is installed in place, leveled, secured with wedges and supports.
We cover the walls with plasterboard: glue it with a special compound
The latest technology - installing plasterboard with glue - is the fastest, but it also has disadvantages. The first is that there is not glue under the finishing everywhere, so hanging cabinets on such a wall is problematic. If you plan in advance to attach something to the wall, lay a continuous layer of glue at this height or install an embedded beam, which will also serve as an additional beacon when setting the sheet level. Then the problem will be solved. Another minus is that there are small differences. That is, the surface turns out to be imperfect. The difference is 2-3 mm. Between the “pieces” of glue, the sheet bends slightly. However, this is a good way to quickly level a wall.
For more information on how to glue drywall to a wall, watch the video.
Important installation rules
To install a sliding door, you will definitely need to have an interior wall containing two layers of plasterboard. This is very important, since the movement of the door leaf will require not only a sufficiently wide gap, but also two thicknesses of the metal profile and two thicknesses of the plasterboard sheet.
Before you figure out how to install a sliding door in a plasterboard partition, we recommend that you familiarize yourself with the materials that will be required during the installation process.
Before starting installation, it would not hurt to remember a few nuances that may create difficulties in the future if you do not know them.
There should be no elements inside the plasterboard partition located in the path of movement of the compartment door. Even if the obstacle is a direct part of the structure.
The metal frame must be fastened strictly in accordance with the level. There should be no distortions under any circumstances. This is very important for working with metal profiles and the entire installation of a partition with a door.
A very important point! People often try to install wiring into plasterboard partitions, install sockets, switches, and lamps, but in the case of a sliding door, installing such internal elements, and indeed wiring in the partition in general, is extremely undesirable. Many people make this mistake during installation, so if you were planning to install something else in the partition, it is better to find a more reliable method.
If the room uses floor coverings, special attention should be paid to such elements as the lower door guides. If you put a carpet in your room, lint from it can get caught in the mechanism, then this can create problems in the future. If you use linoleum, then with friction, the mechanism can easily tear it apart, which will lead to the floor looking unpresentable.