20322 0 4
MesterulManole October 28, 2016Specialization: many years of experience in finishing works of residential and office premises, summer houses, country cottages, etc. Hobby: cycling in all its forms
Aluminum battery on drywall - read on to learn how to hang it
Greetings. This time you will learn how to attach heavy objects to drywall. I hope the topic of the article will be of interest to many and there is a good reason for this. Finishing building surfaces with plasterboard is becoming increasingly widespread.
At the same time, you most likely will not be able to secure heavy objects to such a finish using traditional methods. So, how to fix certain objects on the surface of a sheathed gypsum board so that the result is durable and looks neat?
An integrated approach to fixing to drywall
For starters, why can't drywall hold hanging objects? In fact, plasterboard sheets are quite strong and can withstand high destructive loads from 15 to 60 kgf, depending on the thickness of the sheet. Also, partitions are usually made in two sheets, which further increases their strength.
However, the density of plasterboard is only 80 kg per cubic meter, which is 6-8 times less than the density of wood. This means that you can drive a screw into a plasterboard wall, but the screw will not hold a heavy object. To attach heavy objects to drywall, special technologies must be used.
Comparison of anchors.
like an experiment gone out of control.
Instead of flooding our reader with water consisting of scattered unverified information, our editors tested the strength of the most used types of anchors experimentally.
The experimental setup consists of:
- a square sheet of plasterboard 500x500 mm with a thickness of 12 mm or ½ inch, lined so that the anchor can be mounted exactly in the middle without much difficulty;
- a wooden mandrel for drywall, with which it can be easily installed in the press;
- a press with a wooden frame for a mandrel and a device for applying controlled force to hardware mounted in drywall.
Experiment objectives:
- tear each hardware out of the drywall three times, set the breaking force in kilograms;
- compare the result obtained with the theoretical data on the packaging;
- assess the degree of destruction of the drywall sheet for each anchor;
- when assessing the results, be tied specifically to the type of anchor, and not to a specific manufacturer.
Attaching heavy objects to plasterboard using embeds
The classic technology for attaching a heavy object to a plasterboard wall (partition) is the use of pre-installed embedded elements in the frame of the structure. This technique is used if you need to install a sink, a heating radiator on drywall, hang furniture cabinets or shelves, hang a heavy picture or a bulky sconce.
Mortgages are also used to install the inside of air conditioners. Frame designs with embedded parts make it easy to install an air conditioner in a room without special fasteners for hollow structures. Also, embeds allow you to quickly remove and repair refrigeration equipment and air conditioners, just like on a regular wall.
I described the essence of the technology in the article installing a sink on drywall. At the stage of installing the frame for the partition, a proprietary wooden traverse is installed between the racks or boards are simply mounted. After sheathing with sheets, the embedded elements are not visible and, if necessary, they are used as platforms for a canopy.
This technology is the most reliable, but requires prior coordination and planning. Mortgages must be installed exactly at the location where heavy objects are installed and during installation of the structure.
A few words about installation difficulties
What problems do installers face when they have to attach heavy objects to a plasterboard wall ?
GKL strength table in accordance with sheet thickness
Plasterboard with a sheet thickness of no more than 12 mm is traditionally used for wall cladding. This material is quite durable and resistant to mechanical stress. However, installing a boiler or heating radiator, the weight of which when filled with water is more than 100 kg, is fraught with the risk that the fasteners will tear out of the casing.
By the way, with such an elegant stand, the installation of heating radiators will be more effective, since it will be possible to remove part of the load from the wall mounting
The problem is obvious, but there are simple and effective ways to solve it. If you need to hang something heavy on the wall, you can do it as follows:
- Using special fasteners and supports installed under the fixed object;
- By pre-installing mortgages for wall cladding;
- Through the combined installation of mortgages and the use of special fastening hardware.
What are the advantages and disadvantages of the listed methods?
The advantage of mounting on fasteners without installing mortgages is that the method can be applied to an already used wall. That is, if there is no immediate renovation of the room and there is no desire to dismantle the wall, this is the best option.
Among the disadvantages of the solution, I note that fastenings that are designed for heavy loads are rarely found on sale and their price is high. Well, of course, you need to know what is suitable in a particular case and what is not suitable.
On the wall you can see embedded boards for the heating radiator, which will then be covered with gypsum board sheets
Installing mortgages under the cladding is the best solution if you have to install heavy objects weighing more than 50 kg. In fact, in this case, the fastening is carried out not on drywall, but on mortgages, which, in turn, are rigidly fixed to the rough wall.
The disadvantage of this solution is that it cannot be used on walls that are already in use. That is, the mortgages need to be installed under the sheathing, which is only possible before installing the gypsum boards.
The combined option is used in cases where the dimensions of the embedded parts under the casing partially do not correspond to the location of the hinges on the mounted equipment.
Let's consider the listed methods and find out how to hang a battery on drywall or how to install other equally heavy objects.
Installation of mortgages for fastening heavy objects on gypsum boards
How to install mortgages under gypsum boards with your own hands? The installation instructions are as follows:
Location of the embeds in the wall, where the boiler will be installed
- Immediately after assembling the supporting frame, we determine the installation location of the item whose installation is planned;
- Along the width of the gap between the profiles in the sheathing, bars are cut with a thickness corresponding to the thickness of the guides;
Mortgages before sheathing with plasterboard
- Using dowel nails or anchor bolts, the bars are attached to the wall or to the profile, as in the photo;
- On the sides we attach the bars to the profile with self-tapping screws;
- Next, we sew up the frame with gypsum board sheets;
Fastening hardware for mounting a boiler in embedded parts
- After finishing the walls, we fasten the heavy object with massive screws, which will be firmly held in the thickness of the fixed bars.
I would like to draw your attention to the fact that during installation you will have to photograph the installed bars from different angles. This must be done so that when performing the subsequent installation of attachments, you will hit the bars and not the void.
The question is, why do you need mortgages if you can immediately screw long screws into the wall? There is a reason - if you hang a boiler or heating radiator on screws without placing mortgages under the wall cladding, the load on the fastening elements will be high. As a result, over time, either the fasteners become deformed, or the wall on which the installation was performed becomes unusable.
Fastening elements for installation without preliminary installation of embedded parts
Many people believe that it is impossible to simply hang anything on partitions and walls made of gypsum plasterboard, using certain types of fastening hardware. In fact, this is not so, you just need to choose the right fasteners, the maximum load of which will correspond to the weight of the equipment that you decide to hang.
Let's look at the list of fasteners and methods of their use.
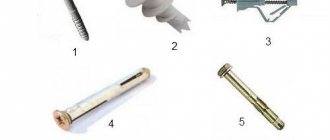
Fastening hardware specially designed for use on plasterboard partitions and walls
Among the things that can be purchased, I note the following:
- Self-tapping screw for metal-to-metal plasterboard;
- Butterfly dowel with self-tapping screw;
- Screw dowel with self-tapping screw;
- Dowel “umbrella” with a bolt;
- Hartmut dowel from Knauf with bolt.
Screwing in a regular self-tapping screw for gypsum boards
An ordinary self-tapping screw for plasterboard, with which the sheets are fixed to the profile, can withstand long-term loads weighing up to 3 kg. That is, by screwing such a screw into the wall, you can hang a mirror, picture or other similar objects on it. If you tighten several screws and hang an item not on one, but on several loops, you can achieve higher installation strength.
The so-called “butterfly” from the inside of plasterboard
Butterfly dowel for hollow structures - can withstand weight up to 10 kg with single-layer wall cladding. This is an excellent solution for mounting various elements of the surroundings, starting with a mirror and ending with small shelves.
Accordingly, if you hang an object not on one dowel, but on several spaced dowels, the resistance of the fastener to weight loads will be increased.
Screwing in the screw dowel without the need for pre-drilling holes
Screw dowel with self-tapping screw - screws into the slab without the need for drilling holes. When mounted on a single-layer cladding, it can withstand a little more than 6 kg of weight load; when mounted on a double cladding, each mount can withstand a load of up to 15 kg.
The spacer part of the so-called “umbrella” from the inside of plasterboard structures
“Umbrella” dowel – a metal version of the “butterfly” dowel consists of a bolt and a metal spacer, which, when the bolt is screwed in, opens like an umbrella. When the fastening hardware is installed correctly, the umbrella dowel can withstand up to 35 kg of weight load on each fastener. With an increase in the number of fastenings, the load on the wall can be increased.
This is what the power element of the Hartmut dowel looks like, due to which fastening hardware is held on vertical structures
The Hartmut dowel from Knauf, when installed on a single-layer sheathing, can withstand up to 35 kg of long-term load. As the number of fastening hardware used increases, the permissible load also increases.
Using such fastenings, you can hang aluminum and bimetallic radiators on drywall without the use of floor stands
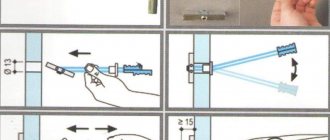
The installation instructions for such a dowel are as follows:
- A hole with a diameter of 13 mm is drilled;
- A dowel with a folded spacer is inserted into the hole;
- The dowel is pulled back so that the spacer part from the inside is pressed against the sheathing;
- We secure the plastic part on the outside of the casing with a fastener and break off the excess;
- We screw in a bolt on which you can attach hanging loops or other hardware adapted for mounting a particular item.
To ensure that the installation of a cast iron heating radiator on drywall can be done without mortgages, we use Hartmut fasteners. But there is one condition: installation of a structure with a nominal weight of over 100 kg is allowed only on double or triple wall cladding.
Fastening without embedded traverses
The planning of repairs does not always coincide with its implementation, and it is often necessary to attach heavy objects to drywall after finishing work, when it is no longer possible to install the mortgages. What to do?
In this case, you need a fastener that will create a support platform on the end side of the sheets. The support will rest on a large surface of the sheet and will make it possible to attach (hang) a heavy object.
For such fasteners, special folding fasteners are used. If desired, you can make them yourself.
I showed an example of such fasteners in the photo. This is how the fastener works. A hole is drilled in the plasterboard wall according to the diameter of the folded fasteners. The fastener is inserted into the hole, opens there, and the mounting bolt or hook remains on the surface.
Anchor screws
Anchor screws, or anchors, are great in two situations:
- Plasterboard finishing was done using mounting adhesive, and the distance to the load-bearing walls was minimal.
- The gypsum board sheathing is made on a frame, but is located at a short distance from the main wall.
In this case, you will need a hammer drill or drill and anchor screws. The future location of the item is marked on the wall. Holes are punched according to the markings and anchors are driven in. Subsequent tightening will secure the anchor firmly in the wall.
The main subtlety of this fastening is that the hole must be punched according to the diameter of the anchor. If it is smaller, the fasteners simply will not fit, and a large diameter will not provide reliable fastening, and there will be backlash.
But the most problematic question is how to attach a shelf to a plasterboard wall if the load-bearing surface is at a distance of 100 millimeters or more.
Other mounting methods
To reduce the expected load, you can use special dowels. They are suitable for mounting on drywall in one layer, paintings, prints, and decorative elements. This type of fastener is called a spring crepe dowel. It can be a plastic butterfly dowel or a metal spring dowel. The principle of operation is the same, insert the dowel into the hole, when screwing the screw (bolt) into the dowel, the “ears”, the “wings” of the dowel move apart, creating a support platform.
Metal dowel (anchor) type DRIVA
A very common beast in our area, it is essentially an auxiliary hardware in the form of a screw with a high thread, in which a thread is made for the main fastening element - also a screw or self-tapping screw.
Installation does not require any special skills or knowledge; a screwdriver (or a screwdriver, as in our case) is enough. There is also no need to drill a hole for the “drive”; when screwed in, it does it for you.
Due to its utilitarian nature, this hardware is available in two sizes:
| Diameter, mm | Length, mm |
| 13 | 42 |
| 15 | 29 |
During the first approach, the following was revealed: failure of hardware of this type occurs under a load of 105lbs, which corresponds to 47.6 kg. Considering the information on the packaging (50lbs - 22.7 kg), the result is more than impressive.
As for the destruction that this hardware leaves behind, the result is satisfactory, since the size of the hole is generally comparable to the size of the anchor.
How to secure a sheet without first installing a frame
Let's look at ways to attach drywall to a wall without a profile. In practice, several options are used for how to level a wall with plasterboard without a profile:
- Dowels or screws.
- By gluing (plaster or cement glue).
Installation of GLK with self-tapping screws and dowels
It is recommended to sheathe walls using self-tapping screws in cases where the base itself has a wooden (OSB, plywood, timber) or plaster surface. Let's look at how to screw drywall to a wall step by step using self-tapping screws:
- All protrusions on wooden partitions are removed with a tool specially designed for this purpose (a hatchet or a chisel with a hammer). If you need to level a foam concrete wall, you can use a hammer drill.
- If the wall is made of OSB, plywood, or timber, then the GLK can be mounted directly on the wall. Installation is carried out using wood screws with a length of 2.5 cm.
- Sheets of drywall are secured with hardware in a checkerboard pattern in increments of about 25 cm. The self-tapping screw, or rather its head, should be slightly “recessed” into the material. We leave a deformation gap of 2-3 mm between the sheets.
I do not recommend this method of fastening with dowels. But if there is no way out and the surface is relatively flat, then you can resort to this method.
The option for attaching the GLK to dowels is as follows:
- The sheet is installed on a leveled base without defects.
- A hole is drilled through it and a plastic part is inserted.
- Then the dowel-nail itself is screwed in with a screwdriver.
How to fix drywall to a wall without profiles: gluing technology
The temperature of the room should be taken into account; it should not be lower than +10 degrees Celsius. At lower values, you will need to worry about heating the room.
When installing drywall directly on a wall using gluing technology, careful preparation of the surface is required. It consists of removing wallpaper, parts of peeling paint or plaster, sealing cracks, and applying a primer with an antiseptic (preferably in two layers).
We stretch the thread or use a laser level to understand how curved the surface is and what layer of glue we will need. If the wall is smooth, then you can glue the drywall under a special spatula (comb). But usually the walls are very crooked and you will need to apply glue buns.
It can be used as special gypsum glue (dries very quickly), or you can use tile adhesive (you can work with it for a long time). For one batch of glue, it is recommended to install no more than two sheets of drywall.
Glue buns are applied at a distance of 30 cm from each other. A sheet of GLK is applied and a level is gradually tapped and applied. Using the level, we determine how evenly the sheet is glued, apply it in different directions and planes so that there is no deflection of the sheet. We hammer glue into the resulting cracks along the edges. Let's start gluing the next sheet. Do not forget to leave a small gap of 2-3 mm between the sheets for subsequent finishing.
Dowel Molly
This type of dowels used when installing gypsum boards can be distinguished by the type of manufacture. This type of fastener is made according to the harpoon expansion principle in order to obtain a sufficiently strong fastening.
The Molly dowel cannot be classified as a cheap product. Prices for fasteners are very high, but this is due to the excellent quality of the products, their reliability and ability to withstand heavy weight.
Molly dowels work according to a special principle:
- An 8mm hole is drilled under the dowel using a drill.
- The dowel must be inserted into this hole. Then the side of the fastener along with the teeth should be firmly pressed against the plasterboard covering. This is what prevents it from turning.
- Then, using an ordinary screwdriver, screw a screw to the plasterboard sheet material. This is done using internal threads. This screw is included with the dowel and is sold together with it in one set. Screws are usually also supplied complete with dowels.
The advantages of this type of fastener include its ability to cope with even the highest loads. In addition, if necessary, you can always dismantle it.
Doubel Fisher
Another type of fasteners is the Fisher PD model. The Fisher PD design itself is made of plastic (here we are talking about the base of the product, where the screw is subsequently screwed in).
During installation, the Fischer is pressed against the joint so that there is a strong adhesion to the screw being screwed in. This is what creates protection against possible loss. Fisher dowels are very popular, and the cost of the products is low.
Dowel nail
Modern models of dowel-nails for plasterboard material are a very common type of fastener. The expansion type device is made of pure nylon. The design of the product consists of three separate sections. The passage hole is located in the very “tail” of the fastener. Thanks to this, screwing is easy, creating the desired axial travel for the screws.
The dowel-nails are fastened quite reliably, because the walls of this fastening element begin to expand in three different directions at once during installation.
Using this modern fastener, the following is fixed:
There are also steel dowels. However, this type of product is rarely used when installing plasterboard sheathing . This dowel-nail can provide through-line installation. In this case, you can easily hammer the fastener into a hole already prepared with a drill.
MOLLY type anchor
Judging by the positive reviews from amateur users and finishing craftsmen, this anchor can only be called the king of gypsum core and the situation in general. When installing Baby Molly, you need to drill a hole of the same diameter as the sleeve. Further work with it is no different from previous models.
This anchor is almost universal, because the diameters in which it is presented on the market are numerous:
| Diameter, mm | Length, mm |
| 8 | 55 |
| 10 | 55 |
| 12 | 55 |
Opening an anchor sleeve is like solving the crime of an expansion rivet. However, here an important detail awaits us: the photo shows that the petals of the anchor sleeve press against the material so strongly that it is pressed through. You can avoid this by screwing in the bullet not with a screwdriver, but with a simple screwdriver.
Returning to the results of the experiment, we note that all approaches were on par. For example, the first failure occurred with a force of 92 lbs or 42.1 kg (force from the manufacturer 80 lbs - 36.3 kg).
The hole after the failure with torn edges is not that comparable, much larger than the diameter of the MOLLY anchor sleeve. The king is dead, long live the king!
| MOLLY | Break force, kg | Destruction (visual) |
| Information on the packaging | 36,3 | — |
| Experiment 1 | 42,1 | bad |
| Experiment 2 | 40,4 | bad |
| Experiment 3 | 39,0 | bad |
Installation of wall sheathing
There is almost always a debate about what to do with an uneven wall - plaster it or it is easier to build a frame from metal profiles and then cover it with gypsum and putty. If the sheathing wins the dispute, then the work ahead is as follows:
- We mark the floor and ceiling, stepping back the required distance from the wall, so as not to take away excess space from the room. We connect the marked risks with lines using a painter's cord. Along the lines we begin fastening PNP profiles, that is, ceiling guides. Why this profile, because with it we can win space. Don't forget to put soundproofing tape on the bottom of the profile. We fasten it with 6 mm x 40 dowels. If we attach it to wood, for example in the ceiling, then we drill it with wood screws.
- We attach straight hangers to the wall, which are used for wall and ceiling profiles with a pitch of 600 mm.
- We install PP profiles into PNP profiles, i.e. ceiling ones, because the guide profile is intended only for this size with a thickness of 27 mm. You can build the sheathing from 50 mm wide profiles from PN and PS, but this will not be economical and will take up excess space from the room. We install in increments of 400 mm or 600 mm.
- We attach straight hangers to the sidewalls of the PP profiles and secure them with fleas. The size of the step depends on the thickness of the wall - it will be sewn into one sheet of drywall or two. The profiles are fastened to each other using small screws, popularly called fleas. But it is also possible to fasten it using a cutter by making holes in the places where the profiles are double connected.
- If the height of the wall is higher than 2400, the length of the gypsum board sheet, then it is necessary to install horizontal jumpers at the joints of the plasterboard sheets. The lintels are made from the same PP profiles in each span. Using metal scissors, cut mustaches on narrow shelves at an angle of 90 degrees. These mustaches are used to attach the profile jumpers to the racks using the same fleas. It should be taken into account that the gypsum board sheets are attached in a checkerboard pattern. This makes it possible to obtain a rigid and reliable structure, therefore the jumpers must be arranged for such a system.
Ready-made sheathing for fastening drywall
Quantity of hardware
When calculating the amount of fasteners, you need to take into account the step with which the frame profiles are installed and the distance between the fixation points. Typically, profiles are mounted on walls at intervals of 0.6 m, and sheets are attached to them at intervals of 0.2-0.25 m. When working with ceilings, the distance between the frame parts depends on its design, but at the same time, the distance between the places where the gypsum is attached to the profile should not exceed 15-17 cm. It is easy to calculate that one square meter of cladding will require from 14 to 18 fasteners. If direct hangers are used in the manufacture of the supporting frame, then you must also take into account that each of these parts will require 4 self-tapping screws. According to quality requirements, hardware for connecting metal parts must have a flat head and a length of at least 10 mm.
Dowel Driva
The Driva (DRV) product is one of the most popular elements intended for fastening. Driva is produced in only two versions. Such fasteners can be either plastic or made of metal.
Plastic fasteners are considered the most relevant and affordable.
This fastening element is very easily screwed into building materials and is securely fixed.
The work is performed in a certain sequence:
- A 6 mm hole is made in the gypsum board.
- Then a dowel is inserted into the prepared hole. You need to cut the dowel into the plasterboard sheet material like a self-tapping screw. For this job it is best to use a screwdriver.
- After this, screw a 3.5 mm or 4.5 mm self-tapping screw or screw into the cross-shaped slot that each Driva dowel has.
Such dowels look aesthetically pleasing with a variety of types of plasterboard material.
This fastener is distinguished by the fact that it does not require free space behind the plasterboard sheet material. However, when selecting a dowel, its length should be taken into account. For example, for metal fasteners it reaches 44 mm, and for plastic products – up to 23 mm.
Drywall anchors: types and applications
The anchor is a very reliable element for fastening various materials. The scope of its application in construction and finishing works is very wide. However, not all anchors are equally suitable for different types of fasteners. This article will discuss in detail the types and models of drywall anchors, the features of their selection and application.
"Butterfly"
Fasteners with the interesting name “butterfly” are classified as universal elements. This dowel is used for surfaces with voids existing behind a wall made of 5 mm plasterboard sheets. This fastener is similar in functioning to an ordinary umbrella. The structure extends directly behind the sheet in the free space. This is how a sufficiently reliable stop of the fastener is ensured.
This type of fixation is suitable for ceilings sheathed with plasterboard material.
For example, when installing heavy lamps, the stops, which begin to open behind the plasterboard sheets, are able to evenly distribute the load over the entire quadrature.