Home / Ceiling design / Design solutions / How to install 3D gypsum panels with your own hands
Gypsum volumetric panels allow you to immediately obtain an almost finished wall or ceiling covering. As a rule, installing 3D gypsum panels on walls or ceilings is done with your own hands and it would be useful to find out the main nuances of such work. There is nothing particularly complicated about this and all operations can be performed even by a person who does not have such experience.
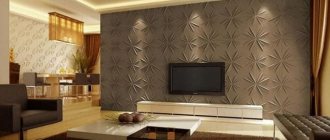
Installation of gypsum panels for walls
The GkerStudio company is pleased to offer installation and painting services for 3D gypsum wall panels.
The company’s specialists are ready to perform installation services in the shortest possible time. We provide installation services for products not only from our company, but also from third parties, including foreign manufacturers. Installation is quite a responsible, but at the same time not a complicated process.
Requiring the installation specialist to strictly follow the specifics of working with the material. And avoid making mistakes that in one way or another can affect both the aesthetic quality of the panels and their performance characteristics.
Advantages and disadvantages of 3D gypsum panels
Considering the advantages of such a finishing material as gypsum-based 3D panels, it is advisable to highlight the following:
- Ease of installation due to the structure of the material and its low weight;
- Low requirements for the quality of the base surface;
- Possibility of cladding using frame method;
- Ease of maintenance and restoration of panels (easily washed, cleaned of contaminants, re-painting possible);
- Excellent performance characteristics of the material (good sound and heat insulation, non-flammable);
- Possibility of combining 3D panels with finishing materials of other groups (wallpaper, tiles, bamboo, etc.);
- Panels can be repainted up to 25 times without loss of quality and excellent appearance;
- A wide variety of shapes, overall dimensions, textures of 3D panels allows you to visually change the size of the room.
If we talk about the disadvantages of the presented modular systems, then special attention should be paid to the low mechanical resistance of gypsum (it breaks easily) and the limited use in rooms with excess humidity (bathroom, balcony, etc.).
Types of 3D panels
Self-installation
To be able to independently install gypsum 3D panels for walls from GkerStudio and its partners, you need to read this short guide, and most importantly, clearly monitor its implementation.
Deciding on the wall
Choosing a wall for installation is usually a mutual task and falls entirely on the shoulders of the designer and, of course, the customer. The most important thing is to correctly calculate the required quantity, buy gypsum panels in our online store with delivery throughout Moscow and the region, and with shipping through transport companies throughout the Russian Federation.
To start the calculation, you need to measure the length of the wall and its height. Let's assume the length of the wall is 3200 mm or 3.2 meters, and the height is 2700 mm or 2.7 meters. For correct calculation, it is necessary to round both the height and length to a multiple of 0.5 in the direction of increase.
That is, having a length of 3.2 meters, we round it up to 3.5 meters, and the height to 3 meters, respectively. Next, you need to calculate the area for this: 3.5 meters, multiply by 3, we get 10.5 square meters, and divide by 0.25 m2 (the area of one panel) we get 42 gypsum 3D panels with dimensions of 500x500 mm necessary to cover this area.
A very important point before ordering gypsum panels is to also determine the following points, such as the presence of socket groups, a TV bracket or an air conditioner on the wall. This will enable our production to prepare special embedded elements for convenient installation, which will be discussed below. And also, for example, buy embedded elements for socket groups in our online store in the related products section.
Floor and ceiling
A very important point at the initial stage, which should not be neglected at all. Even if initially, it seems that the question is not particularly important.
First of all, it is necessary to determine how the installation will be performed, both below and above. For example, “in-floor installation” is possible when gypsum panels are mounted directly from the floor covering, but in this case, installing skirting boards will no longer be possible. If you still plan to install skirting boards, then you will first need to install gypsum mortgages, the height of which will be the same as the height of the skirting board. Our company produces mortgages for installation of both baseboards and ceiling moldings or cornices.
First of all, the floor covering:
- Rough - in the case of installing gypsum 3D panels for walls, on a wall that is adjacent to the rough floor, it is very important not to install from the floor. Because the panels have a convex relief and subsequently it will no longer be possible to lay ceramic tiles or laminate close to the relief. Therefore, first you need to check with the customer the thickness of the future laminate or tile, add to it the thickness of the substrate and a gap of 5 mm, which will result in a value ranging from 15 to 22 mm. From the height at which it is necessary to install gypsum panels.
- Laminate or ceramic tiles - if ceramic tiles or laminate are already laid on the floor where installation is planned on the wall, the start of installation, if installation is planned “in the floor”, begin by retreating 5 mm from the floor.
Ceiling material:
Drywall is the most common type of ceiling covering, and the highest priority for the installation of gypsum 3D panels for walls. Since installation can be carried out close to the ceiling with sealing of contact seams.
A suspended ceiling is a more difficult task, but not by any means feasible. First of all, it is worth understanding that a stretch ceiling is a PVC film, which has excellent linear breaking characteristics, in other words, stretching. But it is not at all resistant to mechanical damage. Therefore, it is highly desirable to install gypsum panels in this case using ceiling embedded parts, the height of which is the same as the height of the future molding or cornice.
Composition of gypsum mixture for the production of 3D panels
In today's post I want to talk about the simplest type of casting from pure plaster.
In another article I will consider stronger compositions - gypsum cement mixtures and, separately, briefly the “Sculptor” mixture
For beginners, the main rule!
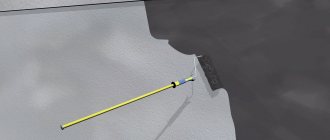
When you prepare the mixture, you need to pour gypsum into water and not vice versa.
Gypsum must be added little by little, stirring constantly. If you do the opposite, you won’t be able to stir properly, and while you’re struggling, it will harden). In the image you can see what your mixture will turn into if you do it the other way around. As a result, the sequence of actions is as follows: Pour water into the container, add plaster and stir using a special attachment for a drill. After stirring, remove the foam that forms on top.
Never forget, the less water, the stronger the finished panel!
Plaster or alabaster?
Very often, especially novice craftsmen ask, what is better to use plaster or alabaster? In fact, the question is a little incomplete, since some information is missing, for example, what kind of gypsum is required for your products. If G4-G6 is suitable for your products, i.e. If you are saving money or there is no point in using more expensive plaster, then you can safely take alabaster. If you worked with G16, then the replacement will be visible.
Bottom line: feel free to use alabaster if G16 gypsum is not required. do not forget, alabaster is stronger than plaster and dries faster (read the article Gypsum or Alabaster, battle of the titans).
I want an even stronger cast.
If you want to get the strongest possible gypsum products, then you can’t get by with the special “Strong Gypsum” additive produced by , all the details are here...
The volume of water is an eternal debate.
Regarding the volume of water, the debate never stops. I personally work only according to one principle: “Water is the minimum”; if there is already a minimum amount of water, but you need even stronger water, then you need to add plasticizers (plasticizers - how to make plaster stronger)
Different gypsum mixtures and plasters require different amounts of water. You will need to independently select the exact proportion to suit your needs. How to do it?
Take 0.6 liters of water at room temperature and add 1 kg gradually, stirring. gypsum You have received your first mixture. If the mixture turns out to be liquid and you understand that you can make it thicker, do not add more plaster, make a new filling, i.e. take 0.5 liters of water and add 1 kg of gypsum, so you will find the required proportion for yourself. To save money, you can divide it in half, i.e. 0.25 l. water + 0.5 kg. gypsum
Result:
In order to make a good and strong gypsum mixture from gypsum or alabaster, without other additives, we make a batch with the lowest possible water content and remember, alabaster is stronger than gypsum and dries faster.
Tool for installing gypsum 3D wall panels
For high-quality installation, the following tools are required:
- Water or laser level
- Notched trowel with tooth pitch from 5 to 10 mm
- Sandpaper with grain 180-240, and 400 (required)
- Fine tooth hacksaw
- Roulette
- Bucket
- Cup
- Mounting crosses or ruble coins
- Sponge for washing dishes
And also materials:
Knauf Perlfix mounting adhesive is designed specifically for installation of gypsum products on walls made of various materials, such as plasterboard, gypsum stucco and, of course, gypsum 3D panels. It has a very high holding capacity and setting speed.
Polymer putty Knauf Rotband Pasta. Incredibly elastic putty mass, with excellent covering power, and a snow-white color. It also has a high content of finely dispersed marble flour, which makes it possible to polish the surface without labor-intensive grinding.
A deep penetration primer is used after installation of gypsum panels, before painting, to generally strengthen the surface and seams, and also binds dust particles, which makes it possible to avoid paint peeling.
How long do they last?
The service life of the panels is 50 years. However:
- if there are frequent temperature changes that lead to increased humidity;
- constant exposure to direct sunlight;
- frequent blows;
- constant vibrations and movement of the house.
In this case, the service life is sharply reduced to 10-15 years or less.
3D gypsum panels decorate the room and make the interior of the room unusual. They are easy to install with your own hands and painted in a color that matches the interior and design. If the panels are regularly looked after and monitored, then they will decorate the room for 50 years (until you get tired of it).
Installation of gypsum panels for walls GkerStudio
2-4 kg of Knauf Perlfix assembly adhesive is mixed in a bucket and applied to the wall using a notched trowel.
- Question: can glue be applied to the back of the panel?
- Answer: No, it is not possible, gypsum, as a hygroscopic material, will instantly absorb moisture from the glue, which will lose its elasticity and adhesive ability.
The gypsum panel is applied to the wall and pressed, and also leveled on the plane using a level. The next panel is mounted with spacers of 1-1.5 mm. That is, it is necessary to leave a distance between the panels and create an expansion joint. Mounting crosses or ruble coins are ideal for this purpose.
- Question: Is it possible to install gypsum 3D panels without distance between panels?
- Answer: Yes, you can, if we are talking about a small panel of 3-5 square meters. Where the likelihood of seam cracking is unlikely. If the panel made of gypsum panels is voluminous and more than 5 sq. m. Creation of an expansion joint is mandatory.
Under no circumstances should you immediately seal the seam between the panels with mounting adhesive. Since the panels absorbed moisture from the glue and expanded a little, they need at least 3 days for the moisture to leave them and return to their original volume.
- Question: How much do the panels expand when moisture gets into them?
- Answer: expansion of the panels occurs depending on the thickness of the panels, their total volume, temperature and humidity in the room, as well as the humidity of the mounting adhesive itself. Typically these values are from 0.1 to 1 mm. Which is quite enough to create from a microcrack to a crack that will be visible to the naked eye.
Trimming is carried out using a hacksaw with a fine tooth. After the drying process, you can begin sealing the seams between the panels. To do this, dilute a small amount of assembly adhesive and, using a rubber spatula, press it into the seams between the panels; the excess is wiped off with a damp sponge. After the glue has dried between the seams, no more than 2 hours. The seam is cleanly sealed using Rotband Pasta polymer putty. Which is applied to the surface of the seam with a rubber spatula and left to dry. After the putty has dried, sanding is done. To begin, take 200 grit sandpaper and sand the surface. At the final stage, repeat the process with 400-grit sandpaper.
- Question: Is it possible to do without 400 grit sandpaper?
- Answer: No, it is not possible, the surface of GkerStudio gypsum 3D panels has a roughness equal to grain 400. Thanks to this, it is possible to equalize the roughness of both the panel and the seam. If you sand only with 200-grit sandpaper, then after painting the seams on the 3D gypsum panels will be visible. Due to the difference in surface roughness, this is called “weld glare”.
Next, the panel is primed using an acrylic primer. After which they begin to paint the 3D panels, you can read what paint to paint in the corresponding article: Painting gypsum 3D panels for walls.
Creating a new reality using 3D panels
When starting a renovation, many people want to radically change their living space and add a fashionable, stylish detail to their interior. This can be done using interesting photo wallpapers, or a new product that has recently appeared on the construction market - 3D panels for walls and ceilings. With the help of such panels, you can create absolutely any decor that will match and suit the style of your room or office space. They will look great in combination with plasterboard sheets. A significant disadvantage that makes you think about purchasing this product is its high cost. Therefore, in order to reduce waste, many are interested in the question: is it possible to make 3D panels yourself?
Making 3D panels from gypsum with your own hands is quite simple
Experts say that it is possible to produce 3D panels yourself; it is enough to know some nuances and rules. Such products are fixed to flat surfaces (walls, ceilings). They can become decorations for buildings and fences.
To achieve the best 3D image effect, you need to choose the right lighting. For these purposes, spot LED lighting is used. 3D panels can differ in their shape, the most popular are:
They are attached to absolutely flat surfaces that have been previously processed and prepared. The corners in the rooms must also be perfectly straight; for this, a special tool is used - a building level, with the help of which you can detect all irregularities and discrepancies.
If you ignore or lose sight of at least one of the points mentioned above, you will not be able to achieve an ideal work result. If it is not possible to completely level the surface, you can use artificial gypsum panels, whose appearance resembles brickwork.
How to make 3D panels yourself
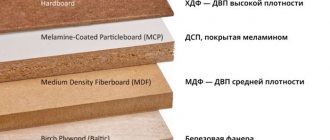
As a rule, the following material is chosen as the basis for panels:
- gypsum;
- MDF;
- plastic;
- bamboo.
The cost will depend on the size of the panels, as well as the material from which they will be made. Approximate price – 4 thousand rubles. for 1 m². It will also be necessary to purchase a special form for the panels. Its cost ranges from 2400-2500 rubles. It has a long service life, even if you make panels every day, it will last you at least 1 year.
Is it worth making panels from gypsum Panels made from gypsum have their advantages and disadvantages. The advantages include: No joints. This can be achieved using regular putty and sandpaper. If everything is done correctly, even a specialist will not be able to find the places where the panels are connected. Easy to fix defects. If during the work there is a slight deformation of the panels or their chipping, damage, all this can be easily eliminated with sandpaper and putty. Low price compared to other similar materials. A low level of strength is the only drawback of this material. But it can be avoided by simply adding polymer mixtures or fiberglass. To increase the service life, the surfaces of the panels should be varnished. If you want the panels to be durable. It is enough to add modifiers to the gypsum solution and get a new material - gypsum polymer. It is very similar to plaster, but more durable. Panels made of gypsum resin can be washed. This production method is usually used in enterprises for further sales. 3D gypsum polymer panels are durable, and you don’t have to worry about them during transportation. If you are making panels for yourself, it will be enough to add fiber fiber to the plaster - artificially created fibers that serve to give the material strength.
Making gypsum 3D panels with your own hands
Main stages of making panels In order to make panels, you will need the following components:
When all the components have been purchased and prepared, you can proceed directly to the production of 3D panels . For this:
- It is necessary to put lime and fiberglass in the required proportions in a deep container.
- Stir and add cold water.
- Using a drill and auger attachment, stir the resulting mixture.
- Add gypsum.
- Mix well, you should end up with a homogeneous mass, without lumps, with a consistency reminiscent of thick sour cream.
- The resulting mixture is poured into an even layer into a special mold for 3D panels and placed on a vibrating table.
- After about 40 minutes, when the panels have hardened and reached strength, they can be removed from the mold.
- If it is not possible to use fiberglass, you can find a replacement for it; sand is suitable for this purpose. In this case, the proportions of the mixture change, less water and gypsum will be needed.
The production facility has special chambers for drying panels, in which the drying process occurs faster. At home, there should be no drafts or frosty air in the room where the panels will dry.
Making gypsum polymer panels with your own hands
- In order to obtain gypsum polymer, you will need:
- Special grade cement (M500). Turkish cement can be used as a substitute.
- Matakaolin-pozzolan.
- Plasticizers.
- Fiber fiber.
- Water repellent.
The process of installing the panels is not complicated, and is very similar to installing artificial stone. The only thing you need to make sure is that the surface is perfectly flat. The panels are secured using special glue, which can be purchased at a hardware store.
How to paint 3D panels yourself
The process of painting the panels occurs after fixing them to the wall. The technology is simple and consists of the following steps:
- First you need to put the seams in order; they must be carefully puttied using plaster and finishing putty.
- After the putty has completely dried, it must be sanded. The base of the panels must be treated with a special primer, which is suitable for mineral substrates.
- Wait until it is completely dry. After this, open the material with water-based paint using a brush or roller. Do not paint the surface with sprayers; the paint will come out unevenly.
- After this, open the material with water-based paint using a brush or roller. Do not paint the surface with sprayers; the paint will come out unevenly.
- It is necessary to select the color scheme for the panels so that it is in harmony with the overall interior of the room. If you want to add shades, you can add some colored pigments to the paint. Such panels can be painted in one or more colors. After painting is completed, sand down any marks (beards) left by the brush, if any.
- After the paint has completely dried, it is better to treat the surface of the panels with varnish. This will give the panels shine and additional color, and it will be possible to wash them with a damp soft cloth or sponge.
How to install sockets in gypsum 3d wall panels
Installation of sockets, socket groups and switches is carried out using mounting frames. This is the most optimal and aesthetic type of installation. Of course, you can mount the rosette group deep into the panel, or even on the surface of the relief, but from an aesthetic point of view it looks terrible.
Therefore, we offer our clients embedded elements for installing socket groups. For 1, 2 and 3 sections, at the customer’s request we can produce mortgages for 4 and 5 socket groups, as well as non-standard options.
Buy embedded frames for mounting sockets and switches in gypsum 3D panels for walls
There will be a TV hanging on the installation wall, how to install it?
To be able to mount a TV bracket, it is necessary to make an embed for the bracket; to do this, write to our manager in the order that you need to make an embed, the size of which must be identical to the dimensions of the bracket fastener. Installation is carried out in exactly the same way if there is an air conditioner on the wall.
We make an imitation of 3D panels with our own hands
To create an imitation, ordinary 50 mm polypropylene pipes are suitable. They are slightly smaller in diameter, but this is not critical; they will look even neater in a small area.
The pipes are cut in half on a sawing machine. If you don’t have a machine, you can find a cutting service; it will cost no more than 1000 rubles from a private craftsman.
To be able to glue these halves to the wall, the insides are filled with polyurethane foam. When the foam has dried, the excess is cut off and the inner surface is coated with Volma Shov gypsum putty or similar.
The prepared pipe halves are glued using Shitrok gypsum putty to a flat prepared wall.
Until the putty hardens, you need to secure the pipes with masking tape.
The next day, the pipes can be sanded with fine sandpaper and painted. The paint is applied with a spray gun.
The final result can be seen in the video:
Installation of gypsum 3D panels by company specialists
GkerStudio specialists will be happy to perform installation at your site in Moscow and the Moscow region, or supervise installation at sites in other regions of the Russian Federation. The main reason for recommendations for engaging our specialists in the installation of 3D gypsum panels is a thorough knowledge of the material and the ability to work with it. First of all, this gives the customer the opportunity to save himself from searching for a third-party team of workers who will be ready to carry out this installation. At the same time, there are no guarantees that the work will be done efficiently, and as a rule, there is no one to file claims with after such installation. If our specialists are involved in the installation of 3D panels, the guarantee is borne directly by the manufacturer.
If necessary, the walls are leveled for subsequent installation, as well as primed with various highly adhesive materials for better adhesion of the wall surface, adhesive composition and panel. It is important to remember that the gypsum from which these products are made is a hygroscopic material, subject to both the absorption of moisture and its release into the external environment (the process of equalizing humidity). During transportation, while in packaging, gypsum panels are unable to “breathe”, but at the same time they manage to absorb excess moisture. To be able to get rid of it, it is necessary to carry out an “acclimatization” process. And it consists of removing the panels from the packaging in the room in which installation is intended, and laying them horizontally over the floor area for 2-3 days. After this period, the humidity of the panels and the room will be equal, which will make it possible to avoid the formation of cracks between the panels in the future.
How long does it take to install gypsum 3D panels?
How long does installation take? If we talk about a small area, for example 10 sq.m. (40 panels) painted with matte acrylic paint, it will average 3-4 working days, and the total period will be 7 days. Why is that? The fact is that after gluing the panels to the wall, it is extremely necessary to allow the moisture that got there through the glue to escape from the panels. And if this is not done, but immediately proceeds to sealing the seams, then they will inevitably crack. Also, the installation time of gypsum 3D panels directly depends on the complexity of the terrain. For example, panels such as Luni, Wave, Fable are easy to install, but Arabic and Vintage are not, and only an experienced specialist can do it.
With large volumes of orders for the installation of gypsum 3D panels, the company can mobilize more than 50 specialists in the shortest possible time, as well as offer the most favorable market price.
Installation prices
Most often they are calculated individually based on the following factors:
- need to level the wall
- terrain complexity
- panel sawing
- recesses for sockets
- non-standard coloring (gloss, gold, chrome, decorative coating)
And they range from 2000 rubles/sq.m., which include a full range of installation services (including consumables and equipment), where the customer only provides finishing paint or decorative coating. We take care of the rest.
Advantages and disadvantages
Like any material, gypsum panels have pros and cons.
The advantages include:
- Versatility . The panels are used in any room. The exception is bathrooms with high humidity, which will quickly destroy the material.
- Ease of restoration . Any defects on the surface that appear during operation can be easily repaired with putty.
- Sound and heat insulation properties . Gypsum 3D panels improve the comfort of living in an apartment building and allow you to save on heating costs in winter and air conditioning in summer.
- Fire safety - gypsum panels are not afraid of direct contact with fire and do not emit toxins even at extremely high temperatures.
- Long service life . The panels do not lose their appearance, they can be repainted several times, and the surface topography will not be affected.
- Easy cleaning . The panels can be wiped with a slightly damp cloth and dry cleaned.
- Easy to install . The panels can be attached without special tools to brick, plasterboard, concrete, or wood using glue.
- Masking minor wall defects . The walls under the panels should be smooth, but perfect smoothness is not required.
- Originality of finishing.
- Environmental friendliness . Gypsum is a natural material that is absolutely safe for human health.
Along with the advantages, the panels have disadvantages:
- The need for careful preparation of the base when installing with glue on the wall . Uneven corners and differences will cause the pattern and seams of the panels to “come apart”.
- Excessive dust settling on the terrain . If panels with a three-dimensional pattern are used for finishing, constant wet cleaning of surfaces cannot be avoided.
- Irritation and fatigue from the relief of surfaces . To avoid this, you should think carefully about the decor of the room. Designers do not recommend covering all surfaces in one room with panels. Sometimes it is enough to cover only part of the wall.
- Heavy weight . A slab measuring 50x50 cm can weigh up to 10 kg. This complicates installation and makes it impossible to use slabs for finishing plasterboard or dilapidated internal partitions. It is better to use the material on strong walls.
How to install 3D gypsum panels with your own hands
Gypsum volumetric panels allow you to immediately obtain an almost finished wall or ceiling covering. As a rule, installing 3D gypsum panels on walls or ceilings is done with your own hands and it would be useful to find out the main nuances of such work. There is nothing particularly complicated about this and all operations can be performed even by a person who does not have such experience.
Surface preparation
The basic requirements for this stage of work are simple: it is necessary to remove all crumbling, peeling or damaged areas of old plasters and putty mixtures. After this, the surface is dusted off so that nothing prevents the adhesive solution from performing its function.
Important: if installation will be carried out using an adhesive solution, the surface of the wall or ceiling must be strong enough and capable of bearing such a load.
If the installation of gypsum squares is carried out on the sheathing, then at the preparatory stage it is only necessary to treat with a standard primer that prevents the development of fungus or mold. Naturally, you will need to assemble the sheathing itself, which, however, is not at all difficult.
Installation
The first option for installing such structures involves the use of various types of adhesive solutions. If the plane on which the installation is carried out is sufficiently flat and provides good adhesion to the part, then for 3D gypsum panels in this case you can even use simple glue intended for drywall. Liquid nails also work well.
Important: in order to get a decent result in the end, you should not neglect the little things. For example, it is necessary to use markings on the plane in order to orient the fragments of the coating along it.
The second installation option involves assembling a metal sheathing and attaching panels to it. The whole process is very similar to plasterboard sheathing, with the only difference being that the dimensions of the parts are smaller. It is important not to use excessive force when tightening the screws to prevent cracking of the plaster.
Some craftsmen use an alternative method of installing gypsum strips - on a plane assembled from plasterboard. They stick to drywall very simply and hold tightly. However, one point needs to be taken into account: such heavy coatings cannot be attached to a wall made of gypsum plasterboard in one layer. It is necessary to assemble the surface from at least two, and preferably three layers of drywall.
Finishing
Despite the fact that gypsum 3D panels allow you to get an almost finished decorative surface and all that is needed is installation, finishing is still needed. It consists of puttying the joints of individual coating fragments. If you have chosen a model with a seamless surface, you definitely cannot do without such a finish, and standard parts are joined with a visible seam.
Since the parts themselves fit together very tightly, it can be difficult to seal very thin joints. To avoid such problems, you can first remove a small chamfer along the edges of the parts or try to join them not so tightly, leaving a minimum gap. In addition, you can use the option of filling the joints directly when installing parts, coating their edges with putty.