Set of socks, Omsa socks
349 ₽ More details
Set of socks, Omsa socks
349 ₽ More details
Grouts
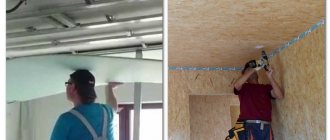
Gypsum plasterboard sheet (GKL), as a rule, is attached to the sheathing; accordingly, the installation of the profile under the plasterboard must be reliable. Often, novice builders buy thin metal PP guides, and some areas on the ceiling are pressed under the weight of the material. To do the job correctly, you need to study finishing technology. The slabs themselves for cladding walls and ceilings are easy to use, and little time is spent on making the frame.
Drywall sheets are attached to a frame made of special profiles
Wooden and metal products
Partitions, walls and ceilings cannot be finished with sheets of plasterboard alone. Therefore, profiles form the main part of the entire structure. There are 2 types of products:
- metal;
- wooden.
In the first case, strips for mounting on gypsum boards have many disadvantages. The material is not in wide demand because manufacturers do not produce it, but it is still used for the installation of sheathing. What disadvantages can you expect if you use wood products:
- low service life;
- rotting of wooden planks when interacting with water;
- such lathing does not shine with strength, so it can become deformed after some time;
- high degree of fire;
- labor-intensive installation of the frame.
This is interesting: the main types of metal profiles.
This video shows how to build a frame from profiles:
Steel structures have undeniable advantages over wooden models. They are several times more expensive, but this is the only negative. Advantages that can be highlighted:
- the rigid and durable sheathing does not deform even after many years of use;
- ease of assembly of the structure;
- the long service life is due to the fact that the material is made of zinc and has sufficiently thick sides so as not to bend under the weight of the sheets;
- There are different types of profiles, both for ceilings and walls.
Of course, the owner will overpay for the purchase of such high-quality building materials, but he will forever forget about the periodic restoration of the hanging product.
Drywall frame: video, do it yourself
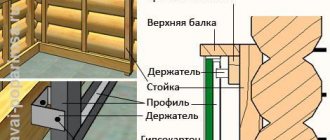
- Suspensions.
- Various types of profiles (rack-mount, guide, ceiling).
- Connectors for joining sections.
- Self-tapping screws, dowels.
- “Crab” connector, which is designed for fastening profiles at places where they intersect.
- If you need to assemble a wooden frame, in addition to wooden beams, you need screws, dowels, and nails.
The construction of the frame begins with laying its perimeter. It must be level, so it must be carefully marked. For the ceiling frame, markings are made along the walls using a tape measure and a laser level.
- An indentation is made from the wall to the required distance, where the unevenness of the wall and the thickness of the guide profile are taken into account. A line is drawn parallel to the wall with a marker or pencil.
But if there are large communication paths under the drywall structure, for example, ventilation system pipes, then you will need to make a larger indentation. Everything will depend on the size of pipes, wires and other things that are planned to be covered with finishing material. A moment like this should be thought through to the smallest detail. The interval observed between slats is 40-60 cm.
The width of the slats themselves is 3-5 cm, and where the joints will form, a sheet of finishing material, the width of which should reach 8 cm. Otherwise, the slats should be double. The frame is attached to a brick or concrete wall with self-tapping screws and dowels, and to a wooden surface - just self-tapping screws will be enough.
Types of guides
There are profiles for ceilings and walls, but they are structurally similar to each other. Therefore, there are only 2 types: starting and main models. The dimensions of the guides are made according to the standard - 300 cm in length. If the room is large, then there is a special fastener that connects 2 elements at the ends and achieves a size of 600 cm.
The frame for attaching drywall is made from starting and main guide profiles
Profiles marked PP and Ps should be installed for areas of the room with heavy loads. These types of steel strips at the ends are designated by the letters C or P. PN - guide profile (starting). It is used for fastening to walls in a horizontal or vertical position. Then the main metal products are installed into it to form the frame. How evenly they are installed, the coating will be even. Variations of steel profiles for drywall:
- NP - this type is used for walls because it plays the role of a vertical support.
- NP - performs the functions of a ceiling value on which gypsum boards are mounted.
- PP - starting guides are installed under the ceiling along the entire perimeter of the room. The main profiles are attached to them and a suspended ceiling is created.
The NP profile is used for better fixation of drywall on the frame.
There are certain types of material that are used infrequently. If the owner of a country house decides to make complex geometric shapes or protect weak areas of the finish from mechanical damage, then you cannot do without them:
- Corners. After attaching the plasterboard slabs, these parts are installed. They are installed along the entire length of the corner, for example, on partitions. Fix the elements with staples and a stapler. They are rarely used on the ceiling; the exceptions are two- or three-tier structures. In other cases, corners are installed on the walls.
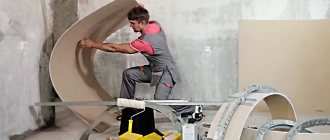
- Half-arcs. These are radius profiles installed in arched openings or other asymmetrical areas of the house. They, like the main types, are secured with screws.
You can do without buying semicircular planks and make them yourself. It is enough to arm yourself with metal scissors, place dashes at equal intervals on the sides of the main flat NP guide and make cuts, not reaching 2 mm from the bottom of the product. Then the structure is bent and mounted to the jumpers. The work won’t take much time and you won’t have to overpay for radius models.
Installation of a profile for drywall
Another disadvantage of wood is that before making a frame for plasterboard from it, it is important to carefully align and dry the prepared slats, otherwise, after some time, as they dry out, they will begin to unscrew, weakening the screw path and deforming the plasterboard sheathing. In order to do it efficiently frame for plasterboard made of metal profiles, it is necessary to carefully prepare the surface. It should be as clean as possible from easily crumbling elements, plaster, and dirt. Also, the ceiling must be properly dried, make sure there are no through holes, cracks, or seal them, if any. When the frame needs to be strengthened, you can twist the UP or insert wooden blocks of suitable sizes into the profiles.
They are also used to frame complex surfaces - openings of doors and windows. The guide sheathing for drywall rotates towards opposite surfaces, releasing the required distance for uniformity of level. Screw pitch up to half a meter. From it, a drawing of lines is made, every 60 cm indicating the location of the rack verticals.
Just like with the ceiling, the surface is initially prepared. It is important to thoroughly clean it from crumbling pieces of plaster, sand, dirt, dry it and also remove various additional elements - wiring, ventilation ducts, pipes, if they will pass in the under-frame space.
Rules for fastening the structure
The lathing is secured to metal hangers. Due to them, a gap is set between the wall or ceiling and the slats. Therefore, the master does not need to level the surface of the ceiling, which significantly speeds up the work process. Several hangers are installed per 1 m². The part looks like a plate, the edges of which are equipped with multiple holes for self-tapping screws.
The frame for plasterboard must be installed on a flat ceiling
The starting guides must be installed on plastic dowels and screws. To securely screw the plank, holes are made in it every 50 cm with a puncher both in the part itself and in the wall. Hammer the plastic fastener and screw in the screw. Other profiles are sold with pre-made holes; they are more suitable for novice builders. Here are recommendations from professionals that will greatly simplify the installation of drywall guides:
- This is the basic rule - regardless of where the drywall will be attached, the slabs are always joined to each other extremely evenly. Even minor differences will complicate further work with putty. For these purposes, use a long level or rule measuring 300 cm.
- The starting guides are installed on a pre-drawn line on the wall. Marks are made on the product at intervals of 50 cm, and the same work is done with the wall. Next, holes are made in the metal strip with a nail, then holes are made in the wall with a hammer drill. Shaking of the attached structure is unacceptable.
- The screws are screwed in at right angles and held with your fingers while working. They are also called “bugs” because they are short in length.
- To tighten fasteners in a hard-to-reach area of the ceiling, for example, under lamps, use an angle attachment on a screwdriver.
To build a frame for drywall in hard-to-reach areas of the ceiling, you should use an angle attachment on a screwdriver - If the countryside property is not insulated from the outside, then after constructing the sheathing and before installing the gypsum board slabs, mineral wool is placed inside the frame and secured with tape or other fasteners.
- According to the technology for installing plasterboard, the profile structure has cells of 50x50 cm. Therefore, in those places where 2 steel strips intersect crosswise, “toads” are attached. They will add rigidity to these weak connections.
You cannot use bent guides to create the frame, as this will affect the evenness of the ceiling or wall.
Required tools and materials
A belt screwdriver is a prime example of a tool that speeds up work, but you can do without it.
While working, you cannot do without certain tools. Some of them are mandatory, while others simply speed up and simplify the workflow. Let’s figure out what tools are needed to ensure that the alignment of plasterboard walls with the frame is as effective as possible:
- A hammer drill is needed to drill holes in the wall, ceiling and floor . This is done in places where the frame will be attached so that the new wall is strong and reliable;
- a screwdriver or Phillips screwdriver is necessary throughout the entire work process;
- metal scissors or a grinder are needed to cut profiles to the required length;
- water level or laser level . With their help, everything will be smooth, and the curvature of the wall will be eliminated;
- Using a knife, drywall is cut into pieces of the required length.
You may also need tools such as a tape measure, a notch, painter's cord, and a plane for chamfering drywall.
As for the materials, everything is simple: drywall, dowels, screws, hangers and profiles. Regular drywall will do if the walls are not being leveled in the bathroom or toilet. In this case, you need to take moisture-resistant sheets that are green. Dowels 40-60 mm long will be sufficient.
All necessary fasteners to assemble the frame
As for self-tapping screws, standard 3.5*25 screws will do (screw diameter 3.5 mm, screw length 25 mm). According to the rules, after screwing in, the self-tapping screw must protrude from the back side of the profile by at least 1 cm. If you add up the thickness of the gypsum board to 12.5 mm and the thickness of the profile to 1 mm, it turns out that it is quite possible to use self-tapping screws 25 mm long. If it seems that they are a little short, then you can take 3.5 * 35, but no more. To fasten the profiles to each other, special metal screws 9.5 mm long are used.
U-shaped mounts, or hangers as they are also called, are also necessary. With their help, not only the suspended ceiling is assembled, but also the walls are leveled. They have standard shapes and sizes, so it will be difficult to make a mistake.
The classic option is a combination of profiles UD 27*28 (hereinafter referred to as guide) and CD 27*60 (hereinafter referred to as rack). The frame rim is created from the guides, and the rack profile is inserted into the guides, creating racks and lintels. It is necessary to select profiles of such dimensions that one can then be inserted into another, otherwise the frame cannot be assembled.
Existing profiles from the Knauf company
Marking the room
The frame requires proper marking of the walls. If this is not done, the design will be crooked. List of tools for work:
- chalk-treated cord, the kind sold in hardware stores;
- roulette
- pencil;
- hydraulic level;
- level.
If the master is not sure of the evenness of the ceiling, then he uses a hydraulic level to find the zero point. In the corner of the room, make a mark of 100 cm from the floor. Place one side of the tool on it, and place the second on the opposite corner; when the water levels out, draw a short line with a pencil at its level. The procedure is performed on all sides of the room.
From the ceiling down the wall, measure no more than 10 cm. Place a mark from which to measure the height to the bottom line. The resulting size is transferred to all corners of the room. This is the ideal way to achieve a uniform plane. It is advisable to involve an assistant in the work.
At the level of two marks, pull the cord tightly, grab the material with your hand closer to the middle, pull it away from the surface and release it. As a result, an even imprint will remain, which will serve as a beacon for installing starting profiles. Similar manipulations are performed around the entire perimeter of the room.
To obtain a high-quality frame for drywall, you should strictly follow the instructions
You can use other methods: step back 10 cm from the ceiling and mark this place with a pencil, place a long level at the level of the line and adjust it, then draw a line on top of it, on the edge of which the tool is again placed and similar work is carried out. And they do this until they mark the entire perimeter of the room.
Surface preparation and marking
Even before you level the wall with plasterboard with the profile, you need to prepare it, and also make markings in the room. As for preparation, it is kept to a minimum. Some people advise removing old finishing coatings from the wall, cleaning it, and covering it with special antifungal mixtures. But all this is a waste of time, effort and money. Who cares if wallpaper remains on the wall if it doesn’t affect anything and won’t be visible.
If desired, you can reupholster old loose plaster so that in the future you don’t have to listen to it slowly crumble behind a frame with drywall.
If the wall is leveled in the bathroom, then it can be treated with a special solution that prevents the development of fungus and mold. This decision would be logical due to the high humidity in the bathroom. In other rooms, such actions do not make much sense. It is much more important to make the correct markings.
You need to mark the ceiling, floor and side walls. It is necessary to draw four lines along which the frame will be attached. Leveling plasterboard walls with a frame with your own hands requires great precision, so it is highly advisable to acquire a laser level.
Using a laser level greatly simplifies not only marking, but also the process of assembling the frame
It is necessary to determine where the wall falls in order to know the place of its maximum protrusion in the room. This can be easily determined by a laser level, which will immediately show where to draw lines for marking. Using a paint cord, all lines are marked on four surfaces for guides. If there is no laser level, then the process will look like this.
- The plumb line determines where the wall is piled.
- We retreat 2-5 cm from the ledge and use a plumb line to mark points on the ceiling and floor. We do this procedure at both ends of the wall.
- Upholstery cord draws lines on the ceiling and floor. Then lines are drawn similarly on the two walls.
The video shows how, even without a laser level, you can assemble a frame with high quality using ordinary tools.
Technique for mounting the frame on the ceiling
The design of the ceiling lathing is almost no different from the wall lathing. Specialists are able to build a product in a room of 20 m² in 1 day. How to do it:
- You need to place a profile for drywall on the drawn lines. First, holes are made in them with a nail, they are applied to the wall, strongly moved to the corner of the room, a hammer drill is inserted into these holes and drilled.
Drawing on the walls for level installation of the frame is done using a nail - Dowels are driven into the material with a hammer. They put a screw there and tighten it with a screwdriver. By the way, it is safer to use a cordless power tool, since a person focused on work may trip over the cord and fall from a height. Fix the plank to the end of the wall, then install another guide and move it to the corner, thereby it will fit into the profile. This process is completed.
- In a room of 3x4 m, accordingly, it is more efficient to mount the profile not along the length of the room, but across it, thus you will not have to lengthen the PP profiles. The material is inserted into the starting guides in increments of 50 cm and connected at the bottom with screws.
- Above the main elements, fasteners (narrow plates with holes) are mounted to the ceiling. The edges of the part are bent and placed against the guide, which is screwed with screws, the remaining ends are bent in the opposite direction. Install hangers in increments of no more than 100 cm.
The frame on the ceiling for plasterboard must have high strength so that the future structure is stable - Jumpers are fixed between the profiles. The material is cut to a length of 58 cm. The main part is 50 cm. Along the edges, cuts are made on the sides 4 cm long, which are pulled to the sides. On the guides attached to the starting ones, lines are created, retreating 50 cm from the wall. The jumper is applied to the marks, screwed on the bottom and sides with self-tapping screws. The remaining part of the sheathing is installed in this way.
- In the areas where the jumpers join the main profile, “crabs” are fixed. The part is installed on top of the cross-shaped connection of the structure, small plates with holes are bent on it and screwed to the guides.
The installation of profiles under drywall is controlled by the building level. Even the slightest differences are categorically unacceptable, especially at the stage where the element is attached to the ceiling. Therefore, it is better to carry out installation together.
Correct installation of a profile under drywall (video)
Follow our advice, and you can easily build a frame for drywall yourself.
Creating markings and installing guide profiles
- Drilling is done for fastening elements. You can immediately install U-shaped brackets.
- The time has come to secure all parts of the structure. First, they install the PN - a closed structure is obtained, into which the SP is inserted. Using metal screws, screw them together (bottom and top). Rack elements are attached to hangers.
- Using metal scissors, cut the ends of the profile along the edges.
The ribs are bent. Through them, the ties are screwed to the racks. The central section remains without a self-tapping screw, otherwise you will end up with a bump.
A metal profile frame for a wall begins with marking its location. It is done on the floor and then transferred to the ceiling using a plumb line and a painting cord, which will ensure strict verticality of the structure. When choosing the spacing of the racks, you should remember that the dimensions of the plasterboard sheet are multiples of 600 mm, so the racks are installed based on this parameter. Attention!
At the location of the door on the floor, you need to break the frame.
Creating wall sheathing
Before starting work, specialists level the surface of the room, since the starting ones are installed on them, and as you know, they are considered the basis for the entire structure. Installation of profiles for plasterboard on walls:
- The wall surface is outlined - this applies to the floor and ceiling. They make marks to which the intended cord is applied, pulled back and released. The impact will leave a straight line.
- Starting guides are installed along the floor and ceiling, which are secured with dowels and screws. Profiles are mounted vertically in the corners of two opposite walls. Since the standard height of modern rooms is no more than 300 cm, the bar does not have to be increased by connecting two such elements with fasteners.
- The main profiles are placed vertically in increments of 50 cm and secured with “bug” screws.
- Jumpers are made with trimmed edges 4 cm long on both sides. They are placed in increments of 50 cm. The work is constantly monitored by level. The connections are fastened with “crabs”.
This is interesting: types of metal profiles.
To give the structure rigidity, craftsmen advise using not only hangers, but also pieces of profile. For example, if the distance between the wall and the sheathing is 10 cm, then PP guides are prepared to the same dimensions, the edges of which are cut at one edge, and all parts are bent back. The material is installed in the frame bar, the other end is placed against the wall, in which holes are made and the product is secured with dowels and screws.
The work is finished. It remains to check the quality of installation of the metal profile for drywall. A thread is pulled from the top corner of the wall to the bottom. Attach the second cord, but in the opposite direction, to form a large letter “X”. If there are no significant gaps and the structure does not wobble, then the process of assembling the sheathing with your own hands was successful.
Self-installation of a profile for drywall
In recent years, finishing a house with materials such as plasterboard has become increasingly popular. After all, with the help of this material, you can create a stylish and original interior in a short time. Arches, niches or volumetric compositions in the walls, multi-level ceilings - these are just a few examples of what can be made from plasterboard, which can be easily bent into the shape you need. There are two ways to install drywall: framed and frameless. Which one you should choose depends on the functions that the structure you have planned should perform, but keep in mind that drywall installed on the frame will last you longer, will allow you to hide some communications and hide uneven walls. How to install a profile under drywall with your own hands - read on.
Marking (diagram) of the partition frame
In the frame diagram of a blind partition, the most important parameter is the pitch between the vertical posts. It depends on the height of the room and the size of the PS profiles used. For example, for single-layer (C111) and two-layer (C112) partitions, the following rules apply:
1. Partition thickness up to 75 mm. PS 50 profiles are used for vertical posts. Guide profiles are correspondingly PN 50.
- With a ceiling height of up to 3 meters, the pitch between the racks is 600 mm (along the axis of the rack);
- At a height of 4 meters, PS pitch is 50 - 400 mm;
- At a height of 5 meters, the PS pitch is 50 - 300 mm.
2. The thickness of the partition is 100 mm. PS 75 profiles are used for vertical posts. Guide profiles are corresponding to PN 75.
- With a ceiling height of up to 3 meters, the pitch between the racks is 600 mm (along the axis of the rack);
- At a height of 4 meters, PS pitch 75 – 400 mm;
- At a height of 5 meters, the PS pitch is 75 - 300 mm.
3. Partition thickness 125 mm. PS 100 profiles are used for vertical posts. Guide profiles are corresponding to PN 100.
- With a ceiling height of up to 3 meters, the pitch between the racks is 600 mm (along the axis of the rack);
- At a height of 4 meters, PS pitch is 100 - 400 mm;
- At a height of 5 meters, the PS pitch is 100 - 300 mm.
Important! According to technology, the height of metal rack profiles should be 10 mm less than the height of the room.
Installation algorithm
The tools have been prepared, the profiles and fasteners have been purchased - it’s time to start installing the frame. For clarity, we first present a list of all actions for installing the frame in order of priority.
- Dismantling the old coating
- Markings for hangers
- Marking for guide profiles
- Installation of hangers
- Installation of guide profiles
- Installation of ceiling profiles
- Aligning the frame plane
- Installation of jumpers
Now we perform each stage sequentially.