Design and principle of operation
The mounting gun consists of the same set of elements. The design determines the operating principle of the tool.
- Frame. Holds a plastic tube or bag. Based on the shape of the frame, the following types of devices are distinguished: skeletal, case (closed), semi-case (half-closed).
- Stock. A part with a wide round plate at the end that rests on the bottom of the tube. When the trigger is pressed, the rod moves forward and pushes a certain part of the sealant from the tube through a narrow spout at the tip. In pneumatic devices, the rod is replaced by air supplied under pressure.
- Trigger. This is the handle that operates the lever mechanism. The speed at which the paste is fed depends on how hard the trigger is pressed.
- Lever device. The user pulls the trigger and the system pushes the piston a certain distance.
- Latch. In simple models, the part is designed to block the stroke of the piston, and in more expensive designs, the lock also relieves pressure from it, preventing spontaneous squeezing of the mixture from the container. First, the latch is pressed out, and only then the rod is pulled back.
Adviсe
Pay attention to useful tips that will be useful for both beginners and professionals.
- When choosing a pistol for a one-time job, you can look at cheap options: skeletal, semi-body.
- It is clear that there is no way to check the ability of a tool to work, but higher quality tools are usually heavier in weight.
- If versatility is required from a tool, it is worth considering options among case models. They are also the most suitable for frequent use.
- If the sealant was purchased not in a tube, but in a soft package, it is enough to unscrew the fixing nut and remove the upper spout. The packaging is inserted into the housing device and the upper part is cut off with a knife. The spout with the fastening nut can be installed in its place.
- If the sealant is purchased in a cartridge, carefully examine the tube spout. On it you can see marks along which it is convenient to cut off this very spout. The marks initially set the thickness of the extruded paste.
Please note the recommendations for applying the paste:
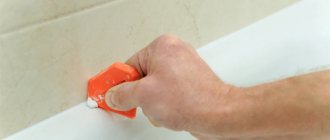
- the seam being processed, for example, between a wall and a bathtub, must be thoroughly cleaned;
- surfaces are degreased;
- areas of surfaces that do not need treatment are protected with construction tape;
- the line of the extruded substance must be continuous;
- wait until the substance is completely dry, and only then remove the masking tape.
How to refill a pistol
The sealing compound is sold in soft aluminum foil tubes or in a hard plastic cartridge. Each type of packaging has its own characteristics.
- Cartridge. Packaged in 300 ml. A dense cylindrical container with a special tip. It has a movable bottom, which moves under the pressure of the rod as the mixture leaves the container. This packaging is used for minor repairs.
- Soft tube. The packaging can be 0.3-0.6 liters in volume. The price of sealant in soft containers is lower than in hard ones. Properties are maintained throughout the entire shelf life.
The sequence of actions for filling the device depends on the form of sealing paste.
Plastic cartridge
With this type of sealant, you can use a closed-type gun (1) or a skeleton gun (2).
1
2
Initially, packaging is prepared:
- the tip of the cylinder is cut off with a sharp blade or knife;
- an applicator is screwed onto the can;
- the end is cut at 45° to a length depending on the thickness of the sealed area. The thicker the joint, the greater the distance you need to retreat from the edge.
To insert glue into the gun, do the following (instructions for a closed design):
- Prepare your device. First you need to open the tool body by twisting the plastic nut that is located at the end of the rod.
- Remove the washer and tighten the support nut to the edge of the rod.
- Place the washer on the piston, secure it with a nut, tighten the nut with a wrench so that the rod does not extend beyond the washer.
- Screw the housing.
- You can then insert the sealant into the tool and secure it with a plastic nut.
To place the sealant in a skeleton-type gun, the following steps are performed:
- The spring petals are pressed and the piston is pulled back all the way.
- The cylinder with the mixture must be installed in the body and slightly pushed forward.
- Clamp the spring petals, push the piston until it touches the bottom of the cylinder.
To remove an exhausted cartridge from the gun or replace it with glue, the sequence of actions must be performed in reverse order.
Composition in soft packaging
Soft foil packaging is suitable for use only in closed devices.
Here are step-by-step instructions on how to fit a foil sausage with sealant inside into a gun:
- The housing unscrews.
- The top nut is screwed onto the piston, locking a metal washer.
- The washer is removed, the support nut is scrolled down along the piston thread.
- The metal washer is returned to the rod, and a plastic washer is fixed on top of it.
- The nut is tightened with a wrench.
- The gun body is installed back into the gun.
- In a foil tube, the edge is cut off with scissors, after which you can insert the sealant into the gun.
- The tip is installed in the cover and fixed.
- The lid is screwed to the body.
- The end is cut at an angle of 45°.
Directions for use: instructions
Regardless of which type of caulk gun you choose, the instructions for use are similar for all. So, how to properly prepare a pistol for use? Let's look at each stage in turn:
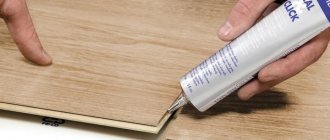
- Using a stationery knife, carefully cut off the spout of the tube at an angle of approximately 45°. The width of the hole should be selected depending on the width of the intended seam.
- Having unscrewed the plastic cap with the cut off spout, pierce the protective valve on the package, and then screw the cap back along the thread.
- In order to insert the sealant package into the gun, you need to free up its internal space. By pressing the latch, push the rod back until it stops.
- The tube with sealant is installed into the gun body until it stops. The piston is pushed in until it comes into contact with the bottom of the package.
- To supply the sealant, pull the trigger of the gun. The speed of the extruded composition depends on the force of pressing.
When using sealant in soft packaging, only case guns are selected. The usage diagram is simple:
- Unscrew the applicator with the spout on the front end of the gun.
- Free up space in the gun in the same way as when using sealants in a tube.
- Using wire cutters, carefully cut off the metal bracket on one side of the package.
- Insert the package so that the cut end is in front.
- Screw the applicator back.
Video: features of using a frame pistol
There are several rules for using a sealant gun:
- Before applying the sealant, it is necessary to thoroughly clean the area where it is applied: remove dirt, remove dust and degrease with alcohol.
- You can stick masking tape on both sides of the gap. Its function is such that when applying sealant, all excess will fall on it and you will not have to wipe off the excess. Peel off the tape immediately after finishing work. The seams are clean and even.
- For good and durable adhesion of the sealant, the surface is treated with an acrylic primer.
After finishing the work, the spout of the package is cleaned of any remaining sealant and closed with a special cap. This will protect the sealant from drying out. The sealant can remain closed for about three months without losing its qualities. The gun itself is also wiped. If this is not done, the gun can quickly become unusable. The metal case is cleaned with a special metal solvent. Plastic surfaces are wiped with soapy water.
Video: How to Optimize a Casing Gun for Sealant
Not many novice remodelers know how to use a caulk gun.
And for some, this tool may seem like a very complex device.
But it does not require any special knowledge and is quite simple to operate.
To start working with sealant, you only need to have a container with the appropriate material and a gun.
The design of the pistol itself is simple. It has a trigger, a frame and a metal pusher. To insert a bottle of sealant into the tool, you must perform the following steps.
If you look at the pusher, you can see a metal retainer (plate with a spring) on the trigger side.
You need to press this lock, and then pull the pusher out to the maximum possible distance.
Then you need to take a bottle of sealant and cut off the tip from it, taking into account the markings. You also need to pierce the membrane under the plastic cap.
When inserting a balloon into the gun, you first need to insert the tip into the hole on it. Then you need to press the latch again and push the pusher into the hole at the bottom of the cylinder until it stops.
Actually, all this must be done to start using the tool. To squeeze out the sealant, you must gently press the trigger of the gun.
Construction stores now have quite a large selection of sealant guns. First of all, the price of this type of tool depends on its functionality.
How to use a gun
When working with a pistol, you must wear protective equipment. The area that needs to be sealed must initially be prepared: cleaned of dirt, degreased with alcohol and treated with acrylic primer to ensure good adhesion of the sealant to the surface. To get an even seam, you can cover the edges of the surface to be treated with masking tape. Afterwards you need to check the functionality of the mechanism and charge the sealant. When the mixture is applied, the tape is removed and the joints are smoothed with a spatula. Excess product is wiped off mechanically, with gasoline or solvent.
Closed type
It is a simple and reliable manual device with a cylindrical body made of a durable metal alloy. You can use a closed gun with acrylic and silicone-based sealants, packaged in cartridges or sausages.
To create a smooth, uniform seam, it is recommended to use special attachments that come with the device.
- Butterfly and flat tip. They apply a layer 0.5-1.3 cm wide to the seams in cars to protect them from corrosion.
- A nozzle that squeezes out and at the same time smoothes the seam. Convenient to seal joints in the bathroom.
- Round nozzle. Apply silicone sealant to double-glazed windows. If the device is held tilted with its nose forward, the seam will be smoothed out at the same time.
To apply sealant, the nozzle of the gun must be placed end-to-end and the lever pressed. The tip of the spout gradually moves forward until it fills the entire space. If you need to pause in work, the latch is pressed down and the rod is pulled back. Upon completion of work, the tip is closed with a cap.
Open skeletal type
The use of skeletal or semi-open instruments is possible only with sealants packaged in rigid packaging with a standard volume of 310 ml. If the device is of high quality, the frame and handle of the tool are made of steel up to 3 mm thick. The diameter of the rod in it is usually 0.8 cm. If the thickness of the steel used is 1 mm or less, then there is a high probability that the device will have to be replaced after 2-3 charges.
Before starting work, you need to press the trigger several times so that the paste enters the cap. The nose of the skeletal tool is placed in the seam, the extrusion piston is moved out of place by lightly pressing a metal plate, which is located near the hooked end of the piston. The plate is easy to recognize, it is not painted and has a steel color. The paste is applied quickly and effortlessly. The device fits comfortably in the palm of your hand. After work, the body, piston and tip must be cleaned of paste residues, rinsed, dried, and only then stored.
Sealants have a strong aroma, so you need to work with them in a well-ventilated area wearing personal protective equipment.
Directions for use: instructions
Regardless of which type of caulk gun you choose, the instructions for use are similar for all. So, how to properly prepare a pistol for use? Let's look at each stage in turn:
- Using a stationery knife, carefully cut off the spout of the tube at an angle of approximately 45°. The width of the hole should be selected depending on the width of the intended seam.
- Having unscrewed the plastic cap with the cut off spout, pierce the protective valve on the package, and then screw the cap back along the thread.
- In order to insert the sealant package into the gun, you need to free up its internal space. By pressing the latch, push the rod back until it stops.
- The tube with sealant is installed into the gun body until it stops. The piston is pushed in until it comes into contact with the bottom of the package.
- To supply the sealant, pull the trigger of the gun. The speed of the extruded composition depends on the force of pressing.
When using sealant in soft packaging, only case guns are selected. The usage diagram is simple:
- Unscrew the applicator with the spout on the front end of the gun.
- Free up space in the gun in the same way as when using sealants in a tube.
- Using wire cutters, carefully cut off the metal bracket on one side of the package.
- Insert the package so that the cut end is in front.
- Screw the applicator back.
Video: features of using a frame pistol
There are several rules for using a sealant gun:
- Before applying the sealant, it is necessary to thoroughly clean the area where it is applied: remove dirt, remove dust and degrease with alcohol.
- You can stick masking tape on both sides of the gap. Its function is such that when applying sealant, all excess will fall on it and you will not have to wipe off the excess. Peel off the tape immediately after finishing work. The seams are clean and even.
- For good and durable adhesion of the sealant, the surface is treated with an acrylic primer.
After finishing the work, the spout of the package is cleaned of any remaining sealant and closed with a special cap. This will protect the sealant from drying out. The sealant can remain closed for about three months without losing its qualities. The gun itself is also wiped. If this is not done, the gun can quickly become unusable. The metal case is cleaned with a special metal solvent. Plastic surfaces are wiped with soapy water.
Video: How to Optimize a Casing Gun for Sealant
If during the repair you need to seal several cracks or joints, you can carry out these actions yourself using sealant. As everyone knows, sealant is mostly sold in packages with a long spout, but it is impossible to get the mass out of there without a special construction gun.
Seeing such a gun for the first time, not everyone will understand how to use it. But this article will tell you in detail and show that this unit is not so difficult to use, but it simplifies the repair process much.
Sealing without a gun
It is impossible to use tubes in soft packaging without additional tools. Without a special device, it is unlikely that you will be able to squeeze out just a little paste even from a rigid container. It will be applied by hand or with improvised means. This is very inconvenient, and there is a possibility that the packaging will burst and the mixture will come out to the top.
If there is no gun, use a regular medium-sized hammer. Its handle is inserted into the tube, the striker rests on the shoulder, the packaging is pulled towards itself, and the sealant is squeezed out of the spout. This method has disadvantages:
- Fatigue sets in quickly, hands begin to shake, and the seam turns out uneven;
- after a couple of minutes of work, the shoulder begins to hurt;
- if the striker is weakly supported, it may accidentally slip and injure a person;
- The sealant will be squeezed out unevenly, especially when the package is already half empty.
Tips for a beginner
If the tool in question was properly equipped, then there should be no difficulties in using it. If you manage to insert the cartridge into the device, then halfway has already been completed. All that remains to be done is to slowly press the “trigger” and squeeze the mixture onto the desired surface.
You should use a few tips to ensure the job goes as smoothly as possible.
- If you select a skeleton or half-body gun, it may take several presses for the sealant to begin to come out of the hole. Remember that the pressure should be smooth to ensure uniform squeezing of the product.
- If you are using a model powered by electricity or a battery, then by pressing the trigger you can control the intensity of the mixture.
- When working with this device for the first time, it is recommended to practice in inconspicuous places or on individual objects. To get the job done efficiently, you need to learn a little how to use the tool.
- If during work you need to trim any area or apply sealant into a narrow gap, you can do this with your fingers. The only thing is that you definitely need to wet them with soapy water. It will help the sealant not stick to your hands.
- Please note that the sealant does not require additional drying. If it is left in the fresh air, it will gain the necessary strength within a few hours.
- As soon as you finish working with the sealant gun, be sure to rinse the mechanism thoroughly under warm soapy water.
- To get a beautiful seam, it is best to use masking tape. They need to cover the surface on both sides, leaving free only the area that should be covered with sealant. It will need to be removed immediately after applying the layer.
- To get a beautiful corner seam of excellent quality, you must first wet the sides with soapy water. You should find a stick made of plastic or wood in advance. On one side it must be cut so that it can be used to set the shape of the seam. This is a very simple and convenient technique, thanks to which you can get a beautiful seam. There is no need to look for special attachments for this, since a regular stick will save the situation.
- If you have gone too far with the sealant, then do not worry about this. This situation can be easily corrected. It will be necessary to dry the seam thoroughly. A regular hairdryer can help with this. Next you will need to remove the remaining material. This can be done using a stick that has previously been soaked in a soap solution. It is important to note that using this solution you can remove various contaminants, but you should still try to work as carefully as possible.
- There may be a situation when there is no sealant gun, but it is necessary for the job. In this case, you can use improvised means to “knock out” the sealant. This is far from the most convenient option, but it will help save the situation.
Based on the above, it becomes clear that charging and using a caulk gun is not that difficult. All that is required is to choose the right tool, choose a quality sealant and practice a little on how to quickly fill it.
To learn how to use a sealant gun, see the following video.
Malfunctions
Repairing a pistol is justified only if it is made of quality materials.
Most often there are two types of breakdowns.
- The supporting element is deformed. The plate on the piston mechanism becomes bent over time, and then the tip of the rod rod comes out from under it, pressing on the cartridge. In this case, the supply of sealant is disrupted. To repair the gun, you need to disassemble it and pull out the support plate. The deformed part must be placed on a solid base, pressed to the center with a bolt and straightened with a hammer until a smooth center is formed. After alignment, the gun is reassembled.
- The trigger in the skeletal structure breaks off. If you apply a lot of force, the lever will quickly break. First you need to straighten the broken piece with pliers. A similar part is turned from a wooden block and placed in place of the broken one. The new trigger is tightened with “seed” screws. For reliability, the trigger can be rewound with electrical tape.