Michel
24378 0 7
Michel June 12, 2017Specialization: plumber with 10 years of experience, computer repair specialist, powerlifting coach. I have extensive experience in construction, interior decoration, and making homemade furniture. Hobbies: sports
Greetings, comrades! Today we are going to get acquainted with some of the intricacies of wall putty. We will find out what the thickness of each layer of coating should be, what is the maximum layer of putty on the wall when applying it in several stages, and how to properly prepare the surface for applying each layer. Let's get started.
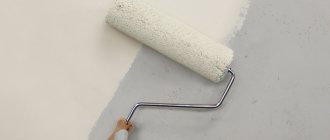
Tools for filling walls.
How to properly putty walls under wallpaper. Preparing the walls
The walls are put in order so that they are even, and then wallpaper can be hung on them. But the fact is that their initial condition may be so bad that it may be premature to think about how to putty the walls, since first you need to repair deep holes in them, then plaster them, and only then proceed directly to putty. Therefore, I highly recommend that you first read my article The procedure for preparing walls for wallpaper, which clearly presents a plan for working with walls, and putty is just one of the stages.
Puttying of walls is carried out in 3 cases:
- After removing old wallpaper, when the walls are relatively smooth and it is not important for you to level (plaster) them.
- After plastering the walls, when they are strictly vertical and ready for further processing.
- When in some places you need to repair small chips on the wall.
Let's go in order.
Types of building mixtures
The mixture can be dry (sold in bags) or diluted to the desired consistency - a ready-to-use paste. Both of them have a number of advantages and a number of disadvantages over each other. How to understand all the intricacies yourself if you have never putty before?
The binding component is the basis of all putty putties. The division of all mixtures into:
- cement putties;
- gypsum putties;
- polymer (acrylic).
Cement
It is clear that the binding component in these mixtures is cement, which imparts its best qualities to the putty: moisture resistance, durability, and resistance to the external environment. This material is indispensable for finishing rooms with high humidity and sudden temperature changes (kitchens, bathrooms, etc.)
This is an excellent material for walls outside buildings, but then lime (cement-lime putty) is added to its composition. The main disadvantage is the high degree of shrinkage.
Plaster
The second name is gypsum plaster. The advantages include:
- quick “setting” of the composition;
- plasticity and ease of use when plastering walls and ceilings;
- formation of a smooth, durable surface after drying;
- does not shrink.
The main advantage is that gypsum wall putty will be fully included in the affordable estimate. The disadvantage is that the material is not resistant to water, which means it cannot be used in wet areas.
Polymer (acrylic)
The most modern and convenient option for putty mixtures. In terms of adhesion, non-shrinkage, uniform drying, and complete absence of shrinkage, it has no equal. Thanks to its fine-grained structure, which gives a very smooth and high-quality strong surface, acrylic putty can be used not only when repairing walls, but also for mating parts of different compositions.
The mixture is capable of holding glass and stone, plastic and fabric, brick and drywall, and any surface to be puttied. Ideal for finishing. This is a universal option for plastering walls! The downside is that the price is steep.
However, the quality of the putty must correspond to the quality of the materials used in construction. Only with this combination can full interaction of materials and high quality work be achieved.
Technical characteristics, methods of use and the expiration date must be indicated by the manufacturer on the packaging.
Why putty the walls?
Why do you need to putty the walls at all, you ask? Well, I took off the old wallpaper and put up new ones. Or I lined the walls with plaster and also hung wallpaper on them.
The fact is that the walls, in any of the above cases, are quite rough, and the wallpaper on them will lie worse than if we had previously puttyed the wall. Wall putty is a fine leveling with millimeter precision. The good thing about putty is that, on the one hand, it is firmly attached to concrete or plaster, and on the other hand, new wallpaper fits perfectly on it.
Which putty is better to putty walls under wallpaper?
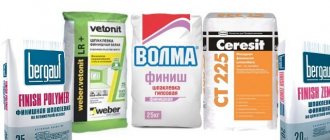
First of all, you need to decide on the type of putty you will work with. There are a lot of them in stores, and it is especially difficult for a beginner to navigate such a countless number of options offered. To make it easier for you, I will talk about one of the popular materials from Weber Vetonit, which I myself constantly use:
Let's make the following estimate. The walls of your house are not the same. Some are load-bearing thick walls facing the street. In cold weather, such walls can freeze very much. And there are interior walls that live at a relatively constant temperature. For these cases, Weber Vetonit has the following options:
- Weber Vetonit VH - when hardened, this putty is resistant to low temperatures.
- Weber Vetonit KR is just a putty for dry rooms.
I have a separate article on how to work with Vetonit putty.
How to determine the required volume of putty
After determining the type of putty, we need to calculate how much we need to take? Usually, on the back of putty packages everything is described in great detail. It would be better to go to the store and read this information directly on the bag. The fact is that all materials are different and it will be difficult to say the exact quantity, but an approximate quantity is possible!
How many times to putty the walls under the wallpaper
It is very important to evaluate how much you have prepared the wall before applying putty. If after plastering the wall is perfectly smooth, then of course one layer is enough. If you haven’t plastered the wall, but are trying to remove unevenness and small differences on the wall using putty, then the consumption of material will be completely different. Typically, the thickness of the putty ranges from 1 to 3 mm, in some places up to 5 mm - no more. Therefore, in the worst case, if you are going to smooth out unevenness up to 1 cm, then in any case you will need to lay the material in 2 layers.
For example, I just had such a case without plaster, when I spent 15 kg of Weber Vetonit KR putty on an interior wall 3.5 meters by 2.5 meters, with a total area of 8.75 meters.
How to putty walls for painting
If you plan not to glue wallpaper, but to paint the walls, then in this case they should be literally polished. In this case, first, with regular putty, unevenness and roughness that may exist after plastering are removed. Then, when the first layer has dried, the wall needs to be sanded, vacuumed, primed and a second layer of finishing putty applied in a very thin layer. The work turns out to be quite complicated in terms of labor costs, but perfectly smooth walls are worth it.
Taking into account the above, you just need to measure the area of the walls that are to be puttied, estimate the thickness of the layer of putty that you are going to lay, decide whether it will be one layer or two and, based on the material consumption indicated on the packaging, calculate how much putty you need to buy.
When making repairs, you need to remember an important thing: Where and how to store dry building mixtures in the apartment. Sometimes, especially if you live in an apartment in which you are renovating, see How to renovate the room in which you live, it is better to purchase building materials in parts.
How to calculate the required amount of putty
Before purchasing putty, you need to correctly calculate the required amount. The average consumption of the mixture can be found on the packaging.
Material consumption depends on many factors:
- Areas of leveled surfaces. It can be determined by measuring the perimeter of the room and multiplying it by the height of the wall.
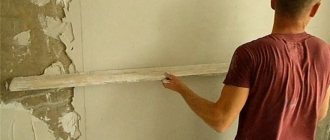
- The thickness of the applied layers, which directly depends on the size of the irregularities and deviations. The size of the irregularities can be easily determined by applying a two-meter strip to the walls. We measure deviations from the vertical using a plumb line.
- Wall material. Depending on the material of the walls, we select the type of putty. Smooth plastered walls can be covered with a thin layer of polymer or water-dispersion putty, up to 1 millimeter layer.
- Type of putty. The consumption of cement putties is much higher than latex or acrylic ones.
The average starting putty, with a layer thickness of two to five millimeters, will be from one to three kilograms per 1 m2. The consumption of cement or gypsum putties with a layer of 6-9 millimeters will increase from four to six kilograms per square.
The final coating is applied in a layer of no more than one millimeter, and ranges from 500 grams to 1.5 kilograms of putty per square meter.
Where to buy putty
My experience tells me that it is better to buy putty in large construction hypermarkets. Why? Because all construction materials, like food, have an expiration date. For example, putty in the form of a dry construction mixture, if the packaging is not opened, may have a shelf life of 12 months, 18 months, etc. from the date of manufacture. Some dry building mixtures have a shelf life of only 6 months. Therefore, in large construction hypermarkets the likelihood of purchasing expired materials is much lower than in dubious warehouses for half the price.
Always check the date of manufacture. You cannot work with expired putty - this will ruin all your work.
How to choose the best putty for wallpaper
There are several types of putty mixtures. They differ not only in brands, but also in characteristics: component base, drying speed, etc. Also, putty can be starting, finishing and universal. The features of each variety will be discussed in the next chapter.
- Gypsum putty
Gypsum putty in the form of a mixture also consists of quicklime, therefore it allows you to make the surface as white and matte as possible, which is important when gluing light-colored wallpaper. It fills all the cracks and recesses, levels the wall to perfection and dries fairly quickly, creating a durable surface without shrinkage. Ideal for wallpaper in dry, heated rooms during the cold season. However, it is not advisable to use it in kitchens, bathrooms and other rooms where there are sources of high moisture. Experts recommend using gypsum putty both as a starting and final coating.
- Cement putty
Cement putty in the form of a solution has a coarse-grained structure and a grayish tint. It is moisture resistant, but takes a very long time to dry and shrinks significantly. Another disadvantage is that the texture is too rough and difficult to sand. But it can be used in wet rooms: kitchens, toilets, showers, bathrooms, as well as basements and cellars if the house is located in a rural area. The cement mass is used for both interior and exterior work, but in the second case, of course, we are not talking about wallpaper.
- Polymer putty
Polymer putty is considered an innovative material. It is characterized by elasticity, ease of application and low consumption. Most often it is made on the basis of acrylic or latex. Purchased ready-to-use. With its help, you can perfectly level both concrete and plasterboard surfaces, but it is inferior to its gypsum counterpart in terms of density.
- Acrylic putty
Acrylic putty is mainly used to prepare walls for final painting. It is used less frequently for wallpaper, but can be used in both dry and wet rooms as a starting or finishing coating.
- Latex putty
Latex-based compound is used only at the final stage of work. It ensures the creation of a smooth, perfectly even glossy surface without a single flaw. It is often used on ceilings. But this option is the least common in Russia and the most expensive.
- Adhesive and oil-adhesive putty
Adhesive and oil-adhesive putty has a high density, so it is difficult to apply to the surface. Only professionals can work with it. The advantage of this mixture is its sufficient strength when drying.
- Putty with PVA
PVA putty is ideal for wet rooms, as it contains antifungal components.
- Water-dispersion putty
Water-dispersion putty has recently become widespread among professional builders. It has very high performance characteristics. According to finishers, this material can be easily applied to concrete, fiberboard, brick, wood and other surfaces.
Thus, when choosing a material, it is important to take into account the condition of the walls, the level of humidity in the room, the possibility of thermal effects and the type of wallpaper. It is better for inexperienced craftsmen to start working with plastic putties to make it easier to switch from dry to wet layers.
With the existing alternative, it is better to use ready-made putty mixtures that adhere well to the plaster and retain their properties after drying. They are ideal for beginners who, due to inexperience, cannot always dilute the composition correctly, and allow them to reduce the time of repair work. According to sellers of construction stores, ready-made putty pastes are in great demand.
At the same time, experts also find advantages in using dry (powder) mixtures, from which you need to prepare the solution yourself.
- Firstly, it is believed that the dry composition is used for interior work, and the finished composition is used for exterior work.
- Secondly, dry mixtures practically do not shrink.
- Thirdly, they are stored for a long time, unlike ready-made pastes, which have a much shorter shelf life.
- Fourthly, they are much cheaper. But the main difficulty lies in the correct preparation of the solution, which ensures a good result of puttying walls under wallpaper.
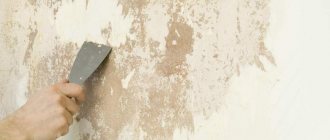
How to prepare walls for putty. Primer
Always, before you are going to putty the walls, you must first prime them, see the article: How to prime walls.
If you apply putty to a concrete wall, it is better to prime the wall 2 times. If you have just plastered the wall, you can prime it once before applying putty.
In any case, you need to look at the general plan for working with the walls, which I mentioned above.
How to properly dilute putty and putty walls
If we use ready-made putty in a jar to putty the walls, then we open it and immediately get to work.
If we use dry mortar to putty the walls, then we need to prepare a putty solution. To prepare the solution we will need:
- Container for preparing the required volume of dry construction mixture.
- Steelyard for weighing dry construction mixture.
- Container for the prepared solution.
- A measuring stick for pouring the required amount of water.
- Drill with installed mixer.
In what proportion should I cook? You need to read the back of the dry mix packaging. For example, for the putty I’m talking about, 25 kg of dry construction mixture requires 10 liters of water.
IMPORTANT!
Putty is not plaster. You can prepare a lot of it at once, because the prepared mixture can live for about another day. Plastering, if we remember, will take place in 20 minutes. starts to freeze. Therefore, estimate how much solution you are willing to put in over the next 24 hours.
Then everything is simple. If, for example, you decide to pour 6 kg of dry construction mixture, then for these 6 kg you will need 2.4 liters of water. We do the calculation according to the rule of proportion:
25 kg = 10 liters
6 kg = X liters
X = 6*10/25 = 2.4 liters of water.
For those who have forgotten the rule of proportion or want to see where mathematical calculations are used in repairs, I suggest looking at the article: Repair and mathematics.
So,
- Pour the required amount of dry mixture from the bag into the bucket.
- Pour the required amount of water into the container for preparing the solution.
- Pour the dry mixture from the bucket into a container with water to prepare the solution.
- Turn on the drill with the mixer installed and begin mixing the dry mixture with water.
You need to stir for about 3 - 5 minutes until the putty gives the appearance of thick sour cream. Then you need to let the solution brew for about 15 minutes and stir again (not for long).
The solution is ready. You can use it.
Types by composition of mixtures
One of the important divisions into types is based on the type of constituent components. Here polymer, gypsum and cement are distinguished. They differ in their properties, and putty is chosen based on operating conditions.
Cement ones are the cheapest, have good strength, and can be used outside and inside the building. Both finishing and starting types are produced. It is resistant to high humidity. How long putty on cement-based walls dries is determined on the packaging, but on average it will take from 12 to 24 hours.
Cement ones are the cheapest, have good strength, and can be used outside and inside the building.
Gypsum creates a snow-white coating on the surface, is flexible and easy to apply. But the strength characteristics are lower than cement. It stands out for its fast drying rate. If we talk about how long it takes for a layer of gypsum putty to dry, it will take an average of 3-6 hours. The downside is the lack of resistance to humidity; it can only be used in dry rooms.
Gypsum creates a snow-white coating on the surface, is flexible and easy to apply.
Polymer ones are created differently. Latex and acrylic types are in demand. They have a high level of moisture resistance and plasticity, which makes it easy to apply the composition. Suitable for a variety of substrates, the result will last a long time, but the cost is higher compared to previous types. How long does it take for polymer putty to dry? They also note the fast drying rate – 4 hours. Although the timing may be slightly different, depending on what the putty consists of.
They have a high level of moisture resistance and plasticity, which makes it easy to apply the composition.
What is the best way to putty the walls? Tools
To putty the walls we will need:
- A trowel for applying the finished mortar to the wall.
- Spatulas (Large, medium (small)).
- Rubber spatula (very small).
Catalog of tools for finishing workIf you rarely go to hardware stores, then it may be difficult for you to immediately navigate which department and what you need to take. Here is a catalog of tools for finishing work, where you can safely search for everything you need for work: construction buckets, spatulas, trowels, trowels, etc. |
And below we will look at the most interesting thing - this is the process of puttying walls.
How to putty walls with your own hands
You need to start putting putty on the wall from one side and move in the opposite direction. The puttying process consists of using a trowel to spread the mortar onto the wall, and then using a spatula to move it left and right, up and down. When spreading the putty on the wall, you need to apply pressure on the spatula. It is necessary to ensure that you do not put an excessive amount of mortar on the wall so that smudges do not form. If you still put more than necessary, disperse this part of the solution along the wall where there is not enough putty applied.
When you run out of solution, prepare a new portion and continue working.
The skill of puttying does not come immediately, it needs to be trained. But I'm sure you will succeed. After applying the putty and dispersing it, literally after a few moments the putty may form smudges in some places. To remove them, you need to run the spatula over this area again.
What is the best spatula to putty on walls? If the area of the wall being processed is large, then it is better to immediately learn how to work with the largest tool. In hard-to-reach places, use a medium or small spatula.
Why do you need a small rubber spatula?
It happens that in the process of work, you accidentally leaned on the wall, poked the sharp end of a spatula into the newly applied and leveled mortar, or just suddenly a hole formed on the wall in a certain place. Then you take a rubber spatula, dip it in putty and carefully apply the latter to the damaged area. In this case, it is not convenient to use a large spatula, because having eliminated a defect in one place, by pressing a little harder, you can create a new problem in another place with the sharp end of the spatula, so it is better to use a rubber spatula.
The rubber spatula is elastic and allows you to apply very small portions of putty to problem areas, without destroying what you have already done with such difficulty.
IMPORTANT!
Try not to accidentally get dirt and especially hardened pieces of cement or plaster into your putty solution. The fact is that if this happens, then in the process of applying the solution and dispersing it with a spatula along the wall, an accidentally falling pebble under the pressure of the spatula will make a furrow in the wall, which will have to be repaired immediately. It is also important that the spatula is not rusty, otherwise it will leave dirty marks on the wall. If you took out your spatula and saw traces of rust, then take a look at my article on how quickly you can revive the tool.
That is why the container into which you pour water to prepare the solution must be clean, and there should be no remains of hardened cement or plaster pieces floating there.
Application
Puttying the walls of premises is a rather labor-intensive process that can take a long time. Which putty is best for walls? Currently, there is a large selection of different mixtures.
First of all, you need to prepare the material if you buy a dry mixture.
The process is as follows:
- First, you should pour a small amount of cold water into the container;
- you need to add the dry mixture to the liquid;
- mix the ingredients with a simple spatula;
- For the final preparation of the material, you need to use a construction mixer at high speed.
Preparing the mixture
In order to clearly understand whether the putty is ready, you need to have some experience in this matter. It should be quite flexible and stick a little to the spatula. Water and dry mixture should be added only in small portions so as not to overdo it with their quantity.
Ready mix
When the putty is ready, you can begin applying the material to the wall. In this case, it is best to use large tools, evenly distributing the mixture over the surface of the wall. The material must be applied at an angle of thirty degrees in a diagonal direction to the plane.
Each subsequent layer must be distributed overlapping the previous one.
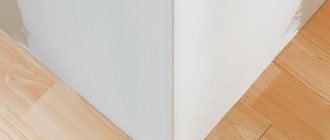
In order to treat the corners of rooms, professional craftsmen use a corner spatula. It allows you to make smooth joints between the planes of the walls.
Putty with an angle trowel
To begin with, the master applies a small amount of putty to each surface with a regular spatula, and then levels it with an angle tool. After the starting layer of putty has dried, the worker can proceed to the next stage - finishing work.
To do this, use a large and small spatula. Using the second tool, small amounts of putty are applied to the first. After this, a thin layer of material is distributed over a relatively flat surface. The thickness of the finishing putty is approximately 1-2 millimeters.
A master who knows his business understands that it is impossible to continue working until at least one of the previous layers has dried. That is why it is best for a professional worker never to push. This can have a very bad effect on wallpaper in the future, which will be applied too quickly to the wall.
Approximately 12 hours should pass between the starting and finishing putty of the walls. The last layer before wallpaper or paint dries a little faster, since it is thinner.
The price of puttying walls for wallpaper can vary, depending on how large-scale each stage of the work will be.
Crushed stone is the most popular building material, which is used as a filler in various concrete mixtures. Here the density of crushed stone is fraction 5 20.
Sand is most widely used in the construction and repair of houses and various structures. Here is everything about GOST 8736 sand.
Without the use of tile adhesive, it is impossible to make repairs and decoration of the premises. Click on the link to see its consumption.
First of all, this concerns the beginning of leveling the walls, since they can often be too crooked and incorrectly erected. After the wall is completely dry, you can begin the final work - sanding with sandpaper.
Grinding
This will make the surface as smooth and beautiful as possible. On such a wall, the wallpaper will lie parallel to each other without any problems. It is worth noting that the thickness of the wallpaper may affect how many layers of putty should be applied to the wall.
The thinner the topcoat, the more times the leveling layer must be applied. That is, if the wallpaper is quite rough, then using the putty mixture only twice is enough.
If the wallpaper is thin, it is best to do this three times. Thus, the price of putty for wallpaper, even on the same types of walls, can be different.
For more information about wall putty, watch the video: