It's no secret that even photo wallpapers of small sizes can decorate and completely change absolutely any room and give it uniqueness. But due to the fact that special techniques are used to produce such photo wallpapers, this is reflected in their high prices. If, for example, you don’t have the opportunity to purchase photo wallpaper for your own home, don’t worry, because you can do it yourself.
Plus, this process is wonderful because you don’t need a lot of materials, and you can make the picture you want without the slightest effort. Let's check how to make photo wallpapers, what needs to be done and in what order, and how such photo wallpapers can be used for successful decoration.
Preparing to create your own photo wallpaper
The initial point to look at is the preliminary stage. You must come up with a design that you want to see on your own wall, and also prepare all the materials necessary for this process.
You need to decide what specific materials you will need:
- printer and color ink for printing images;
- suitable paper for photo wallpaper (as thick as possible);
- good glue, capable of firmly sticking images to wall surfaces.
You may encounter several difficulties while printing your image. For example, if you decide to make a photo wallpaper from your own photograph, it should have a high resolution . To correct the resolution of a photograph or image, you can use several programs: Magnifier, BlowUp, Genuine Fractals and others.
High-resolution photographs for photo wallpaper are necessary because the image on your wall, which is of poor quality, will be blurry, ruin the whole design idea and will not look beautiful.
There is another exciting program for photo wallpaper - ProPoster , it allows you to edit the selected image and immediately divide it into parts of the required sizes .
Attention! When printing, do not forget that all leaves must have the same color and quality, otherwise the overall pattern will be distorted.
A very simple option for creating photo wallpapers with your own hands is to print them on a simple color printer using A4 paper . But if you want to immediately print parts of an image in a large size, you can contact specialized companies that provide printing services on large-format sheets.
The cost of printing photo wallpaper will vary depending on the size needed. On average, the cost of full-color printing will be 600-800 rubles per square meter .
When choosing non-woven wallpaper for painting, look at the markings: this type of wallpaper has special characteristics, because not all non-woven wallpaper can be painted.
Read about the advantages and disadvantages of non-woven wallpaper in this article: in detail about the types, technical characteristics, disadvantages and advantages of non-woven wallpaper.
Tips for choosing photo wallpaper, 3D photo wallpaper
Today, color printing is so developed that it can create high-quality drawings of any size. Saturated colors, a huge number of shades, clear lines, high resolution and contrast allow you to create three-dimensional panoramic images (3D photo wallpaper), in which details are clearly visible even close up.
However, this is also a “disadvantage”, since such wallpaper can overshadow the entire interior, and not fit harmoniously into it. It is necessary to carefully consider all the elements of the room, from the furniture to the color of the curtains when choosing photo wallpaper for the wall. You can pick up 3D photo wallpapers on a designer’s website, buy photo wallpapers, or ask for custom-made photo wallpapers. There is a designer there that will show you how they will look in your room.
How to choose the right colors for photo wallpapers
Designers who develop photo wallpaper designs use 2 colors: the main one, which predominates, and the contrasting one, which sets it off. It is precisely the second (shading) color that is the main one by which you need to select a picture for the interior.
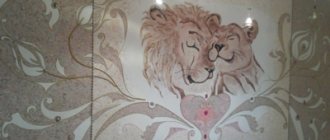
For example, here the predominant bright color is green, and white sets it off, so the chairs and floor are chosen in cream tones.
Three-dimensional photo wallpaper 3D
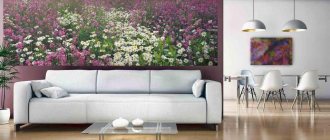
3D photo wallpapers can change the interior beyond recognition and give the room additional depth. It is recommended to use them in rooms with a small amount of furniture, so as not to oversaturate the space. They should occupy most of the wall and be clearly visible from all sides, since the 3D effect appears only from a certain distance. For small rooms (hallway, kitchen), it is better to buy photo wallpapers with small elements, for example, geometric shapes, which can be viewed at close range. For halls and bedrooms, you can choose photo wallpapers with various images: city, landscape, aquarium.
Remember that a drawing can get boring over time, so you need to choose an image that will always lift your spirits and evoke positive emotions.
Creation options
Look at the fact that it is not at all necessary to use the usual options for printing images in order to beautifully decorate the wall with them in your own room.
In fact, there are a huge number of varieties of transferring drawings to a wall surface , and we recommend that you get acquainted with some of them, which are considered especially popular:
- You need to take self-adhesive colored paper and cut out specialized blanks for the image from it . For the convenience of this process, you can use pre-made stencils . If, for example, you simply don’t want to cut out such pictures, you can look for ready-made variations on the Internet: special online stores recommend a huge number of varieties of wall stickers . All you have to do is place them on the wall so that the overall composition comes out.
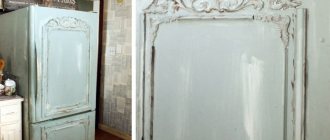
- You can draw the pattern on the wall yourself . To do this, it is necessary to use both a wall free of wallpaper and wallpaper of the same tone, which can be painted very easily. Show your imagination and create fascinating compositions using multi-color paints . And lovers of street creativity are able to depict graffiti .
- Photo wallpaper can be made from available materials : maybe you collected unusual paintings or have a huge number of photographs. They can be glued to the wall or a separate part of it, creating an original composition that you will not notice in other interiors.
As you can see, there are a large number of varieties of how to make photo wallpaper on the wall with your own hands. To make unusual photo wallpaper in your apartment, you can use not only a printer, but also any other means for painting or decorating . These are not all the options, so show your imagination - and maybe you will come up with a much more unusual look.
It is important to know: in any case, to apply images you need a base that will not distort the color. This is precisely why it is best to use wallpaper in white or shades close to it.
Wallpaper from stock photography - original and beautiful
Wallpaper expresses our personality. It often happens that when studying the assortment of stores, we do not find the ideal option - even the best wallpaper does not live up to the picture before the inner eye. But there are already several images saved on the computer that would look great on the wall.
This is how the idea of making your own photo wallpaper is born. And upon closer examination it turns out that there is nothing too complicated here. It won’t even take much more time to decorate the wall than with regular wallpapering.
So, how do you create photo wallpaper with your own hands?
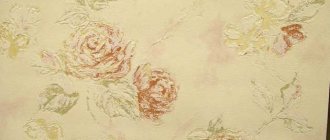
- First of all, we select a suitable photo. When choosing a picture, you should focus not only on your own tastes, but also on a specific room. In particular, for small spaces it is better to choose a cyclic picture in light shades, which will visually “pull apart” the walls. Also, the image should match the range of furniture - but not blend in with it in color, but differ by at least a few tones. It is recommended to select calm, discreet patterns - too colorful photo wallpapers will quickly begin to irritate the eye.
- In order for homemade photo wallpaper to turn out to be of really high quality when transferring it to the wall, a high-resolution image is required. Therefore, we download the selected image from Depositphotos in the largest available size and print it. This can be done on a home color printer - however, in this case, the sheets of photo wallpaper will be very small. For convenience, you can contact a photo workshop that prints photo wallpapers in a wide format - then gluing will take less time, and the photo wallpaper will look better.
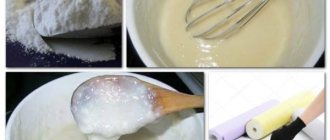
- Choosing a wallpaper base. The denser the chosen material, the better - this way you can avoid “bubbles” and other visual defects on the walls. It is better to choose white paper or cardboard as a base - if sheets of photo wallpaper are pasted onto a colored surface, this may affect the color scheme of the picture.
- Apply a thin layer of PVA glue to the base and glue the picture. We wait for half an hour until the glue dries.
It should be noted here that photo wallpaper can occupy the entire wall - or it can be a modular panel or several individual images. In the first case, it is better to choose a picture with repeating lines and patterns as the background - by connecting parts of the photo wallpaper with each other, you can achieve a completely uniform pattern on the entire wall.
Modular wallpaper consists of one large picture divided into several segments. Moreover, such segments are not glued to the wall “joint to joint”, but with small equal spaces between each other - this improves visual perception.
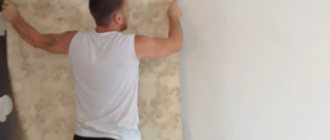
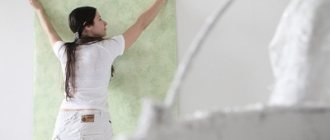
- When the photo wallpaper transferred to the base is completely dry, we proceed to pasting the wall. Here the process is not much different from ordinary wallpapering. To begin with, you should mark the wall with a pencil, applying pictures to it in the right places - this will allow you to paste the images the first time and not make a mistake.
- We apply glue - this time not on the paper, but on the surface of the wall itself. We press the photo wallpaper tightly to the designated places and smooth out the image properly. If you have chosen a fairly dense base, bubbles are unlikely to appear on it - however, for better gluing, it still doesn’t hurt to go over the wallpaper with a rubber roller. Excess glue that comes out from under the wallpaper can be easily removed with a cotton rag.
Preparing walls and tools for gluing photo wallpaper
Before wallpapering, it is imperative to prepare the wall. The surface must be smooth, dry and primed. The question often arises: is it possible to glue photo wallpaper onto old wallpaper? The answer here is clear - no. The main reasons why this should not be done:
- color inconsistency - when applied, the lower wallpaper may disturb the color of the outer wallpaper (see through);
- old wallpaper, due to the additional weight of new ones, may peel off;
- Due to different materials, air bubbles may appear between the layers and the new wallpaper will swell.
I recommend: Inexpensive do-it-yourself renovations in a new building
Now there are various liquids and devices that make it easier to clean walls from old glue and wallpaper residues.
Before you start gluing, immediately prepare the necessary tools and consumables. You will need:
- container for glue (bucket, basin);
- sponges (rags) to remove excess glue
- stationery knife;
- glue (with reserve);
- level;
- ruler;
- roulette;
- pencil;
- glue roller;
- spatula or roller for smoothing wallpaper;
- stepladder (stool, table).
Today, photo wallpapers can be made not only of paper, but also of non-woven or vinyl, so the appropriate type of adhesive is selected. Please note that it must be diluted in advance (2-3 hours) so that it is completely dissolved in water. It is necessary to prepare it with a reserve, since losses are inevitable during the work.