Do I need a primer for walls under putty (after plastering)
Primer before puttying is necessary to level the base, improve adhesion, protect against mold, and reduce the consumption of the plaster mixture. The work uses acrylic, alkyd, silicate, aluminum or epoxy primer. The characteristics of the primer composition are determined by the type of surface (concrete, wood) and the qualities of the plaster used.
How to proceed when priming under putty
Practice shows that perfectly smooth walls without treatment with plaster or putty do not exist. Any layer of primer mixture only follows the processed contours and does not contribute to leveling. When starting putty, adhere to several rules. The wall should be dry after treatment with the mixtures and free of dust and greasy stains on the surface.
If the surface is porous, then to prevent excessive absorption of the putty, it is coated with a deep penetration primer.
If it is necessary to level walls with a large difference, then apply several layers of putty. In this case, make sure that each layer is no thicker than 10-15 millimeters and is applied only after the previous one has dried. Each layer takes 10 hours to dry. The exact drying time depends on the room temperature and the type of substrate.
As the primer evaporates, the respiratory tract is protected with a respirator
Advantages of priming walls over putty
High-quality repairs cannot be carried out without knowledge of the basic stages of finishing material surfaces. Do I need to prime the walls before applying putty? Definitely yes, because to prevent the putty from crumbling, you need to prime the walls before applying it. This will prevent them from falling off after repair. More than once it happened to inexperienced builders that they omitted the priming moment and applied finishing material to an unprepared surface.
This led to terrible consequences: the plaster crumbled, and the finishing, accordingly, also deteriorated. And, as you know, it is much cheaper and faster to make repairs if you first apply primer to the required surface.
Also, if there are any microcracks on the ceiling or wall, the primer lays on the surface with a thin film, covers all the potholes and protects the object from external factors.
The adhesive properties of the primer before puttying are quite high, which is why finishing materials adhere so well to surfaces.
Priming rules
The process of applying primer to walls is simple, but to do the job well, you need to follow certain rules
Putty is the final stage of preparatory work for finishing the wall. However, it is recommended to putty only after the applied primer layer has completely dried.
The primer mixture should be diluted exclusively in the proportions stated by the manufacturer. Otherwise, the effectiveness of the material and its properties can be negated. If there are various contaminants on the surface of the wall, then they will need to be eliminated - get rid of dust, dirt, and remnants of the old finish. For priming you will need a special container, a roller, a brush and the solution itself.
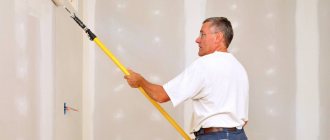
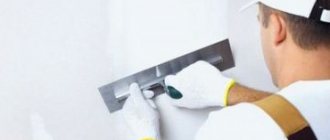
Primer for walls under putty should be carried out using a roller, and hard-to-reach areas can be treated with a brush. The mixture should be distributed as evenly as possible. If it is necessary to apply several layers of primer solution, then each subsequent layer should be applied after the previous one has dried.
Process steps
To navigate the intricacies of repairs and the peculiarities of using various types of building materials, it is recommended to understand in detail the process of finishing the wall surface. Only in this way can you understand what is done first - priming or puttying the walls, whether this is necessary, and how many layers are applied.
Preparatory activities
During the discussion of the project or preparation for work, you should finally decide how many layers will be applied to the wall surface. This has a direct impact on the volume of primer mixture that will have to be purchased.
As you know, the manufacturer’s instructions recommend purchasing an impregnating composition on a basis similar to the solution chosen for puttying. For example, when finishing a wall made of concrete or cement, you should use materials designed taking into account their properties, and choose acrylic-based primers for dyes.
Often, finishing specialists opt for universal compositions, because they help save time and not have to do additional calculations.
Particular attention is paid to the period of time during which the primer dries before applying the putty solution, because the timing of the repair depends on this factor. As a rule, the manufacturer indicates such information on the packaging material.
It is best to use those types of primer compositions that are developed and produced by the manufacturer who produced the putty material you have chosen. This eliminates inconsistencies between different components and components that can enter into chemical reactions.
The product line of putty compositions produced by well-known and not so large companies is so large that you should choose a primer with full responsibility, taking into account the characteristics of a particular material.
Rough leveling layer
We begin to understand when the primer is applied - before or after puttying. Craftsmen claim that a primer composition is mandatory before the putty mixture, especially when it comes to applying the first leveling layers. In this case, the material is planned to cover a wall built from other components. For this reason, it is important to strengthen the adhesion index and ensure a unique combination of layers.
When figuring out what should be done first - prime or putty, it will not be superfluous to remember that the primer composition is also applied in order to reduce the ability of the wall surface to absorb moisture. This will protect the putty from premature drying, prevent the formation of cracks in its layer, and help reduce the cost of building materials.
It turns out that after applying another layer of putty mixture, you should again treat the surface with an impregnating composition. This once again confirms what is applied first - a primer or a new layer of putty.
The soil will play the role of a binding component, saturate the putty and form a reliable connection, strengthening the surface and extending its service life.
There is one more feature - many craftsmen apply not one, but several layers of primer. First, they reduce the percentage of absorption, fill the micropores of the walls, and then form a film layer that ensures adhesion of the putty to the wall material. Note that in such cases, the price issue of the cost of materials and work increases.
Remember that applying the solution to a wet surface is prohibited. Therefore, developers, having found out what is going first - putty or primer, are additionally interested in when, after priming, they are allowed to work with the mortar mixture, so that the reactions have the opportunity to work positively. Professionals advise taking a break of at least four hours, regardless of the recommendations given by the manufacturer.
Finishing
A special feature of this stage is the correct selection of building materials. The issue of choosing a primer mixture is resolved simply - the type of wall surface (the material from which the structure is constructed) is determined. But before the finishing layer, it is recommended to use a composition suitable for the material that is planned to be used for finishing.
Equally important is given to one more fact - a primer mixture is also applied to the applied, dried and sanded putty layer (finishing layer). In this way, the surface is protected from peeling off the smallest particles, the absorbency rate is reduced, and this is combined with a reduction in financial costs for paintwork materials or gluing wallpaper material.
It turns out that the importance of the primer is difficult to overestimate. The component has a list of advantages and can have a serious impact on the finishing process. For this reason, anyone who decides to work with their own hands is advised to clarify at what stages primers are used.
How to prime walls before puttying: simple instructions and tips on choosing a material
We prime the walls before puttying
Wall decoration is perhaps the most important step in renovation. And when choosing different finishing materials for surfaces made of wood, plasterboard or brick, many people wonder whether it is necessary to prime the walls before puttingty. We talk about this in our article.
Why do you need a primer?
Opinions vary greatly on how to prime walls before puttying and whether this step is even necessary in finishing an apartment or house. Some craftsmen assure that this point in the repair can be skipped, others scare with dire consequences. To make an unambiguous conclusion about whether it is necessary to prime the walls before puttying, let’s look at the functions that the primer performs.
So any material has its own special structure. Each of them is porous in its own way and has small microcracks and chips. The primer can fill in all these imperfections, thereby strengthening the material. In addition, priming helps improve adhesion to the plaster or the substance you will use to putty, due to its components. And in the future, finishing materials will not further chip or crumble.
After drying, this solution forms a durable protective film that does not allow any stains or smudges to pass through. Thanks to this solution, the putty will lie more evenly and be easily distributed. Priming also provides protection from excess moisture, fungi, mold and various insects.
We recommend: Airbrush primer - types and preparation for application
Having studied all these features, we can conclude that priming surfaces is not just necessary, but necessary. There are cases when the solution has to be applied in several layers. This, for example, happens with porous brick or concrete, which absorb the first applied layer.
Choosing material
Choose based on what you will be covering and what properties you need. Compositions are divided into three types.
- Concentrated
- Dry mix
- Ready composition
The acrylic type has always been in great demand in the construction market. It is universal, a beginner can handle the job. Acrylic also does not have a strong odor and dries in about three days.
By surface type
There are specialized substances that help achieve a certain effect. For smooth concrete, a solution containing sand is suitable, which will create a rough texture and thereby improve adhesion.
It is better to treat wood with a solution that repels not only water, but also prevents the occurrence of pests and their penetration into the material.
The metal should be coated with a mixture that prevents rust. An alkyd primer that contains zinc chromate and zinc phosphate is suitable here. But keep in mind that it can take about 16 hours to dry.
Drywall also needs to be primed. A universal coating is good for it. Wallpaper glue can also be used as this “strengthener”. But there must be an inscription on its packaging that it is suitable for such work.
By room type
It is worth paying attention, if you are renovating a bathroom, basement or any other room with high humidity, then purchase an antibacterial composition.
For interior work, you should not purchase polyvinyl acetate, glyphthalic, perchlorovinyl, bitumen and polystyrene types of mixtures. They are very poisonous and dangerous to health. They can be used exclusively for exterior decoration.
By color
Attention should also be paid to color. Typically, primer mixtures are made either colorless or white. However, there are also color options. It is important here that its color does not differ much from the topcoat.
Read reviews before purchasing trim. A universal solution - a substance with a high degree of penetration. It won't hurt anything.
In addition, purchase products from the same brand to avoid misunderstandings due to inconsistencies in ingredients.
Preparing the walls for priming before puttying
Cleaning Old Finishes
Clean them of dirt and old coating if it is already falling off.
You can use sandpaper on old paint that sticks quite firmly. If chips and cracks are already visible on it, then it also needs to be removed. A metal brush or a special solvent will help with this.
The surface must be absolutely dry. If you apply the substance to a damp wall, you risk greatly disrupting the process technology.
Prepare the mixture
Next, we proceed directly to preparing the composition. This should not be difficult, since clear instructions for diluting it are always indicated on the packaging.
So, the dry mixture is diluted with water in certain proportions, concentrated formulations need to be diluted, and ready-made ones only need to be poured into a convenient container. Pay attention to the consistency of the mixture - it should be clean without lumps.
Protect your hands and face
Don't forget about protective equipment. Wear a mask and gloves; if the soil smells strongly, you will also need a mask.
Choose a tool and get started
There is no specific tool for the solution, so you can choose what is most convenient for you.
- Roller - it will allow you to quickly apply the composition. At the same time, it is easy to remove excess solution from it.
- A wide brush may take a little longer to work with. However, it has a very significant advantage, such as the ability to reach the most difficult to reach places. Usually these are joints or corners. In any case, this tool perfectly replaces the roller.
- Sprayer - it is mainly used for large rooms. But it should be borne in mind that the composition is very difficult to remove from any surface. Therefore, skin and clothing must be protected.
It is very important to monitor the indoor temperature during this time. Temperature can have a detrimental effect on the density and properties of the applied substance.
If we talk about how long it takes for the primer to dry on the walls before puttying, it depends on the number of layers of the substance applied. One layer of shallow penetration composition takes about 6 hours. Drying of more durable materials will take about 12 hours.
Debunking myths
The biggest misconception among beginners is that drywall does not require priming the walls for putty. No, that's not true. This is especially true in cases where the surface is being prepared for wallpapering or tiling.
This is a rather heavy finish that can “slip” over time. Therefore, drywall needs to ensure strong adhesion to the cladding. In addition, do not forget to treat the side walls and joints of the sheets. Otherwise, the putty applied to them may crumble.
Also, some believe that priming of already prepared surfaces on which the cladding will be applied is also optional. This opinion is also not entirely correct, since this layer also needs to be strengthened. Therefore, the finishing layer of primer will only strengthen the already applied mixture, making it durable and resistant to damage.
Types of primers
Primer compositions are sold in the form of concentrated liquids, dry mixtures or ready-to-use solutions. Any soil contains a binder base, which may contain special fillers and additives. For concentrated and dry mixtures, you will need a solvent, which is indicated on the package. Most often this is ordinary water.
Based on the base material, the following types of primers are distinguished:
- acrylic - suitable for processing most types of surfaces and considered universal;
- phenolic – for coating metal and wood, including chipboard, OSB and fiberboard indoors;
- alkyd - for impregnation of stone walls, plaster, putty surfaces and drywall with subsequent application of alkyd-based paint;
- perchlorovinyl and polystyrene - for plaster and brick when performing external work;
- glypthal - for wooden and metal surfaces, while the composition has toxic properties and can only be used outdoors.
Separately, mention should be made of the special solution “Betonokontakt”. This is an adhesive polymer primer, which contains ground mineral filler. Applicable only to concrete walls. As a result of its application, a thin rough layer with excellent adhesion is formed on the surface, which perfectly holds putty and other finishing materials.
As a primer, it is allowed to use wallpaper or tile adhesive diluted with water to a liquid state. However, such mixtures are recommended to be used before appropriate finishing.
Which primer and in what case is it better to choose?
When finishing brick, concrete, plasterboard (we wrote about priming gypsum boards here) or block walls, it is better to refuse to use special compounds and choose a universal acrylic primer, ready for use. However, please note that it is only used for interior work.
For concrete walls, excellent results can be obtained using Concrete Contact. However, this is more expensive and therefore only makes sense when acrylic primer cannot be used. For example, in a room with high humidity or for outdoor use.
For solid wood, plywood, fiberboard, chipboard and OSB, use phenolic primer, since it contains special additives that can protect the wood from damage by pests. Phenol is more expensive than acrylic, but the quality of processing will be much higher.
After what time can putty be applied?
Cement-sand leveling mixtures take quite a long time to fully gain strength - 4 weeks.
But there is no need to wait this long after plastering. Cement gains 70% of its strength in a week. This is quite enough for applying putty and subsequent finishing, including heavy tiles. For example, Knauf Unterputz cement facade plaster 20 mm thick dries within 7-10 days. Gypsum compositions set in 40-60 minutes and dry completely in about a week . For example, the popular Knauf Rotband, applied to the walls with a layer of 15-20 mm, can be puttyed after 7 days. In a humid room or low temperatures, the drying time may increase to 10-14 days.
Drying time also depends on the thickness of the layer, as well as the temperature and humidity in the room. Using construction hair dryers or creating drafts to speed up the process is not advisable - significant cracks can form on the surface if it dries unevenly, and over time the plaster will begin to peel off.
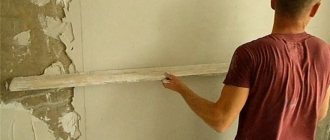
After drying, before puttingtying, the plaster must be sanded - using a special grater with a fine mesh or sandpaper, the wall is processed in a circular motion. In this way, small deposits of the dried mixture, traces of a spatula, and places where layers were applied are removed.
Proper priming and puttying of walls
Those people who want to make repairs to their apartment or home themselves should know that proper priming and puttying of the walls will make the repair high-quality and durable. This article will help you make the right choice of primer and putty for the surface of the walls, as well as use these materials correctly.
Choosing a primer for walls
Let's first clarify why a primer is needed and why prime the walls before puttingty.
The purpose of the primer is an important point in the pre-finishing of walls. The primer completely removes dust from the walls and ensures reliable adhesion of the putty to the base of the wall. In addition, penetrating deeply into the wall (about 2-3 mm), a high-quality primer strengthens the base, which makes the wall surface more reliable for adhesion of the putty mixture.
There are 3 types of primers used in wall repairs:
- Deep penetration primer
- Dust removal primer
- Primer for walls “Concrete Contact”
Proper priming and puttying of walls will be done efficiently if it is advisable to use the primers listed above.
For example, a deep penetration primer should be used when you are ready to apply putty to the walls. That is, an hour before plastering the walls.
A primer to remove dust is applied immediately before wallpapering or before painting walls. Using this type of primer for walls does not have the ability to penetrate deep into the wall and strengthen it; it is only needed to remove dust.
Primer for walls “Concrete Contact” is used to strengthen the surface of the wall and give a rough surface. Typically, “Concrete Contact” is not used before puttingtying walls. It is used before laying ceramic tiles on walls and floors.
Selection of primer composition
Before purchasing a primer, it is important to evaluate the surface of the walls, since the solution is always selected in accordance with the type of base and its properties.
On the modern building materials market you can find completely different compositions: concentrated, with additives, ready for application, or in the form of a dry mixture that requires dilution with a solvent or water.
There are special universal polymer-based mixtures (acrylic) that can be applied to both drywall and concrete bases
The only drawback of the universal primer is the inflated price, which scares off many buyers.
As an alternative, it is worth considering budget solutions, each of which has its own scope of application:
- Phenolic . This composition is intended for the preparation of metal and wooden walls, including chipboard, fiberboard and OSB. Not used when treating puttyed walls.
- Alkyd . Ideal for preparing a wooden surface before puttying. Apply to wood immediately before coating with alkyd paint.
- Glypthal . The material is used as a basis for leveling surfaces made of wood and metal. Due to the toxic odor, it is more suitable for external walls.
- Quartz . The solution is sand-based, so the surface becomes rough when applied. The best adhesion is with paint and decorative plaster.
- Mineral based . The primer is made from gypsum, lime or cement. Ideal for silicate, concrete and plastered surfaces.
All primer mixtures are divided into adhesive or strengthening. The choice depends solely on the material of the walls, as well as their condition.
If you are ready to spend a lot of money on repairs, then it is better to give preference to an acrylic primer.
Sequence of priming work
When it is decided to carry out renovations in an apartment with their own hands, newly minted craftsmen are concerned with the question: how to prime the walls before puttying? The entire process of priming work can be divided into several successive stages.
Preparatory stage
The first priority is to prepare the walls. They should be cleaned of dirt, dust, and old coating if it has begun to peel away from the base. You also need to make sure that the walls are not wet. If there is moisture, it is better to dry them, since it is correct to prime the walls when they are completely dry.
Preparation of the primer composition
The process of preparing the primer is carried out in full accordance with the instructions on the packaging. It's very easy to do it yourself:
- The ready-to-use composition is usually simply mixed thoroughly and poured into a convenient container.
- Concentrated primers are diluted in the proportions specified in the instructions.
- The dry mixture should be diluted with water following the directions on the package.
Applying primer
It is necessary to apply the primer composition in a thin layer, in narrow stripes, when priming each subsequent section, stepping slightly onto the already treated part.
Advice: it is better to use a white or pigmented primer, then all untreated areas will be clearly visible.
You can cover the walls with primer using a brush or roller. If it is necessary to apply several layers of the composition, you should wait until the previous layer has completely dried. The approximate drying time of the primer must be indicated on the packaging.
Do I need to prime the walls?
Many people believe that pre-priming walls is just an unnecessary waste of money. However, if you want the future decorative coating to look perfect and last as long as possible, then the walls must be primed before puttying.
Primer that penetrates deep into pores:
- protects the surface from peeling;
- promotes more uniform penetration of putty, adhesives and dyes.
Primer solutions are also an excellent antiseptic that protects walls from fungus.
In addition, they prevent moisture, which contributes to its development, from penetrating too deeply into the walls. The choice of primers is quite large on the construction market, and manufacturers offer special types for each type of surface. To cover walls after plastering, it is better to use acrylic, polystyrene or perchlorovinyl mixtures of deep penetration or universal compositions of medium porosity.
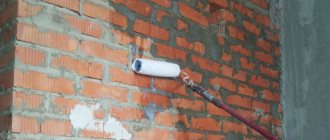
The walls must first be treated with a wet sponge to remove the smallest dust particles. You can prime with either a roller or a brush - a roller distributes the mixture more evenly, and a brush is more convenient to apply it in hard-to-reach places. Also, for convenience and speed, hand sprayers are used.
Puttying begins only after the primer has dried. The time for complete fixation is always indicated on the packaging and can vary from 5 to 15 hours.
To prime or not to prime, that is the question
In order for the finishing putty or plaster to adhere tightly to the walls, not fall off or crack over the entire area, and also not to deform and not allow fungi and black mold to grow, the walls must be covered with a layer of special primer
That is, correctly carried out, high-quality priming of the walls before puttying is a prerequisite for the quality and durability of your repair work, and this is extremely important
Important
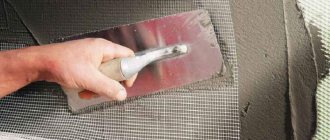
Plasterboard or wood, concrete blocks or brickwork, all these surfaces have completely different compositions, therefore different levels of density and porosity. A primer before puttying, especially with the help of a properly selected composition, will strengthen all surfaces, making them more monolithic and significantly increasing the level of adhesion.
It is thanks to the unique compositions of modern primers offered by the industry that excellent adhesion to almost any surface is ensured, so the plaster or putty will stick like a glove. But these are not all the advantages that a high-quality primer, carried out in a timely manner according to all the rules, gives before putting on walls, which is worth understanding in a little more detail.
- The primer applied before plaster or putty qualitatively fills all the cracks and cracks and natural pores of the material, not only providing greater adhesion, but also significantly reducing the consumption of plaster material per square meter of area. Moreover, the cost of putty mixtures is much higher than that of primer solutions, so the savings are obvious, and with major repairs, and even more so during construction, every penny usually counts.
- If the walls are not freshly built or have some kind of colored spots, then people often face such a problem as the appearance of the outlines of dirt on the surface of the final, fine finish, which can spoil the entire impression of the renovation. A good quality primer for wall putty will allow you to “seal” all this on the wall, preventing it from appearing in the future.
- It will be much easier to putty the walls yourself if they have previously undergone a priming procedure, since the mixture lays on a similarly prepared surface much better and smoother, it adheres to it more strongly, does not flow, does not slide or float.
- Applying a primer on and under the putty with a certain composition can prevent a number of biological threats, for example, the development of black mold or mildew, which can not only be unsightly, but also dangerous to human health and life.
Thus, the answer to the question whether it is worth priming the surface of walls and ceilings before applying putty to them is absolutely clear. This will not only help you get the job done much faster, but also protect yourself and your loved ones from the harmful effects of mold spores, prevent premature destruction of the plaster layer, and also significantly delay the need for repeated repairs over time.
There is another rather complex question that must be voiced, in view of the distribution of the material, whether plasterboard is required to be primed before puttying, since many builders are not at all unanimous in this regard. True professionals who follow technology understand that the top layer of this material is essentially just multilayer paper, and it doesn’t hurt to fasten all its layers together, which a special composition of the primer mixture will successfully do.
Primer for drywall for wallpaper, painting and tiles
- After treatment with this material, the pores of the drywall are compacted, which can significantly reduce the consumption of paint and glue;
- The soil mixture has many positive qualities. Depending on the composition, it can protect against fungi, prevent fire, increase the service life of walls and partitions;
- The surface of the sheets is noticeably leveled after applying the mixture. It helps eliminate small depressions.
Adhesion is an increase in surface density, a decrease in pores in drywall. A very useful quality for this building material. In particular, such soil mixtures are necessary before painting or wallpapering. They help not only to wash dust and dirt out of microscopic cracks, but also to reduce their size and, as a result, significantly increase the service life of gypsum board. Photo - applying primer to drywall
Depending on the type of primer chosen, you need to wait until the surface is completely dry. Experts recommend waiting at least 24 hours regardless of the type - this will allow all components to penetrate deep into the drywall; Afterwards, another layer of primer is applied to consolidate the result. It also takes 1 day to dry. Next, you can begin finishing processing.
For the repair process, it is very important to choose a primer that is suitable for a specific type of work. There are many types of this building material, which vary in their qualities, composition and cost.
The first step is to clean the wall of dust and dirt. To do this, take a slightly damp cloth and wipe the surface. If necessary, repeat the process several times. This will allow the primer to penetrate deeper into the pores and eliminate unevenness. After this, you need to wait for the drywall to dry completely. On average, at normal room temperature it will take 2 hours. If the drywall is impregnated with primer, to achieve the required thickness of the finishing coating, you will have to apply 2-3 layers of putty, when one pass on an unprimed surface with good skill is enough. Betocontact consumption is approximately 0.350 kg/m2, you can work at a room temperature of at least 5 degrees. The price for betocontact is slightly higher than for a regular primer that does not have its properties. But this is the case when it is not worth saving - the result is more expensive. Cheap and high quality can only happen in an alternative reality, where mutually exclusive phenomena can calmly coexist.
- metal painting;
- concrete plaster;
- wood varnishing;
- surface treatment before puttying;
- applying finishing materials to old surfaces.
What is the best primer for drywall? This question can be answered unambiguously. Acrylic, deep penetration, from well-known manufacturers.
As for drywall, this is exactly the case when “you can’t spoil the porridge with oil.” All those properties that a high-quality, general construction primer has when processing gypsum plasterboard will be used and will most favorably affect the quality of subsequent finishing work. During renovations, you want to save as much as possible and not spend money on unnecessary materials. Is it possible to refuse to use primer without fear for the finished coating?
This question must be answered depending on what kind of finishing coating will be used. To understand in what cases a primer is not necessary to use, you need to understand why it is needed at all
What positive qualities does this material have? It is worth paying attention to the primer consumption for drywall per 1m2. This indicator is always indicated by the manufacturer on the packaging
You should always add about 10% to it to get a real result. It should also be taken into account that the consumption is indicated for one layer, but you will need to apply the primer in two layers (the second is applied after the first has completely dried).
Consumption usually ranges from 100-150 grams per square meter.
Additional information on the topic:
- Finishing a bathroom with plasterboard in a wooden house
- Plasterboard ceiling for living room finishing options
- Tutorial for installing a plasterboard ceiling with lighting and lamps
- How to repair a hole in drywall that was opened by mistake
- Plasterboard ceilings photo living room interior design
Putty "Rotband Pasta Pro" from KNAUF - the right choice
Ready-made vinyl putty “ROTBAND PASTA PROFI” is supplied in polypropylene containers of 18 and 5 kg. This paste-like putty has a density of 1.65 kg/l and is intended for finishing surface leveling and is also suitable for texturing.
Its color is white, but tinting is also allowed. The putty is frost-resistant and can withstand at least 5 cycles of complete freezing and thawing without loss of performance, which is very important for a country like Russia.
It is noteworthy that “ROTBAND PASTA PROFI”, in comparison with the already well-known construction market putty “ROTBAND PASTA”, is a completely new product. Main differences: increased adhesion; does not drain from the spatula; the filler fraction has decreased; not afraid of freezing; a denser surface after drying has a beneficial effect on painting; The shelf life has been increased from 9 to 12 months.
As it was, it is capable of withstanding at least 5 freeze-thaw cycles without losing its properties. You just need to let it defrost naturally at room temperature.
After defrosting, the mixture may separate into 2 components: a transparent liquid on top, a thick white mass at the bottom. There is no need to drain the clear liquid. Before work, you will need to thoroughly mix the paste with a mixer at low speed.
The binding component of “ROTBAND PASTA PROFI” is high-quality vinyl, which directly affects the adhesion and frost resistance of the putty. Dolomite with an average grain size of 40 microns (0.04 mm) is used as filler. Mica serves to bind and prevent surface cracking. Attapulgite gives the putty additional viscosity and at the same time plasticity.
Texturing with ROTBAND PASTA PROFI allows you to significantly save on the difference with the cost of decorative plasters. Using a trowel you can achieve more complex textures. To impart strength to the texture, the surface must be treated with a strengthening compound (glaze varnish, primer).
"ROTBAND PASTA PROFI" is ideal for finishing leveling the surface manually. The consistency is thick, but the putty is very flexible. It is easy to apply with a spatula and does not rub up when smoothed repeatedly.
The consistency of the putty is perfectly balanced - its mass does not flow from the tool. The applied layer can be smoothed many times without the appearance of “combs”. The material can be applied in a layer of 0.08 mm, which allows for economical consumption.
The putty can also be applied by machine, which means a high-quality finish can be done much faster. The speed of application in this way increases up to 8 times compared to manual finishing.
“ROTBAND PASTA PROFI” can be diluted with water, and each finisher, if necessary, will be able to achieve the putty consistency he needs. It should be diluted no more than 30 ml per 1 kg. When diluting, it is important to remember that a large amount of water can lead to excessive shrinkage of the surface and reduced adhesion.
Although the putty is white in its original state, it can be tinted so that the treated surface takes on any color you desire.
And finally, one more advantage. Dried putty can be easily sanded, so this process will not be labor-intensive. In addition, this putty can also be sanded wet, and the finishing can be done literally “without noise and dust”, that is, you can live quietly in the next room - comfortably and without harm to your health.
So, the choice for finishers is obvious - ROTBAND PASTA PROFI has only advantages. However, there is still one drawback: the calmness when using it borders on serenity. But isn't this what we all ultimately strive for?