What is a primer composition, what types of primers are there?
A primer is a liquid that prepares the surface for the next coat. It is clear that the “surface” is different, with different characteristics and problems. And “next layer” is also a very general name. The purpose of the primer is to improve the conditions for laying the next layer. To solve various problems, compositions with different properties are needed. Therefore, there are many soils and they act differently.
To choose the right type of primer, you need to understand why you need it, what problem it will solve
It is necessary to select a primer based on what problems need to be solved. This means that you need to have at least a general idea of their types and how they change the properties of the treated surface. Based on their properties, primers are divided into three groups: adhesive, filling and deep penetration. Read more about what happens to the surface after treatment with each of the compounds.
Adhesive
The adhesion primer serves to increase the “adhesion” of the two layers. After drying, it forms a sticky film on the surface, so it can also be called film-forming. Often it contains sand of different fractions for better “adhesion” of the layers. Area of application: weakly absorbent substrates.
Low-absorbing bases are metal, glass, tiles, smoothed (reinforced) concrete. One of the most famous examples of an adhesive primer is BetonoKontakt. I advise you to use it almost everywhere, but it is only needed on very dense substrates that almost do not absorb moisture. In other cases, it is irrational to use it.
The most popular composition of adhesive primers is Betonokontakt.
There is only one example of using Concrete Kosntakt for a floor: if you lay new floor tiles on old ones. In a good way it should be removed. But sometimes you need to raise the overall floor level. And by removing the tiles and glue, you lose the desired height. Removing tiles and then pouring screed is expensive and time-consuming. If the old tiles lie “tight” on the floor, the floor is flat, then you can go through the old coating once or twice with Concrete Contact, and then lay the new floor tiles. This is all. There is no other use for this type of primer on concrete floors.
Filling
Filling impregnations, on the contrary, are applied to highly absorbent substrates. They clog some of the pores, reducing and leveling the absorbency of the surface. It makes sense to apply them to loose surfaces. In the case of a concrete floor, filling impregnation can be applied before:
- By painting or applying varnish. To reduce the consumption of paints and varnishes.
- Under tile adhesive. In case it is necessary to extend the “lifetime” of the glue. Due to the fact that less water will be absorbed, it will remain mobile longer. This will give you more time to bring the tiles into the level. From the whole variety you need to choose the right composition
- Before gluing the floor covering directly onto the screed. Some coverings (linoleum, parquet boards, carpet) can be glued directly to a flat concrete floor. To reduce glue consumption, you can use filling primer.
If you are preparing a concrete floor for painting, so that less paint is wasted and it goes on more evenly, it makes sense to coat it with a filling primer. Diluted paint and varnish composition is often used as this primer before painting. This gives the primary color and reduces absorbency. After all, any floor paint clogs pores, which means it performs the task of a filling primer.
Deep penetration
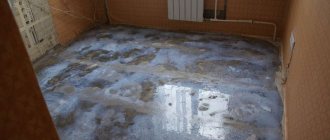
Deep penetration primers are used on surfaces that are constantly dusty and crumbling. The soil components penetrate deep into the material through the pores and bind (glue) unstable particles together. Thus, the material becomes denser and generates less dust. This composition has almost no effect on the amount of moisture absorbed. Deep penetration primers are also called penetrating or strengthening primers.
This is how deep penetration primer works on a concrete floor.
Actually, strengthening is a special subtype of soil of this type. They contain more adhesive components. So, when treated with a deep penetration strengthening primer, due to the gluing of material particles to each other, it becomes less dusty or friable. If you want your concrete floor to be virtually dust-free, you can treat it with a deep-penetrating strengthening primer. The effect is similar to painting, but without changing the color.
What is polymer primer used for?
The use of a primer when pouring the floor is mandatory. It is necessary both on a fresh screed and on an old foundation. In the first case, the soil will improve adhesion between the layers, in the second it will increase the strength of the new base, which has a looser structure compared to the newly poured mortar.
In addition to the above purposes for using this composition, experts identify several problems that can be solved by applying a polymer primer layer:
- formation of a protective layer and closing of pores on the base surface;
- filling small defects (pores, cracks) to create a perfectly flat surface;
- dust removal of surfaces that cannot be completely cleaned with an industrial vacuum cleaner.
When processing, you can use soils with special additives that prevent the formation of fungus and mold.
As a result of applying a primer, the consumption of materials for the next layer is reduced. When pouring expensive polymer compounds, this leads to significant savings.
Composition of primer for concrete floor
We figured out what primers there are based on their properties. Such different effects are achieved because they are made on the basis of different substances. This is reflected in the properties of the final product and affects the scope of application. The following primers can be used for concrete:
- acrylic;
- silicone (organosilicon);
- epoxy;
- polyvinyl acetate;
- silicate.
This is just the basics. Adhesives, abrasive particles, antifungal components, and other additives are added to the “base” solution. The specific composition varies depending on the manufacturer and on what work the composition is intended for.
Five types of primers are suitable for application to concrete
If we talk about fire properties, then acrylic, polyvinyl acetate and silicate soils are fireproof. They are low-hazard when liquid and safe when dried. Epoxy is dangerous until it dries.
Properties of primers for concrete
About solvents and odors. The least odorless primers are diluted with water. These are acrylic, silicone, silicate and polyvinyl acetate. Epoxy primers are diluted with organic solvents (white spirit, acetone, etc.) and have a strong odor. So they should be applied in ventilated areas.
Based on the resistance to film abrasion and weathering, three groups can be distinguished:
- High durability. These are alkyd, organosilicon, epoxy, silicate.
- Medium - acrylic primers.
- Low - polyvinyl acetate.
Not all characteristics are equally important when choosing a primer.
You should pay attention to the durability of the film if you are not going to apply a protective coating over the primer. Or time must pass until the next stage. If you paint or lay tiles immediately after the soil has dried, this characteristic is not so important.
Almost all soils can be used outdoors. The exception is polyvinyl acetate. They are for internal use only. Acrylic primers can be for exterior or outdoor use. So you need to pay attention here if you are going to prime concrete in an unheated room or in an open area.
Deep penetration primers: characteristics, prices, consumption
| Name | Purpose | Binder type | For what reasons? | Under what layers | Drying time | Consumption | Price | Notes |
| Ceresit CT 17/st 17 (Ceresit ST 17) | For interior and exterior use | Aqueous dispersion of acrylic copolymer | Concrete, cement-sand and lime plasters and putties, lightweight and cellular concrete, chipboard, fiberboard, gypsum fiber board, gypsum board | screed, self-leveling floor, gypsum plaster, all types of putties, tiles, paint, wallpaper | 2 hours | 0.1-0.2 l/m2 | 10$ for 10 l | It has a yellow color; painting or light wallpaper is problematic |
| CT 17 Concentrate | For interior and exterior use | The same, but a concentrate that is diluted with water | 0.1-0.2 l/m2 | |||||
| Deep penetration primer Prospectors | For interior and exterior use | Styrene-acrylic dispersion with antiseptic additives | Concrete and concrete screeds, bricks, plasters, putties, gypsum plasterboard, gypsum plasterboard, fiberglass board | screed, self-leveling floor, gypsum plaster, all types of putties, tiles, paint, wallpaper | 1 hour | 0.1-0.2 l/m2 | Not suitable for weakly absorbent surfaces, oil-based paint and steel | |
| Strengthening primer Vetonit Vetonit.Prim Multi | For interior and exterior use | Acrylic dispersion | Concrete, plaster, brick, stone, plasterboard, cellular concrete, foam block, putty, cement surfaces, CBPB, gypsum plasterboard, GLV | for painting, waterproofing, floor levelers, for acrylic, silicate, silicone paints | 1-2 hours | 0.05-0.075 l/m2 | 11.4$ for 10 l | Can be applied twice on weakly absorbent substrates |
| PRIMER of deep penetration before puttying KSh (10) BIRSS | For interior and exterior use | Acrylate | Concrete walls and ceilings of normal and high strength (low-absorbent), gypsum plasterboard, gypsum plasterboard, plaster (except polymer), | Before puttying or applying water-dispersion paints | 1 hour until touch-free | 0.2 - 0.25 kg/m2 | 9.5$ for 10 l | |
| Strengthening Knauf tiefgrund | For interior and exterior use | Polymers | Gypsum and cement plasters, gypsum board, gypsum board, gypsum tongue-and-groove boards, gypsum and cement screeds | Putty, paint, wallpaper, tiles | 3 hours | 0.1 kg/m2; | 12$ for 10 l | |
| LNPP deep penetration primer composition | For outdoor use | Acrylic dispersion | Foam concrete, aerated concrete, old plaster, concrete and brick surfaces, gas silicate, slag concrete, plaster | Under subsequent finishing layers | 4 hours | 0.16 kg/sq.m. | 2$ for 1 liter | Do not use on poorly absorbent substrates, lime plaster or whitewash. |
| Bolars | For interior work | Acrylic | All types of cellular concrete, cement-sand screeds, plasters (except polymer), fiberboard, chipboard, brick | For mortars, paints, finishing materials | 1 hour before applying the next coat and 2 hours for other materials | 0.08 kg/m2 | 7$ for 10 liters | Use gloves, goggles, respirators |
| VD AK 0301 | For interior work, for exterior work (different compositions) | Acrylic dispersion | On mineral surfaces | For painting, tiles, wallpaper, putty, for application to concrete floors | 24 hours | 0.08-0.1 kg/m2; | from $7.6 to $12.7 per 10 liters depending on the type | There is an antiseptic for old paint |
| Volma Universal | For interior and exterior use | Styrene-acrylate dispersion | Tongue-and-groove slabs, gypsum plasterboard, gypsum plasterboard, cement screed, putty, brick | 2.5 hours | 0.1-0.15 kg/m2; | 9$ for 10 liters | On highly absorbent substrates, aerated concrete. apply foam concrete in two layers | |
| Glims (Glims-Grunt Prime) with antiseptic additives | For interior and exterior use | Brick, concrete, foam concrete, plaster, putty, plasterboard, asbestos cement | Plaster, putty, glue, paint | 30 minutes until next layer | 0.08-0.2 kg/m2; | 10$ for 10 liters | ||
| Birss soil M (strengthening, stabilizing, frost-resistant) | For interior and exterior use | Acrylic copolymer | For plaster, putty, brickwork | 20 hours | 0.15-0.2 kg/m2; | 9$ for 10 l | Not recommended for polymer plasters and putties | |
| Unis (Yunis) with antiseptic | For interior and exterior use | Polymer dispersion | Concrete, plaster, aerated concrete, gypsum plasters, brick. gas silicate, GVL, TsPS, tongue-and-groove slabs, | For painting, plaster, wallpaper | 30-40 minutes before the next layer and several hours for subsequent work | 0.15 kg/m2; | 6$ for 10 l | Works with wood, does not allow efflorescence on brick |
| 2-in-1 Deep Penetration Primer TEX Universal | For interior and exterior work, for walls, floors, facades | Polymer | Wood, concrete, drywall, putty | For painting, wallpaper | 30-40 minutes | 0.07-0.2 kg/m2; | ||
| Expert Perfecta | For interior and exterior use | Polymer | Concrete, brick, cellular concrete, cement and gypsum plasters and putties, gypsum plasterboard, gypsum board, fiberglass board, paint, wood, tiles | Plasters, putties, tile adhesives, water-based paints and varnishes, self-leveling floors. | 1 hour | 0.15 – 0.2 l/m2 | 7.3$ for 10 l | |
| Optimist (antibacterial) | For interior work | Acrylic latex | Concrete, gypsum board brick, gypsum, cement plaster, mineral and wooden surfaces | Varnishes, paints, including water-dispersion | 30 minutes before the next coat of primer and 2 hours for complete drying | 0.1 – 0.25 l/m2 | $6.3 for a 10 liter canister | |
| Optimum Leningrad paints | For interior work, for walls | Acrylic | Concrete, plaster, plasterboard, brick, wood | Water-dispersion paints, tile adhesive, wallpaper | 0.07-0.2 kg/m2; | $4.3 for 5 liters |
As you can see from the table, it will not work to say that there is no difference between more expensive and cheaper brands. Even according to the description of the surfaces on which the composition is applied. More expensive compounds have significantly more surface area. Well, you have to look at the quality. But usually the cheaper ones are used for applying paint (if it is not expensive), for wallpapering, etc. For more critical areas - such as plaster, putty, on complex foundations - they prefer not to take risks and take products from trusted companies. A completely justified approach.
Application rules
The rules for applying primers of any type are similar. The deep penetration primer is also applied to a dry, clean base. Dry is a residual moisture content of about 3-5%. Clean - no oil or dirt stains or flaking materials. But “dust-free” is not for this case. Although all dusty particles must be removed. If dusty work was carried out, we brush the walls, sweep the floor, wash it if necessary and wait for it to dry.
A marker or application control is a pigment that allows you to control the process
Next, the primers are applied to warm substrates. We look at the minimum permissible temperature in the description, but usually it is not lower than 10-15°C, but there are frost-resistant compounds. They can be applied to surfaces with a temperature of +3°C. Note. This is the surface temperature.
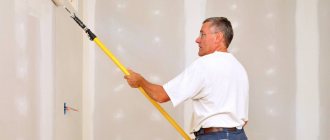
The compositions can be applied using a brush, roller, spray gun, or spray gun. Some of them contain a coloring pigment that allows you to control the application. But in some cases - under paint or light wallpaper - the presence of pigment can interfere, as it can distort the colors. Therefore, for finishing light materials we use a transparent or white primer.
Source
How and with what to apply primer to a concrete floor
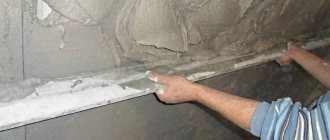
The primer is applied to dry, clean concrete. If the screed is old, remove dust and dirt first. Oil stains also need to be neutralized. During preparation, concrete can be washed with special products, but after that you will need to wait until it dries completely.
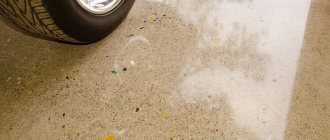
The primer is applied to dry and clean concrete. The most convenient way is using a roller. Some primers have a faint tint (marker) that helps control application. But most markers on a concrete floor are not visible. It's usually too dark. So if there is a composition with and without a marker, then it makes no sense to overpay for the marker. If you still want to control the application, add a little paint. For water-soluble primers, you can add a coloring pigment for water-based emulsions or any other paint that is diluted with water.
It is not always easy to control the application of primer
The primer is applied to the floor in at least two layers. In order to avoid gaps, the direction of application is changed. For example, the first layer is applied along a long wall, the second along a short one. The second layer should be applied only after the first has completely dried. But there are exceptions. Some compositions can be applied after the first layer has partially dried. This is indicated in the description of the primer.
When it comes to drying time, epoxy and acrylic primers dry the fastest. The time until the layer of these compounds dries completely is 1-3 hours. Organosilicon and polyvinyl acetate dry in 3-6 hours, silicate - 6-12 hours, alkyd - 12-24 hours.
Do you need primer for a self-leveling floor before and after pouring?
It is especially important to apply a primer for loose mineral screeds. Without it, sand and cement dust stain the concrete, reducing the strength of the pour. Surfaces made of wood, stone, brick, concrete, when a solution is poured onto them, strongly absorb water, thereby contributing to the rapid thickening of the mixtures. This affects the hardening time and the consumption of the amount of fill.
Note! Without the adhesive properties of the primer, cracks, cavities, air bubbles, and separation from the base base may form on the self-leveling layer. Uneven spreading of the solution is also possible.
The water present in the emulsion, together with the adhesive, is able to penetrate deeply into the pores of the base before evaporation. The polymer composition together with the resins, remaining on the surface, holds the base together without interfering with the passage of air masses through them. This is of great importance for apartments and residential premises.
Why do you need a primer for a concrete floor?
Despite the fact that there are many types of primer compositions, their use for floors is limited. It’s just that the technologies and finishing materials are such that they do not require additional processing. When is a concrete floor primer needed? It makes sense to use in the following situations:
- Before painting. To reduce paint consumption, it is worth applying a filling primer. Select the base according to the type of paint. A couple of examples. If it is acrylic paint, then acrylic primer is also needed. For paints based on natural solvents (for example, oil), epoxy primer is suitable.
- For dust removal. In technical rooms, painting the concrete floor does not always make sense. The paint wears off, which makes it look “not very good” after just a couple of months. But I want to solve the problem of “dusting” of concrete. A strengthening primer is suitable for removing dust from a concrete floor. It almost does not change color, but binds the particles to some depth. Of course, the “bound” layer wears out, and part of the primer composition is washed away. But for some time the amount of dust decreases significantly. Before applying a leveling screed (self-leveling solution), primer is only needed if the base is old
- Under tile adhesive. If the life of the cured adhesive is short, it makes sense to apply a filling primer to the screed. By reducing the absorbency, the tile adhesive will “live” longer. But not by much. You can count on the upper limit of the range specified by the manufacturer. Hardly any more.
- Before applying the leveling layer. Modern flooring requires a level base. Therefore, various types of levelers are often poured over a regular screed. If the screed is “fresh”, then no additional processing is required. If it is old but strong, it makes sense to go through the ground. Binding or strengthening - depending on the situation.
- On old tiles before laying new ones. In this case, an adhesive primer is applied. It is possible with abrasive particles (with sand).
- A fill primer is used before gluing the final floor covering.
As you can see, there are not many situations for using a primer on a concrete floor. There may be other situations where their use is justified. But always think carefully about whether this layer is really needed. And won't he make the situation worse?
What does priming the floor do?
Priming the floor allows you to get the following result:
- the quality of adhesion of concrete to other materials increases;
- the performance characteristics of the screed are increased;
- concrete becomes more resistant to negative environmental factors;
- various defects caused when pouring the screed disappear.
If your house has wooden floors, then a floor primer, the price of which varies from 480 rubles. up to 3500 rub. for 10 liters, allows:
- Significant savings on paint and varnish materials;
- hide various wood defects;
- prevent the formation of mold and mildew;
- improve the quality of adhesion of wood to other materials;
- extend the service life of the floor;
- prevent the tree from releasing resin;
- create excellent floor waterproofing;
- protect the tree from harmful insects.
Therefore, priming your floor, regardless of the flooring used, is a must if you want a quality floor.
When a primer is not needed on a concrete floor
If the leveling layer is planned to be poured onto a previously “iron” screed, the top hard layer should be removed. It has very high strength and even the best composition will not stick to it. The top film is sanded off (a lot of dust), then the debris and dust are carefully removed, and after that a binding primer is applied.
It is better to remove crumbling concrete and iron film...
As you can see, both deep penetration and adhesive primers are needed very rarely for concrete floors. The property of a deep penetration primer is to increase the strength of loose and dusty substrates. If the concrete floor is “loose”, this means that errors were made in the technology during its manufacture. It makes sense to remove it rather than increase strength. After treating concrete with a primer, the strength will not increase enough to guarantee its long-term operation.
The adhesive primer forms a sticky film, but closes some of the pores. This reduces the absorbency of concrete. And this reduces the “adhesion” of the two layers. This is especially true for two layers of concrete. The concrete mixture of the layer being laid will not be able to penetrate to a sufficient depth. This will reduce the adhesion of the two layers. So the situation can get worse, not better. It is better not to apply any primer to a “fresh” cement or concrete screed. The next layer - be it a leveling layer or tile adhesive - will “stick” very well. And the rest of the situations have already been described.
Water-repellent primer for concrete
Another situation that we sometimes encounter is the need to improve the water-repellent properties of a concrete floor. There are two methods that work well for improving the water resistance of concrete.
- Use waterproofing materials. With their help, you can make a concrete or cement floor absolutely waterproof. If this is what you need.
- Apply special additives to the solution. They reduce the absorbency of the entire layer, not just its surface. But they must be introduced during kneading.
It is impossible to make a concrete floor waterproof using a primer.
This problem can be solved by other means. These are two ways to radically improve the water-repellent properties of concrete. Primer for concrete floors is not suitable for waterproofing. All of them, regardless of type, will only reduce absorbency, but will not provide a waterproofing effect. Even the most expensive and very good ones. These compounds have a different purpose. They can reduce moisture absorption, but do not prevent its penetration.
It makes sense to reduce the absorbency of a concrete floor before painting or laying tiles. In the second case - not always, but only with adhesive compositions for tiles that have a short “life” after mixing (or if you are laying tiles for the first time and are worried about not having time).
When do you need a primer for tiles?
Usually the tiles are laid on a screed. New or old. If the concrete is “fresh”, no additional treatment is needed. Tile adhesive should be cement based. Then there will be no problems with adhesion.
If there are problems, it may make sense to use a tile primer. This is worth doing if:
- Concrete is very dusty. Remove dust (as much as possible) and prime with deep penetration primer. Better strengthening. It will not leave a film, but the surface will stop dusting and adhesion will improve.
- There are greasy spots. Stains must be removed and grease neutralized. This is done using alkali (usually). Therefore, the floor is washed and dried. Since a “greasy” floor is clearly not a fresh screed, you can treat it with the same adhesive primer.
Preparing the floor before laying tiles does not always require applying a primer - Lay tiles on tiles. In order for the tile adhesive to “adhere” well to the old coating, you can make notches. This may be enough. If you are laying heavy tiles - large-format or porcelain stoneware - you can treat the old tiles with concrete contact (adhesive primer).
- Concrete was “rubbed” during laying; its surface is very hard and almost does not absorb moisture. According to the technology, the top layer must be sanded off and then the tiles must be laid. But grinding concrete is still a pleasure. The solution is concrete contact treatment and then laying tiles. But this is an option without guarantees.
- On the waterproofing layer. The floor in the bathroom and toilet is usually treated with waterproofing. This is a non-absorbent base. An adhesive primer is required to ensure adhesion. This is when a primer is necessary.
Which primer to use before laying tiles depends on the screed
These are all cases when a primer may be required for laying floor tiles. Once again: a newly poured concrete/cement screed does not need a primer. On “fresh” concrete, primer is only needed when the adhesive is used based on a binder other than cement. In this case, to avoid conflict, it is better to create a film using an adhesive primer.
Choosing the composition
When choosing a primer mixture, it is worth considering that high-quality soil should have the following characteristics: be well absorbed by the surface and dry quickly. You also need to take into account what material the surface that will be primed is made of. So, for drywall and chipboard there are some features of using a primer, and for brick and concrete surfaces there are others.
Primers are available on a water, organic and mineral base. Water-soluble primers include acrylic, latex, silicate and silicone products. In alkyd compositions, organic components act as solvents. In mineral formulas, the base is cement, gypsum and lime.
Types of primers
The consistency of the compositions can be liquid, colorless or thick, milky. Liquid soils saturate the surface well, strengthen it, and bind dust; well suited for surfaces with large pores. But thick primers, in addition to similar properties, will also help get rid of minor defects and irregularities.
According to the component composition of soils, there are the following:
- Acrylic;
- Latex;
- Alkyd;
- Antiseptic;
- Universal;
- Wallpaper glue.
Acrylic primer
Acrylic primer is perhaps the most popular composition among all primers for flooring. All this thanks to the huge number of advantages and its versatility. This is almost the ideal composition among all for floor treatment. Due to the special component composition, it fits perfectly over the entire surface being treated and dries within two hours.
Thanks to the content of various additives, acrylic primer increases the adhesion of the surface to finishing materials, increases resistance to moisture, and helps to strengthen the surface. All these characteristics extend the life of the decorative finish, reduce glue consumption, and make it resistant to temperature fluctuations.
Floor primer
Acrylic primer, in turn, is like this:
- for deep penetration - for porous planes;
- adhesive – improves the adhesion of finishing materials and floors;
- impregnating – for loose surfaces;
- universal – for coatings made of any material;
- special solution – for narrow applications (for metal, wood, concrete, etc.).
Latex primer
Thanks to the fact that manufacturers of building mixtures have found an alternative to natural latex, today there is a primer with excellent moisture-resistant properties. In addition to this characteristic, this composition is very elastic and durable.
This allows you to use this primer in rooms with high humidity: kitchens, bathrooms. This type of soil fits well on wooden surfaces, concrete, and stone. The average consumption of such material according to GOST is 350-500 grams per 1 sq.m.
Floor primer consumption rates and coefficients are regulated by GSEN:
| Name | Consumption kg/1m2 |
| Floor primer Vetonit MD16 concentrate | 0,10-0,15 |
| Two-component mastic Vector-1025 | 0,130-0,150 |
Alkyd primer
Alkyd primer is a film-forming primer composition. It is used for treating wooden and concrete surfaces. This coating will protect the wood from swelling, and the concrete from excess moisture; it is used before laying the tiles.
Due to its component composition, such soil makes the surface resistant to moisture and prevents the appearance of fungus and mold. In addition, this type of material prevents the appearance of rust on the wall from fasteners and fittings, which can show through the decorative coating.
Antiseptic composition
Antiseptic compounds will create reliable protection against fungal formations and various molds. This primer is ideal for priming in rooms with high humidity and dampness: kitchens, bathrooms, showers and swimming pools.
Epoxy and polyurethane primers
Epoxy composition is used for concrete surfaces and is an excellent protection against moisture. Also used for self-leveling coatings. Suitable primers for floor screeds are either epoxy or polyurethane.
Polystyrene composition
This option is used when finishing wood. The peculiarity of this composition is its toxicity, so when working it is necessary to use PPE and ventilate the room.
Universal primer composition
Universal primers have an optimal component composition that allows them to be used on any surface. Due to acrylic additives and resins, such a primer well saturates the surface being treated, improving their adhesive abilities and moisture resistance.
This primer is used for treating drywall, concrete, chipboard, fiberboard, metal and wood. Moreover, it is suitable for priming both indoors and outside the building.