Why are walls plastered?
Plaster is a type of finishing where an additional layer of varying thickness is applied on top of a black base to obtain a smooth wall surface. In some situations, a similar procedure is carried out on ceilings. A plastic mixture based on cement, gypsum, clay or lime is used as a solution. You can make it yourself or purchase it ready-made. Each option has its own specific characteristics.
When carrying out plastering activities, the following goals are pursued:
- Leveling the wall.
- Creating a monolithic layer over the joining seams.
- Increasing the strength of the base.
- Arrangement of a protective barrier against cold, moisture, extraneous sounds and mechanical influences.
- Decorative effect.
Is it necessary to putty on walls plastered with cement mortar in front of the wallpaper?
Despite the enormous popularity of gypsum mixtures, plaster based on sand and cement remains in demand. We often see walls perfectly plastered along lighthouses with sand and cement mortar.
The whole problem is the flowability of the material. Even perfectly balanced plaster can crumble a little after drying. Therefore, you need to purchase a deep penetration primer for interior and exterior use. Prime the walls liberally until they stop absorbing it. After drying, the primer will strengthen the walls and they will not crumble.
Note! Not all types of wallpaper can be glued in this case. On walls plastered with sand-cement mortar, you can glue wallpaper made of dense material and with a large texture. Do not glue thin wallpaper, wallpaper without a textured pattern (smooth). If the sun's rays pass parallel to the wall during the day, imperfections are bound to appear. Small bumps may appear on the wallpaper from large grains of sand under the wallpaper. At certain angles, sunlight will create highlights similar to pimples. Believe me, despite the high cost and beauty of the wallpaper, a pimply wall will look terrible.
Leveling walls with plaster
The most popular types of wall finishing are painting and wallpapering. The fundamental condition for their implementation is a flat, solid base, to create which plastering is used. It can be rough and smooth. If the base is covered with significant unevenness, then the first step is to apply a rough solution.
especially true for buildings older than ten years , where the surface of the walls is often covered with cracks. In some places the old plaster is falling off in large pieces. In this case, the work will require a long level for vertical alignment. Plastering over an old layer usually leads to unevenness in corner areas.
Leveling walls with plaster
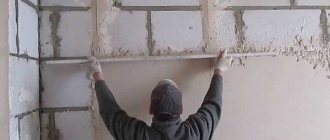
Another situation when plaster is required is the finishing of new buildings built from piece material (blocks, bricks). The most convenient way to level existing potholes and irregularities is to use the so-called. "plaster on lighthouses." We are talking about special metal profiles equipped with a central stiffener. For ease of vertical mounting, these strips have a standard length of 2.5 m.
Aligning walls with beacons
Beacons are installed on the wall surface at the same level using alabaster. The distance between the individual guides depends on the width of the rule (usually 80-100 cm). Throw the finished mixture onto the wall with a trowel or spatula, leveling it along the beacons using the rule. After the rough plaster has completely dried, smooth plaster is applied, which is designed to remove minor flaws from the surface. In cases where the base is initially more or less flat, the first stage can be skipped. Depending on the working conditions (outside, inside), the composition of the mixture may change.
Alternative - dry plaster
Often, drywall is called dry plaster; this material can also be used to level walls, the work time is reduced, there is no need to wait for the walls to dry, and you can freely, without increasing the cost, level very large differences in verticality and geometry. Which is better, drywall or plaster? There is no definite answer to this question; it all depends on the specific situation and the preferences of the owner. If in some areas the wall needs to be increased by 5 centimeters or more, then plasterboard has an advantage. If every centimeter of space matters in a cramped bathroom, plaster wins here. The possibility of sound insulation and insulation is an undeniable advantage of drywall. Based on all that has been said, it follows that traditional plaster is not always the optimal solution.
As you can see, this article is not a guide to plastering walls - it is a guide to determine the course of action. We will consider in more detail all types and methods of work in different variations in separate publications.
Sealing joints with plaster
Sometimes they use fragmentary plaster rather than continuous plaster, covering problem areas of the base. Most often this concerns brick and panel houses built a long time ago with differences in levels , especially at rustications (joints between individual slabs of walls and ceilings). In order not to solve this problem with the help of expensive plasterboard structures, plaster is used. In addition to level differences, cracks appear at the joint sections of the walls, through which heat leaks from the room.
Sealing joints with plaster
During use, the walls shrink, causing the original mortar inside the joints to crack. This problem is familiar not only to residents of old buildings, but also to new economy class buildings. The fact is that developers there primarily focus on speed and low cost of construction, to the detriment of quality. By sealing problem seams, both a decorative and thermal insulation effect is achieved. Before laying the mortar, the joint must be reinforced with a sickle mesh.
Installation of beacons
How smooth the surface you get will depend on the correct installation of the beacons. They are:
- Plaster. In this case, gypsum mortar is applied to the wall in equal fragments, so that the height of the beacons corresponds to the thickness of the plaster. The advantage of plaster is that it dries quickly.
- Cement-sand. Such landmarks are made in the same way as plaster ones. Cement mortar is cheaper, but such beacons can only be installed in small rooms.
- Wooden slats. Vertical lathing made of wooden slats is suitable for apartments, however, landmarks of this type quickly swell from moisture, making it impossible to obtain a flat surface.
- Metal slats. This profile is considered the most reliable. Its main advantage is that the beacons do not have to be removed.
To install beacons follow these steps:
- Screw the self-tapping screw under the ceiling (at a distance of about 150 mm from the corner). The thickness for plaster is determined by the distance from the screw head to the wall.
- Install the same self-tapping screw on the floor (it should be screwed in in a vertical straight line from the “ceiling”).
- Place lumps of plaster between the two screws, the height of which should be slightly greater than the guides.
- Attach the metal profile to the screws, slightly deepening it into the solution. At the same time, make sure that the rail is laid evenly; for this, use a building level. If a deviation occurs, the screws must be adjusted until the metal guide is strictly vertical.
- Install the rail on the opposite side of the wall in the same way.
- Stretch the thread between the beacons and, using it as a guide, install the remaining guides. The step between the slats should not exceed the width of the rule.
Now you can proceed to applying plaster.
Insulating a house with plaster
The plaster layer helps create an additional barrier against the cold. This is achieved by sealing targets, cracks and joints, as well as increasing the overall thickness of the wall. Not long ago, a special “warm” plaster , which contains special additives to increase the thermal insulation effect. Foam balls or polymer chips are mainly used in this role.
"Warm" plaster
Imitation concrete
If you want to make a loft design in your apartment, then you don’t have to clean the walls down to concrete. In stores there is a special plaster that emits a concrete coating. It looks exactly like real concrete. It is almost impossible to distinguish. This plaster is best used in the living room or kitchen. It will also fit well into the bathroom and hallway.
Comments (20)
Zhanna 04/27/2020 at 00:32
The squalor in standard apartments is such finishing. From one extreme to another. Highly qualified builders and finishers are never unemployed. I came across concrete finishing in an apartment made according to a design project. The customer invited a decorative artist to finish the wall. After its completion work, sand fell from the wall onto the finished floor for a very long time, vacuumed repeatedly and every other day the same thing. The radiators were painted in the color of concrete, black frames on the windows, expensive concrete-colored tiles - a lot of money was invested, So what kind of savings can we talk about? Finishing in the Loft style You can’t call it cheap at all, in this style there are expensive interior items and materials too. Bare concrete is a scam of the customer by the designers. In order to make a wall look like concrete and at the same time beautiful and stylish, you need to invest a lot of materials and labor. Old It is possible to open a brick in fragments, but you need to clean it all and strengthen the remains of the mortar on it so that the sand does not fall off, and this is clearly not done with water and a rag! Before giving advice, delve into the issue and technology, do not deceive the average person.
Diana 04/20/2020 at 20:21
So let “one designer” live in such a house himself, if he likes it. This is not a loft, this is squalor.
Dmitry 04/19/2020 at 00:58
And after that there are complaints about neighbors, you can hear the TV, the neighbor can’t sleep, he snores, and so on and so forth.
Natalya 04/16/2020 at 15:45
I agree, it completely sucks. You still need to finish the repairs, plaster, putty, paint, or wallpaper. Nothing good is offered in the article, bare concrete, it looks scary. And saving has nothing to do with it!
Olga 04/16/2020 at 07:28
I agree that this is not very suitable for an apartment. I once had the opportunity to temporarily live in a room with concrete walls. I bought white paint, cut out a stencil and painted white roses, and just hung white tulle on the wall in a bunch. well, in general, it was not bad - as a temporary arrangement solution. In forced circumstances)
Nick 04/15/2020 at 23:01
A real loft is a warehouse, former plant or factory. Equipped for residential or office space, at minimal cost. Look how spacious they look - high ceilings, huge windows. And cheap kitsch, from our designers in small apartments. Stay in a bar or club decorated in a loft style. And return to a cozy apartment. Don't bring the gloom of concrete walls home.
Vika 04/06/2020 at 23:16
Good article. Everything is simple, environmentally friendly, comfortable. Angry comments from unemployed “builders”, “renovators”, etc., who cannot make money on Chinese-Turkish European-quality renovations.
Lyudmila 04/04/2020 at 17:40
This is a fake loft style. It looks scary. Who would want to live in this? It was as if the end of the world had come in this apartment.
Passerby 04/04/2020 at 00:21
As far as I understand, this material will generate dust and you can’t just leave the wall like that, it needs to be covered with something.
Tatyana 03/31/2020 at 15:11
It all comes down to money. The loft is good because our neighbors flood from above every year.
Dmitry 03/29/2020 at 22:24
Indeed, when there is no taste or intelligence to create at least minimal comfort, or they are complete slackers and lazy people. So they came up with an “innovation”, thereby once again convincing those around them that in front of them is a moron. Not a single normal person would allow this in their apartment. This is not fashion! This is squalor! And God forbid children live and grow up among this “beauty”. What kind of taste they may have in the future. This sucks!
Onegin 03/28/2020 at 12:48
Well then, the floor had to be covered with unplaned boards. The barn is just resting.
Ainagul Asia 03/28/2020 at 12:32
I agree with Ekaterina, those who don’t like the loft style should pass by, everyone has their own taste!
Uncle 03/26/2020 at 12:09
The author is back at school, learning to read and write. So as not to emit the concrete coating. Generation Unified State Exam, motherfucker
Lyudmila 03.25.2020 at 20:56
Uncomfortable, it seems that the renovation is not completed.
Nina 03/25/2020 at 15:37
Bomb shelter!!! The loft has not been in fashion for a long time, and if someone wants it, then it is inappropriate in new buildings. In extreme cases, on the first and last floors in houses of pre-revolutionary and pre-war buildings...
Irina 03/25/2020 at 09:24
kubov, 200 rubles?)) Ahhahahaha, a couple of hundred - that’s if you plaster it yourself with crap and cobwebs. I’m doing renovations now, I’ve already been stunned three times by the prices for screed and plaster.
Ekaterina 03.23.2020 at 17:13
I don’t understand the commentators with their claims. Article about loft style. And yes, the loft style looks exactly like this; those who don’t like it, pass by
kubov 03.23.2020 at 10:41
200 rubles per square to plaster here, is it expensive?)) The author is just an idiot, I will repeat the words of the previous speaker.
Andrey Anatolyevich 03/23/2020 at 08:47
then it’s better to go back to the cave…..the author is just an idiot
Creating a protective layer
Many modern building materials used for the construction of low-rise private houses have rather poor resistance to moisture. In their manufacture, the main emphasis is on increasing the thermal insulation characteristics by creating internal voids. If such walls are not additionally protected with facade plaster, moisture that penetrates into the voids during freezing will begin to destroy the material from the inside.
We are talking about walls made of:
- Treble brick.
- Foam concrete.
- Aerated concrete.
- Arbolite (based on cement and sawdust).
How to do this correctly?
In order for the applied layer to last long and reliably, it is necessary to adhere to a certain work plan, as well as all the nuances and rules. It is better for a beginner to first watch a professional work, and then start working on his own.
Required tools and materials
To begin, prepare all the tools and materials. Immediately buy the plaster mixture with a reserve of 10–15%. During the work process, anything can happen: sometimes the solution was mixed incorrectly, sometimes there was no time to use it. This way you have a reserve and don’t have to run to buy something at the wrong time.
You will need the following:
- Container for water and mixing solution.
- Plaster.
- Construction mixer or drill with a whisk attachment.
- Plaster beacons.
- Rule.
- Building level.
- Spatulas of different widths.
- Graters.
Preparing the surface for plastering
The walls are completely cleared of old decorative coating, if any. If there is old plaster on the surface, it is checked for strength. All elements that have peeled off are completely removed. The walls need to be cleaned of all stains that have appeared there, as well as dust.
Primer
Next, we begin to apply primer. This is a fairly important stage in the plastering process. A primer will help increase the adhesion of the solution and the base. If the composition has bactericidal properties, it will also protect against mold and mildew. After treatment, the surface is left to dry completely. And only then do they move on to the next stage.
Display of beacons
In cases where it is necessary to apply plaster on the wall with a thickness of more than 8 mm, professionals recommend installing plaster beacons. This stage is carried out according to the following plan:
- 15 cm retreat from the corners of the wall;
- the remaining distance is divided into equal sections no more than 60 cm wide;
- the beacon is fixed with gypsum mortar or mechanical fasteners.
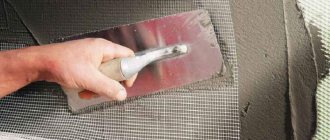
Applying layers of mortar
Now you can proceed directly to plastering. The first layer is called spray. To do this, use a small spatula or ladle, with which the solution is thrown onto the wall and left in this form until completely dry. If the wall is fairly smooth, then you can do without spraying.
The next layer of plaster is primer. Now the solution is applied with a spatula, filling the voids left from previous actions. To level the surface, use a rule. This tool is moved from bottom to top and slightly moved from side to side. The solution is added to those places where there are voids and again goes through the rule. After this, the base is left to dry completely. The final layer of plaster is applied only with a spatula. The thickness cannot exceed 2 mm. This layer is designed to hide the smallest imperfections. After application, the solution is allowed to set a little, and then rubbed with a grater until a smooth surface is formed.
Decorative effect
The purpose of plaster is not always limited to protecting or leveling walls. A novelty in construction technologies is the so-called. “wet facade”, where a layer of decorative plaster is laid on top of the insulation (usually foam plastic). Thanks to this, you can not only insulate the external walls, but also give them a finished look that does not require finishing.
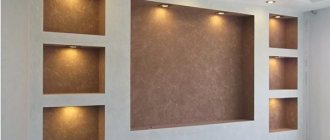
Application of decorative plaster
Decorative plasters have also become widespread in the field of interior decoration due to the ability to create original textures and imitations. Such materials are very convenient because their application does not require a perfectly flat base (like wallpaper or painting). As a result, it is possible to impart individuality and originality to the interior design of the room.
An example of finishing a room with decorative plaster
Modern decorative plasters are offered in different forms:
- Textured.
- Embossed.
- Individual sculpting.
- Bas-reliefs (special stencils are used for their production).
Walls made of concrete, cinder block or brick
Often, walls of this type are found in new, newly built apartments. Plastering walls is necessary to achieve the following goals:
- Leveling the surface of the walls. Thus, you can completely get rid of cracks and unsightly protrusions. But the main thing here is not to forget about the shrinkage that follows the masonry process, which will lead to the fact that in a couple of months the frame of the building will change shape due to pressure under its own weight;
- Closing seams at joints. As a result, you can achieve a complete surface, without which it is impossible to proceed to the finishing coating of the wall with decorative materials;
- Protecting the base from negative environmental factors. A similar problem often occurs in apartments where humidity is high. Thanks to the additional plaster barrier, the house will last much longer, which is undoubtedly good news;
- Giving the room an attractive appearance. One cannot but agree that the appearance of untreated concrete is a little depressing - in such a situation, even ordinary plaster under the “fur coat” coating improves the aesthetic properties of the room. What can we say about Venetian plaster!
The basis of almost any renovation in a new apartment is the preparation of the external surfaces of the partitions for finishing coating with separate layers of tiles, wallpaper or paint. The optimal level of operating properties of the room depends on how well the walls in the new apartment are plastered.
Pros and cons of plaster
Wall plaster comes in several varieties, each of which has its own advantages and disadvantages. However, there are also general characteristics of this type of finish.
Pros of plaster:
- Cheap material . This type of finishing is considered one of the cheapest. First of all, this applies to traditional cement plaster, which, in addition to cement, also contains sand and water. If there are sand deposits near the dacha, then you won’t have to buy it. Even a layman knows how to prepare the simplest solution: add water to a dry mixture of sand and cement (3:1) and stir. Gypsum plasters, mainly used indoors, are sold dry and are also inexpensive.
- Easy to apply. To plaster walls, you will need minimal construction experience. To begin with, you can practice in non-main premises such as a summer kitchen or barn, and then move on to your home. Obtaining a perfectly flat surface is made easier by using beacon strips.
Even a beginner can handle applying plaster
- Good adhesion. Both cement and gypsum mortar work well on traditional concrete or brick walls. To strengthen the coupling, a special plaster mesh is used, which is pressed onto the rough base before applying the mixture.
- Space saving. Unlike other methods of leveling walls (plasterboard structures, etc.), plastering leads to minimal loss of living space. The layer lays down very compactly, without capturing excess height.
- Laying density. The mixture penetrates into cracks and gaps, ensuring good sealing of the room. As a result, the slightest channels of access of cold air into the home are blocked.
- Vapor permeability. While creating good protection against moisture, the plaster, however, does not provoke a “clogging” effect. In a room decorated in this way one can breathe freely and easily.
Disadvantages of plaster:
- The complexity of the process. Despite its simplicity, plastering work will require considerable physical effort to prepare the solution and apply it. To facilitate the procedure, construction mixers and mechanized laying are used to finish large areas.
To facilitate the application of plaster, mechanized laying is used.
- Presence of “wet processes”. Water acts as a solvent when mixing solutions, giving them proper plasticity. However, after application, the leveling layer must dry well, which in some cases takes several days. Therefore, it is recommended to plan plastering work for the warm season , when drying occurs much faster. Due to significant evaporation of moisture, this finish is not permitted in some rooms.
- Dirt. Cement, water, sand - all these components make the procedure quite dirty. It is a little easier in this regard with gypsum mixtures, however, even when working with them, you need to cover all nearby objects and surfaces well with film. In both cases, the master himself must wear work clothes and protective gloves.
- Low speed. As already mentioned, it usually takes several days for the leveling plaster layer to dry: applying the finish to a wet base is prohibited . In this regard, leveling walls with plasterboard is much more convenient, because subsequent work can be completed immediately.
- Problems with finishing wooden houses. As you know, the main enemy of wood is moisture, so they try not to use plaster on wooden walls .
- Difficulty in laying electrical wiring. Due to the lack of internal voids for laying wires, the plastered wall has to be equipped with grooves, cutting out channels in it using an electric device. Frame finishing is more convenient in this regard: it allows you to lay communications under slabs or panels.
The plaster has to be chipped for electrical wiring
Application
Aligning panel walls will protect them from destruction.
Very often in new buildings partition materials from foam blocks, cinder blocks and bricks are used, less often from monolithic panels. If finishing is not provided, then it is necessary in any case; if it is not done, then leveling will affect:
- Removal of surface defects; seams, cracks, depressions and bulges in the wall will be completely covered.
- Leveling the plane so that the wall is perfectly flat and smooth, ready for finishing.
- Protection from external factors, the walls absorb all the moisture, as a result they gradually collapse, their strength characteristics decrease.
- Without finishing, the quality of the wallpaper will be at a low level; all the imperfections of the wall will be transferred to the relief of the canvas.
After leveling, the walls can be covered with any finishing coating.
Almost half of all residential buildings consist of monolithic panels, at first glance the plane of the walls is even.
But, as practice shows, to obtain first-class quality repairs, ideal wall alignment is not only necessary, but also necessary for:
- Increasing thermal insulation properties. The seams between the panels in a monolithic house shrink over time and begin to show through. In cold weather, heat loss increases several times.
- Increasing moisture protection and sound insulation, the more layers there are on the wall, the less noise from the street will pass through.
- Reducing the likelihood of fungus and mold appearing on the surface.
- To create a complete, durable layer of the wall surface, which eliminates the possibility of deformations, cracks and breaks.
- Opportunities to cover the wall surface with any decorative design (wallpaper, paint, panels, etc.)
If you decide to level the walls with plaster yourself in panel houses, you must follow the basic rules and procedure for performing the work step by step.
In general, the whole process is labor-intensive and precise, but almost anyone can handle this task. You should also understand that it would be more advisable to remove the previous layer of plaster.
When not to plaster walls?
Situations when you can do without plastering walls:
- When decorating walls with clapboard, siding, plastic, etc. In this case, the rough base must be thick and durable.
- Leveling is carried out with plasterboard boards. The requirements for the rough foundation are the same as in the previous case.
- Smooth entire walls made of monolithic concrete or slabs. Before wallpapering or painting, it is enough to putty them.
- Buildings made of quality limestone. This material does not require additional protection, maintaining its original quality for hundreds of years.
Why do you need putty under wallpaper?
Remember what wallpaper used to be like? Paper, with edges that had to be cut off on one side and overlapped. This made it possible not to worry too much about the smoothness of the base; most often, the walls were covered with old newspapers before the final finishing.
Today, old newspapers have already been abandoned, but the unevenness of the walls still requires some tinkering to get the wallpaper to fit as it should. That is why many people prefer to immediately entrust these chores to third-party craftsmen who will do it faster, without unnecessary nerves and with high quality.
Modern wallpaper is glued end to end. And the slightest hole or protrusion at the junction of adjacent canvases leads to a poor-quality seam. Ideally, it should be completely invisible, which is why the base needs to be carefully leveled. But the role of putty is not only this.
Functions of putty
In addition to the final leveling of walls or ceilings, finishing putty allows you to solve other problems, which include:
- Elimination of defects such as cracks, chips, large scratches, etc.;
- Giving the base greater strength;
- Increasing the adhesive properties of the base - its ability to firmly adhere to the finishing coating;
Note. Primer compounds fully possess this property, and in some cases it is enough to use only them if other qualities of the putty are not relevant in your case.
- Reducing the ability of the wall material to absorb moisture. This is important for high-quality wallpaper stickers and allows you to save glue;
- Leveling the surface color. White putty will reliably protect the wallpaper (see Decorating walls with wallpaper in the correct form) from stains that can show through it from an untreated wall.
As you can see, putty has many functions, and any of them can play a decisive role in the quality of the finish.
Results
The question of the advisability of using plaster arises when constructing suburban and private buildings independently. This largely depends on the material of the walls and the type of finishing. It is better to plaster solid brick buildings: this will in any case make them stronger and more durable. As for wooden and frame houses, they try not to use “wet” methods for finishing them.
Why plaster walls: when you need plaster, and when you can do without it
decorative plaster Finishing wall repair Plaster
Combination of different colors and textures
Don't stop at one color. Experiment, and your apartment will sparkle with completely new colors. Concrete goes well with metal, wood and other rough surfaces. If you are a fan of bright colors, then go ahead and use them. But only in reasonable quantities. Dark wood, such as oak, looks best with concrete.
Tools and accessories
It is recommended to plaster walls under wallpaper in an apartment with the preliminary installation of beacons, which simplifies the entire finishing process (especially for novice craftsmen). This feature of applying the finish affects the selection of the tools necessary for successful work. It must contain the following items:
- Container for preparing and maintaining the leveling mixture.
- Spatulas of several sizes, trowel and falcon.
- Typical construction rule and standard float.
- Special marks (beacons) used to level coatings.
- Brushes with soft bristles.
In addition to the mandatory tool kit, the worker will need a step-ladder or portable flooring on strong supports.
Disadvantages when using gypsum plaster
The low strength of the material causes minor inconvenience. This is the main drawback noted by many wall decorators. Unfortunately, gypsum material is more easily subject to mechanical damage.
It was previously mentioned that gypsum plaster can restore the microclimate in a room with high humidity. But prolonged exposure to humid air can have a detrimental effect on the gypsum layer. For this reason, plastering the walls in the bathroom is not recommended. Gypsum is also a poor choice for leveling the walls of building facades.
Another disadvantage is the increased likelihood of rust on metal surfaces. This can be combated by covering metal products with paint or using special alloys.