How to properly lay carpet on linoleum
Are you wondering how to lay carpet over old linoleum? The whole process consists of six stages:
- Take measurements of the area of the part of the apartment in which installation is planned.
- Select and buy carpeting. You need to especially note the characteristics of the product, more about this below.
- Prepare part according to the dimensions of the room, leaving a small margin.
- Treat the floor surface.
- Decide which method to lay carpet over linoleum
- Prepare materials.
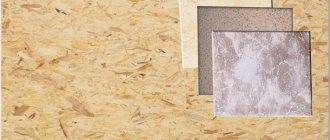
Selecting carpet
Carpet is a flooring material made from synthetic components. There are dozens of options with different compositions in stores. When choosing, contact a consultant at the point of sale, he should advise which model to choose for gluing and which for stretching. This may depend on the strength of the fabric base and elasticity properties.
nuances of choice
The main characteristic is the height and design of the pile. It can be single-level or two-level, and the pile can be either practically invisible with a height of 5 mm, or a “giant” of 40 mm. Here you need to choose based on the purpose of the room. For a nursery, bedroom or living room - it is better to use long pile. A short pile is enough for a balcony or corridor. Also, designs with low pile are chosen by owners of dogs and cats.
Types of carpet by color and pile height Another
characteristic is the color of the floor. It all depends on the design of the room and the personal preferences of its owner. The stores have models in both light and dark shades, there is even carpet with patterns.
Carpet preparation
Even material that has recently been acquired requires simple, simple preparation. Before laying fresh carpet on linoleum, you need time to let it rest. Place the carpet material in the room a few days before installation, this will help it adapt to temperature conditions. After this, you need to cut the material to the appropriate dimensions of the room, do not touch it for 24 hours so that it straightens well.
After spreading, use a utility knife to cut off the remaining
How to lay carpet
The installation algorithm consists of the following stages:
- Take correct measurements.
- Choose a canvas of optimal width.
- Cut the material around the perimeter of the room with a small remainder.
- Treat the floor surface.
- Prepare the carpet and choose a flooring method.
Surface Requirements
The surface must be prepared for better adhesion:
- There should be no unevenness on the linoleum itself - bubbles, swelling, holes and other damage are unacceptable. It must fit tightly to the concrete or be placed on an adhesive base. If there are holes in it, it is necessary to cut out such a section, and put a “patch” of a similar material in its place.
- The surface must be absolutely clean. It is necessary to remove dirt, grease, and dust for proper adhesion of the linoleum to the adhesive base.
- If necessary, the floor must be sanded and the corners and edges of the linoleum glued.
How measurements are taken
The best installation option is a single piece of carpet without joints. To do this, you need to correctly measure the area of the room.
- To get accurate measurements, you need to consider the following factors:
- Asymmetry of the room. Walls and corners may appear proportionally uneven.
- Non-standard premises. If you plan to lay carpet not in a residential area, but, for example, in a store, then you will need a wide canvas. The standard width is usually about four meters. You need to find out in advance about the possible sizes of the material to choose the best option.
- The presence of protrusions and recesses along the perimeter must also be taken into account. Such information will be useful not only for covering the material, but will also help in choosing skirting boards, corners and caps.
The simplest way to measure is to schematically mark the length, width and additional parameters on a sheet of paper. It is also worth adding about ten centimeters to the resulting measurements - this will help avoid difficulties when laying the canvas.
How measurements are taken
In order not to get confused in the data, it is better to sketch a sketch of the floor configuration, on which to note the measurement results
It is advisable to lay carpet in one sheet over the entire floor surface in the room. In order to be able to cover the entire surface without the need to wedge in individual fragments, it is important to take correct measurements, which will help you measure the correct piece of woven material when purchasing it. When taking measurements, the following features should be taken into account:
- geometry of the room (corners are not always straight);
- the presence of niches, other recesses and wall projections;
- recess near the threshold;
- compliance of the room dimensions with the standard dimensions of the carpet fabric.
In order not to get confused in the data, it is better to sketch a sketch of the floor configuration, on which to note the measurement results. Taking into account the possible error in measurements and the geometric nuances of the room, it is advisable to add 5-10 cm to the resulting total length and width, after which the final measurement result will be obtained.
Preparing to lay carpet on a linoleum floor
Before laying carpet on linoleum, you should prepare the subfloor and take the necessary measurements that will help determine the parameters of the carpet patch, since the material must be solid.
Room measurements are carried out as follows:
- all angles are taken into account, sometimes they do not have a right angle, so the diagram of the room should be sketched and all the nuances indicated for accurate cutting of the canvas;
- do not forget about niches, ledges and recesses, especially at the threshold;
- Compare the parameters of the room with the standard size of the carpet; in rare cases, two pieces of covering may be needed.
Do not forget to add 5 to 10 cm of error on each side of the coating; it is better to trim off the excess later.
Advantages and disadvantages of linoleum flooring
Advantages:
- There is no need to additionally dismantle the floor or clean and level the concrete surface.
- There are several installation methods, one of them is gluing with double-sided tape. It's very easy and inexpensive.
- Linoleum has good thermal insulation.
Flaws:
- You cannot lay it on uneven, damaged, poorly fixed, dirty linoleum, otherwise the carpet will lie unevenly, which will make it necessary to eliminate defects and, accordingly, re-install it.
- Under unfavorable factors, linoleum may swell and peel off over time, even if the installation work was carried out in compliance with the necessary rules. Due to this, there is a need for dismantling.
Linoleum: pros and cons of the product
The price of artificial linoleum is very affordable and starts from $30 per m2
- Variety of colors and textures. Linoleum can look like ceramics, wood, marble, water, metal;
- Resistance to abrasion and aesthetic beauty during the entire service life - the design on the material does not disappear;
- Softness. A sheet of linoleum does not creak, like parquet, for example, does not make clicking sounds, like laminate, and is extremely convenient to install;
- Resistant to water. Rotting, mold and other troubles are as bad for real linoleum as for artificial ones. Natural material is treated with impregnations, but there is nothing to rot in artificial material - synthetics completely reject all foreign inclusions;
- Good thermal conductivity. Linoleum floors are quite warm;
- Long service life. Natural material, when properly used, is impeccable for 15-25 years, artificial - at least 10 years;
- Practicality and versatility. The thickness of natural sheets is from 0.8 mm, so the coating is ideal for any floors, while artificial linoleum can be as thick as 0.3 mm, which means it will be convenient on uneven or poorly prepared surfaces.
The product has practically no disadvantages, except:
- Formation of dents. This can be noticed if you move a cabinet that has stood in one place for a couple of years;
- Sensitivity to temperature changes. At -15 and +70 C the coating may begin to warp.
Other activities prior to carpet installation
Before installation, the carpet is left in the room for acclimatization.
If the process of laying carpet flooring is part of a comprehensive renovation of a room, it is necessary to complete other finishing work before laying woven material, so as not to contaminate the carpet during their implementation. You should wait until the applied finishing materials have completely dried and the humidity in the room becomes normal (50-65%).
Before working with carpet fabric, you need to bring it into the room where it will be laid for a day. This is necessary for temperature adaptation of the material and is especially important if work is carried out during the cold season. It is recommended to leave hard carpet in a straightened state after trimming for at least another day, so that the material settles down and finally straightens out. After carrying out the preparatory activities, you can begin to implement one of the methods of laying carpet on laminate or linoleum.
Laying rules
First you need to determine the type, structure and direction of the pile. It is very important to pay attention to the incident light and the presence of the pattern. When assessing, the pile should be in one direction and if there is a pattern, it should match.
Installation requirements:
- To prevent waves from appearing, use glue.
- In addition, due to increased humidity in the room, tubercles may appear.
- Pay attention to how the seams are laid.
- The pattern must match both the width of the floor covering and the length.
- Fix any uneven spots instantly to ensure your carpet lasts for a long time.
- It is necessary to install natural pile carpet very carefully, because it is afraid of adhesive pigments getting into the piles.
overlap
The good thing about this method is that you don’t need to buy anything extra. Unless you want to make the connection more durable and purchase double-sided tape to secure the panels. There is a nuance: with this method, the amount of carpet must be calculated with a margin of about ten to fifteen centimeters for trimming. The operating procedure is as follows:
- Lay the canvas the way it should lie in the final version and overlap the edges of adjacent pieces on top of each other. The overlap should be about ten centimeters.
- At the junction, if desired, place a strip of double-sided tape on the base without removing the top protective layer.
- Place thick cardboard or other similar material along the joint and cut through both overlapping sheets together. The knife must be held at an angle of approximately forty degrees.
Tip: if there is a pattern on the carpet, try to make a joint where it will be least visible - in areas that contrast with each other or in places with the most variegated pattern.
- Next, you should remove the cut off excess, remove the protective paper from the strip of tape and glue both pieces to it, trying to join them as tightly as possible.
- After joining, “comb” the carpet at the joint, making it even less noticeable.
This is the simplest and most effective method for masking joints. In some cases, tape can be replaced with adhesive, but some difficulties may arise here. For example, if it is necessary to remove the old coating, you will have to deal with the glue, which may not be completely cleared from the base or may damage it during cleaning. In addition, glue is used in another joining option, which is carried out using heating.
Parquet: advantages and disadvantages
Parquet or parquet board is the cleanest and most practical material
Parquet or parquet board is the cleanest and most practical material that requires careful handling. With proper care, parquet will last for decades. Made from natural wood, the flooring is distinguished by its excellent aesthetics, practicality and versatility: a good parquet will elevate even a small apartment, you just have to choose it correctly. You can, of course, lay parquet in the kitchen, hallway or on the balcony, but the price and difficulty of maintenance will certainly make you think: good parquet does not come cheap, so the cost of the product starts from $150 per m2.
And now about the advantages:
- Naturalness, environmental friendliness;
- Aesthetics and warmth of natural wood;
- Durability;
- The uniqueness of the design of each element;
- Strength. Parquet doesn’t mind even serious blows, of course, if it’s a natural wood board;
- Variety of colors and shapes.
The coating has many disadvantages:
- Difficulty of care. Cycling, rubbing, oiling - all these procedures are necessary to keep the floor looking beautiful;
- High price;
- Requirement for surface evenness before installation;
- Maintaining a certain temperature and humidity in the room, otherwise the parquet will dry out and begin to creak;
- Not resistant to scratches. If pinpoint impacts do not cause harm, then moving furniture or even putting it in place without special spacers is not recommended.
How to lay carpet over linoleum?
Rolling out the roll and cutting it to fit the size of the room
If the linoleum surface meets the requirements stated above, you can use any of the commonly used methods for laying carpet:
- fixation with double-sided tape;
- stretching on special mounting strips (stretching);
- fixation with special glue.
However, in this case it is preferable to lay it using adhesive tape, and here’s why. Stretching is a labor-intensive method that involves the use of some specific tools, and is considered the domain of professionals. Moreover, laying carpet using the tension method is used when working in rooms with a large floor area and high traffic. Stretching is rarely used to lay carpet in living rooms.
The use of glue is justified when laying carpet in rooms where the floor area exceeds 20 m3. In addition, adhesive mixtures intended for fixing carpet are designed for gluing moisture-absorbing surfaces. The front side of linoleum is not one of these. How this or that special glue will behave in this situation and how effective it will be is unknown.
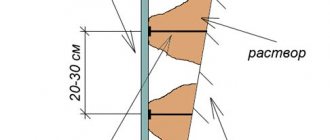
So it is better to lay carpet on the linoleum surface using wide double-sided tape, taking into account the floor area. If it is less than 12 m3, then gluing adhesive tape around the perimeter is sufficient; if it is larger, it is advisable to make additional mounting strips on the floor in increments of 50-70 cm. Although many craftsmen advise, even with a small floor area, to make transverse adhesive strips or a “mesh” of tape
Methods of fixing carpet
Before you start laying carpet, you need to choose one of the methods of attaching it to the base, which for this type of covering can be the following:
- fixing the whole canvas with glue and without glue;
- gluing fragments;
- stretching the canvas onto slats with nails using a special tool (stretching), in which the coating is not attached to the base at all, but is held most securely.
Depending on the chosen fastening method, the carpet is also installed. The cloth purchased in the store needs to be spread on the floor of the room so that it is smoothed and leveled for a couple of days at room temperature.
How to prepare the base before starting work?
Before you begin laying the flooring, you should carefully prepare the base.
If the “base” for the material is concrete, you need to fill in all the unevenness, thoroughly clean and prime the surface. Laying carpet on a concrete floor without treating it with a primer is fraught with the constant “influx” of dust from under the covering - you will have to stand guard almost around the clock with a vacuum cleaner.
As for wooden floors, they can be “treated” in two ways:
- Cover the surface with chipboard sheets, fill the joints, and treat everything with a primer.
- remove protruding parts (nail heads, screws), scrape the surface, prime and fill with self-leveling mixture.
Article on the topic: How to level a floor with plywood: analysis of the device of 3 different options
To prevent the carpet from deteriorating and wearing out, it is advisable to lay a high-quality backing underneath it. It has been proven that it can extend the life of carpet by at least one and a half times. The underlayment gives the surface elasticity and strength, with it the floor will be even warmer and the sound insulation will be even better. This “bonus layer” will help create the effect of a dense and thick carpet, even if the covering itself is thin. The underlay, like carpet, should be purchased with a reserve.
The underlay provides the carpet with additional strength and elasticity, and also significantly extends its service life - by one and a half to two times
Article on the topic: Carpet underlay - a whim or a necessity?
Advice from professionals
The technology for laying carpet is simple. The work can be completed by a person without professional skills. To ensure everything goes well, experts recommend following five simple rules:
- Linoleum must be securely fixed to the floor, without bulges or depressions. The surface is washed and degreased.
- Provide dry air in the room. You can turn on the heater.
- Choose an installation method suitable for specific conditions.
- Upon completion of work, ventilate the room.
- After installation, a lot of trimmed small fibers remain in the pile. They are removed with a vacuum cleaner and a soft brush.
Precise adjustment is carried out when the entire main canvas is securely fixed to the floor. Failure to follow the rules will lead to defects, which cannot always be painlessly corrected.
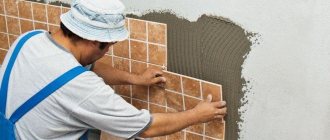
How to glue carpet to linoleum
Oddly enough, but laying carpet on budget brands of linoleum flooring is much simpler and easier than on a commercial or semi-commercial Target. This is explained simply; cheap linoleums have a top facing layer that is regular PVC. There are a dime a dozen adhesive compositions for PVC, however, they are all expensive. The commercial version of the flooring has a much denser top layer, so it is not always possible to lay the carpet with glue.
In any case, experts recommend using polyurethane mastics and adhesive compositions. It can also be laid on water-based, chloroprene and butadiene glue, if the sticker strip is first primed on the back side.
The most difficult stage is rolling to the base
We glue the carpet correctly
To begin with, you can try laying the material on double-sided construction tape; this is both faster and easier than fiddling with polyurethane glue, which often has a very unpleasant odor.
Laying on tape
Double-sided adhesive tape is cut into strips of 1-1.5 m. Working with a whole reel is not very convenient. The strips are glued according to pre-applied markings, without removing the protective film from the front surface. Next, you need to roll out the carpet and lay it on the linoleum according to the marker marks made.
One edge of the cloth is securely fixed with heavy objects, and the carpet itself is rolled up. To lay the material, the roll is gradually rolled out and at the same time the protective coating is removed from the tape. The carpet is straightened, slightly stretched and pressed tightly against the adhesive tape. The installation procedure is carried out according to the scheme, from the entrance to the opposite corner. If you don't rush, the process does not cause any particular difficulties or difficulties.
Laying on tape
Paint sticker
The installation scheme is almost the same. The only difference is the preliminary application of a thin strip of glue to the markings on the linoleum and to the back of the carpet. It is clear that before laying the canvas, you need to make sure that the applied stripes match.
After 1-1.5 hours, the adhesive strip on the floor is re-treated with glue, the floor covering is folded like an accordion and transferred to the wall. Together with an assistant, you need to unroll the carpet, lift it and lay it on top of the linoleum with glue applied.
Advice! If the room is large, it is better to lay the material according to the pattern with tape, but instead of removing the protective film, you will need to apply glue with a brush.
It is believed that it is better to lay carpet with pre-sizing; in this case, the durability and strength of the adhesive seam is 30% higher.
Laying carpet with rubber base
Is it possible to lay carpet over linoleum?
In this case, most often you will hear an affirmative answer. It all depends on the condition of the surface. If, before laying it, the base of the floor is perfectly leveled, and the floor itself maintains an integral structure without damage, then no questions arise. It will be an ideal underlay for carpet flooring. In this case, it’s better not to even spend money on a special substrate.
A coating in good condition that can be used as a base.
When the coating is very tired and has served for decades, its surface almost certainly has damage in the form of cuts and scratches. And the main problem is unevenness; the carpet will probably duplicate the hills and valleys of the floor. In this case, everything needs to be dismantled.
Note! If your house has old, slightly damaged linoleum, but the floor surface is flat, it is better to carry out minor repairs. Glue the seams, sand the surface, and only then begin work.
Advantages and disadvantages
It is possible to install a new carpet base on old linoleum. What benefits can you really get from this, and what problems can you expect?
Pros:
- You will save yourself from additional work on dismantling the old floor;
- You don’t have to work hard to level the surface;
- There are several styling options that you can really handle even without the hands of a master;
- Even old linoleum will create additional protection from moisture and improve heat and sound insulation.
Carpet covering on linoleum - improved insulation
Cons:
- Sometimes installation on a linoleum surface is a bad decision. If the previous floor is too uneven, it is better to remove it and lay a new one on a previously prepared base;
- High humidity, rearranging furniture, and temperature changes lead to swelling of the floor. It will become uneven, you need to remove it.
As we see, there are more positive aspects, and negative ones only relate to situations where there are problems with old linoleum. If you don’t have such problems, then the choice is definitely in favor of flooring on top.
Fixation with glue
This fastening method is used in spacious rooms and where there is a lot of traffic. It consists of distributing the adhesive mixture on the base and the material itself. A positive characteristic of this option is the prevention of folds, swelling and other deformations.
Fixing carpet with glue
Perform work in the following order:
- clean the base from dust and various contaminants;
- Apply the adhesive mixture to the surface using a notched spatula and distribute evenly;
- put the prepared backing; if the room is large, it is glued in parts;
- give time to dry, then roll out the carpet on the floor so that the edges extend to the walls;
- fold the material in half, spread glue on the wrong side of one of the halves;
- place it on the surface and press firmly;
- perform the same actions with the second half;
- pressing the material to the base, cut off excess pieces near the wall;
- adjust the covering under the baseboard using a special tool - a stretcher;
- Attach the plinth to the wall with self-tapping screws.
The advantages of this method include a long period of operation and the ability to perform installation in several panels. The appearance of unsightly folds and bubbles is excluded. The disadvantages are considered to be labor-intensive and the fact that it will not be possible to remove and apply the material again.
If a “warm floor” is installed, it is important to take into account temperature restrictions so that the coating does not collapse.
How to lay linoleum on old parquet
The sequence of actions when laying linoleum depends only on the condition of the old floor covering. Depending on its condition, different methods are used to secure the material to the base, so first you need to carefully inspect all the dies. If the covering is in good condition, you can lay it directly on it. In other cases, sheets of plywood are needed. People who do not know how to properly lay linoleum on old parquet make several mistakes:
- do not use a substrate;
- they forget to eliminate all rotten dies;
- choose a simpler but ineffective installation method.
Each element of the old coating with cracks and fungus must be removed.
In order for the coating to last longer, you need to choose the right option for securing the material.
Laying method on a flat but stepped parquet
Since the tiles of stepped parquet are less than 10 cm wide, a backing must be laid under the linoleum. Such material should not be thicker than the floor covering. In small rooms, the material is not even secured with glue, but is only pressed with baseboards. With this method, it should not “slide” to the side. If the surface is large, you should first attach the underlay to the glue, and then glue the floor covering to it.
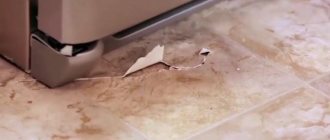
A crease appears on poorly secured linoleum
Such work is carried out only after leveling, sanding and priming the parquet. As a result, the surface should be as smooth as if sheets of cardboard were laid.
Gluing the substrate and linoleum occurs almost the same way. First, glue is applied to the base over an area of no more than 2 meters. Then the material is rolled out and the glued area from the wall is ironed. This is necessary to get rid of bubbles.
If a single piece of linoleum is spread over the entire room, it must be smoothed from one of the walls. When you need to secure 2 sheets, perform a few simple steps to hide the joint:
- lay the sheets so that there is no gap between them;
- after this you need to glue the material with transparent tape along the entire length of the joint;
- then carefully cut the tape in the middle and pour in a small amount of linoleum glue;
- at the last stage all that remains is to smooth out the joint and wait a few minutes.
When the tape is peeled off, the joint will become invisible. For a better idea of how the work happens, it’s worth watching a video on the topic.
Preparing parquet for laying linoleum
Option for laying linoleum on worn parquet
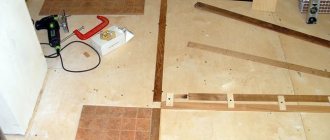
If the parquet is worn out and cannot be sanded smooth over the entire area, use sheets of plywood. They are necessary
After preparing the necessary materials and checking the parquet for mold, you need to perform the work in several stages:
- Secure sheets of plywood or fiberboard one by one with self-tapping screws directly onto the old parquet boards. They need to be laid from the far end of the room, moving towards the opposite wall.
- The gaps that form between the sheets must be filled with sealant. This is necessary to protect the old coating from moisture that may penetrate from above.
After sealing the plywood joints, a backing is laid on the material
- At the next stage, the linoleum is laid without glue so that it stretches.
- At the joints near the walls, excess material should be cut off so that there is a gap of about 1 cm, which will then be covered with a plinth.
- To glue linoleum, you need to roll it up near the wall with the window. When applying glue to its inner surface, you should carefully unwind the material and smooth out any irregularities.
- After this, you need to leave the material for a day and only then fix the plinth.
To prevent signs of wear from appearing on the material, the coating should not be exposed to heavy loads during the first week.
Laying linoleum on damaged parquet
Restoring parquet is not always advisable. However, even with serious damage, laying linoleum will hide all the imperfections. The procedure is quite simple:
- Damaged planks are dismantled using a hammer and chisel.
- The subfloor is cleaned and treated with waterproofing, and a sheathing is created.
- Lay sheets of plywood or fiberboard on the floor, fixing them with self-tapping screws to the old ceiling. All cracks are treated with sealant.
- Spread the linoleum, cutting the edges so that there is a gap of no more than 1 cm between them and the wall.
- Linoleum is placed on the base using glue. The composition is applied from one edge, gradually moving to the opposite side. The material must be smoothed, removing any irregularities.
Installation is complete, but the material is not yet secured with skirting boards
Free fixation
This method is more affordable financially, since you do not have to purchase glue or tape. But in this case, air bubbles and folds may form, which affects the wear resistance of the carpet.
Free fixation of carpet with tape
If there is furniture in the house with wheels, then this method is not suitable, and cleaning with a vacuum cleaner will not work. How the flooring works:
- clean the base from dust;
- lay and secure the substrate using staples, maintaining a distance of 20 cm;
- roll out the material on the surface with a margin of 8 cm on the walls;
- Press the side with the factory edge against the wall and secure it with a plinth;
- In the doorway, press the coating with a special metal plate.
Fixation using tape requires that the base be level. In this case, tape with a width of 60 to 150 mm is used. It is first glued around the perimeter, and then in the form of a lattice along the floor. The squares are made 50 × 50 cm in size, and there is no need to remove the protective paper.
Lay out the carpet with a small margin. The protective paper is removed as the coating is rolled out. Excess material is removed at the junction with the wall. This method allows for gluing and joining several panels together. For carpet, the base can be linoleum or chipboard.
The technology for laying carpet is shown in this video:
Average score of ratings is more than 0
Share link
Comments There are no comments yet, but you could be the first...
Types of adhesives
Most carpet adhesives are universal; they can be used to glue linoleum and other floor coverings. Depending on the composition and principle of action, there are dispersion, two-component adhesives and Velcro adhesives.
Water-dispersed
Advantages
- It's easy to use.
- It can glue not only carpet, but also other materials.
- Incombustible.
- Non-toxic, virtually odorless.
- If PVA accidentally gets on a surface that is not to be glued, you can remove it with a wet rag.
- Compared to other means it is inexpensive.
- PVA glue can be used to glue carpet onto plywood, fiberboard, and other substrates.
- Suitable for substrates with a water-repellent base.
Flaws
- The adhesive joint is exposed to moisture. Cannot be used in rooms with high humidity levels.
- Due to the poor elasticity of the product after drying, the service life of carpets is significantly reduced.
- If you apply too thick a layer of PVA, the strength of the connection between the carpet and the base is reduced, and the coating itself will collapse over time.
- Carpet cannot be installed on a concrete base.
- Pure textile coverings cannot be glued with PVA.
How to join and cut carpet
If the coating is not solid and requires joining, this must be done very carefully in order to make the joint as inconspicuous as possible. The best way looks like this:
- We lay two sheets of overlap in increments of 4–5 cm.
- We glue the carpet around the perimeter, not reaching the edge 3-5 cm.
- We cut the carpet where it overlaps under the ruler.
- We get perfectly matching edges, which we carefully glue and press with a roller.
The question may also arise about how to treat the edges of carpet at home, which after trimming does not look aesthetically pleasing and threatens to unravel over time. There are several solutions to the problem, among which the most correct one is to have it done by a professional overlocker. But if you really want to do it at home, you can finish the edges yourself using thread, a needle and a loop stitch. It is also possible to secure the pile along the edge with thin Velkro.