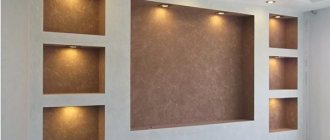
Cladding with plasterboard sheets: advantages
Facing with HA sheets is carried out in the following cases:
- surface leveling;
- improved heat and sound insulation;
- hide wires and pipes;
- surface decoration - creating niches, shelves, design with figured elements.
The plasterboard sheet has a flat surface; when mounted on a wall, it does not deform, but remains flat. This is convenient for subsequent painting, laying tiles, and wallpapering.
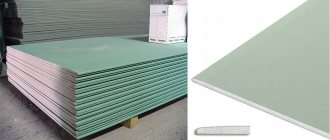
In various rooms with high humidity and high temperatures, the following types of gypsum boards are used:
- An ordinary room with moderate temperature changes is a gray gypsum board sheet.
- Wet room: bathroom, corridor in a private house, balcony, attic, kitchen - green sheet of plasterboard.
- A room with a working fireplace, a Russian stove, with a rough stove - pink gypsum board.
There are methods for attaching sheets to the surface - frame and without frame.
In the first case, profiles are applicable. For the second method, you need to choose the right adhesive composition. Advantages of gluing gypsum board to the surface:
- installation is easy and quick;
- less expensive method compared to frame;
- this method does not take away extra centimeters.
The negative side is the inability to hide wires and communications behind the casing.
Preparing the wall surface
Priming the wall
The base must be level and clean. It should not contain greasy stains or dust. It is best to clean the walls with a slightly damp brush, which will remove most of the dirt. Try to limit the use of chemicals to a minimum, only for removing greasy stains.
Then the wall should be well primed over the entire surface. However, it is not necessary to use expensive primers. Typical popular primers are quite suitable.
Many manufacturers offer primers designed for a specific type of wall (brick, concrete, blocks, etc.). Regardless of the type, it must be remembered that the purpose of using a primer is to equalize the absorbency of the wall over the entire surface and improve the ability to bind it to the adhesive solution.
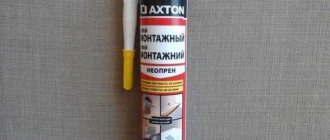
To glue plasterboard sheets, you must use glue (for example, Perlfix) intended for this type of work. They have a composition adapted to the unusual material such as cardboard. A poor choice of adhesive can result in the solution not bonding to the gypsum sheet.
Is it possible to glue on uneven walls?
One simple way to level a “falling” wall is to cover it with plasterboard on a pre-made frame.
If the difference in wall unevenness is small, the method of gluing sheets is used. To use this technology, you need to familiarize yourself with the nuances and rules.
- The type of plaster and adhesive composition must be selected in accordance with the humidity and temperature conditions in the room.
- The frameless method is applicable if the wall has an unevenness of maximum 5 cm.
- When carrying out installation, you must follow the step-by-step instructions in compliance with all the rules.
- To select glue, you need to pay attention to the material of the rough wall.
If you follow all the rules, installing gypsum boards with glue will be easy and will last a long time.
Installing drywall on a wall without a frame
Do you want to line the partitions in your apartment with plasterboard, but it’s a pity to lose precious centimeters that are already missing? Install drywall on unframed walls. This method is even simpler - you don’t have to bother with installing the profile. It will save space and create equally ideal surfaces. Even without extensive experience in repairs, you can cope with this task on your own.
How to choose the right gypsum board adhesive for gluing plaster
Wall covering with plasterboard is carried out by choosing the right adhesive composition. The mixture is selected according to environmental factors. Stroy market offers mixtures:
- Gypsum glue "Perlfix".
- Plaster based on gypsum: “Start”, “Finish”.
- Gypsum-based putty “Knauf-fugen”.
- Tile adhesive "Ceresit -SM 11". This is a cement composition with fillers.
- Silicone sealant made of acrylic and polyurethane, “liquid nails”, assembly adhesive mixture. These mixtures are used for smooth surfaces or for gluing sheet to sheet.
- Polyurethane foam. Select a composition with a “min” coefficient.
Glue selection
Today, several methods are used to install gypsum boards directly on the wall. There is an option with polyurethane foam and self-tapping screws. Plugs with self-tapping screws are installed on the wall, after which holes are drilled in the sheet into which polyurethane foam is poured. The latter, expanding to a level limited by self-tapping screws, secures a sheet of drywall. However, this method is not used often due to its complexity and low predictability of the result.
As for glue, there are universal options, such as Knauf-Perflix, which will be exactly what you need. With its help, you can glue gypsum boards to concrete, aerated concrete, brick and other surfaces. Also popular is Ceresit SM 11, which is equally suitable for plasterboard sheets and tiles.
If you have to glue on a flat concrete surface, then “concrete contact” is best suited. The latter contains particles of sand, which provide roughness, and therefore greater grip, which smooth concrete lacks.
Preparing a plasterboard wall: what is needed?
To fix the gypsum board to the wall, you need materials and tools:
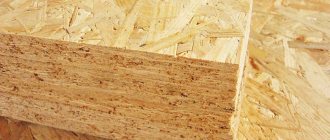
- The selected type of drywall is moisture-resistant, ordinary.
- Dowel-nails, self-tapping screws.
- Selected adhesive for fixing sheets.
- Hammer, construction mixer.
- A plumb line, usually a sharp knife, a level.
- Container for preparing glue, spatula.
- Primer, roller, brush.
After collecting the necessary tools, as well as purchasing all the materials, you need to prepare the rough surface.
- Clean the wall of old cladding, wallpaper, paint.
- Existing cracks must be reinforced and puttied. Seal all holes with cement or gypsum based mortar.
- The surface is coated with a primer.
When the primer dries, gypsum boards are prepared. Holes for switch sockets are cut out in them.
For high-quality wall finishing, you need to properly prepare the adhesive mixture:
- The specified amount of water is poured into a clean container.
- Add a little dry mixture to the water and mix.
- After this, add the specified amount of dry mixture and slowly mix with a mixer.
- After obtaining a homogeneous mass, pour a small amount of PVA into the glue and mix again.
Preparing walls for gluing plasterboard sheets
Before you begin installing drywall without a frame, you need to clean the wall of the old finish.
- It is easier to remove wallpaper with a spatula, after wetting it with water using a sponge or spray bottle. An excellent soaking effect is obtained when using a steam generator.
It is difficult to remove paint from a concrete wall, but it is necessary, otherwise the composition for gluing gypsum boards will either not stick to it or will tear it off from the base. As a result, the sheet will not hold.
- Old plaster is tapped to detect hidden delaminations. Remove damaged and suspicious parts to a solid base.
If the layer of plaster is thick over the entire wall, it makes sense to remove it entirely using a hammer drill or a hammer and chisel. This will help save additional centimeters of usable space.
DIY gluing plaster to the wall: step-by-step guide
Having prepared the rough walls and mortar for fixing the gypsum boards, you can begin installation. There are 3 methods for gluing sheets:
- Apply a continuous layer of glue using a notched trowel. Used for concrete walls.
- Applying glue in small piles.
- Using beacons and lining foam (gypsum pieces). For very uneven walls.
Each method is applicable according to the evenness of the rough wall.
Sticking the first sheets
A sheet of drywall is placed on long wooden slats opposite the place where it will be fixed. An adhesive composition is applied to the sheet in a continuous layer or in piles.
After this, the gypsum board with glue is carefully lifted to the wall. Wires are threaded through the holes. The sheet is raised above the floor by 10mm - for this you can put a piece of drywall. Place it close to the wall and level it. Evenness is measured by level, diagonally, vertically and horizontally. After installation, the plasterboard is pressed against the wall and checked again for evenness. The glued drywall must be secured with supports.
The second sheet is glued only after the glue under the first sheet has set. Equalization follows it.
Plasterboarding corners
Pasting the wall with finishing material begins from the inner corner.
Drywall is glued onto the adjacent wall with an overlap. To paste the outer corner, you need to measure the distance from the corner to the glued sheet and carefully cut off the measured distance from the whole gypsum board. This cut out part with glue is applied to the corner and aligned with a level and plumb line.
The next cut piece is placed on the corner so that it covers the end of the drywall glued to the 900 corner.
Grouting joints
After covering the wall and the glue has completely dried, it is necessary to carry out a series of work to reinforce the joints. For this:
- Cover the entire surface with primer. All joints are primed with a brush.
- After the primer mixture has dried, joint putty is applied to the joints. Reinforcing tape is glued onto it and covered with the same putty on top. If self-tapping screws or dowel-nails were used, then all fasteners are covered with the same solution.
- When the putty has dried, grout with sandpaper to remove all small excess putty particles and smooth out the seams.
The last stage is filling the entire surface and priming before finishing.
Is it possible to glue drywall to the wall and what are the risks?
Installing drywall on a frame is a fairly common occurrence, but there are examples when gypsum boards are simply glued to the walls. Let's consider how rational this installation method is.
Is this installation method acceptable?
Gluing drywall directly to the walls is included in the list of technical solutions from gypsum board manufacturers (for example, from Knauf). Also, this installation method is included in the set of building rules SP 163. 1325800.2014, so formally gluing drywall is allowed. According to the standards, this can be done on flat bases and on walls with differences of up to 40 mm.
Quick installation?
Among the advantages of gluing drywall, they often highlight the speed of installation and the ability to carry out the work on their own without the involvement of specialists. However, not everything is so simple.
Installation on flat surfaces is really fast, and on such surfaces the use of a frame installation method usually does not make sense. Gluing onto flat surfaces is carried out using gypsum putty.
With uneven bases, everything is not so rosy: on surfaces with a difference of more than 20 mm, beacons or preliminary leveling should be used; you will also have to correct wall defects that prevent the installation of beacons. Beacons for these works are cut from sheets of ordinary drywall and placed on small cakes of gypsum glue. The time required to complete the work in this case is no less than with frame installation.
Is it easy to do it yourself?
If we talk about the complexity of installation with your own hands, then everything is the same as in the previous paragraph: gluing it to a flat wall is easier than installing a frame. However, with differences of 20 - 40 mm, problems begin. Before gluing the sheets, you must first work with a level and a rule so that all the beacons are level. This process is actually reminiscent of installing beacons under plaster, and this is not the easiest procedure.
Is the frameless method cheaper?
You can win money only with moderate consumption of gypsum glue. If you do the alignment using plasterboard beacons, the cost will be comparable to the frame installation method.
Possibility of communication and insulation
With a frameless installation method, for laying communications, the walls will need to be tapped, which will affect the speed and complexity of the work. It will also not be possible to make internal insulation.
Features of installation on some materials
Problems can arise when drywall is applied to damp mineral materials. For example, on aerated concrete walls until they dry. If the gypsum board is covered with mineral surfaces on both sides, then unfavorable processes begin to occur inside the cardboard - mold may appear.
Conclusion
Gluing drywall makes sense on flat walls or on surfaces with slight differences. It is more rational to level complex surfaces with strong differences using the frame method.
What properties are inherent in high-quality glue?
To choose a high-quality solution that ensures reliability and long service life of the cladding, pay attention to the following characteristics:
- adhesive properties and rapid adhesion to bonded surfaces: this indicator is of particular importance when installing large, heavy tiles.
- potable period: glue with a short hardening time requires dilution in small portions and high speed, which is not very convenient and can affect the quality of installation;
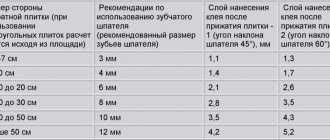
- plasticity: a mixture with a low level is suitable for leveling or laying cladding on inclined bases, a composition with a moderate level is used when installing tiles on flat, smooth surfaces;
- elasticity: under conditions of slight deformation, the cladding will not peel off from the base;
- spreadability: a high level of the indicator allows you to evenly distribute the composition over the base of the floor and fill all unevenness; moderate and low levels should be for compositions intended for wall cladding;
- water resistance: a high-quality mixture retains its performance properties for a long time in conditions of high humidity.
Preparing drywall
Minimum 200 mm above the window
Before you begin gluing, you must cut the drywall correctly. The slabs should have a height less than the height of the wall by about 15-20mm. This will allow you to create a gap between the wall, floor and ceiling. The gaps will allow air to circulate and promote better adhesion of the adhesive solution.
Floor clearance
Ceiling clearance
Gaps are also important due to the sensitivity of the slabs to moisture, which can appear at the junction of the wall and the floor or ceiling. Traditional plasters are more resistant to such moisture.
To install sockets, you need to cut the necessary holes for all sockets and switches (where the so-called “dose boxes” will be). Cutting holes after gluing drywall boards can damage electrical cables and the boxes themselves. Holes are cut adapted to the diameter of the boxes (or a little larger by 5mm). For this purpose, it is worth purchasing so-called “crowns”, mounted on a regular drill or screwdriver. They guarantee the production of round holes with precisely selected diameters.
Strobe for socket box
Can tiles be laid on drywall?
An important condition for performing tile laying work is the absence of height differences and curvature of the base. To level the surface, cement or gypsum mortars, plaster, and also plasterboard are used, onto which various types of cladding are applied, including tiles.
Advantages of laying on drywall:
- leveling the base requires little time;
- reducing glue consumption during installation;
- increasing the speed of work: there is no need to wait for the leveling solution to dry;
- reliability of the cladding: due to the evenness of the surface, the adhesive mixture completely fills the space between the lamella and the wall, so the cladding will hold tightly.
Gluing drywall to plaster
Published on October 27, 2017 in the Walls category // // Author: Admin
- 5
- 4
- 3
- 2
- 1
(0 votes, average: 0 out of 5)
With the help of plasterboard sheets, repair work has become much easier. Even a beginner can cope with this task by following simple instructions. The time required to complete repair work is significantly reduced. GCR can be glued or attached to a special profile frame or adhesive solution. The two methods are extremely clear and differ in the complexity of execution. In the article we will figure out whether it is possible to glue drywall to plaster - both to plastered walls using glue, and to the plaster mixture itself.
Selection of materials
Drywall
For certain types of work, plasterboard sheets are selected based on their purpose:
Depending on the properties, plasterboard can be:
- regular: white or gray, used for finishing work in rooms with moderate temperatures and low humidity levels;
- moisture resistant: green sheets. In the production of the material, additives are used that reduce moisture absorption. Used to decorate walls in the bathroom, kitchen and rooms located in close proximity to bodies of water. The material is able to retain its properties when exposed to humidity up to 80% for no more than 10 hours a day;
- fire-resistant with increased moisture resistance: pink-colored material, installed in rooms with unstable humidity levels and elevated temperatures.
Most often, tiling is done in the bathroom or kitchen, so choose a moisture-resistant material for installation work.
Glue selection
Mixtures for laying lamellas on drywall are presented by manufacturers in the following forms:
- a cement-based composition with the addition of special plasticizers and modifying components that provide the adhesive mass with elasticity, moisture resistance and strength. Used when laying tiles made from natural materials, porcelain stoneware;
- dispersion composition: a gel-like mass that does not require pre-mixing and is used for interior decoration;
- reactive mixture: characterized by very fast and strong adhesion of surfaces, used when facing wooden, plastic or metal bases with ceramic lamellas;
- liquid nails: a composition that provides strong fixation of the bonded surfaces, but is characterized by a short time for possible correction of the tiles and high costs.
How to glue drywall to foam
Drywall on polyurethane foam
- The surface must be clean, free of grease and dirt (dust, old sealants, etc.)
- Old paint, plaster or mortar must be removed and highly absorbent and porous substrates primed with a suitable primer.
- The foam canister must have a temperature greater than 5 °C. Apply foam with a diameter of about 3 cm around the perimeter of the slab, and zigzag through the center.
- Wait about 5 minutes and press the sheet of drywall against the wall. Depending on the external conditions and the weight of the panels, hold for approximately 1 minute, pushing the glued object to the ground.
- Further finishing (puttying of joints) can begin after 60 minutes. Cracks and irregularities can be filled with foam.
Its characteristics are specifically for these works, Perlfix sets (hardens) faster than “Rotband”, which means it is easier to mount gypsum boards on the surface. But if you still decide to Rotband, then the walls must first be cleaned of old whitewash, be sure to be primed and dried, and only after that the gypsum board must be glued. In general, we applied mounting adhesive to the sheet, now we lean it against the wall.
All that remains is to set it level and plane. All those tools are used for this: a level, a mallet and a board. GCR should be knocked out only in those places under which beacons are located.
If you hit anywhere, it’s very easy to get a hole that can’t be fixed. We lean the level (or rule) against the drywall. If we see a bump somewhere, lightly tap it with a mallet through the plywood so as not to nick the sheet. You need to knock lightly and very carefully, because if you overdo it, you will get a depression in this place, and this cannot be corrected - you will have to putty later.
The first video of the profile is of insufficient quality, but in the second I really want to see how single-level connectors will be installed. It is important to use special primers that have deep penetration properties. To problem areas (potholes and dents), apply the plaster in a thin layer several times, not forgetting to let the previous layer dry completely.
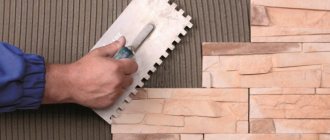
How to glue tiles to drywall?
- after installing the drywall sheets, putty the corners and joints;
- To improve adhesion and reduce adhesive consumption, apply a primer to the base. After 45-60 minutes, cover the surface with a second layer of primer mixture;
- select a scheme for laying lamellas, determine the “zero level”: mark points in the corners of the walls that are equally distant from the floor and use a marking cord to mark the horizontal line of the masonry;
- Apply vertical rows in increments equal to the width of 2 tiles. Control the evenness of the mark with a plumb line;
- count the required number of lamellas (divide the length of the horizontal line by the width of the product);
- lay out the tiles horizontally along the wall: if it becomes necessary to cut the lamella by more than half, start laying from the corner that is visible. Otherwise, install from the central part of the wall;
- Pre-lay out the tiles vertically so that the cut pieces are near the floor;
- fix a wooden strip or metal profile on the line of the beginning of the second row of lamellas;
- prepare the adhesive mixture for work;
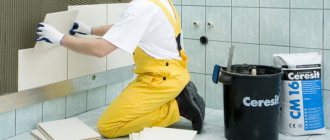
- Apply the solution onto a sheet of drywall using a flat trowel and level the surface with a notched trowel;
- start laying from the second row (on the support rail); Place the product on the adhesive applied to the base and press it with your hands. To install large lamellas, use a rubber hammer;
- lay adjacent tiles vertically and horizontally in the same way, fill the gaps between the tiles with glue;
- insert dividing crosses into the space between the tiles - this will ensure evenness of the seams;
- after completing the laying of the rows above the support rail, dismantle it and make the first row of lamellas;
- wait until the adhesive solution dries, fill the seams with grout (using a rubber spatula, moving from top to bottom), after it hardens, clean the tiles with a dry sponge or rag;
- Apply water-repellent varnish to the seams.
Lay no more than 5 lamellas at one time, after which take a break of 1 hour: this will relieve the tension of the base.
Laying tiles on drywall is a convenient way to perform facing work, which is not much different from installing lamellas on a wall, but is characterized by greater reliability, quality and speed of execution.
What to glue drywall to different surfaces
Drywall can be glued to concrete and brick walls. You just have to figure out which method is more suitable for a particular surface.
Brick wall
There are 3 ways to fix a plasterboard sheet to a brick wall. Each of them has a certain algorithm of actions and some distinctive features.
Method I
It is used if the wall has an unevenness of more than 3 cm. In this case, the amount of glue applied is not so large. In this case, it is best to use gypsum mixtures.
These mixtures have one distinctive property - they dry out quickly. In this case, you should mix a little glue. Basically it should be enough for 1 sheet of drywall.
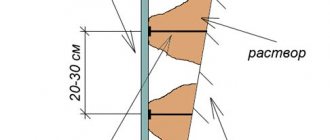
A spot adhesive mixture is applied to the laid sheet. The distance between small piles of glue should be 25 cm.