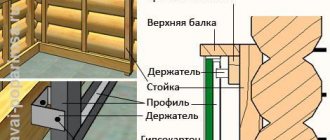
The easiest way to install drywall on uneven walls is to use the framing method. By maintaining the required distance from the load-bearing wall, you can very easily neutralize the factor of even very significant differences.
Scheme for gluing drywall to uneven walls
However, in the case of small rooms, the frame method will “eat up” part of the already limited space, so it is better to use frameless adhesive installation. But before you begin such a seemingly simple job, it’s worth delving into the technologies and methods of wall leveling. How to glue drywall to uneven surfaces?
Cladding with plasterboard sheets: advantages
Facing with HA sheets is carried out in the following cases:
- surface leveling;
- improved heat and sound insulation;
- hide wires and pipes;
- surface decoration - creating niches, shelves, design with figured elements.
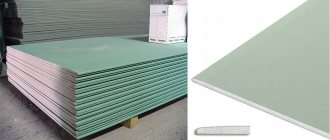
The plasterboard sheet has a flat surface; when mounted on a wall, it does not deform, but remains flat. This is convenient for subsequent painting, laying tiles, and wallpapering.
In various rooms with high humidity and high temperatures, the following types of gypsum boards are used:
- An ordinary room with moderate temperature changes is a gray gypsum board sheet.
- Wet room: bathroom, corridor in a private house, balcony, attic, kitchen - green sheet of plasterboard.
- A room with a working fireplace, a Russian stove, with a rough stove - pink gypsum board.
On the construction market there are types of floor plasterboard and facade plasterboard for outdoor work.
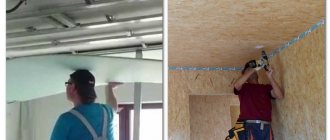
There are methods for attaching sheets to the surface - frame and without frame. In the first case, profiles are applicable. For the second method, you need to choose the right adhesive composition.
Advantages of gluing gypsum board to the surface:
- installation is easy and quick;
- less expensive method compared to frame;
- this method does not take away extra centimeters.
The negative side is the inability to hide wires and communications behind the casing.
Summary. Useful tips
As you can see from the article, gluing drywall to a wall is not that difficult. And with constant practice, frame fastening is even easier and faster.
Depending on the condition of the walls in one room, several different methods can be used. For example, a frame with insulation is made on the external wall of a house, and slabs are simply glued to the internal walls.
For each specific case, use the most suitable option. Do the work slowly. Having previously made all measurements and markings. This way you will save yourself from many mistakes and rework.
Drywall is the material of the future. Easy to use, it retains its qualities for a long time. Don't be afraid to try it once and you will realize that it is comfortable and good material to work with.
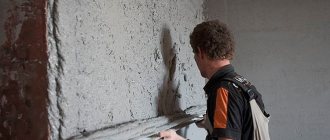
Is it possible to glue on uneven walls?
One simple way to level a “falling” wall is to cover it with plasterboard on a pre-made frame.
If the difference in wall unevenness is small, the method of gluing sheets is used. To use this technology, you need to familiarize yourself with the nuances and rules.
- The type of plaster and adhesive composition must be selected in accordance with the humidity and temperature conditions in the room.
- The frameless method is applicable if the wall has an unevenness of maximum 5 cm.
- When carrying out installation, you must follow the step-by-step instructions in compliance with all the rules.
- To select glue, you need to pay attention to the material of the rough wall.
If you follow all the rules, installing gypsum boards with glue will be easy and will last a long time.
Completion of work
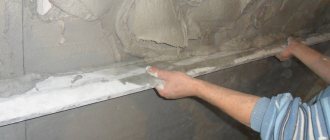
After the adhesive has completely dried, after 2-3 days, start filling the joints: apply putty for leveling, then press the reinforcing tape into it. Once everything is dry, apply another leveling coat of joint compound to the joints and any protruding nail heads (if used).
Puttying gypsum board joints
For leveling, you can use the same mixture that was used for gluing the plasterboard.
Seal gaps along the floor with caulk. Finishing work can begin only after the joints have completely dried.
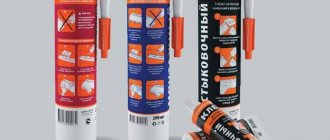
How to choose the right gypsum board adhesive for gluing plaster
Wall covering with plasterboard is carried out by choosing the right adhesive composition. The mixture is selected according to environmental factors. Stroy market offers mixtures:
- Gypsum glue "Perlfix".
- Plaster based on gypsum: “Start”, “Finish”.
- Gypsum-based putty “Knauf-fugen”.
- Tile adhesive "Ceresit -SM 11". This is a cement composition with fillers.
- Silicone sealant made of acrylic and polyurethane, “liquid nails”, assembly adhesive mixture. These mixtures are used for smooth surfaces or for gluing sheet to sheet.
- Polyurethane foam. Select a composition with a “min” coefficient.
Sealants are mainly used on brick, concrete walls, and foam blocks.
Is it possible to glue it to polyurethane foam?
There are 2 ways to glue a sheet of material to the wall on foam:
- First, the gypsum board is attached to the wall with dowel nails, then holes are made and the void under the plaster is filled through them.
- Apply foam to the sheet and stick it to the wall.
First method
The material is placed on a flat horizontal surface. 9-12 holes are drilled in it. After the gypsum board with holes is applied to the wall, all drilled holes are marked with a pencil. The holes for the dowels are brightened on the rough coating.
The GC sheet is secured with dowel nails. There is no need to screw in the screw all the way. It is necessary to achieve evenness of the vertically placed material, so when screwing in, use a level. When the sheet is exposed, foam is injected into the holes.
Second method
If the wall is flat, then the foam is applied to a horizontally lying plasterboard. After this, the sheet is applied to the wall, leveled and pressed to force the foam to adhere to the surface.
Polyurethane foam increases 2-3 times. Therefore, the product with the lowest expansion coefficient is selected, and during drying, the condition of the plasterboard on the wall is constantly checked.
Is it possible to glue gypsum boards to tile adhesive?
GKL is glued with tile adhesive, but if the wall has unevenness up to 1 cm. If the unevenness is more than 1 cm, the adhesive will eventually fall off along with the sheet of drywall.
For greater strength, plasterboard sheets are additionally fixed with self-tapping screws or dowel nails.
If you need to make a double covering of gypsum plasterboard, then when gluing the first layer, apply glue with a thickness of 0.3-0.5 mm, after complete drying, the same amount of glue is applied for the second gypsum board. A prerequisite is additional fixation with self-tapping screws.
Adhesive for foam block walls
The best option for choosing adhesive for a foam block wall is Perlfix. Holes are made in the HA sheet at a distance of 40 cm with a diameter of 2-2.5 cm. The glue is applied to the wall. After which, the gypsum board is immediately glued. Excess glue will come out through the holes made. It is removed with a spatula. In this way, additional reinforcement is achieved.
Made from polystyrene concrete
Polystyrene concrete - made from cement, foam balls, quartz sand and additives. On a wall made of this composition, it is necessary to use cement-based adhesive mixtures with fillers. There is a negative point at the base - it freezes. Therefore, to ensure that the wall finish is held firmly in place, it must be additionally secured with dowel nails.
For wooden walls
The cladding of wooden walls is done in this way:
- Treating wood with an antiseptic agent.
- Setting beacons for the evenness of the applied sheet.
- Holes are made 30 cm from the beacons and a plastic sleeve from the dowel-nail is inserted.
- GK sheets are glued to the adhesive mixture. Additionally fixed with dowel nails.
Attention. Before using glue, you need to coat the rough surface with a primer.
For walls made of brick, concrete
GCRs are attached to brick and concrete walls in 4 ways:
- Fixation with glue.
- Cladding with polyurethane foam.
- Using self-tapping screws.
- Fixing the dowel-nails.
The choice of method depends on the curvature of the wall and humidity.
Concrete wall. Basically it is smooth - cement-based glue is used. For better adhesion, notches are made on the wall, covered with a primer, and then the gypsum board is fixed.
Brick wall. The facing material is fixed using polyurethane foam. Applying foam to the sheet with a snake allows you to control the amount of product applied. After applying the foam to the sheet, wait 2-3 minutes. When the foam begins to expand, the sheet is applied to the wall and leveled.
For mounting on a brick wall, polystyrene foam is used for mounting. It doesn't expand as much as other similar products.
The choice of glue depending on the flatness of the wall
There are three options for surfaces to which plasterboard sheets will be attached:
- flat surface (stone or monolithic plastered walls) with a height difference of no more than 5 mm;
- Brick wall;
- surface with significant unevenness.
Plasterboard can be glued onto a flat wall using almost any adhesive. This can be cement- or gypsum-based adhesive, polyurethane foam, or polymer mastic. The simplest and most affordable method is mounting on polyurethane foam.
For gluing sheets to a completely flat surface, adhesive mastic is suitable. Manufacturers package it in plastic tubes, from which glue is squeezed out using a special gun.
An adhesive composition based on cement or gypsum will need to be diluted with water before use according to the description on the package.
Advice! Before attaching the sheet with a gypsum or cement based adhesive, spray the wall surface with water from a spray bottle.
If the installation of drywall is carried out on a brick wall, then any glue can be used if the masonry is even. For uneven brick surfaces, Perflix is ideal, which is applied to the sheets pointwise along the entire perimeter. The thickness of the glue layer should vary from 5 to 30 mm, the distance between the “dots” should be approximately 30-50 cm.
In order to glue gypsum plasterboard onto an uneven wall, the Knauf-Perlfix adhesive composition is suitable, and the curvature should be no more than 2 cm. If the slope is greater, it is necessary to cut the sheets into strips 10 cm wide and glue them to the wall at intervals of 35 cm at using Fugen putty.
Preparing a plasterboard wall: what is needed?
To fix the gypsum board to the wall, you need materials and tools:
- The selected type of drywall is moisture-resistant, ordinary.
- Dowel-nails, self-tapping screws.
- Selected adhesive for fixing sheets.
- Hammer, construction mixer.
- A plumb line, usually a sharp knife, a level.
- Container for preparing glue, spatula.
- Primer, roller, brush.
After collecting the necessary tools, as well as purchasing all the materials, you need to prepare the rough surface.
- Clean the wall of old cladding, wallpaper, paint.
- Existing cracks must be reinforced and puttied. Seal all holes with cement or gypsum based mortar.
- The surface is coated with a primer.
When the primer dries, gypsum boards are prepared. Holes for switch sockets are cut out in them.
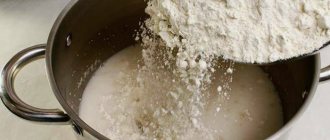
For high-quality wall finishing, you need to properly prepare the adhesive mixture:
- The specified amount of water is poured into a clean container.
- Add a little dry mixture to the water and mix.
- After this, add the specified amount of dry mixture and slowly mix with a mixer.
To obtain a homogeneous mass, you do not need to set the mixer at high speed. This will cause a lot of air bubbles in the solution.
- After obtaining a homogeneous mass, pour a small amount of PVA into the glue and mix again.
After kneading, the solution must stand for at least 5 minutes to completely dissolve the additives and obtain elasticity.
A few words about safety precautions
Working with gypsum boards generates quite a lot of dust. Inhaling it will not add health to anyone, so it is better to protect yourself with a respirator. You should also ensure that dust does not penetrate into living spaces by curtaining the openings with a damp cloth.
As you can see, gluing drywall to a wall with your own hands is not such a difficult task. To do this, it is not necessary to invite a specialist of the appropriate profile. Just be patient and have a little experience, and you will succeed.
DIY gluing plaster to the wall: step-by-step guide
Having prepared the rough walls and mortar for fixing the gypsum boards, you can begin installation. There are 3 methods for gluing sheets:
- Apply a continuous layer of glue using a notched trowel. Used for concrete walls.
- Applying glue in small piles.
- Using beacons and lining foam (gypsum pieces). For very uneven walls.
Each method is applicable according to the evenness of the rough wall.
Sticking the first sheets
A sheet of drywall is placed on long wooden slats opposite the place where it will be fixed. An adhesive composition is applied to the sheet in a continuous layer or in piles.
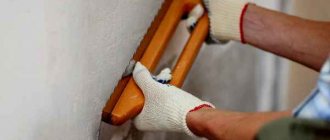
After this, the gypsum board with glue is carefully lifted to the wall. Wires are threaded through the holes. The sheet is raised above the floor by 10mm - for this you can put a piece of drywall. Place it close to the wall and level it. Evenness is measured by level, diagonally, vertically and horizontally. After installation, the plasterboard is pressed against the wall and checked again for evenness. The glued drywall must be secured with supports.
The second sheet is glued only after the glue under the first sheet has set. Equalization follows it.
Plasterboarding corners
Pasting the wall with finishing material begins from the inner corner.
Drywall is glued onto the adjacent wall with an overlap. To paste the outer corner, you need to measure the distance from the corner to the glued sheet and carefully cut off the measured distance from the whole gypsum board. This cut out part with glue is applied to the corner and aligned with a level and plumb line.
The next cut piece is placed on the corner so that it covers the end of the drywall glued to the 900 corner.
Grouting joints
After covering the wall and the glue has completely dried, it is necessary to carry out a series of work to reinforce the joints. For this:
- Cover the entire surface with primer. All joints are primed with a brush.
- After the primer mixture has dried, joint putty is applied to the joints. Reinforcing tape is glued onto it and covered with the same putty on top. If self-tapping screws or dowel-nails were used, then all fasteners are covered with the same solution.
- When the putty has dried, grout with sandpaper to remove all small excess putty particles and smooth out the seams.
The last stage is filling the entire surface and priming before finishing.
Requirements for the base before finishing with dry plaster
Since drywall is attached with gypsum glue using the adhesive method, the wall must provide reliable adhesion to it. The adhesive method is primarily used for finishing walls made of masonry materials (brick, porous ceramics, aerated concrete, etc.). Such bases have high adhesion to gypsum glue. However, they must be clean and dust-free.
When decorating a new room, preparing the foundation usually does not pose any problems, but with old walls you have to work hard. Old plaster need not be removed only if it is not thick and holds very firmly. To check how well it holds, you need to tap the wall. If at the same time an empty sound is heard, then such a foundation is not reliable. Sheets of plasterboard glued to it may come off along with the plaster. There is only one way out - knock down the old plaster. Sometimes a void sound is heard only in a limited area of the wall. In this case, you can remove only this area, and then plaster it again. Under no circumstances should drywall be glued to walls with clay plaster. It must be removed to a solid base.
To improve adhesion, the base should be pre-primed. However, there are gypsum adhesives that do not require primer, as stated on their packaging.
Before gluing the plates, it is necessary to install the electrical wiring, and make holes in the plates themselves for the terminals.
The glue is applied in three rows: one row - dotted in the middle and in the form of stripes - along the edges. A separate strip is applied along the bottom edge. The diameter of the cake and the width of the strip are approximately the same - approximately 10 cm. Some people apply only cakes - this option is also acceptable. If the slabs are thick, then the cakes should be applied in four rows.