The process of installing light objects on a gypsum board wall
You can hang a picture using dowels. Here it is also worth considering the size and weight of the canvas. Installation is carried out as follows:
- If it is a light and small canvas, then we will use a self-adhesive hook on which the picture is hung;
- If the canvas is large and heavy: use a magnet to find a metal profile;
- the central place where the painting will be located and a hole will be made with a drill is covered with masking tape (10 cm long) so that there is no micro-destruction of the drywall;
- the hole should be drilled until the drill enters the profile;
- Next, you should remove the tape;
- an anchor or dowel is driven into the hole;
- the screw is screwed in, but not completely;
- A picture is hung on this screw.
The weight is removed from the drywall and transferred to the profile. This is the best option for hanging a picture or hanger on a plasterboard wall.
Options for attaching lightweight objects to drywall There are several other ways you can hang a shelf on a drywall wall.
Method 1 – glue
Before you hang shelves on a plasterboard wall, you need to know the weight of the item. If it is heavy, then this method may not be suitable. To hang, for example, a shelf for decorative elements you need:
- Make markings on the wall for the item to be mounted.
- Apply a layer of contact glue to the markings.
- The glue is applied to the interior part.
- The object is pressed against the wall with some force (not too much, so as not to break the drywall).
- Wait some time for the adhesive to set.
It is worth remembering that the glued part should not be loaded with unnecessary things, as it may break.
Method 2 - self-tapping screws
When using self-tapping screws, you need to know what parts are needed for fastening.
If the precise location of the metal profiles is known, then the corresponding screws are needed. But if the interior part will be attached to drywall, then black self-tapping screws are selected. It is best to choose long self-tapping screws so that they go through the thickness of the plasterboard and catch on a metal profile or wooden beam. Algorithm of actions:
- Decide on the installation location.
- Mark on the wall all the necessary fastening points and lines along which the part will be hung.
- Place the object against the wall along the lines evenly and tighten the screws at the previously marked points.
Self-tapping screws are not screwed in twice; this will destroy the structure of the gypsum board. Also, do not overtighten the screws - the drywall may burst.
Method 3 – dowels
This method is chosen when hanging heavier structures. Hanging a mirror on a plasterboard wall is not difficult using this method.
- Double-sided tape. If the mirror is small and light, then tape is glued to the back of the mirror along all the borders and with a cross in the middle.
- Liquid nails or glue. Weight up to 20 kg is allowed in this method. Apply to the mounting location on the wall and to the back of the mirror. It is worth considering that the glue can come out beyond the object when pressed, so it should be applied not to the edges, but a little deeper.
If a mirror or other structure weighs more than 20 kg, then “butterflies” and anchor bolts are used.
Mounting on a mortgage
The most reliable and versatile way to attach heavy shelves . By using this method, you can be absolutely sure of the reliability of the structure, but you need to decide in advance where the shelves will be located.
Embed created during installation of a frame for a plasterboard wall
So:
- even before installing plasterboard for a plasterboard wall, you need to decide on the location of the interior elements;
- a mortgage is mounted - it can be a reinforced metal profile or a wooden block that is screwed to the base;
- on the plasterboard with which the frame is sheathed, marks are placed at the locations of the mortgages;
A mortgage made of metal profiles can be found using a magnet - after finishing the wall, level marks are applied;
- The shelves are installed according to the marks and screwed with screws of the appropriate length, as well as their intended purpose (for metal structures or wood).
shelves mounted on a mortgage have high strength and can withstand a lot of weight.
Mounting on a mortgage is the most acceptable option for hanging a heavy shelf. Even if you decide to rearrange the room, then the shelf can be easily dismantled, and the holes in the place of the screws will be practically invisible. In extreme cases, it will not be difficult to disguise them.
The shelves vary in appearance and assigned functions.
Which method is more suitable for hanging a shelf on drywall is an individual matter. Each person chooses the purpose of the shelf himself. The main thing is to consider the weight of the structure with objects on it.
Watch the video: detailed instructions for attaching shelves to plasterboard walls.
Hanging a shelf on a tile
Decorating a bathroom with PVC wall panels with your own hands
Hanging a shelf in the bathroom is sometimes problematic, since most of them are tiled. and she is quite fragile. It cracks very easily if you drill into it. So how can you not only hang shelves beautifully, but also leave the tiles intact?
To do this we need a standard drill or hammer drill, dowels and screws. But the drills must be purchased with carbide surfacing. Thus, when you begin the drilling process, carefully remove the glaze from the tile and drill through the core of the tile at low speed with the tool, preferably without pressing too hard. After the tiles are drilled, take a drill of a smaller diameter and fully pierce the wall to the size you need. Next, all that remains is to install the dowel and screw the shelf with self-tapping screws.
Transparent shelf hung on tiles
It is important to note that you can hang a shelf on the tiles using suction cups. However, you should remember that you should not place too heavy things on it, as it may come loose from time to time.
Installation of light shelves
Self-tapping screws
Small shelf on the wall
The lighter the object, the easier it is to hang it on a gypsum wall - this is an axiom.
That is why the most ordinary self-tapping screws are used to fasten decorative elements that do not bear virtually any load:
- Having marked on the wall the point where the fastening will be located, we attach a self-tapping screw to it and screw it into the plasterboard at low speed with a screwdriver.
- After this, trying not to widen the hole more than necessary, unscrew the screw back.
- Fill the screw socket with glue or acrylic-based sealant and return the screw to its place.
This combined fastening allows you to securely fix light shelves, which will become an excellent decoration for your interior design. If the shelf has a large mass, use special fasteners.
Dowel "Driva" and analogues
One of the most popular fasteners for fixing shelves and small wall cabinets on gypsum plasterboard is the Driva dowel (pictured):
"Driva" in working position
- “Driva” is a self-tapping metal or plastic sleeve with a rare high thread.
- A steel locking screw is responsible for fixation in the gypsum plasterboard sheathing.
- When fastening, “Driva” is installed in the selected location and tightened using a screwdriver. Then a locking screw is inserted into the socket, which we tighten, securely fixing the dowel in the core of the plasterboard.
Advice! If the fastening is carried out in sheathing with a thickness of more than 15 mm, before hanging the shelves on plasterboard, you should drill a hole with a diameter of 8 mm and only then install the Driva dowel. This will help avoid deformation of the wall sheathing.
Analogues of "Driva" are polymer dowels. They are installed in a pre-drilled hole and tightened with a self-tapping screw, deforming and securely fastening into the casing. The price of these elements depends on their design, as well as the material from which they are made.
Fastening the shelf with dowel nails
How to attach drywall dowels - All about drywall
This method is applicable if the load on the shelf is small, but at the same time, fastening with glue is not suitable. Fasteners are selected based on the location of the structure:
- The plasterboard wall has a wooden frame.
- A gypsum board wall contains metal elements.
- The surface was leveled with plasterboard using a frameless method.
Depending on the weight of the shelf, different types of dowels are applicable
. Installation algorithm:
- Choose a place for the shelf; it is advisable that the fastening is on the sheathing: vertical or horizontal;
- Apply markings. To do this, you will need a simple pencil or chalk (the drawing instrument should be easily erasable). You will need a level to ensure the item is mounted evenly.
- Place the shelf against the marks, check the levelness and height from the floor (comfort of use).
- Using a drill, you need to make a hole with a diameter that matches the size of the dowel.
- Using a hammer, carefully insert the dowel into the hole you made.
- After this, fix the shelf with a self-tapping screw. If it is hung with hidden hooks, then after completely screwing in the self-tapping screw to the head, use a screwdriver to unscrew the fastener 2 turns. Hang the shelf on this fastener.
After installation, the shelf can be used depending on its purpose.
For lightweight structures
Method 1. Adhesive installation
Once the paneling and finishing are complete, we may be wondering how to attach a shelf to a drywall wall. The problem is that drywall is a rather fragile material, and therefore it will crumble under load. This means that when hanging shelves we will have to use a variety of devices that will allow us to compensate for this shortcoming of drywall.
Such shelves can be attached with glue
The choice of fastening method directly depends on two parameters:
- The weight of the shelf itself.
- The planned load on it.
We will build on them when planning our work.
This composition is quite suitable!
For decorative shelves, stands for small photographs or keys in the hallway, you can use adhesive mounting. This method is the easiest to implement:
- We apply markings on the wall for installing a decorative object.
- Following the markings, apply a thin layer of contact adhesive to the surface covered with gypsum board.
- Apply the same layer of glue to the back of the shelf.
- Let the glue sit for some time (depending on the type of composition) and press the shelf against the wall. The pressure should be tight, but not too tight: it is advisable to dose the force so as not to crush the drywall.
If you don't put too much pressure on it, the glue will hold!
The described method requires virtually no labor costs, but its reliability is low.
Method 2. Fastening with screws
If we are dealing with a structure whose mass is small, but does not allow the use of the adhesive method, we can simply fix the shelf with self-tapping screws. The choice of fasteners depends on where we will carry out the work:
If you don’t load it, then a shelf like the one in the photo holds perfectly on four self-tapping screws
- if the shelf will be installed simply in drywall or in a wooden frame element, then we use wood screws (black);
Such fasteners hold well in a gypsum layer or in a wooden frame
- if the position of the shelf can be adjusted so that the fasteners fit into the metal profile under the casing, we use metal screws with a drill.
The length of the self-tapping screw must be sufficient to completely go through the gypsum board and penetrate into the wooden beam or steel profile. For single-layer sheathing, it is advisable to use elements from 25–35 mm.
The instructions for performing the work are extremely simple:
The fastener with the drill is well fixed in the metal profile
- Select the installation location. As I noted above, it is desirable that the fasteners fall either into the vertical posts of the frame or into the horizontal cross members.
- We put marks on the wall.
- Place the shelf against the wall and tighten the screws according to the marks. It is advisable to use a screwdriver: this way the hole will not “break”.
The correct screw depth will ensure a secure fit.
If tightened too tightly, the reliability of the fastening may decrease due to the integrity of the cardboard layer. And it is also undesirable to unscrew the screws and re-tighten them back: the thread destroys the plaster, and when re-attached it will hold much worse.
For heavier shelves
Method 3. Expansion and drop-down dowels
DIY wall shelves
Now let's figure out how to hang a heavy shelf. Here, ordinary self-tapping screws are not enough - it is advisable to either use special dowels or solve the problem in other ways.
Let's start with a description of special fasteners - fortunately, they are available on the market in a fairly wide range:
| Illustration | Maximum load per point, kg | Name and operating principle |
| 6–12 | Butterfly. A lightweight, two-blade dowel that fits into a pre-drilled hole. When the locking screw is tightened, the blades open and are pressed against the skin from the inside. | |
| 20–30 | Driva Plastic or metal dowel with deep thread. Installed by screwing it into drywall along a starting hole with a diameter of 5–6 mm. Fixation is ensured by spiral blades, which, when the locking screw is screwed in, expand inside the plaster layer. | |
| 15–16 | Fischer Pd It is made of plastic, consists of a sleeve with a massive end. When tightening the fastener, the end stop is pressed into the sleeve, opening it and pushing it apart into the drywall. | |
| Up to 50 | Molly Probably the most popular type of fastener. It is installed in a hole with a diameter of 8–10 mm, while the teeth on the neck are stuck into the drywall. When the locking screw is tightened, the inside of the dowel opens, pressing tightly against the gypsum board and distributing the load from the hung shelf over a sufficiently large area. |
Perhaps the described mounts have one significant drawback - a rather high price. But if we consider that to hang a shelf we need only a few of these dowels, then this drawback can be considered insignificant.
Method 4. Through anchor
However, sometimes you have to decide how to screw a shelf to drywall if the load on it is high, and it’s not possible to use a special dowel. This situation arises, for example, when there is a minimum gap between the sheathing and the wall, which does not allow the installation of a spacer sleeve.
Here you can do it like this:
- First, using a drill or screwdriver with a drill bit installed, we make holes in the plasterboard sheathing. The diameter of the holes must be equal to the diameter of the fasteners used.
- Then we replace the drill with a hammer drill and use a drill to make a socket for the anchor sleeve in the load-bearing wall. The depth of the nest must be no less than the distance from the load-bearing wall to the outer surface of the gypsum board.
- We insert an anchor sleeve made of durable plastic or metal into the drilled hole.
- We fix the sleeve with a locking screw with a head or hook. When screwed, the sleeve will gradually open, and most of the load will fall on the main wall.
When implementing this method with your own hands, it is worth keeping in mind that both when drilling a nest with a hammer drill and when hanging a shelf, the hole in the gypsum board will increase slightly. So it’s worth installing fasteners in advance - then at the finishing stage we will be able to mask any defects that have arisen.
Method 5. Mortgage
And finally, a universal answer to the question of how to fix a shelf on drywall. If you want the suspended structure to hold tightly, it is better to provide for its installation in advance:
- When installing the frame for gypsum board sheathing, we select a place on the wall for installing a shelf.
- In the selected location, we attach a wooden beam or a thick board to the main wall with anchors. We select the thickness of the element so that the gap between its surface and the back of the plasterboard sheathing is minimal.
- After sheathing, we find the mortgage (using marks or tapping the drywall). We hang the shelf on ordinary self-tapping screws, screwing them through the gypsum board into the wood to a depth of at least 40 mm.
- If the shelf is heavy, we use the method described in the previous section. The use of an embedded beam will not only not interfere with the installation of through anchors, but will also strengthen the fastening unit.
How to attach a heavy shelf or hanger to a plasterboard wall?
Do-it-yourself installation of objects that exert a significant load is much more difficult. In such a situation, hidden mortgages are preferable. If they are absent, it is important to choose the right fixing fittings.
Using Molly
Molly is a fairly popular solution that allows you to hang a shelf for books or dishes, as well as a small cabinet. The fastener consists of a metal sleeve and a screw.
Installation technology:
- You need to make sure that the threaded element screws in without problems. A hole is drilled according to the diameter of the main part.
- A metal part is carefully driven into the seat. This fragment has two teeth on the neck, which must be completely recessed into the surface, which will prevent the sleeve from twisting during installation.
- The remaining fastening points are prepared in the same way.
- A washer is put on the screw, and the object being hung is screwed to the wall. Fixation is achieved due to the fact that several legs on the reverse side open and rest against the drywall.
“Molly” has proven itself especially well when used for through fixation to drywall through a metal profile, when the legs of the anchor on the reverse side rest against the body of the metal structure.
The last stage of fastening will require little effort. It is taken into account that the mounted object must be held until all screws are completely screwed in. If possible, installation is carried out directly through the back wall of the cabinet, if there is a special mounting for this.
Through anchors
This method provides the greatest reliability if there are concrete or brick walls under the plasterboard. It is better to use metal options.
Process diagram:
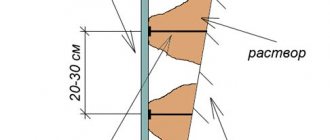
- A suitable size product is selected. The length is calculated from the thickness of the slab and the frame space data, multiplied by two. The fact is that the penetration into the supporting wall cannot be less than the size under the gypsum board.
- A hole of the required diameter is drilled in the plasterboard surface, after which a seat is formed at the base. A drill is used for this.
- The metal sleeve, which should fit flush, becomes clogged.
- A mounting bolt with a head or hook is screwed in, onto which you can attach the desired item.
When fixing through plasterboard to a load-bearing main wall, a stud 8–12 mm thick is used, and the depth of immersion of the stud into the base should be equal to the distance from the plasterboard to the wall
. The required result is achieved only with the correct choice of the size of the fixing product and accurate installation.
Finishing
To give the structure a finished look, the surface is finished. To do this you need:
- Initially, it is necessary to apply a primer to the drywall so that the putty material adheres firmly to the surface. The primer is applied with a spatula in a thin layer.
- The first layer of putty is applied to the drywall with a spatula; it should be of such thickness as to hide all the seams, the caps of the screws recessed into the gypsum board, and the joints between the sheets. Simply put, the result is a homogeneous structure without protrusions and depressions on the surface.
- The first layer is sanded off with sandpaper to ensure a smooth surface.
- Then apply a thin second layer of putty with a spatula. When the material has hardened, they begin the final stage of the process - painting the drywall or gluing it.
You can create different designs for plasterboard shelves. Some build lighting fixtures into the structure, others decorate it with multi-colored glass. In any case, by creating a niche from plasterboard with your own hands, a person opens up the chance to organize the interior according to his own ideas and ideas.
How and how to screw a shelf to a plasterboard wall
Reading time:
Drywall is increasingly being used to decorate walls. The material has proven itself well: it is easy to work with, and the appearance is quite decent.
Walls are often built from plasterboard.
At the same time, the question arises about attaching various objects to plasterboard walls: how to do it firmly and beautifully.
- Mounting features
- How to Attach a Heavy Shelf Anchor Bolts
Installing a heavy shelf on drywall
It will not be possible to secure a heavy shelf structure to drywall using the usual method (described above). This is due to the fact that the significant weight of the product will simply destroy the wall finishing material, which will not only spoil the mood and overall interior of the room, but will also require additional financial costs for the restoration of the gypsum board wall. To attach a heavy shelf to a plasterboard wall, there is a special method - mounting the structure on a metal sheathing profile through plasterboard, using special fasteners.
Installing a heavy shelf on drywall
The design of the dowel prevents it from unscrewing spontaneously and ensures fastening without straining.
- Drill a hole in the required section of the wall, through the gypsum board and the profile on which it is attached.
- Insert a dowel or butterfly into the resulting hole - determined by the type of structure, as well as the screw itself with the main fastening for the future hanging shelf.
- Clamp everything with a certain force - the main thing is that the pressure exerted on the plasterboard wall does not destroy it, and that the installed fastener can withstand the weight of the suspended shelf.
To carry out this work, the same tools and materials are required as in the above-described method of installing a light-weight shelf. The only difference is the technology of the process itself.
There is another fairly popular method for installing a shelf on drywall:
An anchor bolt is good for hanging a cabinet or shelf that will bear a serious load.
This method involves the use of anchor bolts, but this fastening option is used only in extreme cases. The principle of operation of this method is that the shelf is attached to the plasterboard directly through the main wall and the plasterboard sheathing. This is quite reliable, but it is quite difficult to dismantle a shelf installed using this method if necessary.
- It is necessary to drill holes in the drywall for subsequent installation of anchor bolts in those areas where the further location of the shelf is planned.
- Then, through the prepared holes in the main wall, you need to make holes of the required length - in the panel of the house, etc.
- Next, through the holes made, the anchor is installed in the wall and clamped. The anchor used can either act as a high-quality and reliable fastening or hold a bracket and hook for a hanging shelf.
Required tools:
- anchor bolts in sufficient quantity;
- drill;
- fasteners;
- bracket or hook (if necessary).
For this method, you can also use dowels - driva, which are mounted in the wall and hold the shelf perfectly. But it is worth considering that this method of installing a suspended structure on plasterboard is only possible if the gypsum plasterboard wall is mounted on a metal frame, and the plasterboard itself is simply glued to the surface. If there is a significant distance between the main wall and the dowel, the use of anchor bolts is considered optimal.
Important: when working with gypsum plasterboard sheets and placing various suspended structures on their surface, it is imperative to take correct measurements, since an incorrectly selected length of a screw in a dowel or self-tapping screw can cause a poor-quality final result of the work. Accordingly, everything will have to be redone
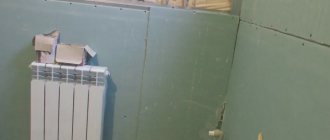
Installing a water heater on a plasterboard wall
A boiler is a device that weighs quite a lot. Therefore, you need to choose a method of hanging on a plasterboard wall for heavy things.
The best option is to find a way to use brackets purchased specifically for the boiler and mount them directly to the concrete wall.
If this option is not suitable, all that remains is to look for a way out and mount the boiler directly on the plasterboard wall. It is important to understand that not a single plasterboard wall can support the entire large boiler filled with water, so the task comes down to distributing the weight of the boiler over several attachment points.
It is best to fix the boiler in a corner so that you can attach it to two walls at once. In addition, you can organize an additional shelf under the boiler that will hold it, thereby reducing the load on other fasteners. When attaching to the wall, it is important to find the places where the guides pass under the gypsum board and mount them there.
And the most reliable mounting alternative if you cannot mount it to the wall is to mount it to the ceiling. If your ceiling is still concrete, then this is an excellent opportunity to make a reliable installation to it. An example of such a mount is shown below.
Installation of decorative shelves and paintings
Heavier objects should be hung using special fastening devices.
Up to 10 kilograms
With such a load on the plasterboard surface, the ideal solution would be to use a “butterfly”. This option is a dowel consisting of a plastic sleeve with two spread legs on a rod and a threaded screw.
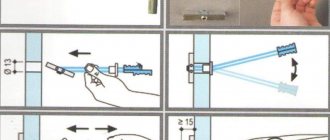
The product is attached according to the following diagram:
Based on the size of the sleeve, a suitable drill bit for a screwdriver or drill is selected. Mounting points are outlined. The tool attachment is directed strictly perpendicularly. The resulting hole should be smooth, without deformation of the edges
To prevent such damage, you need to correctly set the power of the drill. The legs of the plastic element are straightened, and the sleeve is carefully inserted. It is not recommended to press hard, as the gypsum board may be damaged. To completely sink the product, a hammer is used, since there are two protrusions at the neck that fix the position of the part. The screw is screwed in
Due to this, on the reverse side the paws rest against the sheet.
After installing all the mounting points, you can hang a picture or mirror.
To use a standard butterfly mount in a plasterboard wall, you need to drill a hole with a diameter of 8 mm
Up to 30 kilograms
It is recommended to fasten massive objects that create a load of up to 25–30 kg per fixation point using a special dowel - Driva. Its structure is similar to the previous version, but the plastic element has a “snail” shape. The part is equipped with a sharp tip and thread located on the surface of the body. A special screw is used for fixation.
Fastening a shelf or other item is carried out according to the following algorithm:
- Installation points are marked and holes with a diameter of 6 mm are drilled. It is taken into account that the seat must be exactly perpendicular to the surface.
- After preparation, you need to screw on the plastic elements. This will require some effort, because the snail thread cuts into the structure. A screwdriver will make the process much easier. The neck of the dowel should be almost in the same plane with the wall.
- Depending on the fastening device of the item being hung, installation occurs by installing and tightening the screw.
Driva fastener installation diagram
It is taken into account that Driva is divided into categories: for plasterboard bases, plastic options are recommended, since metal ones do not provide reliable installation into such a surface.
Methods for attaching lightweight objects to drywall
If it is necessary to install elements that do not create a serious load, ordinary self-tapping screws are used. There are two fixation options.
Method No. 1
The simplest technology:
- The area on which it is planned to hang the object is determined.
- Based on the frame diagram, you need to find the nearest rack profiles and jumpers. If you don't have a detailed plan, you can use a large magnet.
- If possible, the position of the element on the surface is adjusted. It is desirable that of the two fastening points, one is on the sheathing part.
- For fixation, special screws are used, which are selected depending on the frame material.
A self-tapping screw screwed into a wall profile can easily support small paintings and other similar objects.
It is more difficult to detect a wooden beam under drywall; for this, you can use tapping.
Method No. 2
This method is not complicated, but does not always guarantee the desired result. Algorithm of actions:
- A hole is drilled into the surface slightly smaller than the shaft of the selected screw.
- The space is filled with elastic putty.
- After the solution has set a little, carefully screw in the self-tapping screw.
- If a small area near the surface is open, then grease it a little.
- After the mixture has completely dried, you can attach a lightweight object to a plasterboard slab.
It is taken into account that this method does not ensure the preservation of the position of the element if it is affected.
On a note! An excellent option is to use a dowel-nail, the sleeve of which is selected according to the thickness of the sheet. An alternative is to create an independent seat from a wooden chopstick.
Planting on a solution, just like the use of conventional dowel-nails, is justified only in the case of fixation on two- or three-layer drywall, but in any case, the maximum for such a suspension is 5 - 7 kg
How to hang a shelf
The ideal situation is when it is known in advance where shelves, hanging furniture or various hanging equipment will be located. In this case, reinforcement in the frame for plasterboard can be provided in the form of additional profiles (metal or wooden vertical posts), to which anything can subsequently be attached.
However, of course, it is impossible to foresee everything in advance. It often happens that after installing a plasterboard partition or wall covering, after some time it becomes necessary to fix something on them. This is where you have to rack your brains about how to do this without dismantling half the wall.
There are several options. The most successful case is when a metal profile was used for the frame; it was installed correctly and efficiently in accordance with all standards. That is, you can attach shelves to it, but finding it inside the wall is quite difficult. The issue can be solved very simply with the help of a magnet. You need to hold a magnet along the wall and try to catch in which area the metal mass acts on it.
If the drywall was attached to walls without a profile, or the profile is not too wide, you can use fairly long dowels. But at the same time, it is very desirable to know how thick the plasterboard structure is in order to choose the right size of dowels. The dowel must enter the wall to a sufficient depth so that all the load that will subsequently fall on it is transferred to the wall, but not to the drywall.
The most difficult case is when the frame for drywall was made of wooden slats of low strength, and it is necessary to hang heavy shelves loaded with books or heavy attachments on the wall. In principle, there are not many options on how to solve this problem. It is best to build a support for furniture or equipment to relieve the load on the plasterboard wall. The support can be made of any durable material. This could be a wooden cabinet, for example, or a structure made of chrome pipes.
By the way, small decorative shelves or other lightweight elements can be attached directly to drywall. But this will require a fastener specially designed for such cases, known as a “butterfly”. In fact, this is a non-standard dowel, which, as it is screwed in, opens inside the material, due to which it sits in it quite tightly and firmly
When using such a dowel, it is very important to choose the right drill, select a dowel of the exact size for it, and all work must be done as carefully as possible
How to choose the right mount
Naturally, many controversial issues arise here. But first you need to decide on the weight and size of the shelf, its design and method of operation. And only after that make a conclusion about which method is right for you.
- If you are going to arrange a small shelf, for example, a shelf for a light painting or photo frame, you can secure the shelf with dowels directly to the gypsum board;
- If the goal is a shelf whose depth is more than 10 cm, but at the same time it is intended for books at most, the method of fastening to profiles is suitable;
- If heavy or expensive fragile objects will be placed on the shelf, it is better to play it safe and attach it to the wall.
But if there is no uncertainty about how the shelf will be used, undoubtedly, the choice should be the most reliable anchor method.
Lightweight shelf on plasterboard
A decorative shelf that does not have much weight can be attached to drywall without difficulty. To do this, you need to find a special kind of dowels in the store, which craftsmen began to call “butterfly”. Such dowels are sold everywhere, so purchasing them will not be a problem.
Dowels of this type are ideal for attaching not only light shelves, but also anything that might need to be hung on drywall. There is only one limitation - furniture, mirror, decoration or anything else should not be heavy.
The butterfly dowel is easy to use. First you need to mark the structure for future fasteners. After this, the drywall is drilled through. The dowels in question are inserted into the holes. These dowels are then carefully and tightly tightened using a screwdriver or screwdriver.
Now you can hang a light shelf or anything else on the drywall. For example, a painting, decoration, mirror or something else. The butterfly dowel allows you to solve the problem of fastening in the simplest way, without spending a lot of effort and time on it.
How to attach a cornice to a drywall wall
The renovation is complete, the ceiling and walls were decorated with plasterboard. And the question arises of how to attach the cornice to such a surface.
Of course, it would be better to think about the provision of a cornice before installing the drywall, and lay a wooden beam or profile under it, but which is subsequently fixed to the cornice. But this was not done, and accordingly it is necessary to take a different path. Let's look at the method of attaching the cornice to drywall.
First, let's decide what we need for work:
- For direct fastening of the structure, a butterfly dowel is used.
- Since the fastening is carried out at height, you will need a ladder or stepladder.
- You will also need a drill or hammer drill, since the work requires creating holes.
- The work will use metal elements, using the profile as an example, so you will need a hacksaw or grinder.
- A tape measure is used to measure
- You will need pliers to clamp and fasten in use.
- If you want to make the cornice level, use a building level.
- Use a marker or pencil to make marks.
- Safety glasses are also a good idea
- And finally, for final fastening you will need screwdrivers or a screwdriver.
So, we’ve sorted out the tool, it’s time to get straight to work:
When starting work, you need to protect yourself with goggles and a protective mask. When working, plaster emits dust, which is not good for health. The first thing you need to do is determine the place where the cornice will hang. Typically, fastening is carried out 10–15 centimeters above the window. Using a level and a ruler, measure the distance and make marks on the sides of the window opening, in the places where the brackets will be located. We make holes, install dowels, and then fasten the brackets (they must be secured in a horizontal position). We attach the cornice itself directly to the brackets, after which we hang curtains and tulle on it.
Tip: when attaching the cornice to the ceiling, also use this type of fastening, only the distance should be 15-20 centimeters from the wall. In this case, you can use a lambrequin to hide the cornice itself.
Installation of heavy objects
Using Molly Dowels
Heavier items must be hung using special fasteners. Most often, a Molly dowel is used for this.
The instructions below show you how to hang a shelf on a plasterboard wall using this fixture:
Fixation "Molly" from the wrong side
- In the selected location, using a drill whose diameter corresponds to the diameter of the plastic or metal sleeve, we drill a through hole in the casing.
- We insert the Molly sleeve into the made socket, driving it in with light blows of a hammer. In this case, the retaining edge of the sleeve should protrude slightly above the surface of the gypsum board.
- We insert a self-tapping screw into the sleeve, after which we begin to tighten it. When the self-tapping screw is screwed in, the fragments of the “Molly” sleeve inside the sheathing open and press the fastener against the drywall from the back side.
- Thus, our shelf turns out to be securely fixed: on the front side the dowel is prevented from moving by the locking edge, and on the back side the open sleeve prevents it from moving.
Mounting on anchors
The use of long metal anchors makes it possible to hang even the heaviest shelves and drawers on gypsum plasterboard sheathing.
Installation is carried out as follows:
- Using a drill, we drill a hole in the plasterboard, the diameter of which is equal to or slightly larger than the diameter of the anchor sleeve.
- Then, replacing the drill with a drill with a concrete attachment, we make a nest for the anchor in the main wall, hidden behind the gypsum plasterboard sheathing.
- We insert an anchor with a metal sleeve into the hole, after which we hammer it in such a way that the sleeve completely fits into the socket in concrete or brickwork.
Anchor for concrete
Advice! The optimal depth of the anchor into concrete or brick is at least 50 mm.
The fastening process is completed by the final fixation of the anchor using a locking screw. In this case, the sleeve opens inside the concrete, “tightly” securing the entire structure.
Maximum loads on gypsum boards
If the assembly is based on a frame, with standard sheathing sheets (12.5 mm), then such a wall has a decent margin of safety.
The basis of the entire wall is rack profiles connected to each other and located in increments of 400 - 600 millimeters. This design with a plasterboard sheet can withstand a load of up to 50 kilograms at one point.
But, as a rule, large objects are secured with several fasteners. It follows that if the fasteners are placed evenly every 1 meter, then the suspended object can withstand 80 - 100 kilograms of load.
Even if you hang a shelf with a TV on a plasterboard wall, the distribution of attachment points, combined with the safety margin of the material itself, can easily withstand such a load.
The main thing is to use the right materials and follow the technology for their use.
Overview of drywall fasteners
In order to hang a shelf on a wall with such a finish, various methods are used, but you must use fastening material. The good old option with a nail in the wall will not work here, just like a wooden dowel with a screw.
Such fastenings for gypsum boards are available for sale.
- "Driva".
- "Butterfly".
- "Umbrella".
- "Mole."
- Anchors.
“Driva” is a plastic (nylon) type of dowel with a screw thread on the surface and a length slightly exceeding the thickness of the sheet. The thickness of this fastening exceeds standard dowels, which allows it to be more securely fixed in the material. Each “drive” can withstand a load of 25 kilograms and is perfect for hanging light shelves.
"Butterfly" has two components. Actually the self-tapping screw and a plastic device, which, when the screw is screwed in, opens the wings on the reverse side. This design is securely fixed in the thickness of the plasterboard, and the open stops distribute the load. This hardware also allows you to attach not too heavy objects to drywall.
Mounting options
Perfect option
In the photo we see a pre-inserted embedment beam for attaching the shelf to the wall.
There is a saying: “If I had known where I would fall, I would have put some hay in it.” So, if you think about the location of the shelves in advance, you can place embedded beams in these places. This is the best answer to the question, how to attach a shelf to drywall?
We have already said and will not tire of repeating that any construction, even if it is a cosmetic renovation of an apartment, requires planning. A clear understanding of the sequence of actions not only speeds up the process and eliminates the lion's share of errors, but also eliminates problems, one of which we have to solve.
Advice! It is better to screw the embedding bars onto dowels to the wall with screws, having previously drilled holes in the wall and board. This will be more reliable and durable.
If the embedded beams are installed, the shelf is attached to them through the plasterboard sheet with self-tapping screws.
Not only shelves, but also cabinets with cabinets are perfectly supported on the beams.
Option with glued sheets
Drywall is sometimes glued to walls if they are smooth enough.
Attaching the shelf to the load-bearing wall through the drywall that is glued to it is also not difficult.
You will need some tools:
- impact drill or hammer drill;
- plastic dowels 6×80 mm;
- hammer;
- concrete drill 6 mm;
- anchor screws 75 mm;
- screwdriver or screwdriver.
Now let's determine in which places the holes need to be made. To do this, place the shelf against the wall in its mounting position and mark points on the wall with a pencil through the mounting holes.
Then at these points we drill holes 85 mm deep. We carefully develop the hole so that the dowel fits into it quite easily.
Important! If the dowel is difficult to drive, bends or breaks, take another drill or drill a hole. The dowel should go to the full depth of the hole.
Insert the dowels into the holes and hammer them in until they stop. Tighten the first screw and level the shelf. When it becomes level, tighten the second screw. That's it, the shelf is in its rightful place!
Important! The dowel and screw should be in the body of the brick/concrete wall, and not in the adhesive layer.
Option with plasterboard and profiles
If you need to hang a decorative shelf, sconce or other light object, you can use a little trick:
- We take an ordinary magnet, preferably a more powerful one.
- We find a metal profile through the plasterboard sheet.
- We take a metal screw with a length exceeding the thickness of the sheet by 5-6 mm.
- We screw our accessory to the metal profile with a screwdriver through a sheet of drywall.
It is unlikely that it will be possible to attach a heavy shelf or cabinet in this way, but a small shelf for keys or gloves can easily be attached. But how can you attach a heavy shelf to drywall if there is no timber installed?
The cabinets are held from below by a special profile.
You can attach the profile to which the drywall was attached to the vertical posts, and from below - with an additional profile, as in the photo.
All kinds of “butterflies”, “umbrellas”, “Molly”
The principle of operation of all these fasteners is simple. They pass into a narrow hole; a screw that is screwed in straightens their “wings” with which they hold onto the material.
All of these fasteners are suitable for light to medium-sized items and for really heavy shelves.