Home → Documentation → Siding → Vinyl siding Deuke → Installation of horizontal row siding
You can begin installing row panels only after the main elements of Docke siding have been installed.
When installing Docke siding on walls that do not have openings, as a rule, no difficulties arise. If the wall is not solid and has windows and doors, the vinyl siding panels will need to be trimmed to go around them.
Siding Installation Instructions
When installing siding, you must follow each step of the installation instructions. The most difficult thing is to correctly frame the façade so that the siding lays flat, without waves. If the walls are straight, then lathing is not required.
Common mistakes when installing siding : not using galvanized steel or aluminum nails, not leaving a 1mm gap between the nail head and the vinyl sheet. In the first case, rusty stains form on the material, in the second, the material inevitably warps and deteriorates, since it cannot expand and contract under the influence of temperature.
The design of the sheets contains a mounting edge with perforation, therefore, if you hammer a nail into the middle of the technological hole with the required gap, the strip moves depending on the temperature, which compensates for the change in its length. It is also necessary to leave a small gap between the strip and the accessory so that it can move freely horizontally.
Siding can be installed horizontally, vertically or diagonally. But if the material is horizontal, then under no circumstances should it be placed vertically, and vice versa.
Does a house covered with siding breathe? Of course, due to ventilation through perforations. In addition, correct installation of panels and accessories ensures high-quality ventilation of the walls of the house without allowing water to pass through.
The technology for installing vinyl siding involves observing the effect of possible expansion and contraction during heating or cooling. Following all of the following instructions will allow you to install siding so that your home looks beautiful and prestigious for many years. Do not drive the nails all the way in. Leave a distance of 1–1.5 mm between the top of the nail and the panel being nailed. The nails are driven in at a distance of 30–40 cm from each other. After nailing, the panels should move freely horizontally. Drive the nail exactly into the center of the special hole in the panel, but not from the edge - this can lead to breakage of the panel. Do not drive a nail into the face of the panel!
Leave a gap of 5–6 mm between the siding panel and accessories for possible expansion and contraction of the panel. When installing in cold weather, leave a gap of 9-10 mm. After snapping the siding panel into place with the bottom panel (or starter strip), do not tighten it. Once secured, the panels should hang without tension. When installing shutters, formwork, electrical wiring, etc., drill holes in the siding 5 mm wider than the diameter of the bolts used. This will allow the panels to expand or contract freely.
Nails must be made of aluminum or galvanized with a head with a diameter of 0.9–1 cm. The nail shank must have a diameter of 0.9–1 cm. The nail shank must have a diameter of 0.3 cm and a length sufficient to penetrate the base to a depth of at least 2 cm.
Vinyl siding is nailed down so as not to interfere with possible tension and compression. Leave a gap of 5-6 mm for possible expansion when attaching panels to chamfers and edges. Don't nail the siding too tightly! Leave approximately 1-1.5mm of space between the top edge of the nail head and the vinyl. This is necessary for free expansion and contraction. This will also prevent the ripple effect. The center of the nail should be in the middle of the special hole. Point the nail straight! A bent nail will bend the panel and can cause the siding to bulge.
Do not drive a nail into the face of the panel! Punching a nail through vinyl paneling can cause resistance to possible expansion and contraction, causing the siding to bulge. Do not pull on the siding when attaching it. Excessive tension on a panel changes its shape and can cause panels and other parts to not connect properly. The panel must first be connected to the bottom panel and pushed upward until it clicks into place. After this you can nail it.
Docking Features
Since when installing fragments it is not always possible to use a whole part, there is a need for a connection along the length (height). There are several methods for this:
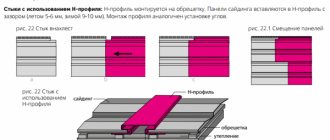
Overlapping mounting
A fairly common method involves superimposing the top element on the bottom. Installation instructions:
- The product located below must be aligned and the level must be marked. To position the panels along the upper edge, the fastening sections (5–6 mm) are trimmed.
- The size of the overlapped fragment is determined and 20–25 mm is added to it (overlap). A fixation section is cut out of the part, the size of which is equal to the expected overlap plus 5 mm.
- The products are connected.
- Before fixing the corners, check the gap between their internal parts; it should be at least 9–10 mm.
The overlap of adjacent corner elements should be 25 mm
Building up
A transition can also be formed by building up the area using an overlay. For these purposes, a cut of the element used is used. The technology is as follows:
- The size of the working fragment is 10–15 cm. Places for fixing the siding to a width of 20 mm plus 7–8 mm are cut out on its inner surface on both sides. Due to the fact that the insert part is the junction of the upper and lower sections, its dimensions must be taken into account in the general calculations of the length of the corner.
- Connecting all the elements is quite simple; to do this, they need to be installed in the exact sequence: the product is placed from the ground or base, the connection is made, after which the rest of the space is decorated, everything is fixed. The result will be two overlaps. There must be a gap of at least 5–6 mm between the inner sides of all connections.
Connection of the external corner profile: a – through an adhesive overlay;
b – through the punched overlay; 2 – top profile panel; 3 – bottom panel; 4 – overlay A significant disadvantage of this method is the possibility of moisture penetration, so you additionally need to use an elastic sealant.
Other methods have many more disadvantages and are not recommended for use.
On a note! When installing fragments of the plinth series, you can use a starting corner strip as an additional part.
Installing the inside corner of siding
The inside corner of the siding is installed at the existing junction of the two walls, 6 mm below the edge of the starting strip. Leave a distance from above to the eaves sufficient to install the soffit. Attach the piece by driving nails into the top holes on either side of the piece. The part should hang on these two nails. The corner pieces should rise evenly up the wall to the cornice. Nail the part to the adjacent walls, driving nails at a distance of 20-40 cm from each other, placing them in the center of the nail holes provided in the part. This will allow for possible vertical expansion. Don't nail too tightly.
A similar procedure is performed for the external corner part. Connecting corner pieces is necessary when the piece does not reach the desired height. Cut 2.5 cm from the top edge of the piece, leaving the middle, front part. Overlap the next (top) corner piece over the bottom piece by 2cm, leaving 0.5cm for possible expansion. The work on connecting the parts of the external corner is the same as for the parts of the internal corner.
How to determine the required size of a corner profile
To determine how long the corner siding should be, you need to measure the value from the bottom edge of the starting strip (it is the one that is first attached to the sheathing) to the place where the cornice will be installed. Subtract 6 mm from the resulting value. This is necessary in order to take into account linear changes under temperature influence.
It happens that the length of one standard profile is not enough to frame a corner or you need to finish it in several pieces, what to do then? In this case, you will have to install the elements overlapping. Add 2 cm to the size of the additional part for joining.
Such an area will be enough to completely protect the structure from moisture, dirt and cold.
Installing the Outside Corner of Siding
Install the outside corner of the siding, leaving a 6mm gap at the top to the eaves or J-rail. Attach the piece by driving nails into the top holes on either side of the piece. The part should hang on these two nails. Place the nails in the center of the nail holes provided in the parts, at a distance of 20–40 cm from each other. This will leave room for expansion and contraction at the bottom of the wall. Don't nail too tightly!
Installation of the starting strip (J profiles)
The starter strip provides support for the bottom row of siding panels. To install it, you need to draw a horizontal line along the perimeter of the house, which is 40 mm above the estimated bottom edge of the panels. Then the starting strip is applied with the upper edge to this line and fixed with self-tapping screws on the sheathing.
CAREFULLY!
The screws should not be tightened tightly; a small gap should be left for the free movement of the strip. The self-tapping screw is screwed in exactly in the middle of the elongated holes so that during temperature changes the part can move and compensate for the change in size without deforming the plane of the skin. This rule applies to all siding elements.
The next strip is not attached closely, but at a distance of 6 mm from the previous one to compensate for temperature stretches.
Making a cover for the outer corner
Sometimes it is necessary to close an outer corner from the top or bottom. To make the lid, cut J-rails from the piece equal to twice the width of the outer corner (counting from the base of the corner piece). Cut a 90 degree angle in the center. Then cut 1 inch off each side, leaving a nailed edge. Bend the strip in the center and nail it to the outside corner of the house. Then insert the outer corner piece into the resulting channel and nail.
Note: if the width of the rail is not enough to install a corner piece into it, then you need to cut off the inner closed part, thereby increasing its width.
Subtleties during the installation process
The corners are installed immediately after installation of the sheathing is completed. Among all the finished siding elements, they especially attract attention. If the slightest mistake is made during installation, it will immediately catch your eye, so you must approach the installation of corners with all responsibility.
After reading this note, you will not make common mistakes and will be prepared for any surprises that await the installer.
When describing the process of covering a building with siding, mention is constantly made of the unusual property of the material from which the siding panels and finishing strips are made. It has a fairly large coefficient of thermal expansion. This feature also affects the fastening rules, which must be strictly followed. It would not be amiss to remind you that after attaching the siding, the panels should not be clamped in order to be able to move from side to side.
How to take measurements correctly?
Let's start with a description of how to properly attach an external corner profile. First of all, you need to install the cornice soffits or at least mark the location of their installation. Without this, you will not be able to accurately measure the distance that needs to be left between the edge of the corner profile and the bottom plane of the cornice.
You also need to decide on the bottom edge of the corner of the building. We will describe options when there is a protruding base or installed structures. Now let’s look at the procedure for cladding external corners with a flat or sunken base.
Correct measurement of the corner height is done as follows: measure the distance between the cornice and the bottom plane of the starting strip and add 3 mm. The profile is placed at the corner close to the soffit and lowered by 3 mm, leaving a gap for thermal expansion.
Accordingly, the lower edge of the corner will drop below the starting bar by 6 mm. This will be enough so that in frosty weather, compression does not expose the underside of the fastener, which greatly spoils the appearance of the building. For the same purpose, perforated strips of corner profiles are trimmed from the edges by 5-6 mm so that they are not visible when the material expands.
What materials should I choose for installing siding corners?
You choose the fasteners at your discretion. Self-tapping screws, nails and staples are common among installers.
The most unreliable fastening is the staples.
They are used exclusively for wooden sheathing, and in the event of strong gusts of wind they can simply be torn out and the siding warped. If there is no supply of material, repairs can become a problem. And the strength of the connection loses strength over time. The nails hold tightly and for a long time. But, as we remember, you cannot nail it too tightly, but you must leave a gap between the nail head and the perforated strip.
Agree, it is difficult to make a gap of a millimeter with a hammer. Based on this, the optimal fastener is a self-tapping screw with a press washer. Installation is done quickly and without additional devices. First, the screw is tightened with a certain force set on the screwdriver, and then unscrewed one turn. After a few screws, this method becomes a habit.
The profile begins to be fastened from the top of the outer or inner corner. Self-tapping screws are screwed into the upper part of the uppermost perforated holes.
Then you should carefully check whether the angle is set correctly: whether the part hangs evenly along its entire length, whether the gaps for thermal changes are accurately maintained, including whether the starting strips fit the perforation at a distance of less than 6 mm.
If everything is done correctly, you can fasten the entire corner by screwing in the screws exactly in the center of the perforation holes at a distance of no further than 40 cm from each other.
In cases where the length of the vinyl profile is less than the height of the corner of the building, installation is carried out in two parts using the “overlapping” method. Be sure to place the top part above the bottom to prevent moisture and dust from getting inside. The amount of overlap is at least 20 mm. The total length of the two parts must correspond to the distance between the cornice and the bottom plane of the starting strip, plus 3 mm (compression-expansion gap) and plus 20 mm overlap.
The easiest way to prepare the connection is to perform it on a flat horizontal surface. Place the two parts of the corner as for installation with an overlap of 20 mm, mark marks on the upper part at a distance of 6 mm from the edge of the perforation of the lower one.
Then cut the strips with mounting holes according to the marks, leaving only the front side of the profile. Next, according to all the rules, first install the lower part, and then the upper. It is advisable to keep the dimensions of the additional parts the same when installing all corners, including internal ones.
Installation, joining and connection of profiles
There are several other ways to connect vertical profiles. Can be joined using an overlay. The lower and upper parts of the corner are installed according to all the rules in the same plane “end-to-end”.
The front part is first cut out from the remainder of the corner profile and glued to the bottom part from the inside. This method makes the corner of the house look more beautiful, but from an engineering point of view it loses - moisture can get inside the profile.
The third option differs from the previous one in that the perforated strips of the insert are not completely cut off, but the central part is left and secured in the same way as the entire corner.
Only the edges of the planks are cut at the rate of 20 mm overlap and 6 mm temperature gap. As a variation, it can be installed using the herringbone method, although this is unlikely to increase the density of the structure.
If you are dealing with a protruding plinth or installing siding in the veranda area where the corner profile rests on the floor, you will need to shorten the vinyl corner by 6 mm.
In some cases, it becomes necessary to cover the edges of the outer corner at the top and bottom.
This possibility exists. A J-rail is usually used to cover the bottom corner. A part is cut out of it, two times the width of the outer plane of the outer corner.
To bend the resulting segment at a right angle, a 90-degree angle is cut in the center from the inside, and the outside is shortened by 2.2 cm on both sides. The fastening strip is not touched. Having bent the resulting part, attach it to the outer corner of the sheathing.
In this case, it is necessary to take into account thermal expansion and leave a gap between the lower edge of the corner profile and the bottom of the resulting lid.
To cover the top edge, you can use the same part as for the bottom edge, or you can make it from a trim corner profile. Make cuts on one side and bend them inward.
It is advisable to secure the edges. For those who want to save money, we can offer a budget option. Instead of an expensive external corner, it is possible to accommodate two J-profiles. This replacement looks no worse than a solid one, but costs an order of magnitude cheaper.
Installing siding under a window
Install the top edge piece below the window across the width of the opening, flush with the frame. Sometimes it is necessary to nail the battens to make the siding fit more tightly to the wall. Using hammer drill pliers, make tabs in the panel 6 mm below the edge at intervals of 17-20 cm. The resulting tabs should be right side out and are then laid under the top edge of the siding.
Note: You can install the top edge in combination with the J-rail. To do this, first install the j-rail and then the top edge so that it is inside the j-rail. This combination provides the best appearance.
How to go around windows and doorways with siding
They are decorated in almost the same ways, the only difference is the presence of rain tides on the window openings. The method of tying the opening depends on the depth of the block in the plane of the wall.
To design openings located in the same plane as the wall, platbands are used
. They have grooves for the end placement of siding, so the installation of platbands is carried out before installing the main panels.
If the openings are up to 20 cm deep, then a J-bar is used. Its installation is carried out on top of the finished panels; the finishing strip must be attached to the window frame around the perimeter.
For large opening depths, sets of the same siding panels are used, cut taking into account the temperature gap along the length of the slope and assembled according to the usual principle. A universal strip is installed along the perimeter of the window block, and a complex angle is mounted at the outer joint of the planes. In this case, it is also necessary to install additional panels before installing the main panels.
To finish the slopes, it is necessary to first install the sheathing on them, which is usually done during the construction of the main one, since the openings need to be insulated along with the plane of the walls. Regardless of the angle of slope, the sheathing of the openings is installed perpendicular to the main one, and the angle is ensured by the position of the finishing or universal strips.
Measuring the panel above the window
Measure and cut the panel, repeating the previous steps, but cut off the bottom part of the panel, not the top. Insert the panel into the J-rail installed above the window. Nail it. The last panel of siding under the eaves. Install the top edge piece. Nail the finishing strip to the wall flush to the cornice.
You may need to nail the battens to make the siding fit more tightly. You may need more than one finishing j-rail. Measurement of the top part. Measure the distance between the top of the inner groove of the top edge and the siding panel lip below, subtract 3 mm. Cut the top of the panel to this measurement. Arrangement of protrusions for fastening the top panel. Place the cut siding panel against the top edge and draw a line where the two pieces meet. Using hammer drill pliers, make holes in the siding 6 mm below the top edge at intervals of 17–20 cm, with the tabs facing out.
Installing the launch pad
Insert the first panel into the start profile. Place the ends into the grooves of the corner elements. Make sure there are end clearances. We start fixing the panel from the middle, moving towards the edges. Don't forget about the gap under the screw head.
If the panel is shorter than the length of the wall, use a connecting strip - H-profile - for extension.
You can do without a plank; in this case, we install the siding with an overlap.
Installing siding on gables
Measure the angle of the roof using a section of panel. Connect it to the panel below. Attach another piece of panel to the roof ridge. Measure the corner line where both panels overlap. This will be a template for cutting the end of the siding that should be installed on one side of the gable. Repeat for the other side of the gable. Install the J-rail on the gable under the roof overhang and nail it to code. If it is necessary to use more than one J-rail, the joining of the parts is carried out in the same way as the parts of the upper edge. Lock the siding panel to the bottom panel and insert the J-rail into the groove.
Note: Leave a 6mm gap between the siding and the J-rail for possible expansion.
Installation of siding panels under the eaves
Before installing the last (top) panel, a finishing profile is installed; you can use a J-profile or a corner profile. Taking into account the upper gap of 3 mm, the required part is cut out. Since the locking part is cut off, we use a punch to make hooks. We insert and snap the last profile.
Lathing and insulation
On new buildings made of wood, sheathing is usually not required. But old buildings, as a rule, have uneven walls. It is necessary to install lathing on such walls to avoid the “wave” effect. On an uneven wooden surface, a sheathing is made of boards or slats. On the stone surface, they make a sheathing of wooden slats measuring 2.5 x 8 cm, nailing them to the wall. For horizontal siding, the slats should be installed vertically at a distance of 30–40 cm from each other. They should be installed around windows, doors, other openings and openings, at all corners, along the bottom and top of the siding installation area.
For vertical siding, the rules for installing sheathing are the same, but only the sheathing is installed horizontally. The lathed wall can be covered with insulation, or the space between the j-battens can be filled with insulation of the same thickness as the slats. This will create a smooth surface of the walls and prevent the “wave” effect from appearing. It is recommended to use insulation in slabs measuring 1.2 x 2.5 m or in rolls. You cannot use loose insulation, which can become deformed.
Installation of the selected sheathing
Installation of the sheathing begins with the installation of the outermost strips (if you plan to install vertical siding, then the upper and lower ones). They are attached to the wall at the corners, the position is checked by plumb line
. Then a cord (at least two) is stretched between the outer planks, which serves to check the position of the intermediate strips of the sheathing and ensure flatness.
The intermediate strips are installed in increments that allow the insulation boards to be tightly laid between them. To ensure flatness, pieces of wood, plywood, etc. should be placed under them in the right places.
(for wooden sheathing) or adjust the height of the metal profile above the wall plane when using a direct (U-shaped) drywall hanger.
After installing the first layer of planks and carrying out intermediate operations, a counter-lattice is installed, which will directly serve as a support for the siding. It is installed perpendicular to the planks of the first layer (and, accordingly, to the siding panels), with a step that ensures optimal fastening of the sheathing (40-60 cm, in some cases - 30-40 cm).
The counter-lattice performs the additional function of providing a ventilation gap between the sheathing and the wall pie, allowing steam to escape.
NOTE!
If you do not plan to install external insulation, then the load-bearing layer of the sheathing is installed immediately (perpendicular to the siding panels).
Vinyl siding care
Vinyl siding differs from other types of siding (cladding panels) in its practicality, unpretentiousness, attractiveness and does not require special care in order to look great. However, like other products used outdoors, vinyl siding will need maintenance from time to time. By following our tips for cleaning and maintaining vinyl siding, it will always look its best.
Vinyl siding can be easily washed with a regular garden hose. If in some areas the dirt is the strongest, you can remove it with a soft cloth or a long-handled brush with soft bristles. If there are contaminants that cannot be washed off with plain water, then it is better to use a special solution: 1 part detergent (any washing powder will do) and 2 parts trisodium phosphate per 4 liters of water.
In areas where high humidity prevails, a problem may arise with the appearance of mold on the siding. To clean it in the solution mentioned above, you need to replace 1 liter of water with 1 liter of five percent sodium hydrochloride. To remove stubborn stains, you can use abrasive cleaning powders or stain removers without harming the siding.
The maximum damage they can cause to a vinyl siding panel is scratches and, as a result, surface roughness. Such damage will not be noticeable even at a distance of several meters from the house. Before using cleaning powders, it is recommended to first rinse the entire paneling with water. It is advisable to leave cleaning products on the surface of the siding for only a few minutes, after which they should be thoroughly rinsed off with water.
Attention: do not use cleaning products containing organic solvents, pure chlorine (they can “corrode” the surface of the panel), grease removers, solvents, nail polish remover, or furniture polishes. These products can damage the surface of vinyl siding.
These articles may also be of interest to you:
- Siding installation
- Vinyl siding installation
- What is siding?
- Options for finishing the facade of the house
What else would you like to read?
Tags: Siding Installation Instructions, Installing Siding, Lathing and Insulation, Proper Placement of Siding Panels, Cutting Siding, Siding, Installing Outside Corner of Siding, Installing Inside Corner of Siding, Installing Horizontal Siding, Installing First Panel of Siding, Installing Lath Around Window and Door Openings , Siding Installation, Gable Siding Installation, Under Window Siding Installation, Starter Strip Installation, Vinyl Siding Maintenance