The exterior decoration of a house is a matter of care and pride for the owner.
A neat, dignified appearance that evokes a feeling of solidity and good quality construction is achieved only by using high-quality materials or technologies.
The use of siding, which appeared on the market relatively recently, allows you to solve a lot of problems with finishing quickly, simply and without the involvement of expensive labor.
Constant research and development have led to the emergence of various types of siding, both in material and shape. Let's consider one of the most attractive - metal siding under a log.
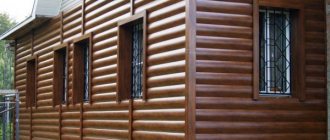
Metal siding for logs
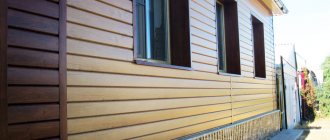
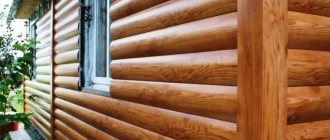
Metal log siding is a finishing material stamped from sheet metal, made in the form of long narrow panels with a profile shape reminiscent of a log house.
Once assembled, the imitation of a log building turns out to be quite realistic. Using photo offset printing, a pattern of wood texture is applied to the finished profile - cracks, knots, annual rings, etc., making the surface of the set difficult to distinguish from a natural log house made of rounded logs even upon close examination.
It is possible to choose the color of the panels; manufacturers make all color options close to the color of natural logs - from light to dark brown.
The assembly of such material is simple and does not take much time , and is quite accessible not only to professionals, but also to people with minimal training.
ATTENTION!
The appearance of a house finished with metal log siding takes on a completely natural appearance, but there are no typical wood flaws.
Metal siding under a log - photo
Installation of sheathing: nuances
All work begins with the installation of the sheathing. Here, a galvanized profile is most often used. In some cases, you can order a ready-made sheathing, but the cost will rise several times. Therefore, it is best to do the lathing yourself.
Wooden sheathing under metal siding is not suitable, as it will soon become unusable.
Installation of profiles under metal siding.
The pitch of the sheathing may be different. In this case, we are talking about installing metal siding, so the profiles do not need to be installed too close to each other. Profiles can be mounted using self-tapping screws. The choice of type of screws will directly depend on what material the building is made of. The sheathing is installed around the entire perimeter of the building. After work, it is necessary to insulate the facade.
Main advantages over other types of siding
Advantages of metal log siding:
- Simple and quick installation.
- The profile is stamped from galvanized steel, which is highly resistant to corrosion.
- There is a protective polymer coating that enhances the material’s resistance to destructive processes.
- High resistance to temperature fluctuations; in severe frosts, the properties of the metal practically do not change, unlike PVC panels.
- The guaranteed service life is higher than that of PVC panels.
- Under mechanical stress, the metal is dented or bent, while PVC simply breaks.
- Non-flammable material.
From a technical point of view, log metal siding has all the qualities inherent in other types of similar metal coverings . All the differences between them are, for the most part, in the aesthetic plane, and there are great advantages here.
The surface, which has the texture of a log frame, looks very traditional, collected, the whole house is perceived as a single whole.
Metal siding is divided into the following types:
- Under the tree;
- Under the beam;
- Ship plank;
- Under a stone;
- Under the brick.
House with metal log siding
Advantages and disadvantages of the material
The main advantages of metal siding include:
- Decorative. The coating has a rich color, texture and texture that imitates a rounded log.
- Fire safety. The material does not burn and does not spread flame.
- Durability and immunity to moisture. The stability of the product is quite high: even with significant mechanical stress, the integrity is not compromised. The panels are also able to withstand significant temperature fluctuations and prolonged precipitation.
- Easy to install. All work can be done with your own hands without the involvement of specialists.
- Durability. When installed correctly, the service life is more than 30 years. The decorative layer is highly resistant to ultraviolet radiation.
- Environmentally friendly. The product does not emit substances harmful to health even when heated strongly.
- Availability. The cost of the material is quite affordable. Panels can also be cut to order.
Excellent performance and affordable price explain the reason for the popularity of metal siding.
The main disadvantages of the product:
- Weight. The coating puts a load on the base and foundation, so it may be necessary to strengthen them.
- Lack of thermal insulation properties. To reduce losses, insulation is carried out.
- Impossibility of restoration. Damaged panels cannot be restored to their exact geometric shape.
Many owners of houses and cottages with iron coating note that in hot weather the surface becomes very hot, which sometimes increases the temperature in the rooms. But this problem occurs when using dark-colored trim installed without a ventilation gap.
Dark-colored siding will highlight the architecture of the building and make it more original
Specifications
- The width of the panels is 260-390 mm .
- Useful width (without lock) - 226-360 mm .
- The length of the panels is 0.8-8 m .
- Profile height - 3-4 cm .
- The presence of anti-hurricane locks that prevent water from penetrating into the joints of the panels.
- Possibility of installation in a convenient direction - from bottom to top or vice versa.
Manufacturers supply panels stamped into either one or two logs, making installation of the covering faster .
Specifications
Profiles and dimensions of a metal block house
This cladding option is available in two types: single-row profile and combined panels (with two rows).
The first variety is a better solution; it better reproduces the imitation of natural wood, since the joints between the strips look uniform. In addition, this option allows you to minimize waste and eliminate the need to replace a large fragment if there is significant damage.
The size of the block house panels depends on the manufacturer, but the most common parameters are the following:
- the width of a single-fracture product is 18–21 cm, a double-fracture product is from 23 to 35 cm;
- wave depth – 17–37 mm;
- profile length – from 50 cm to 4 m, maximum – 6 m.
It is important to choose the right optimal dimensions for metal siding.
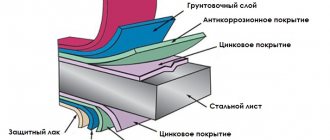
The panels are made from galvanized steel sheet, which is rolled and stamped. Their thickness ranges from 0.4 to 0.8 mm. The parts are coated on top and bottom with protective and decorative compounds and materials.
Popular manufacturers of metal siding for logs
Among the manufacturers of metal siding for logs, the following companies stand out::
- Alta siding.
- Woodstock.
- Grand Line.
- Metal profile.
- Nord house and many others.
IMPORTANT!
It should be taken into account that the market situation changes daily, new manufacturers come in and bring their developments and innovations. When choosing a material, you must first look at the technical characteristics and appearance, and only then at the manufacturer.
Equipment
Metal log siding is produced complete with all additional and auxiliary elements for installation and design of joints, transitions, openings and junctions.
Available for sale:
- Internal and external corners.
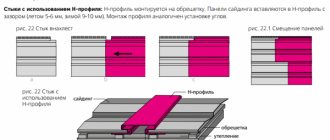
- H-profile for longitudinal joining.
- Start and finish profiles.
- Window strips.
- Platbands.
- Soffits.
- Moldings (under the roof).
- J-platbands.
All additional elements have a color and protective coating identical to that of the main panels; they look as if they were made from the same type of wood.
Equipment
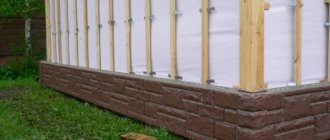
Preparation of lathing and insulation of walls
Before directly installing the siding, it is necessary to carry out preparatory operations - insulate the outer wall and install sheathing , which simultaneously serves to support the insulation and (mostly) serves as a support for the siding.
Any material intended for this purpose is used as insulation, the main thing is that the basic rule is observed - the vapor permeability of materials should follow an increasing pattern from the outside .
This means that the insulation must allow vapor to pass through better than the wall material.
In addition, to protect against external moisture (atmospheric), in order to prevent swelling of the insulation, you will need a layer of a waterproof membrane that releases steam from the inside, but does not allow it to pass through from the outside .
Siding insulation
The thickness of the sheathing strips must be no less than the thickness of the insulation . Typically, bars of 50 by 50 mm are used if slab mineral wool with a thickness of 50 mm is used.
A counter-lattice is placed on top of the main sheathing , which supports the siding panels and also provides a ventilation gap for condensate removal. Its thickness is 30-40 mm.
The spacing of the counter-lattice strips is usually about 60 cm, which is convenient for installing siding panels . Before starting installation, it is recommended to check the pitch size for compliance with the existing material .
It is necessary to carefully monitor the presence of the counter-lattice plane. This is usually done at the stage of installing the main planks and insulation - if there are flaws or bends in the walls, a layer of leveling plaster is applied .
However, you should control the position of the counter-lattice slats using tensioned cords, and if necessary, add pieces of wood, plywood, etc. to level the plane.
The sheathing can be made from wooden planks, but it is better to use metal guides for drywall.
Layers
Decorative qualities
Buildings that are decorated with metal siding are visually practically no different from wooden log houses. Walls and corners acquire clear lines that are pleasing to the eye. Thanks to the variety of patterns, structures and colors, each owner will be able to choose what kind of “wood” his house is built from - whether it will be oak, birch, pine, or maple.
The front side can be textured or smooth, and the color can be matte or glossy. If desired, from catalogs you can select series with shades of valuable wood species or imitating buildings that have stood for several centuries.
Setting the starting bar
First, select the lowest point where the siding should end. 40 mm is measured upward from it and a horizontal line is drawn (check by level). The starting bar is attached along this line with the top edge aligned with it.
Self-tapping screws are screwed exactly into the center of the holes . They should not be tightened; there should be a small gap left to compensate for temperature movements of the metal. The expansion coefficient of metal siding is 10 times lower than that of vinyl, but tightly fastening the elements is not recommended.
The initial strip following the first is installed at a distance of 6 mm from the previous one to compensate for thermal expansion , otherwise they may overlap each other, causing swelling of the cladding surface.
Setting the starting bar
Required tools and hardware
To fasten the cladding, depending on the type of sheathing, self-tapping screws 4.2 with a length of 16 to 40 or stainless (aluminum or galvanized) nails 3 mm (with a wide head of 8 mm) with a length of 40 - 50 mm and dowel nails are used (Fig. 2) .
For work you will need: a screwdriver (hammer), tape measure, level, plumb bob, square, metal scissors (manual or electric), a hacksaw or a circular saw with a blade for cutting metal.
ATTENTION! When using angle grinders, damage occurs to the polymer and zinc coating of the siding, which can lead to accelerated corrosion
Arrangement of obtuse and acute angles
Additional metal siding elements have a flexible structure. If it is necessary to install an obtuse corner, you need to attach the corner profile to the corner and press it until it is completely adjacent to the sheathing . In this position it is fixed at the installation site.
To create an acute angle, you need to compress the sides of the corner profile to the desired state and secure it in place. You should act carefully, without damaging the protective polymer coating. Typically, such operations, with a certain sensitivity to the material, take place without damage or bruises .
Arrangement of obtuse and acute angles
Installation of vertical strips - corners and H-shaped connector
Installation of complex corner strips and H-connections is carried out after installation of the starting strip. Their position is controlled by a plumb line . The screw fastening pitch is 20-30 cm, since the complexity of the profile and the important task of the element require reliable fastening, eliminating distortions or other deformations.
Experts often advise installing simple angles, especially if the installation is carried out by untrained people . They are a regular corner without additional profile details.
It is much easier to attach such elements, since they are placed on top of the installed panels and simply cover the corner joint. This installation is carried out using self-tapping screws , screwed into pre-drilled holes, or onto blind rivets.
In the second case, the connection looks somewhat more solid, but disassembling it if necessary is much more difficult - you will have to drill out the rivets.
Installation of vertical strips - corners and H-shaped connector
Installation of panels
Typically, panels are installed in a horizontal position from bottom to top. This arrangement is most natural for wooden buildings , although vertical installation is also possible.
The bottom panel is inserted into the corner and H-profiles, snapped into the lock of the starting profile, then fixed with self-tapping screws in the sheathing . The fastening rules are the same - a small gap is left for the free movement of parts if necessary.
ATTENTION!
The optimal size of self-tapping screws is 1 cm in diameter and 2.5 cm in length. The self-tapping screw material must have a protective coating that prevents corrosion.
All the following panels are attached in a similar way . It is recommended to check the horizontal level every 3 panels and correct the position if deviations are detected.
Installation of panels
How to go around windows and doorways with siding
The framing of window and door openings is generally the same, but the windows are additionally equipped with ebbs for rainwater drainage. The procedure is usually dictated by the position of the window or door relative to the plane of the wall .
If the design of deep-set window or door blocks is required, then near-window strips are used; in other cases, platbands are used .
First you need to install the sheathing . The best material for it is a galvanized metal profile. The use of wood is possible, but is not recommended by experts due to possible problems with drying out, rotting or swelling of the material.
For windows with installation depth less than 20 cm, J-bar is used . To install it, a finishing strip is installed around the perimeter of the window frame, into which the J-bar is installed.
If the installation depth of the window exceeds 20 cm, a complex outer corner is usually used, into which strips of siding cut to length are installed . On the window side, the siding is limited by a universal strip attached to the window frame.
If the length of the planks is insufficient, a conventional overlap of at least 25 mm is carried out.
Platbands are used to finish openings that are located in the plane of the wall . They come in different sizes; the most suitable type is purchased for installation. Installation of platbands is carried out before installation of panels.
The main problem with such work is cutting corner joints at 45 degrees. The precision of this fit ensures a neat appearance of the window and prevents rainwater from entering the cracks .
Usually, various miter boxes are used, although their accuracy is very relative and does not always meet the requirements. Sometimes they make an exact 45-degree angle template, which is used to mark the cutting line on the profile.
The best option is the one that gives the most successful result, so there are no clear recommendations in this matter.
How to go around windows and doorways with siding
Preparatory work
Before installing the main covering, it is necessary to carry out a number of previous activities:
- All excess is removed from the base. The old decorative finish can be left if it does not interfere with further work and will not lead to problems in the future.
- The condition of the surface is assessed. Seams and cracks are unstitched, treated with a primer and sealed. If the damage is more than 10–15 cm, then additional reinforcement is performed.
- The base is prepared separately. The foundation must not have significant defects.
- The surface is treated to prevent the appearance of microorganisms. The wooden facade is impregnated with fire retardants.
- The coating is thoroughly dried.
- If required, a vapor barrier is attached (most important when working with wooden houses). The peculiarity of this material is that the film is placed with the rough side facing the wall. The joining is done with an overlap, everything is glued with mounting tape. Fixation is carried out with staples directly to the covering or using slats. The fastening areas are sealed.
At the same time, the missing tools and materials are being prepared.
Construction of sheathing
When deciding how to properly cover a house with metal siding, take into account that the simplest and most affordable option is to create a frame from standard elements.
Wooden
Due to the fact that a properly fixed sheathing is a guarantee of the reliability and durability of the coating, the work must be approached very responsibly. Step-by-step algorithm of actions:
- To install the frame, a beam with a section of 50*40 or 50*50 is used. The material is pre-treated with antiseptics and fire retardants.
- The surface is being marked. The main posts should be placed perpendicular to the cladding panels. Lines are drawn in increments of 50–60 cm.
- After drying, the timber is drilled out for screws. The pitch of the mounting holes is from 20 to 40 cm. These fixing points are transferred to the previously marked lines. Using a puncher, holes are drilled for dowels according to the marks.
- The racks are aligned and pre-fixed, after which the beam is leveled and substrates are placed under it. Final fixation is carried out.
- For greater convenience, corner posts are set using a plumb line and level. A cord is stretched between them, allowing you to quickly align the remaining elements.
For the installation of wooden sheathing, carefully processed and dried timber is used.
The resulting gaps between the wall and the timber are carefully filled with polyurethane foam. This will eliminate the appearance of “cold bridges” after laying the thermal insulation material
Metal
Do-it-yourself lathing from metal profiles is erected according to the following scheme:
- Marking is being carried out. Installation lines are drawn in increments of 50–60 cm. When working with a base, 35–50 cm.
- The hanging frame elements are being fastened. To do this, holes are drilled at a distance of 35–45 cm according to the markings, hangers are attached to self-tapping screws and dowels and bent to the desired shape.
- The corner segments are positioned first and carefully aligned along the plane. A cord is stretched between them to align the remaining racks.
The alignment of the metal frame racks is done using a cord that is pulled between the corner profiles
Carrying out work on assembling the frame requires accuracy; all parts must be placed exactly level and form a single plane.
VIDEO:
Hydro- and thermal insulation of walls
Covering a house with metal siding often involves additional insulation. Various materials are suitable for this, but the most affordable and preferable for self-installation are mineral wool or penoplex (an improved version of polystyrene foam).
Thermal insulation and waterproofing are carried out as follows:
- When choosing a wooden frame, mineral wool is placed in the resulting cells. It is laid tightly, without gaps. Work is carried out wearing protective equipment for the respiratory tract and mucous membranes.
- The metal frame is excellent for laying penoplex. To do this, even during installation of the sheathing, the slabs are pinned onto installed and bent hangers. For additional fastening, dowels with a large head are used. The material is placed without matching the joints of adjacent rows, the corners are overlapped. Additional sealing is carried out.
- A film is stretched over the entire surface to protect against moisture penetration. The joining points are combined with a large supply of material.
Installation of finishing strips
The finishing strip covers the edges of the perforated edge panels. Without it, the cladding looks unfinished and sloppy. In addition, the top roller of the finishing strip prevents rainwater from entering under the sheathing.
Installed almost simultaneously with the last panel, immediately before its installation . The strip of siding is cut to width, inserted under the side of the finishing profile, and then fixed in it.
Metal log siding is a reliable, durable and impressive exterior covering for a home. The possibility of do-it-yourself installation, durability and solidity of the cladding made it popular and preferable, even despite the higher cost compared to vinyl or acrylic analogues .
The reliability of the material and a more successful combination of technical characteristics make metal siding for logs one of the undisputed leaders among many similar materials.
Installation of finishing strips
Tips and tricks
When choosing high-quality and beautiful metal siding, you should listen to the recommendations of specialists.
- If you are looking for a versatile and discreet option, then you should choose a material that imitates a log. Such materials are not afraid of temperature changes, and their external coatings are less susceptible to fading.
- If you install metal siding yourself, then you should use only one type of fastener - vertical or horizontal.
- Metal siding must have certificates: hygienic and fire safety. Be sure to request these documents before purchasing facing material.
Pay attention to the warranty periods for metal siding. Both single and double parts generally have the same warranty. Experts do not recommend purchasing metal panels that are too cheap
During their installation, you can significantly overpay for component materials. To avoid such a problem, it is worth finding out the price of not only the siding itself, but also all the necessary components. Before purchasing metal siding, you should make a correct calculation of the volume of material (per sq. m) that you will need to decorate your house. Some companies provide a similar service. Metal siding can only be attached to a reliable metal sheathing. Such a design will prevent deformation and deflection of the cladding, so its installation should not be neglected. Vertical metal siding must be installed only from top to bottom.