The cladding for the house has been selected. Now a new task: how to attach siding? The process is simple, but there are many nuances that need to be taken into account in the work. It depends on them how long the cladding will last, how smooth and beautiful it will be. And will mold and mildew appear underneath it? In general, let's figure it out!
What tools will be needed for installation?
The following tools are used to install siding:
- Construction level - to install the sheathing exactly horizontally. This determines how neat the entire façade of the house will be. We don't want rows of panels to float freely along the wall, do we? It’s good if you have 2 levels at once: short (up to 1 m - for small fragments of walls) and longer - from 1.5 m or more - for the main surface of the walls.
- Roulette. The siding panel can be from 3 to 3.6 m long, so choose a tape measure no smaller. A 5-meter one is quite suitable.
- Screwdriver or hammer. As a rule, the first one is used - for fastening siding with self-tapping screws. If you choose wood sheathing, you can use nails to install it. Then you will need a hammer.
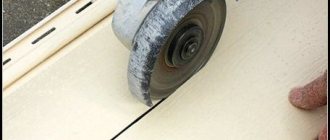
- A hacksaw for cutting siding - vinyl, acrylic or metal. You can replace it with a grinder or jigsaw.
- Drill: if the walls of the house are made of brick, foam blocks or concrete. In this case, holes are made in the walls into which dowels are inserted.
- A punch is a special tool for making perforations in siding. Sometimes it is necessary to cut off the perforations on window and finishing strips, and using this tool you can make a new one.
You may also need other tools, depending on the situation and the materials you use. For example, a diamond blade or circular saw may be useful for cutting fiber cement siding.
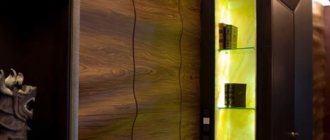
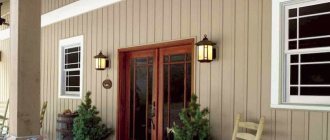
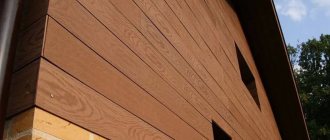
What is a classic "American"
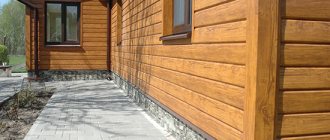
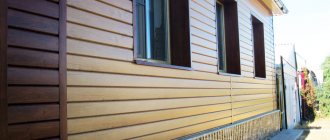
Unlike traditional Russian or Eurolining, the classic American one has a wedge-shaped shape, which facilitates installation: thanks to the profile, a constant angle of inclination of the front surface of the panel is maintained, and the amount of overlap does not affect the angle of inclination. In the upper part of the lamella there is a narrowed tenon, in the lower wide part there is a groove corresponding to the tenon. During installation, the tenon of the lower board is inserted into the groove of the upper one, thereby preventing water from flowing into the joint.
American lining is made from ordinary naturally dried and heat-treated wood; they differ in size. The width of the lamellas made of heat-treated wood is 8.5 cm, the thickness in the thickest part is 1.8 cm, the length of the panels made of coniferous wood is up to 3 m, from birch - up to 2 m. The lamellas made of raw wood without heat treatment have a thickness of 2 .8 or 4.5 cm, width 14 or 19 cm, length up to 6 m.
Installation of the “American” is carried out with nails or self-tapping screws on a wooden frame made of 4.0 x 5.0 cm timber in increments of 50 cm. Installation can be carried out either from the bottom up or from the top down.
The advantage of American products is their extended service life, waste-free production, and ease of installation. The downside is that the layout is only horizontal.
Do-it-yourself siding installation: a set of additional strips
In addition to the tools and the panels themselves, for installing siding you need special fastening strips and profiles:
- starting (also known as starting) bar
- finish bar
- j-trim profile or j-profile
- connecting strip (aka H-profile)
- outside corner
- internal corner
- platbands and slopes
- window trims
- hanging strips
- soffits
- edging strip.
Rice. 4. Planks and profiles that can be useful in installing siding.
As a rule, the entire set is rarely used. The required set and number of planks will vary depending on the architectural features of the building. The supplier's sales department specialists will help you calculate it. Or you can do it yourself on the manufacturer's website.
Don't forget also that you will need a lot of screws (or nails) and dowels. If you decide to insulate the walls of the house under the cladding, you additionally need to select and calculate the insulation.
Perhaps the best option for external insulation today is a cake made of mineral wool and a waterproof membrane that will protect the insulation from getting wet. Waterproofing will also be needed for houses without insulation, but made from materials that absorb moisture - wood, aerated concrete, etc.
Overlapping installation
As is known, vinyl sading has a fairly large coefficient of linear expansion, which is highly dependent on temperature. As can be seen in the video showing incorrectly installed facades, this property causes the panels to diverge at the joint, which will certainly lead to water or snow getting under the facade cladding with the formation of places of high humidity that negatively affect the “health” of the load-bearing wall of the building.
To avoid this problem, the panels are joined with an overlap of at least 25 mm and a thermal gap between the locking strips of 6 to 20 mm, depending on the outside temperature at the time of installation. Compliance with this condition, together with the movable fastening, will avoid thermal deformation and divergence of the locking connection between the rows.
When making overlapped siding connections, you should remember that the bottom or top rows of cladding must overlap the joint, so you should not connect the rows on top of each other, except in cases where the siding is fixed to sheathing strips specially mounted at the place where the panels overlap.
When installing siding in areas of window or door openings, overlapping joints should be avoided to ensure the tightness and strength of the cladding, and the joints should be moved to another location on the façade.
Another factor that must be taken into account in the case where the siding is overlapped and such connections are quite numerous over the entire area of the facade is the direction of illumination that prevails during the day. In order to properly hide the seam, the installation of the top panel formed during joining should be carried out from the shadow side in relation to the bottom.
Then the sunlight directed at the joint will not cast a shadow from the joint, which ensures its camouflage on the surface of the facade. With the correct direction of light, the overlapping siding joint is practically invisible in a photo with maximum magnification, and even more so when viewing the surface of the facade from a certain distance.
It is also necessary to overlap siding in cases where panels are installed in places where cables or pipelines exit, the dismantling of which is associated with certain difficulties, and sometimes is simply impossible. The parts of the facades with outgoing pipelines shown in the photo are lined with vinyl panels using an overlap joint.
If external objects hit the horizontal strip, it is from this place that the cladding should begin, cutting out the siding to the required depth to maintain thermal gaps. The cutout of the top panel is mirrored, which allows you to hide the joint and lead the pipe or cable through a neat oval hole, which can be covered with a decorative element.
Conclusion
If you watch how to join lap siding in a video detailing all the intricacies of this complex technological operation, you can use this knowledge when doing the work yourself or to monitor the actions of the builders so that the end result is a high-quality, durable and beautiful finish.
Attaching siding sheathing: important nuances
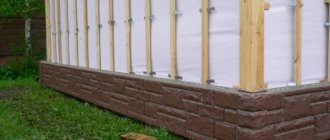
Finally, we have a complete set of materials. You can begin installation. The first step is to install the sheathing - a profile for attaching the siding. It is mounted perpendicular to the panels. If the siding is horizontal, then the sheathing is attached vertically.
Important nuances of lathing installation.
- It is necessary to accurately measure the horizontal and vertical. If the sheathing is installed crookedly, then the entire facade will be uneven.
- If you use wooden sheathing, it must be treated with antiseptics.
- The distance between two adjacent profiles should be 30-40 cm, but not more than 50 cm. The more frequent the step, the stronger the structure. It is best not to take a random value, but to calculate the pitch of the sheathing based on the length of the panels and the wall.
- When you calculate the pitch of the sheathing, make markings on the wall where and how the guides will be located.
- As a guide for installing the starting bar, you need to draw a strictly horizontal line along the entire perimeter of the building.
- First, the sheathing is installed in the corners, then between them, on the walls themselves.
- Do not connect the guide battens together, otherwise you will disrupt the process of natural air circulation.
Lathing pitch: 30-40 cm. Vertical guides cannot be connected to each other so as not to disrupt the air circulation process.
When to overlap siding
Overlapping panels at each other at the edges is used for certain purposes:
- Reduced material consumption. This is explained by the fact that the parts do not need such extensive trimming as when installing an H-profile.
- Creating a single visual plane. The coating has no separation. This result can only be achieved with correct and precise docking. But the effect will be observed only from the selected side, most often the street.
- Achieving better decorativeness. The fact is that not all manufacturers produce a complete list of additional elements of the desired shade; often components are only one or two colors (white or brown). Accordingly, the joining area stands out sharply against the background of the overall surface texture.
Reduced costs. Self-installation reduces the cost of an additional profile. If the labor of hired specialists is used, then the cost of installing the joining strip and adjusting the panels to the required size is deducted. But invited specialists must have appropriate qualifications.
You can also use the overlap technique if the necessary products are not available. Although siding (especially vinyl) is widely available, it is not always possible to purchase additional siding. And sometimes it is not practical to go to another city to get the necessary element.
This method also has some disadvantages:
- A significant drawback is that a noticeable joint is formed at the junction points. If everything looks beautiful from the direction of installation, then from the opposite direction it may look completely different. Upon closer inspection, the gaps appear to be quite large. After the coating shrinks, they become less noticeable, but do not disappear.
- When the house is located near the roadway, the joints can fill with dust and dirt.
- Violation of the installation technology will lead to heaving of the connecting sections.
Attention! When choosing between using a special profile and overlapping installation, you need to weigh the pros and cons, as well as evaluate your own capabilities
How to attach siding to a wall: installing auxiliary profiles
Before you begin directly installing the siding, you need to install auxiliary profiles. For example, it is worth considering how to connect basement siding with regular siding, and also protect the foundation from erosion. Low tide is used for this. It must be installed before installing the siding. Align everything strictly horizontally. If the length of the wall is greater than the ebb, it is increased by making an overlap of 3-5 cm.
A starting bar is installed above the low tide. This is where the first siding panel will be inserted. If the starting strip is not installed horizontally, the entire façade will be uneven.
If the starting strip is not installed strictly horizontally, the entire facade will be uneven.
Next, the internal and external corners are mounted. If the house is one-story, as a rule, the length of the corner elements (3 m) is sufficient. If the house is higher, you will have to increase the planks. The technology for connecting a siding corner is simple:
- Calculate the missing angle length and add 5 cm to it.
- Cut the corner piece to the appropriate length.
- Install the corner profiles so that the top overlaps the bottom by 5 cm.
Rice. 5. Installation of external corner.
After this, the window strips are installed (they can be replaced with a j-profile). Doorways and arches, if any, are framed in the same way.
Starting profile: install it correctly
Siding installation consists of several stages and includes the installation of many components, including starting and corner profiles, moldings and much more. This process occurs along the lines of walls, windows and roofing.
Installation of Deke siding consists of several key points:
- Choice of technology;
- Setting up a starting profile;
- Installation of external and internal corners;
- Covering corners other than rectangular.
How to choose the right technology?
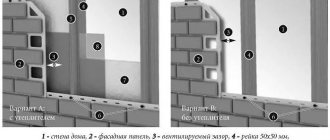
First, determine the type of base (Fig. 15). It can be sunken, protruding and even. The first is that the base “sinks” into the wall, which slightly overhangs it. The second - the wall is narrower, the third - they have the same width. Facade cladding with a flat and sinking base is carried out using the same technology, with a protruding base - using a slightly different one.
Sometimes the base can change its appearance, turning from protruding to sinking. This transformation is possible due to the thickness of the sheathing. If you have retained the protruding plinth, then you need to install a vinyl molding under the starting panel. In this case, the base can be left untouched and covered with base siding.
Rice. 15. Types of socles: a - sinking; b - smooth; c - protruding (aligned with the wall by the sheathing); g - protruding with ebb along the top of the sheathing; 1 - wall; 2 - sheathing; 3 - base; 4 – vinyl deck; 5 - cement screed
Docke siding starter profiles are used not only along the bottom of the wall of a building. Starter strips successfully cover the roof gable, which is especially important with an attic covered with siding and open facades. They are ideal for installation on roof gables and at the beginning of subsequent floors when a design or engineering project requires a visual separation of the cladding. Installation is carried out along the bottom line of the wall.
How to connect siding along the length?
As a rule, the length of siding is from 3 to 3.6 m. The length of the house can be greater, and in this case the question arises: how to connect the siding strips?
There are 2 ways:
- Using a connecting strip: this is the technologically correct option.
- Without a connecting strip, overlapping: a riskier option.
Let's consider both methods in more detail.
Installing overlapping siding creates the impression of a continuous wall fabric, without dividing strips. It should be noted right away that no matter how hard we try to connect the panels neatly and evenly, at a certain angle the joints will be visible. Over time, dirt will get trapped in them, making them even more noticeable. And yet many people choose this method.
Rice. 6. Installation of overlapping siding.
Important details:
- The panels must be mounted with an overlap (the upper one should overlap the lower one by about 3 cm).
- The panels cannot be nailed tightly onto each other. When heated in the sun, they will expand and, if firmly fixed, become deformed.
- The joints must be placed in a checkerboard pattern, at a sufficient distance from each other (at least 50 cm). It is impossible for the joint to be located in the same place in two rows in a row.
If you are installing overlapping siding, do it in a checkerboard pattern. But it is better to connect the panels using an H-profile. It will protect the joint from water and dirt.
Installing siding with a connecting strip allows you to protect the joint. Water and dirt will not get there. The facade will look like new for much longer. If you choose this method of connecting the siding to each other, then the connecting strip will need to be installed simultaneously and similarly to the corner elements.
Rice. 7. Installation of siding using a connecting strip.
- The plank should not reach the foundation (base) from below and the cornice from above by about 0.5 cm - so that deformation does not occur during thermal expansion.
- If the length of the H-profile is not enough, increase it in the same way as the outer corner.
- Check that it is positioned without vertical deviations.
Why use the overlap method
The overlay is economical since an H-profile is not needed
Advantages
There are several reasons to use overlay siding:
- Saving. In order to reduce material costs, an overlap is used - a direct connection. You avoid large-scale trimming, as happens when working with an H-profile.
- Aesthetics. The exterior of the walls forms a single covering without dividing strips. This result is obtained with precise docking, in compliance with the rules.
- Non-standard walls for which the length of the canvas is not enough.
- Easy installation . This method is easier and you can do the house cladding yourself. There is no need to adjust each panel to the required length, and there is no need to install a joining strip. Hired workers take all these nuances into account and significantly increase the payment rate.
- Color spectrum. Using the overlay method, it is easier for you to choose the desired color scheme for the cladding, since components of the desired shade are often not on sale. Therefore, the connection is made without the use of auxiliary decorative strips.
If the correct installation technology is followed, the joint lines are not noticeable
Flaws
There are disadvantages to installing PVC lining with an overlap:
- The work must be done carefully; this is a waste of time.
- The effect of a continuous surface is not observed from all viewing points. The overlay is visible when viewed from the overlay side.
- The cracks become more noticeable with seasonal weather fluctuations.
- If the technological installation rules are not followed, the joints will bulge.
- Violation of tightness. Overlapping areas may be affected by wind. Dirt and dust accumulate in the cracks.
When choosing an overlap method, I recommend weighing the pros and cons, calculating your strengths and only then making a decision.
As the building shrinks and the soil shifts seasonally, the gap may become more noticeable
Installation of siding panels
Now that all the auxiliary strips and profiles are in place, you can begin installing the panels themselves. The technology for attaching siding is simple:
- The panels are mounted from left to right, from top to bottom.
- The first row of panels is inserted into the starting strip.
- Regularly check that the siding is installed horizontally. It is optimal to do this every third row.
- Before the last row of siding, a finishing strip is installed, and the last panel is inserted into it.
However, there are a number of nuances that need to be known and taken into account. How to properly attach siding?
- The panels must be installed using galvanized self-tapping screws (non-galvanized ones are susceptible to corrosion, and you risk that over time the facade will become stained with rusty stains).
- The screws are screwed in all the way, and then half a turn back - to allow the panels to expand and contract freely under the influence of temperature changes.
- Self-tapping screws must be screwed strictly into the center of the perforation of the panel or strip and always at a right angle. It is prohibited to screw self-tapping screws into the body of the panel.
- From the siding panel to the corner elements, near-window strips, H-profiles, adjacent panels and other elements, you need to retreat 3-4 mm in summer and 6-8 mm in winter - so that there is space for thermal expansion of the siding.
Rice. 8. Self-tapping screws are screwed into the center of the perforation and at right angles to the panel.
Self-tapping screws cannot be screwed into the body of the siding panel. But only into the perforation, and in its center and at right angles to the panel.
If all these rules are not followed, the panels may become deformed. And it will be impossible to correct the situation; the facade will have to be completely reinstalled.
Rice. 9. What are the consequences of errors in siding installation?
How to avoid mistakes: 7 rules
Direct connection of panels, without a connecting strip, has its own characteristics. A guarantee of a good result is provided by following certain rules:
| Photo | Description |
| Rule 1 Installation is carried out only at positive air temperatures, not lower than 10 °C. Otherwise, large gaps will be difficult to set correctly. | |
| Rule 2 The overlap of panels must be strictly observed in the interval of 20–30 mm. | |
| Rule 3 The top panel must be clearly aligned with the horizon, achieving a single continuation of the bottom part. | |
| Rule 4 Trimming of nail strips/panel locks is mandatory. As a result, the required distance is formed, allowing for an even overlay and compensation for expansion moments. | |
| Rule 5 A staggered arrangement helps level out overlap areas. | |
| Rule 6 A stop is placed under the end of the interior siding panel. A timber or board is stuffed, eliminating the possibility of deflection. | |
| Rule 7 To reduce the visibility of the seam, no physical effort should be made. Bending the end, pressing, or pulling on the lock will damage the material. |
Try to remove joints from doors and corners. Start laying from these areas, so the overlay will be placed at a certain distance. This is especially important in areas of doorways, where the wall vibrates when slammed shut.
Fastening metal siding: features
Above we described the technology for installing vinyl and acrylic siding. In general, metal panels are installed in the same way. But if PVC siding has a fairly large thermal expansion, then the linear coefficient of thermal expansion of the metal is 10 times less. Therefore, when installing them, there is no need to leave such gaps. A small space is enough to make the installation process comfortable.
One more nuance. The siding is attached to a metal profile. Use only metals that do not corrode.
Metal siding is tougher than plastic siding. Therefore, installing it is somewhat more difficult and longer. You won’t be able to do the work yourself – you will need at least 1 or 2 assistants.
Traditional wood panels
Traditional wooden siding, when faced with an overlap, requires preliminary marking on the mounted frame to maintain a constant angle of inclination of the panels. Installation is carried out from the bottom up, starting from the base strip, the thickness of which will determine the angle of inclination of the lamellas.
A 25x25 mm block is mounted along the bottom edge of the wall, then the first panel is installed so that it hangs slightly below the block. The lining can be fastened with nails or self-tapping screws; the main thing during installation is to prevent deformation of the lamella: as soon as it begins to bend, the fastening pressure must be loosened.
The next panel is installed with an overlap, the size of which is determined for aesthetic reasons. Then measure the distance on the frame block from the top of the bottom panel to the top of the next one. This value must be constant throughout the entire cladding. The resulting size is marked on each beam of the supporting frame, and all subsequent cladding strips are mounted according to the marks.
Attaching siding: summary
The siding installation process is simple. You can handle it yourself, especially if you have one or two assistants. The main thing is to know how to properly attach siding and not deviate from the manufacturer’s instructions. All the nuances are not accidental. They are justified by technology:
- Gaps are needed for thermal expansion of PVC siding.
- Lathing is necessary to prevent the walls of the house from being destroyed by mold and fungi.
- Self-tapping screws must be galvanized, and they must be screwed into the center of the perforation strictly at a right angle, not all the way, but with a small gap. So that you can insert a coin between the screw head and the panel.
Still, if you are not sure that you can handle the installation yourself, delegate the work to professionals. Remember: the price of a mistake is decades of service not only for the finishing, but often also for the walls of the house. Professional installers know all the features of fastening different panels. And they will clad your house quickly, efficiently, without increasing the price and timing, as well as sudden troubles.
You can find such installers.
If you still haven’t chosen panels for cladding your home, take a look at the siding catalog. A huge selection of options to suit every taste and pocket. Return to list
The locks on the panels are not latched
The ordinary siding strip has a locking connection, which consists of a lower hook and an upper lock. Installation of planks is carried out from bottom to top. The first bar clings to the starting profile using the bottom hook. In this case, the fastening element of the upper panel must overlap the lower one. The hook is inserted into the groove until it clicks slightly. Particular attention must be paid to this, because a poorly secured strip may fall off due to temperature changes. As a result, the entire wall will have to be dismantled to correct the flaw.
The locking fasteners of the plank came loose, causing the panels to fall out of the wall.
Installation of internal corner profile
Similar to the outer profile, make sure that there is a gap (3 mm) between the top edge and the soffit, and the bottom is 6 mm below the starting profile. If necessary, the internal element can also be “increased”.
The internal corner piece can be replaced with one or two J-profiles.
Laying technology
Installation of siding begins with the creation of sheathing, laying insulation, and vapor barrier. The pitch between the vertical bars is maintained at 50–65 cm. The horizontal bars are calculated based on the size of the material.
If the rules are followed, the seams are difficult to notice
Stage 1. Sequence of actions
- The starting bar is placed above the ebb/foundation. Fixation is done with self-tapping screws in the center of the fasteners. The screws do not tighten flush, leaving free play for the material to expand.
- If there are complex/internal corners, start working from these places, installing the corner profile, corner elements to hold the panels. A special overlay will be used for external corners.
- The issue with the direction of the lining is being resolved, that is, move towards the seam: first, the lower bar covering it.
- The alternation of joints is determined. Calculate so that the offset is made through two panels.
- To perform proper alternation, some elements will be trimmed to length.
- Checkerboard docking must be performed symmetrically.
- The fastening lock is cut to the depth of the joint. The front part is not affected.
The principle of installing overlapping siding
Stage 2. Installation of the first panel
The process of attaching siding begins with installing the starting profile. Next, the lower part of the first panel is inserted into the profile, and the upper edge is fixed to the sheathing with screws/nails. Start fastening from the middle, gradually moving towards the edges.
In the place of fastening with fittings, leave 6 mm for “walking/expansion” of the material. If work is carried out during the cold period, the gap should be larger (10–12 mm).
Temperature clearances are calculated when installing fasteners/starter molding
Stage 3. Installation of the attachment part
The overlay panel is aligned horizontally, adjusted to match the cutouts and attached over the first plank with an overlap.
Reinforce under long sections to eliminate sagging. Nail a piece of block/board in the right place directly to the wall.
Carry out the fastening slowly, carefully adjusting each part, then the joints will be less noticeable. The finishing strip is installed before installing the last row
Stage 4. After installation
A sealant will help prevent the penetration of dust/moisture in the areas of the linings. Choose a special type of siding; it is elastic and absorbs the “walking” of the planks by 50%, for example Tytan, Weather Master.
Seal the panel seams with sealant.
Description of components
- starting profile - a load-bearing element, the first siding panel is attached to it;
- the finishing strip is the last one in the row, hiding the top edge of the last panel;
- corner elements - they are used to form corners, the profiles have grooves in which the siding panel is placed;
- platbands for doors and windows - perform a decorative function, decorating door and window openings;
- window and door profiles - if the window or door is not located flush with the wall, but in a recess, then these profiles will help close the slopes during finishing;
- J-profile is needed for fastening panels, sometimes used instead of corner profiles;
- The J-chamfer is necessary to decorate the edge of the roof, otherwise it is called a wind board;
- ebb tides are designed to drain water from the walls;
- ceiling soffits can be perforated or solid; they cover the overhanging part of the roof from below; perforated ones provide ventilation between the siding and the wall;
- moldings connect panels located in different planes;
- H-profile is required for joining panels.