You can decorate the facade of a building using various materials that are manufactured for the purpose of external decoration of walls. Popular external coatings include: plaster, brick, stone, siding, and hanging structures.
The most unpretentious and at the same time durable material is siding. A prefabricated structure made of various types of panels is a decorative design for walls, and is durable and environmentally friendly.
Panels can be made of metal (aluminum or steel), polyvinyl chloride, ceramic, acrylic.
In this article we will tell you how to cover a house with metal siding with your own hands.
Metal siding: preparation for work and equipment
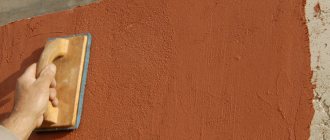
To properly install metal siding, you must first prepare the walls : clear debris from them, seal cracks (if any), cover them with a primer mixture. Inspection of the walls is important: you should check the perpendicularity of the corners, the vertical and horizontal lines of the wall (check by level and plumb line).
At the stage of preparatory work, the markings should be applied correctly: the quality of installation of the metal cladding depends on how correctly it is done.
In addition, it is important to properly prepare the cladding material itself: it is necessary to cut and cut the panels for further work .
The metal sheets are covered with protective foam, which must be removed before starting work. If a panel with a protective film is left in the sun, it will be quite difficult to remove it, since under the influence of sunlight the film sticks to the surface even more.
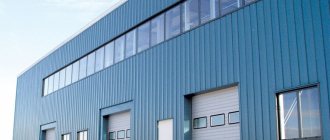
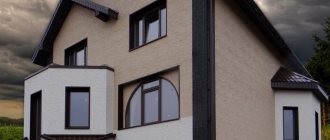
House with metal siding
Siding cover kit
In addition to the main covering - metal siding panels - it is necessary to purchase component materials for the complete design of the cladding :
- Cornice strips . Necessary for the design of window and door openings, as well as for the design of panel joints;
- window trims . For the design of slopes of openings and windows;
- external corners . For decoration of external corners;
- internal corners . To design internal joining corners of panels;
- starting bar . To create a lower support and guide under the siding panels;
- finishing bar . To design the top (finish) panel;
- soffits _ For decoration of the cornice part of the facade and overhangs;
- connecting strips . To design connecting adjacent planks;
- J-bar. For decoration of windows and doorways.
NOTE!
When purchasing siding panels, you should immediately purchase components. It is recommended that all materials be selected from the same manufacturer: in this case there will be a complete match of elements in fastenings and a complete match in color.
If you take additional elements from other manufacturers, the color and dimensions may not match.
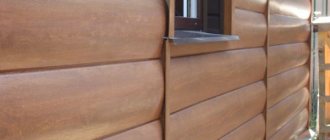
Metal siding is divided into the following types:
- Under the tree;
- Under the beam;
- Ship plank;
- Under a stone;
- Under the brick;
- Under a log.
Equipment
Basic recommendations for working with metal siding
When covering, a number of factors need to be taken into account:
- It is necessary to accurately calculate the amount of material for cladding the building. To do this, measurements are taken of all areas of the facade that will be finished. A scheme of work is drawn up; it is especially relevant when creating complex compositions that involve a combination of several colors on one wall. You can confirm the resulting calculations with the help of consultants at points of sale.
Calculation of siding area for cladding walls, pediment, cornice - The number of additional elements and related materials is calculated separately. The technology assumes that components from the same manufacturer must be used for installation; deviating from this rule is possible only in extreme cases.
- The most preferable solution is to cut steel siding to order according to a drawn up diagram, this will allow you to obtain finished parts of the required dimensions. If this is difficult, then trimming is carried out with an electric jigsaw with a suitable attachment or a reciprocating saw. It is not recommended to use a grinder or similar tools that operate at high speeds, as they lead to overheating of the cut area, which causes corrosion.
- All parts must be installed taking into account the thermal gap. Iron panels do not expand as much as PVC products, but under the influence of high temperatures, fragments that are too tightly fixed are deformed. The optimal gap between the hole and the head of the self-tapping screw screwed in the center is 1 mm. Fixation is carried out in the direction from the middle to the edges of the panel.
Installation of panels taking into account the thermal gap - Before purchasing the material, you should read the instructions placed by the manufacturer on the label or separately. It should contain not only the characteristics of the product, but also the order of work, as well as recommendations regarding additional elements. Products must have all necessary certificates.
- After purchase, the panels are stored on a flat surface in a horizontal position in a place protected from precipitation.
Following the recommendations will help you avoid further problems.
Preparing tools
Despite the fact that installation of metal siding is done manually and does not require special equipment, you should still stock up on the necessary tools :
- Tin scissors (or metal saw) for cutting panels;
- a puncher for making mounting holes (or a punch);
- a screwdriver for screwing in self-tapping screws;
- hammer (if using nails for fastening);
- a drill attachment for screwing in self-tapping screws with a seal;
- tape measure (preferably fabric, so that the metal tape measure does not damage the panel coating);
- level (preferably laser or other long);
- a plumb line to track the verticality of walls and sheathing;
- square (wooden or plastic if possible).
You should also stock up on protective equipment: glasses, gloves. It is necessary to purchase self-tapping screws and a small can of paint similar in color to the panels to paint over accidentally damaged parts of the material .
CAREFULLY!
You should not use a grinder to cut metal siding panels: the tool can damage the protective polymer layer, which will lead to corrosion of the material.
In addition, it is not recommended to use staples when fastening elements (corners, planks).
Tools
Advantages
The main advantages of metal siding are:
- Long service life . Most manufacturers guarantee the service life of their products for 20-25 years without burnout and up to 50 years before through corrosion;
- Light weight structure . Since thin sheets of metal (about 0.5 mm) are used in production, and protective coatings are applied in a layer calculated in micrometers, then 1 m2 is only about 4 kg;
- Economical . By using domestic metal, creating an extensive logistics network and distributing production facilities throughout Russia, manufacturing companies can offer metal siding cheaper than foreign manufacturers;
- Environmental Safety . Metal panels, unlike PVC, are not only non-flammable, but also do not emit harmful substances during operation;
- Ease of installation . Due to the fact that metal is not so susceptible to thermal deformation and is not afraid of low temperatures, the installation process is not complicated by the need to control the tightening force of fasteners, there is no need to leave special temperature gaps, etc.
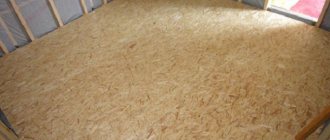
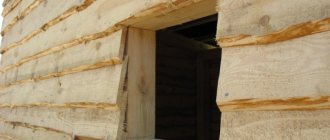
Wall sheathing for siding
Cladding panels should be mounted on pre-installed sheathing . The sheathing can be made of metal profiles or wooden beams.
If wooden guides are used, they should be prepared: dried, treated with special agents against the formation of mold, mildew, beetles and coated with protective agents against moisture.
A metal profile is most often used for metal siding : it can withstand the load more reliably (metal siding has sufficient weight), is durable, and also does not require additional processing.
For wood sheathing, beams with a cross section of 5x5 cm should be used . It is permissible to make a metal lathing from a metal profile, which is used for installing drywall.
Installation of the sheathing begins with the lower and upper guides, as well as from the corners.
The direction of the frame lines under the siding is determined in accordance with the laying of the panels : when the panels are placed vertically, the guides are attached horizontally and vice versa: when the panels are laid horizontally, the sheathing is done vertically. The sheathing step is recommended to be from 30 to 50 centimeters .
Around the windows, bars (or metal profiles) are mounted close to the window. The lathing around doorways is done in a similar way.
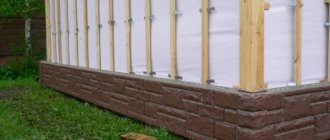
It is recommended to install insulation under metal siding: it reduces heat loss and increases sound insulation. Therefore, after completing the sheathing, insulation is laid.
Lathing
Waterproofing, vapor barrier, wall insulation
A layer of waterproofing is installed under the metal siding on the insulation : the water that gets under the ridge of the roof in the form of snow or rain flows down the walls.
At the same time, when it hits the waterproofing layer, it falls down to the foundation and into the drainage system. At the same time, the waterproofing layer protects the insulation ; it also does not prevent the escape of vapors from the room.
If there is no insulation, it is still necessary to install waterproofing under the metal siding.
Along with the waterproofing layer, it is recommended to lay a vapor barrier layer under the insulation to remove wet vapors from the side of the building and protect the insulation from them.
In cases where the building is built from materials with vapor-tight properties, a vapor barrier is not installed. But in this case, it is contraindicated to insulate from the inside: there is a high probability of the insulation getting wet.
Under metal siding, mineral wool or glass wool is most often used as an insulating layer : they provide good insulation and are good sound insulators.
The insulation is placed tightly between the sheathing guides over the entire area of the facade without gaps between the joints. Installation is carried out on a vapor barrier membrane. A waterproofing film is attached to the top . Next, the siding is installed.
Vapor barrier
Application area
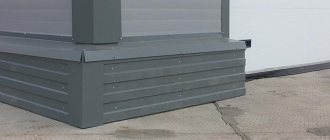
Metal siding is widely used for finishing building facades, plinths and eaves of roofs, as well as ceilings.
Despite the “heavy” name, metal siding is a lightweight finishing material
Facade siding is used only for finishing external walls. Basement siding differs from ordinary siding in its moisture resistance and darker shade and is used to finish the lower part of the building (basement). Finishing of roof eaves, as well as open terraces and balconies, is done using perforated siding , the panels of which have slots for better air circulation. The second name for perforated siding is soffit. Ceiling siding is used for finishing ceilings in both indoor and outdoor spaces (gazebos, garages, terraces).
Installing starter siding strip
Before you begin laying the main siding sheets, you must install a starting strip. To do this, you need to determine its location.
The starting bar should be 40 centimeters higher from the bottom horizontal line of the building . To secure the starting strip evenly, you should draw a line along the entire perimeter of the building on which the starting strip will be attached.
To attach the plank, you should attach it to the marked line with the upper edge and secure it with self-tapping screws in the wall. This option is suitable for a wooden wall.
If the walls are concrete or brick, then, having attached the plank to the intended line, you should mark the fastening points and drill holes for the dowels, and then fasten the plank with self-tapping screws by screwing them into the dowel .
IMPORTANT!
When attaching the starting strip, a gap of several millimeters should be made between the ends to prevent deformation of the coating.
The pitch of fastening the starting strip should be up to 40 mm.
Installing the starting bar
Setting internal and external corners
Any angles must be set in strict accordance with the vertical line. If the angle deviates even by a few degrees, the entire structure will be uneven and incorrect.
When installing a corner (internal or external), you should step back from the top edge of the facade about six millimeters and down from the starting strip - about 8 mm.
In order to evenly fasten the corner strip, it should be applied to the fastening point, fixed in a strictly vertical position, first on the two upper screws (not tightly), and then screw in the remaining fasteners sequentially from below.
The corner elements should not be fastened tightly enough with self-tapping screws (leaving a gap of 1-2 mm).
If you screw the screws in very tightly, the metal sheet may subsequently become deformed.
If it is necessary to lengthen the corner element, then an overlap of 2.5 centimeters is made by placing the upper part on the lower one. The peculiarity of the joining for all corner parts is the execution of the joining seam at the same level .
Setting obtuse angles
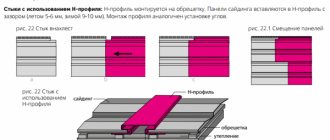
Installation of H-profile
H-profile for metal siding is an element that serves as a design for the joints of the main cladding panels.
Installation of the H-profile is not difficult: the main thing is to correctly calculate its location .
Installation is carried out similarly to the corner elements: first, the upper screws are attached, then other screws are screwed in along the entire perforation in 4-cm increments . In this case, it is necessary to indent a few millimeters above the cornice and retreat down from the starting strip - 6 mm.
To lengthen the H-profile, the profiles are joined with an overlap (the upper part overlaps the lower by 2.5 cm). It is recommended to join the profiles at the same level so as not to disturb the decorative design.
Installing the H-connector
4.1. Control of the cladding plane
During installation of the leveling system, check the plane of the cladding using a level, a standard rule strip, or strings.
Permissible deviations in the position of the guide profiles: - vertically (horizontally) in the plane of the wall - 5 mm; - vertically (horizontally) perpendicular to the plane of the wall - 3mm; — from the specified distance between adjacent profiles – 10 mm; — coaxiality (coincidence of the central axis) of profiles adjacent in height – 4 mm; — the ledge of profiles adjacent in height is 3 mm.
How to get around window and doorways
J-profile is used to design window and door openings . You can use special platbands.
The depth of window openings (including door openings) can be different, which is why installation is carried out differently.
Windows that are located in a recess in the wall are designed similarly to the corners.
If windows and doorways are located in line with the wall, then you should use elements designed for this purpose - aprons - to decorate them.
Installation of the apron begins from the bottom of the window recess . Next, its side parts are attached. It should be taken into account that the side elements should be located on top of the bottom bar. The top bar should overlap the side elements.
NOTE!
When using a J-profile, installation is carried out with an overlap. With this type of fastening, two side strips should be used, as well as an upper and lower one.
Without decorative design of openings (both window and door), a mark is made on the profile located at a distance equal to two lengths of the width and height of the opening.
Next, cuts are made in the corners, and the profile is bent in the shape of the letter P. It is fastened along the perforations in the central part, at a distance of approximately 15 cm from the corners. Next, the J-profile is installed .
Doorways are designed in a similar way.
Installation of window openings
General information
These instructions provide all the necessary information regarding the installation of Metal Profile siding.
Before you begin, please read these instructions carefully. ATTENTION! A mandatory condition for providing a guarantee is compliance with the rules of transportation, storage, loading, unloading and installation!
Transportation
- Siding panels must be loaded onto a flat, solid base of the body. The length of the body should not be less than the length of the packs with siding.
- During transportation, it is necessary to ensure that the products are protected from movement and mechanical damage.
- The recommended vehicle speed is up to 80 km/h. It is necessary to avoid sudden acceleration and braking.
Loading and unloading, storage
- Loading and unloading of siding should be carried out using lifting equipment with soft slings, and for bundles longer than 5 meters - using traverses.
- When unloading manually, it is necessary to involve a sufficient number of workers (at the rate of 1 person per 1.5-2 m of sheet), but not less than 2 people.
- The sheets must be lifted and moved carefully in the position as in the figure, avoiding strong bends.
- It is prohibited to throw sheets or drag them.
- Storage conditions when exposed to climatic factors must comply with conditions 3 according to GOST 15150 (unheated rooms without direct exposure to sunlight and rain).
- Packs of siding in original packaging must be laid on level ground on 50x150 mm beams with a step of 0.5 m in one row.
- When storing for more than 1 month, it is necessary to open the packaging film on each end side of the packs to ensure ventilation.
How to attach siding
To ensure that the cladding does not deform and the panels hold securely and firmly, during installation you should follow some fastening rules :
- The self-tapping screw should be fastened with a gap of up to two millimeters to ensure free expansion of the material. In this case, deformation of the sheets can be avoided;
- Rubber washers should be placed under the screw heads;
- You should use self-tapping screws that are treated with a coating that protects hardware from corrosion;
- the panels should be fastened to each other using specially designed locks that snap into place, making the seams airtight;
- the step of fastening elements should be no more than 40 centimeters.
In addition to securely fastening the panels in the area of corners, window and door openings, it is advisable to lay insulation to prevent moisture vapor from entering the structure.
Correct fastening
Laying siding panels
Installation of panels, regardless of direction, starts from the corner. The first panel must be brought around the corner and inserted with the end part into the starting strip .
It is recommended to fasten each element starting from the center, moving towards the edges . Each subsequent row of sheets must be attached to the previous one by snapping into the lock.
The required opening is cut out under the windows and the panels are installed sequentially in rows.
This is how the entire front part of the siding is laid out up to the penultimate row. Next, the finishing strip is installed.
Technical specifications
STARTING MATERIAL - rolled galvanized steel with polymer coating in various colors.
| Metal thickness: 0.5 mm for siding; 0.5 and 0.7 mm for facade panels. Panel length up to 6,000 mm Weight sq.m. siding thickness 0.5 mm - 5.67 kg/m2 Weight sq.m. facade panel 0.5 mm thick - 5.61 kg/m2 0.7 mm thick - 7.84 kg/m2 |
Laying the last row and finishing
After completing the installation of the penultimate row, you should then attach the finishing strip . The distance to the last row of siding panels is measured from the edge of the plank. The strip should be bent so that it fits into the lock on the bottom of the panel.
In this way, the entire last row of covering on the facade is designed. Next, if necessary, install panels on the gables .
Installation of finishing strips