Material characteristics
Sheathing options
People started using wooden parts for both interior and exterior decoration of their homes a very long time ago. At the same time, technology has constantly developed, because today there are many materials that can be used to solve this problem.
Below we provide brief characteristics of those that are used most often:
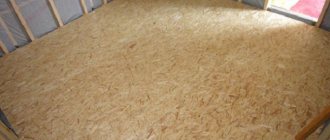
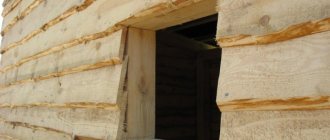
- Unedged board - parts obtained by sawing logs into plates without aligning the edges. Despite the rather sloppy appearance, the material can be used for decoration, especially if the entire interior or exterior of the building is stylized as antique (rustic and country styles).
The use of unedged boards in exterior finishing
Advice! Before installation, be sure to clear the unedged board of bark, and then trim off the thin edges to avoid cracking.
- Edged boards are used a little less frequently as a finishing material, but they allow you to create a smooth surface suitable for painting or applying decorative plaster. The main disadvantage of this design is that when drying, the dimensions of the board decrease, and quite large gaps form between the parts.
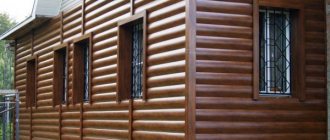
- Wooden lining, block house and imitation timber are materials that are aimed specifically at covering surfaces. Their design provides for the presence of locks - protrusions and depressions at the ends of the panels, which, when connected, overlap the seams and form an almost airtight connection.
Photo of pine lining
Note! For interior decoration, lining is usually used, while for exterior design craftsmen give preference to false beams or block houses.
- Planking is a board for finishing facades that has undergone special treatment in a high-temperature chamber. Thanks to this, the parts become virtually impervious to external influences, so they can withstand moisture and temperature changes without deformation.
Oblique planking (another name is planken) for facades
Of course, the range of products used for cladding houses is much more extensive: finishing boards differ from each other in appearance, installation method, and cost. So you can easily find a suitable option!
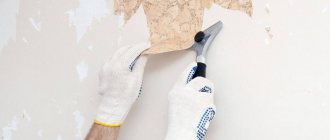
Ways to protect finishing boards from external influences
Products used for finishing various surfaces are distinguished from each other not only by their appearance and price, but also by the processing method. The thing is that wood is a fairly hygroscopic material, and if it is left unprotected, then even indoor decoration will lose its attractiveness over time.
The result of firing with different intensities
There are many ways to process boards, and in the table below we describe the most effective:
| Methodology | Short description |
| Drying | Any instructions for preparing wooden parts for use in sheathing begins with a description of the drying process. The thing is that wood, losing moisture, decreases in size, therefore, by using raw wood, we practically guarantee that cracks will appear in the finishing over time. |
| Burning | If we need to protect the wood quickly and do it ourselves, then it is enough to “walk” over the surface of the dried boards with a blowtorch. This extreme exposure removes moisture from the upper layers, significantly increasing the strength and stability of the part as a whole. |
| Heat treatment | High-temperature treatment using steam is often used in the production of facade boards. This effect is similar to firing, but unlike an open flame, steam does not damage the fibers, preserving their natural color and structure. |
| Impregnation | To protect wood from moisture and microorganisms, complex impregnations are used. The oil-based hydrophobic part covers the fibers with a thin film, and antiseptics inhibit the development of bacteria and fungi. |
| Painting/varnishing | Finally, you can use a barrier protection method by applying varnish or paint to the finishing surface. In this case, the material will simply block the contact of wood fibers with water and other external factors. |
Applying a protective composition to the surface
Advice from professionals
To ensure high-quality installation work and obtain the desired result, you should listen to the following advice:
- Check the quality of the material when purchasing.
- Before installation, finishing materials made of wood should sit for 2-3 days. The fact is that wood shrinks due to changes in humidity and air temperature. If you carry out the installation right away, after a while the tree will shrink and space will appear between the planks.
- It is advisable to create a gap between the wall and the finish and organize ventilation. Condensation can collect on the back of the planks, which can cause the wood to rot.
Tags: board, unedged, finishing, wall
« Previous entry
Installation method
Regardless of which board you chose for wall covering, such products are installed according to a similar algorithm. The main difference between the procedures is the need for insulation or waterproofing of wooden parts, as well as in the method of fastening the parts.
The general scheme of work is as follows:
- First, we prepare the base by cleaning it, and then treat it with moisture-proof and antiseptic components.
- Then we install the sheathing on the base - a frame made of beams or a steel profile, to which the sheathing itself will be attached.
Sheathing made of steel profile
- If necessary, we lay insulation between the cells of the sheathing - polystyrene foam, polystyrene, mineral wool, etc.
Note! Cellulose wool can be blown under the boards after they are installed, but then the thermal insulation process must be planned in advance, specifically leaving holes to fill cavities in the frame.
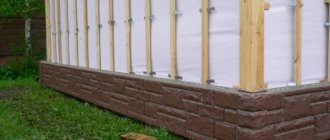
- We lay membrane material on top of the insulation and sheathing, which will protect objects under the sheathing from moisture and condensation.
- We mount the finishing panels, fixing them to the sheathing using glue, self-tapping screws, nails or special clips - clasps.
Installation diagram of parts on clamps
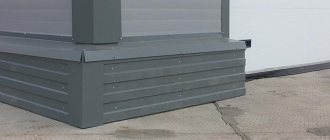
- At the final stage, we install additional elements - skirting boards, fillets, corner trims, flashings, etc.
Waterproofing
How is a house finished with lapped boards? Is it possible to combine this method of finishing the facade with its insulation? What types of wood are best to use? How to waterproof a facade, and what impregnations should be used to protect wood? In our article we will try to find answers to these and some other questions.
Country style house.
Lapped boards are far from the most effective in terms of weather protection and are not the cheapest finishing method. The advantages of this solution mainly come down to the fact that it creates a certain style: country style implies an exaggerated, old-fashioned, extremely simple finish using exclusively natural materials.
That is why for finishing we use lumber with distinctly uneven edges and a completely preserved structure of the wood layers - unedged boards.
We invite you to familiarize yourself with: Do-it-yourself chimney damper
Let's find out which types of wood are preferable for finishing. In general, if you use protective impregnations, you can safely use inexpensive spruce and pine. However, larch cladding is the most practical.
Information: the price of a cubic meter of unedged larch boards starts from 13-14 thousand rubles.
Why larch?
- It is not susceptible to mold fungi. The resin composition of this softwood makes it impervious to rot;
- Larch practically does not absorb water and, as a result, is least susceptible to deformation due to fluctuations in humidity.
The optimal board width is 300 millimeters. Thickness can vary in the range of 22 - 30 mm.
Unedged board made of Siberian larch.
A board façade, like any other, needs ventilation. And not only from the front side, but also from the back: dampness under the cladding will not benefit the walls, regardless of their material.
The boards are usually attached horizontally to the sheathing to prevent water from flowing between them. If so, the sheathing must be vertical. A block with a cross section of 50x50 mm is used for it.
How can the beam be attached?
- To a wooden wall, provided that the facade will not be insulated - with ordinary nails 100 mm long;
- To brick walls or facades made of gas and foam concrete - with dowel screws;
- When laying insulation of considerable thickness into the sheathing, the block is attached to direct hangers for the profile under the plasterboard.
Useful: to secure the entire sheathing in one plane, it is enough to place the two outermost bars at the required distance from the wall. Then two or three threads are stretched between them, which serve as a guide when attaching the remaining elements of the sheathing.
To protect the sheathing from rot and mold, antiseptic impregnation is used. The antiseptic is diluted in water and applied to the surface of the bar with a regular brush.
The pitch of the sheathing is selected so that the length of the board is a multiple of it. The typical step for lathing without insulation is 1.5 meters; When laying insulation, the bars are packed in increments equal to the size of the slab of heat-insulating material.
The sheathing pitch is equal to the width of the insulation boards.
When choosing insulation, it is important to remember the main rule of forming the structure of the facade: the vapor permeability of the walls should not decrease from the inside to the outside. Otherwise, moisture will accumulate in the thickness of the walls.
The consequences are quite predictable:
- Decrease in the thermal insulation qualities of the wall;
- The appearance of fungus;
- Reduced service life of capital structures.
As a rule, slabs of glued mineral wool are used as insulation. The material is covered with a windproof membrane that protects the facade from blowing. A furniture stapler is used to attach the membrane to the sheathing.
An important point: a gap of 1-2 centimeters is left between the windproof membrane and the sheathing board. This instruction is related to the need for ventilation of the back side of the sheathing. A ventilation gap can be created by bending the membrane on each block inward and securing it with a stapler on the side edges of the block; As an option, you can put a counter-latten made of a thin wooden batten on top of the main lathing.
Waterproofing will provide reliable protection from dampness.
Coating waterproofing is used on facades made of brick, aerated concrete or rubble. Wooden walls are covered with rolled material along the lathing with an overlap of 10 centimeters. A ventilation gap is left under the waterproofing, ensuring vapor permeability of the walls.
A special case
If a roof made of overlapping planks is installed, its structure will be noticeably different from that accepted for more modern roofing materials.
The traditional installation scheme is as follows:
- The basis of the roof is on the rafters, and the longitudinal logs laid on the gables of the house are laid down;
- At the base of the slope, a so-called stream is hung on hooks - a log hollowed out inside that serves as a drain;
- The board is laid along the slopes in two layers. In this case, the lower edge of both layers of the board rests against the flow, and the upper edge is pressed down by a log - a log.
The photo shows a house with a plank roof.
With the use of modern waterproofing materials, this scheme can be significantly simplified:
- A sheathing of boards or timber is placed on the bed;
- A layer of waterproofing is laid on the sheathing, extending to the edge of the gutter;
- A counter-lattice made of thin lath is placed on top of the waterproofing;
- The board is laid parallel to the planks with an overlap that prevents water from flowing in.
Laying the board parallel to the slabs.
The main problem with a plank roof will be the deformation of the boards due to constant fluctuations in humidity.
To prevent deformation, protective impregnations - water repellents - are used. Among the most famous impregnations, it is worth mentioning Aquatex - Extra and... ordinary drying oil. It is applied to the surface of the board heated in a water bath, in two layers without intermediate drying.
An important point: impregnation will have to be repeated every two to three years. From a practicality point of view, boards are not the best material for roofing.
How to cover a house with overlapping boards with your own hands?
- The sheathing starts from the bottom;
- Several spacers are stuffed under the bottom of the first board - scraps of wood, allowing it to be secured at the desired angle to the wall;
- The following boards are attached with an overlap of 5 centimeters. The fasteners (nails or screws) are hidden.
We invite you to familiarize yourself with: Brick-like facade panels for exterior decoration of a house: types, pros and cons
The corners are decorated with boards stacked vertically on top of the sheathing.
Joints and gaps are filled with polyurethane sealant. Weather-resistant paint or decorative protective impregnations can be used as the final coating.
Which wood to choose to cover a house with unedged boards: how to do it yourself
More recently, such material as unedged boards was used for cladding buildings for utility purposes. But today this option is also common among residential buildings. To give the house originality and style, it is sheathed with unedged boards.
What is the attractiveness of this finishing method and how to do it yourself, these are the questions that those interested will receive an answer to today.
Pediment made of unedged boards. Constructive?
I’m thinking about the idea of constructing a pediment in a log house from unedged boards... Comrade.
The aircraft carrier made something similar... thanks to him for the idea. The facade is ventilated, the outer side looks something like this (the boards are packed horizontally).
What is confusing is that since the boards are horizontal and overlapped, the water will stagnate there... The gap is required for ventilation.
How to organize such a gap?
It will not be possible to do without the bottom layer of boards because... the windproof film will be visible...
What kind of material: its advantages and disadvantages
A board that has a raw edge, and even the remains of bark, is called unedged. The cost of such material is lower than fully processed and polished. But modern designers have found use for this type of wood. Now it is fashionable to use unedged boards for cladding the facade of a house.
Correctly fitted elements create an imitation of a house built entirely from wood material. Even the raw edge gives it an original and slightly rough but natural look. Like processed boards, unedged boards have a set of positive and negative characteristics.
Let's look at the advantages first:
- Environmentally friendly - the material is absolutely safe for human health and the environment.
- Vapor permeability - wood allows vapor to pass from the interior to the outside, which allows you to create an ideal microclimate in the living rooms of the building.
- Thermal insulation and sound insulation properties.
- Simple and quick installation without the use of complex technologies and tools.
- Possibility of partial reconstruction if a small area is damaged.
- Attractive appearance.
- A variety of textures, which depends only on the type of wood.
- You can sheathe a structure of any geometric shape.
- Possibility to combine with other facing materials.
Now let's look at the disadvantages:
- the need to use protective impregnations;
- regular renewal of protective layers;
- without protection the service life is short;
- quickly damaged by fungus, mold, insects and rodents;
- easily ignites and sustains combustion.
Material Dimensions
Finishing is carried out with unedged boards of 16, 19, 22 and 25 mm in thickness, there are also thicker ones - 32-75 mm.
Specialized stores are replete with a variety of choices of this material, which is explained by the frequent finishing work with its use.
The creation and uniqueness of the play of chiaroscuro is the effect obtained thanks to the horizontal cladding. For facades, it is recommended to purchase unedged boards 30 cm wide.
Preference is given to high-density wood of northern species, which is characterized by a beautiful texture. I would especially like to note the selected butt wood and Siberian larch, which come without defects.
Wood species from which it is made
To sheathe the outside of a house with unedged boards, you need to choose the highest quality material. An important parameter is the duration of service. For these purposes, there are only a few options to choose from:
- Pine has a denser structure, which allows it to withstand strong mechanical loads.
- Spruce is not so dense, so it retains heat well.
- Larch is reliable in all aspects.
With the edged finishing board everything is clear. If there are any defects on the surface, then you should not buy it. It’s even easier with an unedged board. But when choosing this material, you should pay attention to several points:
- quality of cut - a good product should not have chips, gouges or other defects;
- bitches – there can’t be too many of them. The presence of such a defect reduces the quality of the board and also provokes curvature of the material during drying;
- cracks - reduce strength, reduce service life and compromise the integrity of the material;
- curvature - if the board has such a defect, it is difficult to fix it on the base.
Facade board. Types and features
The familiar lining, block house, imitating the style of log houses made of hewn logs, and boards imitating timber, are similar in the installation method. They are fastened using the tongue and groove method. They are mounted tightly, without gaps, often using the open method, that is, with self-tapping screws through and through.
Planken
A new word in the field of construction. Planken - what kind of material is this? At its core, it is an edged board, well sanded on all sides. There are two types of plank profiles - with straight and beveled ends of the boards. The straight ends of the plank have an edge angle of 90°; as a rule, installation occurs with an overlap.
Figure 2. Finishing the facade with planken.
An innovative material that has burst into the construction market. Previously, only floor coverings were made from composite wood boards. Today, with the advent of new technologies, the production of panels is practically waste-free. In the process of manufacturing a wood-polymer composite, wood flour is mixed with synthetic substances and polymer resins.
As a result, the resulting product is very durable, not subject to deformation, resistant to fading and does not require special care. The appearance completely matches the structure and color of the wooden covering. Siding is easy to use: it can be easily sawed off or trimmed; the plasticity of panels made of fiberboard is achieved precisely because of the presence of a polymer composite in the composition.
Thermal board
The name of this material contains the word board, but this is only a conventional name. The process of modifying wood with gradually increasing temperatures changes its structure so much that it radically changes its performance characteristics. Thermal board panels become moisture-proof, lightweight, and durable.
The appearance of the finish is not inferior to elite types of wood, repeating the structure and color of, for example, oak. Basically, planken made from thermal boards is in high demand. But if you wish, you can clad the house with clapboard or panels that imitate timber. For facades, thermally treated fir, alder, beech and maple are used. The “thermo” prefix does not affect installation methods in any way.
Particularly loved by admirers of natural finishing materials is larch. It is able to transform the appearance of the facade, giving it a noble, status look. And the price of larch panels is quite affordable. When choosing facade slabs from this coniferous wood, you only need to be guided by the chosen design style. A variety of color solutions will help realize any design idea.
The technical and operational characteristics are amazing. Even in the absence of any treatment with impregnations and special means, a larch facade will last at least 25 years. The antiseptic properties of wood will prevent the development of fungi and mold, and will protect against wood insects. Larch is resistant to large temperature changes and changes in weather conditions. If there are no shortcomings, the larch facade will become an original decoration of the house.
Price overview
The price range for facade panels is in a wide range. You can get by with unedged boards when cladding, for example, outbuildings. It is, in fact, not a facing material; it is sold by the cubic meter and can be quite inexpensive.
Average prices for façade boards are shown in the table below.
| Name | Unit. | Price |
| Planed board | 1 sq. m. | From 210 rubles |
| Lining | 1 sq. m. | From 460 rubles |
| Planken (oblique and straight cut) | 1 sq. m. | From 799 rubles |
| Planken/siding | 1 linear meter. | From 250 rubles |
| Thermal board | 1 sq. m. | From 1600 rubles |
| Dpk board | 1 sq. m. | From 1900 rubles |
Facade panels made from elite wood species are usually made to order, and there is no maximum price range.
Subtleties of wooden wall design
If you have already chosen a wooden option for finishing the facade, you should take care of the material in advance. Unedged boards require a special approach. First, they decide whether to leave the bark on the board or not.
If the bark is left, then you need to choose elements where this layer is securely held and does not peel off or crumble. In the case when the bark is not needed, then everything is cleaned and thoroughly sanded.
Further, absolutely all wooden parts are coated with antiseptic and moisture-repellent compounds. If this is not done, the material will quickly become covered with unpleasant-looking stains, and over time, rot.
The wood can be painted and given an original shade, or you can choose a transparent coating in the form of varnishes. In the second option, the natural color and, of course, the texture of the wood are preserved.
Finishing materials for an apartment: mounting options for different room designs
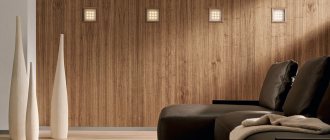
Recently, wood has been used more and more often to decorate walls in the house. This is due to the modern desire to use environmentally friendly materials. In addition, wood looks very beautiful on the walls. The use of this material is always welcome: it is suitable for a bedroom, it will add solidity to an office or guest room, and it will look laconic in the hallway.
Wooden finishing materials are distinguished by their diversity; before choosing, you should familiarize yourself with each of them in more detail:
- Lining. It is used for both external and internal work. The panels are durable, have good heat and sound insulation, and are durable.
- Eurolining. It differs from the previous version with more modern manufacturing technology. It has an improved connecting system (the likelihood of the slats diverging has decreased); the slats have special ventilation channels that prevent the formation of condensation on the back side of the slats.
- Gusvarblok. A special feature of the material is the ability to combine gusvarblock panels of different colors and textures.
- Wooden wallpaper. Made from noble wood, there are more than 100 types of wallpaper on the market. The material is sold in veneer rolls, sheet thickness - 0.1-0.6.
- Wall panels. Made from solid wood: cedar, flax, oak, alder.
Wood allows designers to unleash their full creative potential: the variety of finishing options for this material will surprise many. We will tell you only the most interesting of them.
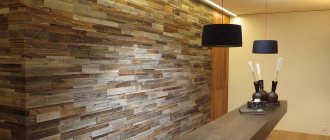
Diagonal installation of wooden planks is a real art. Many even make their planks into intricate patterns, and even entire paintings, combining materials of different shades and sizes. Diagonal installation is distinguished by its originality and does not require special skills. Everything happens according to the standard scheme, only the top and bottom edges of the board need to be aligned at the desired angle.
It is not advisable to decorate all walls in this way. It is recommended to use wood cuts as a separate decorative element. For example, with their help you can highlight a relaxation area: decorate the wall behind the sofa. Select a certain section of the wall with an old wooden frame, and fill the spaces inside the frame with saw cuts of different sizes.
We suggest you read: What should be the temperature in the hammam?
Original ways to use:
- Instead of a railing at the stairs. The bars are installed from floor to ceiling, enclosing one side of the staircase.
- As a wall decoration. Initially, it is recommended to paint the wall with a contrasting color, preferably dark, after which the bars are mounted to the wall in a hidden way, and free space is left between them. Dark gaps will create an amazing effect.
To do this, all the bars need to be cut into small squares of different widths (from 2 to 4 cm). After which they are mounted close to each other on the wall in a hidden way. Different widths of the pieces will create a relief wall.
This material will look beautiful without the use of special techniques. We simply mount unedged boards on the wall in a herringbone pattern or one to one (then there will be empty gaps).
The second interesting option is to vertically attach an unedged board from a large tree to the wall. It will look beautiful if you choose a board of an unusual shape.
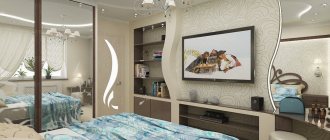
Bedroom cladding
A classic option for a bedroom is to decorate the space at the head of the bed with wooden panels. Some designers specifically provide a niche in the wall for such decoration. The type of lumber does not matter: edged or unedged boards, lining, laminate, etc. You can complicate this design option and put together some kind of pattern from the boards or use a combination of shades to lay out a full-fledged picture.
A guest house is an ideal place to use wood trim. It will give the room coziness, beauty and create a homely atmosphere. The first tip: decorate the ceiling with wood. In general, you can cover an entire room with wood, creating smooth transitions from walls to ceiling, or combining it with other materials: lining with saw cuts or unedged boards, combining bars and laminate or wooden panels.
Carrying out house siding work
When the finishing method has been chosen and all materials have been purchased, all work begins. One person cannot do everything himself. Therefore, you immediately need to find yourself an assistant, or better yet two. In addition, you will have to build scaffolding to make it convenient to sheathe the walls at the top point.
Installation of sheathing
You can't do it without a frame. This element performs the following functions:
- levels the base and hides any imperfections that may have appeared during operation;
- supports insulation;
- creates a ventilation gap to remove condensation.
To build a frame they work like this:
- 15-20 cm retreat from the corner of the house. This will be the place for the first frame element.
- Make the same mark from another corner.
- The remaining area is divided into equal parts, the width of which corresponds to the width of one sheet of insulation.
- Fix all the parts in the marked places.
- Dowels are used for fastening.
We insulate and waterproof the house
It is better to use mineral wool as insulation under unedged boards. The material is non-flammable, which is important, because wood quickly ignites in a fire. But such insulation quickly absorbs moisture, which means that a hydrobarrier should be installed both outside and inside.
That's why they work like this:
- vapor barrier film. Lay overlapping from bottom to top. The joints are taped;
- the insulation is placed closely between the sheathing beams, but so that gaps do not form;
- The hydrobarrier is laid in the same way as a vapor barrier film.
A counter-lattice is installed on top. This will help create a ventilation gap and hold the top trim in place.
Fasteners
To secure the boards, use regular nails. Their size depends on the thickness of the finishing material. Each element is fixed to the sheathing bar with several nails. This will help make the design as reliable as possible.
Exterior decoration facade herringbone
Finishing is done from bottom to top in a way chosen and convenient for the owner. If this is an overlap option, then do it as follows:
- The bottom board is fixed at the level of the foundation or plinth.
- They retreat such a distance that the top board can cover.
- Fix the second board.
- Work up to the top of the wall.
- The second layer will be placed in a checkerboard pattern, that is, it will cover all the voids and at the same time extend onto the edges of adjacent boards by about 4–5 cm.
- Technology of external installation of herringbone façade
The second option for fixing an unedged board was also false, but requires more care in order to do everything efficiently and correctly. There are some nuances here.
Fastening the guides
There are no differences in the frame installation process. The main thing is to make the markings correctly and be sure to use a building level so that all elements are placed clearly horizontally and vertically.
Installation of siding panels
This method of finishing a house is usually started from the bottom of the wall. But you need to work very carefully and accurately so that the result is of the highest quality and moisture does not penetrate under the finish.
- the first element is fixed, adhering to the horizontal;
- the second board is pressed against the sheathing with its upper edge, and the lower edge covers the previous board by 2–3 cm;
- each subsequent board is laid in exactly the same way;
- To seal corners, you can purchase special corner elements;
- at the end, all joints are treated with polyurethane-based sealant.
Inexpensive and original home decoration with boards
To decorate the facade of a building, as a rule, standard materials are used. But if a person wants to decorate his home in a unique way, then he can use unedged boards. The building gets a very unique appearance. A huge advantage is the low cost of materials.
For cladding, you can use different types of materials.
- If we consider the characteristics of various types of wood, then larch is considered the best option. Wood is not afraid of high humidity; it has a lower degree of warping than all other species. It is easy to work with and holds nails well.
- Finishing the facade with unedged spruce boards is considered not a very popular option. Wood has its own impregnation. Due to the presence of a large number of knots, the boards have an attractive decorative appearance. After some time, noticeable cracks appear on them, so unedged spruce boards are used extremely rarely.
- The pine will quickly warp and soon become unusable. It is never used for exterior cladding.
- Hardwood will look very nice. In addition, it has a long service life. It is worth remembering that hard rocks are difficult to process, and nails can cause them to split if the work is not done carefully. Also considered a disadvantage is the high price of the material.
In order to make the house attractive from the outside, you will need a beam with a section of 20x20 or 30x30 mm. It will be used for the frame of the building. The average width of an unedged board is 30 cm. The thickness of the elements can be selected depending on preference.
You need to purchase sealant and mineral wool, antiseptic impregnation and protective impregnation in advance. Barriers for the insulation used and finishing products - varnish or paint - are purchased.
- All products must first be coated with a primer or a special substance for protection. This will increase the wear resistance of the elements several times and increase their service life.
- Next, waterproofing is installed on the walls where the boards will be finished. In this case, coating waterproofing would be the ideal option. It is necessary not only to take care of protecting the walls, but also to secure the blind areas of the building. The mastic is applied to the surface of the walls using a small brush. If there are gaps, the mixture is poured into them, and all excess is removed with a spatula.
- You need to wait until the waterproofing layer is completely dry. To prevent mold and mildew from appearing in the building, it is advisable to apply at least three layers of the mixture.
- Then you need to install insulation. Mineral wool would be an ideal option for external insulation. It does not ignite, it is not afraid of frost, high humidity, or precipitation.
We invite you to familiarize yourself with Wall cladding in a bathhouse inside
In order to correctly calculate how many elements will be needed to finish the house, you need to determine the installation option. There are several methods for fixing them.
- Butt.
There will be large gaps between the main elements used In this case, a lot of sealant or special material is additionally used, which is used for caulking. - "Herringbone." The elements are stacked so that the bottom edge of one product is on the top edge of the previous one. The end result can be an effect that resembles siding.
- Overlapping. In this case, the unedged boards will be arranged in a checkerboard pattern.
The last method is considered the most expensive, because you will have to use much more elements for the cladding.
After the most suitable cladding option has been selected, the total area of the building walls that will be treated is calculated. From the resulting amount, you must subtract the area that will fall on the doors and windows.
If you know at least approximately the size of the board that will be used for the facade, then you can calculate the almost exact number of elements used for the work. The material is purchased with a small reserve so that there will certainly be enough.
In order to finish a house with unedged boards, you need to use a minimum set of the simplest tools.
- For marking you will need a pencil and a long tape measure.
- Be sure to use a building level.
- You can't do without nails, a hammer and a square.
- Since the boards will have to be cut, a hacksaw is used.
- To apply the finishing touch, use a small roller or a special brush.
It is unlikely that you can do without a frame if you plan to cover the facade with unedged or some other board.
It plays a very important role and helps to level the base of the building and hide all existing defects that could arise as a result of long-term use of the structure.
The frame allows you to securely hold the insulation used. With its help, it is possible to create a special ventilation gap through which condensate will subsequently be removed.
Frame installation
If you plan to decorate the house with unedged overlapping boards, then you need to pay special attention to the correct construction of the frame.
The work is carried out according to the following principle.
- At a distance of 15-20 cm from the corner of the building, you need to mark the place where the very first element of the future structure will be fixed.
- Similar actions are performed in relation to the second corner.
- The area of the building that remains is divided into as even parts as possible, the width of which will be the same as that of the insulation sheets.
- At the places marked in advance, you need to fix the parts used with dowels.
This design for the exterior of a house is quite airtight due to the fact that the upper elements will overlap the edges of the lower boards. Additional work will need to be carried out exclusively at the corners of the structure.
The boards are mounted using ordinary nails on top of a layer of waterproofing and insulation.
The boards are packed vertically, then you can begin to secure the horizontal elements. It's worth moving from bottom to top. Each subsequent layer will be installed on the previous one with an overlap of approximately 2 cm.
Final finishing
After the boards for finishing the facade are securely fastened, sealant can be applied to the joints. Experts recommend using polyurethane sealants, which are more elastic and can withstand fairly strong stretching. They are not so afraid of mechanical damage.
A combination of beauty and economy
Lastly, the finishing coat is applied. Most often, varnish is used, which must be carefully applied to each board with a small brush.
An unedged board for finishing a facade is an excellent and economical option that will look very beautiful and original. Installation does not take much time and does not require any special knowledge.
Inexpensive and original house decoration with boards Link to main publication
Since wooden elements are the most characteristic of country, let’s consider them in more detail - what they are, where they are located, in what quantity. The material from which these elements are made is no less important.
| finishing element | Description |
| The facades of most country-style houses are covered with wood. The cladding can be solid or lattice; often only the top floor is finished with wood. For cladding, clapboard, planken, block house and unedged boards are used, which are usually attached with an overlap. The wood used is only hard deciduous and coniferous species, resistant to weathering. The materials are necessarily treated with protective compounds, thanks to which the wooden finish lasts for years. With the help of cladding, you can style almost any house as a country house, the main thing is to choose the right finish in color and complement the exterior with other elements of the chosen style |
| It’s even easier to style your home like German country - half-timbered. To do this, false beams are attached to the facade, which form a certain geometric pattern. Very often, beams are replaced with natural boards: the wood is impregnated with antiseptics and painted dark. If we compare wood paneling and decorating with beams, the second method is much more profitable, since less material is required. The beams are attached to the facade in increments of 40-100 cm, depending on the pattern, and can also only be located on the second floor. For such stylization, houses of regular shape with light-colored plastered walls are best suited, although red brick buildings in some cases look good |
| These products are the most decorative elements in the design of the facade. The country style is most characterized by wooden shutters with horizontally arranged slats like blinds. Although in the Russian direction preference is given to solid structures rather than lattice ones. Such shutters, if they are made of solid wood and not knocked down like a shield, are usually decorated with carvings made in various techniques. The appearance of the platbands also largely depends on the style direction. For example, in Canadian and American country these are roughly processed boards of a predominantly dark color; in English and French, the platbands are very neat and painted white; in Russian, they are carved |
| These small elements serve to support horizontal beams, cornices, roof slopes and at the same time decorate the under-roof space. As a rule, they are a piece of board in the form of a right triangle with a figured cut at the end edge. Thin consoles are usually decorated with openwork carvings; thicker consoles are simply painted and varnished. You can make them yourself, but this requires the appropriate tools and woodworking skills, so it is much easier to buy them. But attaching the consoles to the facade does not require any special skill and is very simple. Consoles are located at the corners of the house, on pillars, under all protruding elements of the facade - balconies, terrace roofs, second floor ceilings. They are fastened in increments of 60-100 cm, depending on the weight of the structures being held and the thickness of the consoles themselves. |
Additionally, for country style, a variety of wooden cornices, support posts, lattice railings, and ethnic decorative crafts are used. The more complex the architecture of the building, the more elements will need to be selected. The most successful in this regard are houses with open terraces, as well as a balcony or a protruding second floor. Here it is enough to install simple wooden columns as supports and mount horizontal railings from boards.
The most striking characteristic feature of the rustic style is the reference to ethnic motifs in the exterior decoration of the home.
Wood paneling
Edged board
Cutting bars
Coating care
Any wood material requires proper care, otherwise it will quickly lose its strength and aesthetic appearance:
- Mandatory treatment against parasites and rot.
- Protect the coating from moisture and environmental influences by treating them with stain or varnish.
Parasites and rot are the main enemies of wood finishing. If they are found, the panel must be immediately thrown away before the outbreak spreads to the rest of the planks.
Wood and lumber allow you to create a cozy and harmonious interior in any room. In terms of technical characteristics, this finish is not inferior to other materials, and its cost even allows you to save money. The main thing is to find your own design option.
Installation of poles
After studying the thematic section of the forum, the craftsman decided to abandon concreting in favor of butting. I drilled holes with a hand drill (200 mm) in increments of 3 m, to a depth of 1.3 m, filled in a 10 cm layer of crushed stone, compacted it and installed the pillars. Layers of sand and crushed stone with tamping and pouring filled the holes to the top. The pillars became strong, “like stone.”
As often happens, practical thoughts come late: after installing his pillars, the craftsman began to think about the durability of the supports and how he would have to change them in ten years due to insufficient wall thickness. For those still preparing, he advises the following:
buka23
If you need a fence that will last for decades, immediately think about the appropriate supports. What I came to: it is optimal to cover tubing pipes with a wall thickness of 5.6 or 7 mm, cover them with soil and protect them with bitumen. It's practically forever. If it’s cheaper, use a 100×100 mm wooden beam, burn it intensively and do not coat it, but actually soak it in pine tar and linseed oil. During installation, there is no need for concrete, only backfilling with crushed stone for “ventilation”. There is no need to fight the forces of frost heaving - it is easier to neutralize them.
How to mount everything
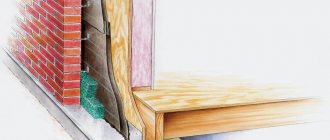
Typically, finishing the facade of a house with unedged boards begins with applying waterproofing compounds to the walls. This will protect the walls from moisture and you won’t have to think about the condition of the base surface after decoration. Next comes the insulation operations - if necessary, it is at this stage that an additional layer of insulation can be installed on the outside of the buildings. Only after all this work does the actual finishing begin. It is performed in the following sequence:
- Slats or bars are attached to the walls, which will serve as lathing for the outer covering. You can place them horizontally or vertically, depending on the orientation of the decorative covering strips.
- Insulation is installed if necessary and covered with protective membranes.
- The wall is sheathed with planks from bottom to top in the chosen method. The choice of covering option will be influenced by two factors: ease of installation and preference for appearance. If you cover the wall with overlapping strips, you will need a little more planks, but everything will be easier to do. Installation with a herringbone pattern will require more effort, but the appearance of the coating will be more attractive. However, this is a matter of personal preference.
- The joints of the boards are sealed with sealant and the final design of the wall is carried out.
There will be two cladding methods - overlapping, checkerboard or herringbone. The first option involves placing the boards in such a way that the upper one covers the edges of the lower ones on both sides. The second option is similar to a siding plane - the lower edge of the upper plank overlaps the top of the lower one.
Materials
buka23
I’ll tell you about my fence - a plot of 15 acres, the length of the fence along the perimeter is 110 meters. Three-meter pillars, made of profile pipe 60×40×2 mm, are prepared. Covered with epoxy primer, which is usually used to protect metal structures (bridges, supports), the bottom was additionally coated with bitumen mastic.
To fill the spans, the craftsman purchased 6 m³ of unedged wood boards with natural moisture content. Immediately after the purchase, it was debarked, treated with iron sulfate and stacked with pads for ventilation. This is one of the most important points - thanks to treatment with vitriol, the board is protected from pests and blue stains. Moreover, this same product will help transform wood already damaged by microflora. buka23 was convinced of this from his own experience by purchasing a batch of lumber (150x30 cm board, 2 meters long) for vertical.
buka23
I would also like to say something about iron sulfate - due to the start of the summer season, I couldn’t buy a board anywhere and at any price without being affected by blue stains. But, well coated with vitriol, after drying for 2.5 months it looks like new! True, the board itself takes on a dirty gray-yellow tint, but before firing this is irrelevant. Vitriol is diluted with water 1/10 and applied liberally with a brush.
Technology of cladding boards for façade elements of a private house
There should not be any difficulties when installing façade boards. Following the manufacturer's recommendations and basic skills will help you build a facade without the involvement of specialists. The material is lightweight and can be changed in size.
Step-by-step lap sheathing technology
Depending on the choice of lumber , finishing is done with overlapping boards or joint to joint. When covering a house with DPK boards , they often resort to the overlap finishing method:
- The wall is marked, and the frame for the guide rails is attached using the markings.
- If additional thermal insulation is intended, at this stage insulating material is placed in the cells of the frame.
Figure 3. Overlapping planking. - The next step will be attaching the façade boards. This happens from the bottom up. All elements are leveled and secured horizontally with self-tapping screws or nails. It is better to fasten in a staggered manner so that the cladding does not move during natural deformation.
- With a plank width of 100 mm, the overlap should be at least 20-27 mm on each side. These proportions must be maintained over the entire cladding area.
- The lengthwise joining of façade elements is covered with even strips.
Vertical façade cladding
With the vertical method of finishing facade boards, a tongue-and-groove joint is used.
- First of all, guides are installed according to the markings. Under the vertical cladding, the guides are leveled strictly horizontally.
- Thermal insulation is being installed.
- The boards are attached vertically to the frame with self-tapping screws or nails, in hidden or open ways.
- For better adhesion of the tongue-and-groove lock, each cladding element is tapped with a wooden hammer.
- The joints of the boards are covered with cash strips.
Sheathing with flashings and staggered
In order for the facade to serve for a long time and be less subject to deformation, when the boards are arranged vertically, the option of installing the facade of the house with strippings or in a staggered manner is used. Both of these options, used for covering a house with facade boards , are similar. The only difference is in the width of the boards that are attached between the main elements of the facade. Flashings can be wooden that are installed behind the two main sheathing boards, forming a gap between them. This creates internal ventilation of the system. If the main sheathing board serves as flashings, this type of installation is called staggered finishing. The same principle applies when facing with unedged boards .
Sheathing with open seams
For special ventilation of the façade system, they resort to finishing-cladding with open seams. The board can be installed both vertically and horizontally. The basic rule for this type of installation is to install UV-resistant windproof membranes under the main planks. The size of the gaps between the boards can vary from 3 mm to 5-6 mm, but not more than 15-18% of the total sheathing area. A facade with open seams is convenient in practical terms. A separate element is easier to replace in case of damage.
Scandinavian motifs in exterior design.
Scandinavian style involves the use of wood and stones. Straight, laconic shapes, natural colors in the decoration. Facade panels, both natural and using composites, can easily cope with all these conditions. The exterior is decorated with clear geometric lines, contrasting colors, in brown, beige, red and gray tones.
Figure 4. Finishing the facade with unedged boards.
How to cladding a house with other types of boards
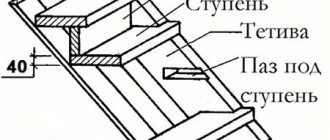
Diagram of the connection between the sheathing and the roof.
This option for finishing the façade of a building is not the most economical. You should know that only specialists can carry out high-quality cladding of a house with boards.
The cladding of the front part of the house can be done in the form of lining using smooth or rough boards. The elements are laid overlapping. This can be done by using special boards that have tongue-and-groove or quarter joints. This type of cladding is used for finishing work on walls made of bricks or blocks.
This type of cladding combines decorative and heat-insulating functions. The latter option is used in the case of insulation using the “dry” method.