Coffee capsule Nescafe Dolce Gusto Chocochino, 3 packs of 16 capsules
1305 ₽ More details
Hot chocolate capsules Nescafe Dolce Gusto Chococino, 8 servings
334 ₽ More details
Accessories for fireplaces
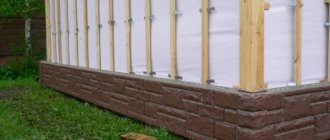
The base on screw piles is the distance between the ground surface and the lower supporting structure consisting of elements. How to cover the base of a house on screw piles should be decided depending on several factors, including the availability of a certain material, as well as the design of the structure. Various materials are used for processing and finishing of suspended structure devices.
Types of finishing of screw pile foundations
There are quite a lot of finishing options, but there are only two types:
- hinged screen;
- shallow strip foundation.
Screw pile foundations form a basement or ground floor. With the help of piles, a small space is created between the soil and the lower supports of the structure.
There are several types of base finishes
During the construction process, the foundation is covered with a suspended or strip structure. With the help of this, a semi-basement space is obtained, which is subsequently used for its intended purpose.
Closing the plinth is necessary. Screw piles are used in three options:
- screw compartment on the tip;
- all-screw design;
- paddle tip.
With all these options, the hinged type is most often used, which is the most popular. This is due to the fact that the hanging screen is more practical and easier to install. Sometimes mixed options are used, when a secondary foundation is laid between the casing. This is especially true when insulation is necessary.
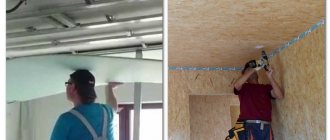
Also, regardless of what types of piles or cladding method were chosen, a lathing made of a profile pipe should be used to strengthen the base. The profile can be selected in accordance with the parameters and lower elements of the house, including pile areas. This must be done for durability.
In this video you will learn how to close the base:
The finishing largely depends on the type of building and the requirements for the basement. Availability of materials is also important. Each type has its own characteristics due to different installation work.
The mounted version is aligned along the walls of the house and is not buried in the ground. Fastening occurs using self-tapping screws and other additional elements.
The standard installation time is one day; installation is simple and economical. The finish can be of any material, including stone or wood.
A strip foundation will require a certain set of materials. Typically, such a foundation is constructed using stone or brick masonry in combination with concrete elements.
This type of finishing is buried in the ground; for this reason, certain properties of the soil under the house are required, as well as a flat surface in the area where the load-bearing piles are installed.
How to cover the pile foundation outside the house?
The reasons for closing the outer part of the pile foundation are:
- Decorative considerations.
- Waterproofing, protecting the subfloor from wind and precipitation.
- Thermal insulation of the pile field.
For all its strength and stability, a pile foundation looks like a set of thin and unreliable supports.
There is a feeling that the house is built on flimsy perches and is about to collapse. An erroneous impression, but it is the result of an assessment of the subconscious, which acts independently and is not amenable to volitional correction .
Installing the simplest decorative base immediately changes the perception, and the house immediately looks like a durable and reliable home.
There are also more rational reasons for sealing the base. This is protection of the underground from water penetration, from snow drifting in winter, and from soil freezing . The pile field does not tolerate excessive watering, and the access of precipitation to the installation sites of supports can significantly change the degree of soil saturation with water.
In addition, the creation of a plinth allows for the formation of a cushion of warm air under the house, which reduces the risk of frost heaving and improves the operation of the piles.
IMPORTANT!
The specificity of most pile foundations does not allow a rigid connection between the grillage and the blind area. When choosing a method for creating a fence (as a false base is commonly called), you should first of all take into account the type of base and its performance qualities.
Materials
To close the pile foundation from the outside, many different materials are used, which differ not only in price, but also in quality. Among the most popular options are:
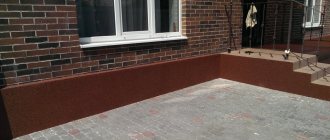
- Plaster. The cheapest material that has increased vapor permeability. The demand for plaster during finishing work is explained by the variety in the choice of decor. Decorative plaster allows you to create a variety of designs, changing the texture and color of the coating. The main disadvantage is the short service life.
- A natural stone. A durable option that comes in a variety of shapes and surfaces. However, it has a lot of disadvantages, for example, it creates an increased load on the screw foundation. Finishing the foundation requires metal studs and framing for finishing. Installation technology requires special skills. In addition, installing natural stone requires the use of reinforcement and stops, which significantly increases the overall cost.
- Fake diamond. Much cheaper than natural. the material is produced in the form of small tiles or panels. Installation is carried out using fasteners. The main disadvantage of the material is the monotony of the decor (mosaic).
- Brick. A universal material that has enhanced thermal insulation properties. Installation is carried out only with a strip foundation. Opens up great opportunities for creating unique designs.
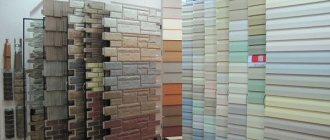
- Plastic panels. They are often used to cover the base due to their increased resistance to loads, as well as chemical and biological effects. The material is completely protected from the harmful effects of moisture and condensation. In addition, plastic panels have a variety of designs and textures, which makes them universal.
The choice of material must be made based on the climatic conditions in which it will be used.
You can sew up the base with various materials
Thermal insulation of a screw foundation
One of the main negative characteristics of this technology for creating a foundation for a house is that the foundation design on screw piles has an underground space, and this, in turn, allows cold air to penetrate from below, which will certainly affect the comfort and microclimate in the entire building.
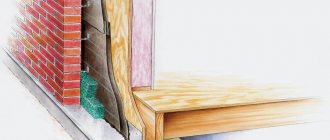
Thermal insulation of the foundation on screw piles has its own characteristics. The first step is to create a structure similar to the missing base, which is subsequently insulated. Insulation must be carried out in a complex - inside and outside.
Scheme of thermal insulation of the foundation with polystyrene foam.
So, the entire thermal insulation procedure is divided into the following stages:
- treating piles with a waterproofing agent;
- erection of a structure that will replace the permanent base;
- covering the constructed base with decorative panels;
- installation of insulating material slabs from inside the base;
- foaming of insulation joints.
Experts recommend two methods for constructing an imitation plinth:
- lightweight brickwork;
- the use of support bars or slats.
The first method involves digging a small depression (150-200 mm) between the support posts, then pouring a reinforced foundation into it. After it has set, it is necessary to lay half a brick and glue the insulating material to this wall.
The second method is to fix wooden beams on piles in a horizontal position using bolts or metal guides, but then you will need a welding machine. After this, insulation sheets are attached to the constructed structure. According to experts, the insulation can also be fixed directly to the cladding material. It is best to use penoplex or polystyrene foam as insulation material. In addition to excellent thermal insulation properties, these materials have good sound insulation.
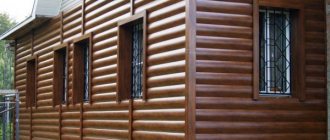
Basement siding
The most popular and frequently used option for cladding the basement of a house on a pile foundation is siding. The material has many advantages, including:
- Low cost of both the material itself and the components needed during installation work.
- Installation of basement siding does not require special skills, which allows you to carry out the installation yourself.
- Durability. Plastic does not rot and is also resistant to negative environmental influences.
- Variety of designs. It can imitate the texture of natural materials, which allows it to organically fit into the overall design of the house and the surrounding area.
- Easy to care for. Siding is easy to clean, which can be done even with the use of strong detergents.
More details on the finishing of the base with siding.
It has virtually no drawbacks, which makes it the most popular and frequently used.
Plinth installation methods
| Name | Characteristic |
| Hanging plinth | Does not go deep into the ground. It can be installed within 24 hours, is economical, provides ventilation and protection from dampness. Aesthetic: the finish imitates any materials, such as stone or wood. |
| Shallow strip plinth | Based on a strip foundation. Installation is combined with the installation of the blind area. Not suitable for areas with strong elevation changes and heaving soil. Requires time and money resources. It is not damaged by impacts, is the basis for the basement of a house, and insulates a screw foundation. No cladding required. |
Profile flooring
Corrugated sheeting was originally used as a roofing material. Currently, it is widely used in the field of plinth cladding. It has the following advantages:
- Easy to install. Sheathing the basement of a house can be done independently, using a metal saw and a screwdriver. No special skills required.
- Wide variety of colors.
- Low price compared to other options.
- Light weight, which prevents the creation of additional load on the foundation.
- No additional processing required.
Despite all the advantages, profile flooring has a number of significant disadvantages:
- Low resistance to mechanical stress and high likelihood of scratches.
- Areas with missing polymer coating are vulnerable to corrosion.
- Despite the variety of colors, corrugated sheeting has only one type of shape.
- Increased susceptibility to rotting, especially in places of contact with open ground.
- Rapid fading and loss of glossy shine.
It is worth noting that corrugated sheeting is quite flexible and can be easily cut, so it can be used regardless of the type of structure.
This is interesting: finishing the basement of a private house with corrugated sheets.
Communities › DRIVE2 At The Dacha › Blog › Closing the pile-screw base.
Warm dacha greetings to all Drayvovites. I went through different options for the subject, and finally settled on this one. Cover it with extrusion and cover it with aceid. You can then stick anything on top of the aceid or just paint it. And so, step by step. We dig a trench 30-70 cm deep, depending on how heaving the soil is. Mel1971 and I have clay, so we dug 50 cm (we didn’t have enough strength for more).
The top board goes along the top of the piles and is attached with self-tapping screws directly to the frame of the house, the bottom board is parallel to it, 5 centimeters above the ground level at the lowest point.
Since the piles somehow protrude or move away from the vertical, we adjust the places where they intersect with the bottom board so that they are in the same plane with the top one.
Flat slate
Previously, flat slate was used in almost any type of decoration. Now this option is used in rare cases, as it is considered unreliable. Among the main advantages it is worth highlighting:
- possibility of self-installation if you have a special set of tools;
- increased resistance to decay and negative environmental influences;
- slate allows the use of thermal panels for insulation;
- practically unlimited service life.
However, this type has a large number of disadvantages. The main ones worth highlighting are:
- Increased fragility of the material. It is quite dense, but if it is cut incorrectly or drilled poorly, the slate crumbles and is destroyed.
- Increased complexity of fastening to piles.
- The price of flat slate is significantly higher than most other materials.
- Requires additional work using other materials to give the slate a presentable appearance.
You can lay this kind of slate yourself
When checking flat slate, it was revealed that it is dangerous to human health due to the presence of a large amount of asbestos.
Other options for finishing the basement of a house on screw piles
In addition to base siding, the finishing of the base of a screw foundation can be made from other materials. At the same time, they have advantages and disadvantages, after familiarizing themselves with which, everyone chooses the appropriate option.
Brick finishing
Brick is considered a reliable building material. But to make smooth and high-quality masonry you need experience. Therefore, for such a matter it is better to use the services of professionals.
The cladding is laid on a concrete base or on a metal beam, which will serve as a support. Ventilation gaps must be left in the brickwork. The process takes time and money.
Plastic panels
This option is an affordable and quick way to finish the base. The panels are universal and can be attached to any foundation. They reliably protect against external influences, including biological and chemical. The finish is flexible and can withstand heavy loads.
Corrugated sheet
Another way to arrange a basement is corrugated sheeting. This option is not suitable for wooden and frame houses, because the material is hardly considered universal. But it is durable, perfectly protects from wind and water. It is installed on the sheathing, which makes the process quick and simple.
Flat slate
The appearance of this finish wants to be the best. But slate is used as a base for other decorative finishes, for example, tiles or special plaster.
Several options for this finish can be seen in the photos on the Internet. Asbestos cement sheets are secured with slate nails or bolts. But during installation, you need to remember that slate is quite fragile and cannot withstand strong impacts.
Cement particle board
Instead of flat cement boards, cement-bonded particle boards are chosen. They are more durable, but at the same time lightweight. They are much easier to work with. DSPs are easy to drill and trim. Nails and screws are used as fasteners. This is an excellent base for decorative material.
Moisture-resistant plywood
This is another option that is used as a basis for decoration. Plywood is suitable for the construction of frame houses. The material does not deform under the influence of water. Some craftsmen do not even apply a primer before applying the cladding.
Facing the base with stone
It doesn’t matter whether the stone is natural or artificial, but it is difficult to lay. Therefore, it is better to use the services of a professional team
The material is reliable, durable and resistant to all external influences. But natural stone will be quite expensive, and artificial stone will be cheaper.
Frame system
The frame system includes the initial installation of the sheathing, on which the cladding is subsequently placed. The sheathing consists of metal bars or pipes, including corners that are welded to the piles, as well as wooden elements.
It is on this structure that the finishing itself is installed, which can be made of any material. It is worth considering that each type of material has its own characteristics, and cladding is done taking into account every nuance and compatibility of elements and substances.
The sheathing and the entire frame that occupies the space under the house must be processed.
Metal elements are treated with anti-corrosion substances, and wood is treated with a special antiseptic.
How to make a shallow strip plinth with your own hands?
Soil preparation
- The site is cleared of vegetation and debris.
- A trench 50 * 40 cm is dug, the inner border of which goes under the walls of the house.
- The bottom is treated with geotextile.
Installation
- A frame made of reinforcement is installed.
- The trench is filled with cement mortar.
- Brick or cinder concrete is placed on the strip base.
- The masonry is brought under the walls, vents are installed.
- The finishing is done in the same way as a suspended plinth.
On soft soils, you need to make a trench 30 cm deeper to create a cushion: 20 cm for sand, 10 cm for gravel and roofing felt.
Facing brick
Facing brick is the most expensive option for facing work. In addition, special skills are required, and in their absence, you will have to turn to specialists, which will entail additional financial costs. Among the main advantages of facing bricks it is worth highlighting:
- It has increased heat resistance, which eliminates the possibility of the house freezing in winter.
- Does not require special care, additional finishing or restoration work after a while.
- Brickwork creates additional support for the house, which reduces the load on the piles, making the overall structure more stable.
- It differs from other materials in its long service life, regardless of the climatic conditions in which it will be used.
Despite the large number of advantages, there are disadvantages that should be taken into account when choosing:
- increased cost of both materials and work itself;
- masonry construction work requires a lot of time;
- limited number of appearance options.
Don't forget to use pins
To obtain a stable and reliable structure, the use of lathing and metal pins is required.
Siding
Siding is a modern material and is very popular, due to its many advantages. A special base type is used for work, the durability of which is in many ways superior to the façade version.
You can cover the foundation as follows:
- The frame is pre-installed. For this, the most affordable installation option is used.
- The first method resembles the process of creating piles with a grillage. The peculiarity is that the tape is poured into a small depression level with the ground. A cohesive structure is created that will serve as support for the masonry.
- The second method is used when the piles are made of pipes. Corners are welded to the base at a short distance from the ground; for reliability, the place under them is compacted and a support is created. Rolled metal is welded on top, the thickness of which depends on the load.
There are 2 common cladding methods:
- installation of a suspended plinth;
- construction of brick foundation walls.
The first method is much simpler - you just need to install decorative panels on a wooden or metal sheathing attached to the stilts or walls of the house. In the second case, you will have to make a small concrete base. What both methods have in common is that even an inexperienced person can handle the job.
Installation technology for suspended plinth finishing
Installation work of suspended finishing is carried out according to the following algorithm:
- A recess 20-30 cm deep and 50-60 cm wide along the external contour of the house. Roofing material is placed at the bottom of the excavation, which is covered with sand. This is necessary to protect piles made of metal from moisture coming from the ground in winter or during rains. To ensure rapid drainage of water, it is necessary to lay the drainage pipe on a sand bed.
- Next, you need to install a frame with which the finishing material will be attached. It can be made using profile pipes or wooden blocks. The frame must be attached to the piles using brackets. In this case, the cladding should protrude beyond the surface of the grillage by 30-40 mm.
- You need to attach the starting profile to the frame, and then begin attaching the panels, moving from left to right. It is necessary to leave small gaps of 30-50 mm between the blind area and the sheathing material. This space is necessary for air circulation and protection in case of soil rise in winter.
- The sheathing must be fastened using self-tapping screws, which are screwed into the oval holes of the finishing slabs. In this case, it is necessary to leave 1-2 mm between the screw and the plastic, this will protect the cladding elements from damage that may occur due to expansion due to changes in the overall temperature.
- Finally, it is necessary to attach the structure to the supporting frame of the foundation.
If the cladding material is DSP (16 mm) or flat slate, then the frame does not need to be installed, since the overall rigidity of the materials will be quite high.
How to sheathe the bottom of a house?
Two technologies for external cladding of the base are practiced:
- installation of the screen on a suspended sheathing welded or nailed to the piles;
- laying a shallow strip of brick or stone around the perimeter of the house.
The design features of the hinged screen make the technology effective in the case of metal or wooden piles.
The advantages of this technology are low costs, fast construction speed and sufficient ventilation of the underground space.
Shallow foundations are often built around reinforced concrete supports. This is a rather labor-intensive method, since you first need to dig a trench, lay a drainage pad, and build a ribbon of brick or stone on top with vents for ventilation. At the same time, this fundamental cladding is distinguished by its resistance to external factors and long service life.
To reduce heat loss in the house, experts advise insulating the suspended base. To do this, mineral wool or eco-wool is placed into the frame cells on the inside of the skin. In cold regions, a layer of insulating material is also placed on top of the sheathing under the outer sheathing.
How to sheathe the base of a pile-screw foundation with your own hands
To cover a pile-screw foundation with your own hands, you need:
- Attach the starting strip of siding to the bottom rail of the frame with a self-tapping screw pitch of 30 cm.
- The corner strip is attached with a gap of 10 mm, observing a screw pitch of 30 cm.
- Secure the third panel into the groove of the starting strip and slide it into the corner strip, leaving a small space for possible expansion of the material.
- Secure the bar using self-tapping screws.
- Insert the next strip into the corner strip and slide it towards the bottom rail and secure it.
- Install the remaining panels. The height of the last panel can be trimmed if necessary.
- Install a second corner strip, which will act as a starting corner for the next wall.
- Secure the finishing strip.
All panels must be installed with small gaps of 20-30 mm and secured with 5 self-tapping screws. Installation of the cladding should be carried out without tension, since under the influence of temperature the material can change its dimensions by 6-7 mm.
Instead of self-tapping screws, galvanized nails (30-40 mm) with a wide head can be used. In this case, a small gap must be left between the cap and the finishing material.
Finishing materials and technologies
Siding finishing
The simplest and fastest way to externally arrange a plinth - it does not require special skills, is economical, and the installation process takes a minimum of time.
An example of siding finishing.
Features of the material
- Durable . The service life can reach 50 years.
- It is resistant to environmental influences - ultraviolet radiation, temperature changes, precipitation, etc.
- Resistant to mechanical stress.
- It has increased strength and reliability thanks to special manufacturing technology .
- A large assortment , ranging from ordinary, unremarkable panels to imitation stone, brick and other materials.
Finish installation technology
Stage 1. Surface preparation
The working base is cleaned, if necessary leveled by plastering (permissible surface deviation - 2 cm), and primed.
It should be taken into account that the working surface must be dry - moisture will provoke the formation of mold/rust, deformation of the sheathing and the development of fungal microorganisms. In areas with a high groundwater level, before proceeding with the installation of the lathing frame, a layer of waterproofing should be laid.
Stage 2. Installation of sheathing
The sheathing for the siding is made of galvanized steel profile (usually it comes complete with finishing material). It is not recommended to use a wooden frame, as it may fail before there is a need to replace the siding.
Making foundation sheathing for siding installation.
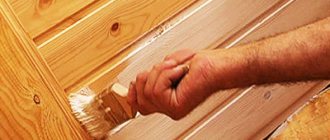
When arranging wooden sheathing, it is necessary to use wood that has been pre-treated with biological and fire-retardant impregnation.
- The lathing is attached to the false base from the bottom up, the first profile is at a distance of 10 - 15 cm from the ground surface. On soils not subject to heaving, the structure can be arranged so that it is in contact with the ground.
- The distance of the frame from the wall should be equal to the thickness of the siding panel. If the base is planned to be insulated, then the distance between the wall and the sheathing is equal to the thickness of the heat-insulating layer.
- Wooden slats or a metal profile are attached in the form of a lattice with square cells. The side of the square is approximately 50 cm.
Stage 3. Finishing the frame.
Siding can be fastened in two ways - using the locking method and using pins. In the first case, installation is carried out from the bottom up, in the manner of installing ordinary siding for walls. In the second case, installation is performed from top to bottom.
Installation work.
- First of all, the starting profile is installed, which is attached 10 cm from the corner. The distance between the fastening points is 30 cm. Installation is carried out strictly horizontally, the line is controlled using a level during the installation process.
- The installation of the first panel is carried out 2 centimeters below the starting profile, then moves to the left until it stops, is treated with sealant and docked with the corner part.
- The panels of the second and subsequent rows are brought to the starting profile and adjusted to the panel of the previous row.
- After all rows have been installed, the J-profile (or internal corners) must be secured.
- The last step is to install the finishing boards, which are attached to the last row of siding panels.
Plastering
The method is economical and simple. Despite some disadvantages, plaster is popular due to its versatility and decorative properties.
Plastering the foundation.
Features of the material
- Unstable under mechanical influences.
- Short-lived. After several years, it begins to crack and crumble.
- Susceptible to moisture.
Plastering technology
Stage 1. Surface preparation
The base must be clean and dry. But not too dry, otherwise the adhesion of the solution to the surface will be weak and it will begin to peel off. To improve the adhesive properties of the surface, it is moderately moistened with water.
Stage 2. Installation of sheathing
The lathing for plastering can be wooden or metal. For metal, ready-made sections of mesh are usually used, which are attached to the surface using dowels with a wide head. At least 16 dowels are distributed per 1 m2, more is possible.
Wooden frames are rarely used, usually for finishing wooden surfaces. They are made from slats several centimeters wide. You can attach it directly to the work surface, or you can assemble the wooden frame separately, and only then attach it to the plinth.
Stage 3. Plastering the surface
Consists of several steps.
- Spray application. That is, the first layer of plaster. The spray has a liquid consistency and is applied with a thickness of 3 to 5 mm. Serves for better adhesion of the subsequent layer to the surface.
- Applying the base layer. Its thickness is from 7 to 9 mm. The main layer is applied after the spray has set a little.
- To improve appearance and level the surface. Often a third layer of plaster is applied, up to 3 mm thick.
- The coating is thoroughly leveled and rubbed with special graters.
- After the plaster has dried, it is painted.
Applying plaster to the foundation.
If decorative types of plaster are used, then the work is carried out in accordance with the technology for applying a specific type of mortar. Typically, decorative plastering is carried out in two layers - spray and finishing coat.
Today, decorative plaster is in no way inferior in aesthetics to other types of finishing, but it is easy to apply and costs several times less than many finishing materials.
Cladding with clinker tiles
Features of the material
- Has moisture-repellent properties.
- Externally it resembles a brick.
- Thickness – 8 -10 mm.
- Unlike clinker bricks, the weight of tiles is much less.
- Durable and resistant to external influences.
Clinker tiles on a “refined” foundation.
Installation technology
Stage 1. Preparatory
First, the required amount of material is calculated. To do this, measure the height of the plinth, and then divide this value by the width of the tile + the width of the tile joint, and then make the appropriate calculations taking into account the length of the plinth.
The surface for laying must be flat and dry.
Stage 2. Cladding
Fastening is carried out using a special adhesive composition that is resistant to various influences - frost, high humidity, mechanical stress.
There are several varieties of reinforced tile adhesives, but epoxy adhesives are the most durable. They are resistant to any impact, durable (or rather eternal, since the tiles will fail much earlier) and are firmly attached. The only drawback is that they set very quickly, so it is not recommended for amateurs to work with them; it will no longer be possible to correct the error.
Installation of clinker tiles with glue.
The adhesive composition is applied in a thin layer to the base and back surface of the tile for better bonding. It should be noted that when working with epoxy-based adhesives, the composition should be applied to a small area, since its hardening time is only a few minutes.
Stage 3. Filling joints between tiles
The seams are filled with an adhesive solution, which is tightly compacted and rubbed, after which its excess is removed, and the tiles are wiped with a damp cloth.
Artificial stone finishing
The appearance of such finishing is in no way inferior to cladding with natural material, but it costs much less.
Artificial stone looks great when used on a foundation.
Features of the material
- Has increased frost resistance.
- Imitates a large number of natural materials - rocks, river stones, stones with a torn structure, etc.
- Has less weight than natural stone.
- Durable.
Installation technology
Stage 1. Surface preparation
The base needs to be leveled and strengthened, since the material has a decent weight. To strengthen the surface, it is necessary to concrete or plaster it, having previously secured a reinforcing mesh to it. Reinforcement is necessary so that the base can withstand the weight of the facing material.
Armor mesh - installation
The surface must be absolutely flat - this is controlled by the building level. For better adhesion, the base is coated with a primer.
Brick finishing
The cladding can be made of more serious materials. Brick will allow you to build strong and durable protection. You can also choose this type for aesthetic reasons.
Brick base
Finishing a building with brick begins with laying the foundation for the masonry. Just as in the case of siding, it is necessary to provide a layer that compensates for soil deformations in winter. There are two base options:
- Monolithic non-buried tape. This option is not recommended for construction on heaving soils. It can only be used on coarse and sandy soils (medium or coarse sand).
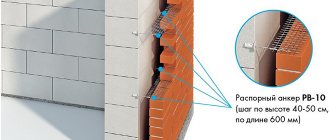
- At a distance of 50-70 mm from the ground, a corner is welded to the metal heads of the piles. The shelf of this profile will become the base for a brick wall. It is recommended to take an equal angle corner with a shelf width of 120 mm. The thickness of the rolled products is determined depending on the height of the masonry and the distance between the piles. If in doubt, it is better to take a thicker product.
The length of rolled metal can be 6 or 12 m. They are chosen depending on what is available and on the length of the walls of the building. Brick laying must be carried out with bandaging. To connect the elements together, a masonry mortar made of sand and cement is used. The average thickness of the seams is 10-12 mm.
Brick finishing has the following advantages:
- good thermal insulation properties of the material (it is worth choosing hollow ceramic bricks with increased performance);
- no need for additional finishing;
- maintainability;
- durability.
The finish is also characterized by a number of shortcomings. These include large mass and cost, labor intensity, limited color solutions.
Finishing materials used
Let's assume that our object stands on a screw foundation. The question immediately arises - how to sheathe the outside of the pile foundation of a house?
There are quite a large number of building materials available for finishing the base of a pile foundation.
Sew up the base of the screw foundation with the following materials:
- flat slate - used for outbuildings, garages, baths. Any foundation structure on screw piles can be easily sheathed thanks to this. That the sheet material is large in size. Self-tapping screws are used to fasten slate. The material is installed carefully, as it is fragile;
- corrugated sheeting - it is also used for covering the base of a pile-screw foundation. This material is lightweight, does not create large load forces on the foundation, can withstand temperature changes well, and resists exposure to a humid environment. During installation work, it is recommended to act carefully so as not to scratch the surface of the corrugated sheets, otherwise rust will begin to form in the damaged areas. There is an additional bonus in finishing with such material - many people install a door in the sheet to use the free space for storing various materials;
- basement siding is a plastic material that is not affected by temperature changes and is lightweight. How to properly cover a screw foundation outside a house with such material? When performing installation work, gaps are left at the corners of the object for linear expansions of panel elements. The material is attached with self-tapping screws to the frame base. The work does not cause any difficulties and can be easily done on your own;
- brick stone is a serious material with which reliable protection is constructed, characterized by a long service life. Some developers like this material for its aesthetic appearance.
Many people use plastic panels or wooden beams as finishing for the base of a pile-screw foundation.
Photos of finishing options
Pile-screw foundations: panel cladding
A pile foundation is fundamentally different from a monolithic or strip structure. Its peculiarity is that the pile heads are not sunk into the ground, but are the above-ground part of the foundation. And no matter what type of piles was used, the essence does not change. To give the facade a pleasant appearance, the space that forms between the ground surface and the base of the house must be closed. We will tell you in this article how to cladding a pile foundation with your own hands.
How to close screw piles
The final stage of construction is finishing the basement space. In houses with pile foundations, space is left, giving an unfinished look.
In this regard, it is important to understand the finishing and study all the nuances that you should pay attention to when performing it. Let's consider how to cover the base of a house on screw piles, the advantages and disadvantages of finishing materials
Let's consider how to cover the base of a house on screw piles, the advantages and disadvantages of finishing materials
Let's consider how to cover the base of a house on screw piles, the advantages and disadvantages of finishing materials.
Advantages of finishing the basement space
Finishing the space between the pile foundation and the house has advantages:
- increases thermal insulation;
- prevents medium and large animals from entering under the floor;
- prevents snow and rainwater from accumulating under the house.
In order for the finishing to perform all of the listed functions, when choosing a material you need to carefully study all the advantages and disadvantages of each type.
Finishing methods
To prevent the floors in the house from being blown through, it is necessary to insulate the basement space
The open space between the soil and the floor is blown by the wind and exposed to sub-zero temperatures, resulting in a cold floor in the house. We close the piles under the house using:
- shallow strip plinth devices;
- hanging finishing material between the piles, having previously built a frame.
When choosing a finishing method and material, we consider:
- soil type;
- groundwater level;
- climatic conditions.
First of all, we install the support sheathing from a profile pipe; it will serve as a connection between the supports. The guide spacing should be 300-400 mm. The profile is selected with different side widths (40x20).
To prevent communications from freezing, we insulate them with mineral wool or foil roll insulation.
When choosing a material, we take into account that it is in contact with the surface of the earth, therefore, if water is close to it or flooded, it will be affected by all the harmful factors.
Flat slate
Asbestos boards are not an environmentally friendly material
Every year this material is losing its popularity; it is being replaced by modern, environmentally friendly materials.
Advantages:
- resistant to atmospheric influences;
- durable.
Flaws:
- asbestos is dangerous to human health and pollutes the environment;
- fragile;
- unattractive appearance.
The base of a screw foundation covered with flat slate will not harmonize with a building made from modern materials.
Blind area
The blind area insulates the base from moisture
Upon contact with soil, the quality of the facing materials is lost, so the surface must be isolated from moisture and a blind area made. For waterproofing, we use roofing felt or dense polyethylene, one end of which is tucked under the blind area, and the other edge is folded onto the frame sheathing under the finishing material.
Upon completion of the cladding, we arrange a blind area that will prevent rain and melt water from leaking under the building. To ensure the drainage of water and condensate, it must be mounted with an inclination of 1.5 degrees from the base.
Concrete is poured evenly into the formwork, in which a mesh of reinforcement is laid. We lay an expansion joint at the junction with the foundation plinth.
For more information about blind areas in a house on screw piles, see this video:
If the house is located on a slope, part of the underground can be equipped as a cellar; in this case, we provide for the installation of a door.
Finishing the basement in a wooden house
When finishing the foundation of a wooden house and cladding the basement, special attention is paid to carefully waterproofing and thermal insulation of the entire basement belt around the building. The wood from which the walls of the home are built is susceptible to rotting and mold growth, and is vulnerable to excess sedimentary and ground moisture
Only reliable protection of the base will prevent liquid from penetrating into the wall part and preventing it from freezing in the cold season. After taking measures to waterproof and thermally protect the base, it can be finished using the technologies described above.
Finishing the base of a wooden house Source remlandia.ru
How to close and how to decorate the basement of a house on stilts from the outside?
The first stage involves creating the sheathing. This frame is necessary for further fastening of the facing material using screws or nails. The lathing consists of boards or metal profiles.
The following are the instructions:
- Installation of vertical slats. After installing the horizontal boards, the vertical ones are also installed. This will help further strengthen the structure. The installation step is 40-50 cm.
- Arrangement of a drainage cushion. A trench is dug along the perimeter of the base and filled with sand or crushed stone.
- Insulation. If you plan to insulate the base, then this procedure is performed at this stage.
- Waterproofing. A waterproofing material is installed on top of the insulation - the end of the roll should be lined with sand, and the edge should be compacted into it.
- Creating a blind area. Paving slabs are laid on top of the sand - this move helps protect the base from excess moisture.
At the final stage, panels or the selected facing material are installed. The corners must be secured with a special profile, and at the end a metal casting is installed.
If another technology for cladding the pile base was chosen, then the masonry is first made, then the surface is finished with the selected material.
Base insulation
A false base made of any material protects against the penetration of precipitation, debris and animals, but not from the cold. To protect the basement from frost, a thermal insulation layer is needed.
It is convenient to mount sheets of polystyrene foam or expanded polystyrene under the base. A film or roofing material is placed between the insulation and the external finishing to prevent the formation of condensation. It is also convenient to install expanded polystyrene boards on the inside of the masonry.
Regardless of the foundation material, ventilation holes are left on each wall. The number and area of the holes are calculated by measuring the total area of the base and dividing it by 400.
Vents are covered with bars to protect against the entry of rodents and other small animals. It is impossible to close the ventilation for the winter, so it is done at a height of at least 25-30 cm above the blind area, otherwise they will be constantly covered with snow.
A properly executed plinth will improve the appearance of the structure and protect the underground from the negative effects of the external environment. Since this part of the building does not take up or transfer the load to other elements, small errors when installing it yourself do not matter.