Self-installation of socket boxes in drywall
In modern construction, gypsum boards - plasterboard sheets - are often used.
This material is used for the installation of hollow walls and interior partitions. The installation scheme for electrical installation equipment has changed accordingly. In particular, additional fittings for electrical sockets and switches. Previously, these elements were mounted in the wall; for this, the installation box was inserted into a drilled hole, where it was fixed with mortar. This option is not suitable for hollow structures, so special socket boxes designed for drywall have appeared on the market.
Note that the socket box is a mandatory element when installing electrical equipment. It is used for installing sockets, switches, dimmers, and thermostats. In addition, they can be used for unsoldering electrical wiring.
The work process is intuitive, however, there are certain nuances that will be useful for the home craftsman to know. Let us immediately clarify that expensive equipment or special skills are not required to install socket boxes in drywall.
I am glad to welcome you, friends, to the blog “Electrician in the House”. In today's episode we will examine in detail the topic of how to install a socket box in drywall.
Dimensions of socket boxes for drywall
Before starting to describe the installation process, it makes sense to understand the features of the product. Let us immediately note that a regular socket box is not suitable for installation in plasterboard partitions; only a certain type of product intended for such cases is used here. Among the reputable manufacturers, the following brands can be distinguished:
These products are classified by planting depth and outer diameter. These parameters are labeled H and d2 respectively. The standard diameter of the socket box for plasterboard is 68 mm. In addition, models with external diameters of 60, 64, 65, 70 and 75 millimeters are available.
If we talk about planting depth, here you can find the following sizes: 40, 42, 45, 60 and 62 millimeters
Socket boxes are selected individually, depending on the installation location. If possible, and the thickness of the partition allows, we recommend choosing models with a seating depth of 60-62 mm. Such designs are much more convenient when disconnecting wiring, especially if the circuit excludes the installation of junction boxes. In this case, the wires are disconnected in the socket box, so every extra millimeter will play a decisive role.
In addition, in products with a large planting depth it is much easier to connect wires and install electrical equipment.
In today’s article, as an example, I will use socket boxes for plasterboard Schneider Electric modification IMT35150. These products have a standard outer diameter (68 mm), the seating depth is 45 mm.
The housing of the Schneider Electric IMT35150 socket box is made of non-flammable plastic. It uses a combined polypropylene + fire retardant material that can withstand temperatures up to 850°C. The case is quite durable, equipped with a wide front edge. There are plugs of various diameters designed to accommodate wires of any cross-section.
To fix the socket box in the partition, two metal tabs are used. The use of metal clamps provides a large area of adhesion to the surface, without damaging the plasterboard coating. To fix the legs, screw self-tapping screws are used, which, when tightened, securely press the box to the surface.
For variety, let’s look at Polish socket boxes for plasterboard from Pawbol Euproduct. The plastic feels very dense and reliable. Only here thin metal legs are used
Selection of material and dimensions of the socket box
The need for electrification of rooms made of plasterboard walls and ceilings has led to the creation of special accessories that allow the installation of electrical switches, sockets and other means of energy supply, taking into account the specifics of the material.
One of these accessories is a socket box for installing sockets and switches in a plasterboard partition.
An electrical box (electrical) is a device designed for laying, connecting and distributing electrical cables. It is used for electrification of buildings with internal and external power lines.
Round electrical installation box
Electrical boxes are divided into two types: distribution boxes and installation boxes.
The first ones are intended for installing a branching point for wires, the second ones are for installing switches or power supply sockets. Installation boxes, in addition to their intended purpose, can play the role of a distribution box.
There are metal and plastic electrical boxes, in everyday language called socket boxes. Boxes made of polypropylene are most widely used due to their low cost and excellent dielectric properties.
Based on their design features, socket boxes are divided into two categories.
- installation boxes for solid walls
- installation boxes for hollow walls
The difference between them is that socket boxes intended for installation in hollow walls are equipped with a clamping mechanism that allows you to securely fasten the box to the wall.
Fixed to the wall using a clamping device
Throughout the European continent, a single standard for the internal cross-section of the socket box has been adopted, which is 68 mm. Thanks to this, installation boxes are a universal mounting device for all types of sockets and switches.
Various manufacturers of electrical equipment produce socket boxes with slight differences in shape, color and density of plastic. The shape and material from which the clamping mechanism is made, which consists of two “legs” on movable threaded clamps, may differ.
To install two or more boxes in one place, “batteries” of socket boxes are used, fastened into a single block with special connectors. Such blocks are used in places that are used to connect a large number of consumers. For example, in the kitchen above the desk or for connecting office equipment in office premises.
Socket box block for installing three sockets
In addition to the traditionally round installation boxes, there are also square, rectangular or oval boxes.
When choosing the desired shape of the socket box, the specific situation in which the installation will be carried out is taken into account.
Square and rectangular socket boxes are used when additional cable routing is planned inside the installed point. This is due to the fact that the internal volume of such boxes is larger. In fact, these types of socket boxes combine the functions of a transfer and installation box at the same time.
One type of square socket box
Oval socket boxes are used when installing two or more sockets or switches in one place, replacing prefabricated blocks. They are advantageous to use in cases where the sockets are located vertically.
An oval-shaped electrical box is used
Installation of socket boxes
The owner can install a socket in a concrete wall himself or by contacting organizations involved in the construction and finishing of residential premises. Specialists will help you lay electrical cables, install junction boxes, sockets and switches.
The cost of the work depends on the location of the residential or office space, for example, in Moscow, installing one outlet in a wall made of cast concrete will cost 600-700 rubles. (without cable laying and wall finishing).
When installing it yourself, the owner of the premises will need to prepare a tool and complete 3 steps:
- mark the walls in the area of intended installation;
- drill mounting holes in the required quantity;
- secure the socket boxes in the holes;
- complete the final finishing of the wall surface;
- mount mechanisms and connect power cables;
- install the outer cover and then test the operation of the devices.
Marking
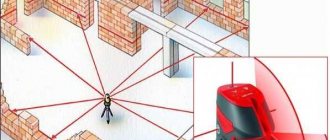
Installing socket boxes in a concrete wall begins with determining the location of the products. Horizontal and vertical lines are drawn on the surface of the wall, allowing you to find the center of installation of the box.
If you plan to install a module or several separate switching nodes, then the distance between the axes is maintained in the range from 70 to 72 mm (depending on the product manufacturer). To determine the dimensions of the module, it is recommended to assemble the plastic boxes into a single block and then check that the markings are correct.
Making holes
To install a socket box in a concrete wall, you need to make a hole with a diamond crown, which is installed in the hammer drill chuck. The diameter of the channel is 70-75 mm, the depth of the hole depends on the type of installation box. In order to reduce tool costs, it is possible to make a hole using a drill.
Holes are drilled around the perimeter of the future landing socket, the central part is knocked out with a chisel. The depth of the hole should ensure that the socket box fits flush with the wall surface (taking into account the plaster layer).
Installation of boxes
Installing a socket box in concrete begins with making a pattern that allows you to maintain the correct position of the block of mounting boxes or adjacent elements. The pattern is made from a piece of metal profile for drywall, the length of the element exceeds the dimensions of the module.
The socket boxes, assembled into a block, are screwed to the guide strip with standard screws. Then the structure is placed in the previously made hole to check the parallelism of the surface of the end of the socket box and the wall.
Before fixing the socket box in a concrete wall, it is necessary to treat the holes with a primer that removes dust particles and improves the adhesion of building materials. To fix the parts, gypsum mortar or similar materials are used. The material is introduced into the channels with a spatula, and then the pattern with the assembled module is inserted. Excess mixture is squeezed into the gap between the side walls of the socket box and the walls of the channel.
The power cable is inserted through the technological hole in the box and laid inside in a coil. After aligning the unit horizontally, the cracks are sealed with fixing material.
The solution is rubbed into the gaps with a spatula until air voids are removed; after final filling, the position of the elements is checked using a hydraulic level. The pattern is fixed with spacer wedges or screws, which are screwed into dowels (pre-installed in the concrete surface).
The main requirements that are put forward to the element
There are no special recommendations or rules when choosing mounting boxes. There are also no secrets for installation and proper operation. You can only find general provisions that affect the safety of such products; these values are fixed in the technical documentation that is accompanied with the device. Based on this document, a person must observe the correct installation, which occurs as the installation of distribution boxes. The area and distance are determined by generally accepted building codes.
Although the mounting boxes do not have any special features, the installation must fully comply with the requirements. This will avoid a number of problems that may arise during the work process.
Therefore, it is important to pay attention to:
The strength of the product should be maximum. This will balance the effort that a person makes to remove the plug from the socket
It is also important to understand that the box must be tightly fixed in the wall; any movements are not allowed. To achieve better installation, the outer side should be equipped with special grooves and hooks, which will prevent the socket box from accidentally falling out
For the same purpose, technological holes are used through which cables are routed. To ensure the tightest fixation, it is recommended to use special solutions, for example, alabaster or building plaster. Once the liquid has set, it will not be possible to pull out the structure with ordinary forces; special tools will have to be used for this. The housing must be made of dielectric plastic and must also provide high resistance to moisture and dust. This will increase its electrical and fire safety.
The inner side should be equipped with special ribs that will allow the socket to be tightly fixed and prevent accidental falling out. The old elements did not have such properties, and therefore were remembered by users as unreliable. It is important to understand that sockets must have special holes for screw fastening. If this is not the case, then it is better to look for another option. In the production of socket boxes, only high-quality and non-flammable materials are used that are suitable for any wall surface. This requirement is important not only for drywall, but also for brick and concrete, because a flame that occurs in an outlet will easily spread to nearby furniture and wallpaper.
Also, we must not forget about the presence of auxiliary elements for fixation. This will simplify the process of installing mounting boxes significantly, and also opens up the possibility of creating blocks with a different number of socket boxes.
The installation box, which is installed in drywall, differs from the standard model several times, and also has a number of advantages that will allow you to place the structure in an almost hollow wall.
What should you pay attention to?
Before you carry out the installation, be sure to select the type of electrical outlet that you will use. The modern market is ready to offer you the following types of glasses for sockets and switches:
Plastic structures that do not have presser feet. This type must be used in a concrete or brick wall.
Socket box with presser feet. This type of construction is perfect for drywall or plastic panels.
Metal structures with and without bottom. Previously, these structures were used in old houses. Today, these structures can be used to conduct wiring in a wooden house. In the PUE rules you can find information that installation of sockets and switches in wood can only be done using metal socket boxes.
If you have already decided on the type of structure you plan to choose, then begin the preparatory work.
Self-installation of socket boxes in drywall
In modern construction, gypsum boards - plasterboard sheets - are often used. This material is used for the installation of hollow walls and interior partitions. The installation scheme for electrical installation equipment has changed accordingly. In particular, additional fittings for electrical sockets and switches.
Previously, these elements were mounted in the wall; for this, the installation box was inserted into a drilled hole, where it was fixed with mortar. This option is not suitable for hollow structures, so special socket boxes designed for drywall have appeared on the market.
Note that the socket box is a mandatory element when installing electrical equipment. It is used for installing sockets, switches, dimmers, and thermostats. In addition, they can be used for unsoldering electrical wiring.
Please note that even a novice craftsman can easily install a socket box in a plasterboard wall.
The work process is intuitive, however, there are certain nuances that will be useful for the home craftsman to know. Let us immediately clarify that expensive equipment or special skills are not required to install socket boxes in drywall.
I am glad to welcome you, friends, to the blog “Electrician in the House”. In today's episode we will examine in detail the topic of how to install a socket box in drywall.
Let's sum it up
Now you know how to secure a socket box in drywall. Additional details can be found by watching the video in this article. Ask questions on the topic in your comments.
Did you like the article? Subscribe to our Yandex.Zen channel
May 27, 2021
Plasterboard systems, Connecting power supply devices, Laying power supply, Work with power supply
If you want to express gratitude, add a clarification or objection, or ask the author something, add a comment or say thank you!
Cutting holes for socket boxes in drywall
So, we completed the markings, and we did it accurately and accurately. Now we need to take care of the mounting holes for our “plastic boxes”. To do this, you will need a drill or screwdriver equipped with a bit with a diameter of 67 mm.
I have a whole set of them with different diameters: 51, 57, 67, 76, 89,102. This set of Chinese crowns is therefore not very expensive. Anyone can afford such a set. But I must note that despite the fact that the Chinese set is very reliable and has served me for almost five years. Each crown for socket boxes on drywall when assembled has a centering drill.
The further procedure is quite simple: we rest the centering drill against the marks we made, and carefully drill four holes with a crown.
Please note that drywall is a fairly soft and pliable material, so you should not use excessive force when drilling. This may dent or break the septum.
Considering the characteristics of the material, you can completely do without a crown. Drywall can be cut with a utility knife, however, in this case, the holes will not look very presentable.
Installation technology
In concrete
If you need to install a socket box in a concrete or brick wall, then remember that you must proceed as follows:
- Make markings on the wall surface. This may require a building level and a marker. The installation height of the sockets must be selected independently. Before this, we recommend studying the SNiP standards, as well as GOST. After this, place a cross on the wall, and then lean against the socket.
- Take a hammer drill and a concrete bit and start drilling. It is necessary to drill the groove approximately 5 mm deeper than the height of the socket box. If you don't have bits, then you can use a drill and then use a chisel to knock out the core. If necessary, you can also make a square hole using a grinder.
- After you finish the groove, you need to clean it. After that, you can insert the socket box and try on how it will look. Thanks to this, we can confidently say that in the future you will no longer encounter difficulties during installation.
- Dilute the solution that will be needed to smear the socket box into the wall. A good solution can be prepared from gypsum putty, alabaster and water.
- Now you can wet the hole with a putty knife and pour the solution inside. After this, you can simply fix the socket box flush with the wall. The screws that are located on the side should be parallel to the floor.
- Now you can caulk the edges and remove excess mortar from the structure. After cleaning the cup for the socket or switch, you can begin installation.
This simple method that we have indicated will help you independently install a socket box in a wall made of brick, concrete, foam block, and also aerated concrete. If you plan to see the essence of the montage, then you can watch the video below:
In drywall
Attaching a socket box to a plasterboard partition is quite simple. Here you will no longer need to make a solution. For sockets in drywall there is a special glass with clamps. They allow you to securely fix your structure.
To install a glass in a plaster wall yourself, you will need to go through the following steps:
- Apply markings to the wall. We provided detailed information on how to install a socket in drywall in our article.
- Now you need to cut a hole and pull out the wires. Then they can be passed through the socket.
- To ensure the box is securely fixed, you will need to tighten the screws on the sides.
These are all the processes that will need to be done to install a socket box in a plasterboard wall with your own hands. As you can see, there is nothing complicated here and almost anyone can cope with such tasks. If the plaster wall is also tiled, then the technology may differ significantly. In the video below you can see what the technology for attaching a glass under ceramic tiles looks like.
In the tree
The last option is to connect a socket box in a wooden wall. If you decide to carry out hidden wiring in a wooden house, then remember that you will need to install a metal socket box in the tree.
To make holes for a glass in wood, you will need to purchase a special crown. In a wooden house, it is best for you to install open wiring.
Installation and connection of the socket
Correctly form the supply of wire; a minimum supply of 10 cm is considered, but if possible, leave more.
- Using the mounting screws in the socket box, we fasten the socket mechanism, aligning it level.
- The last step is to return all the plastic elements to their place. If you have a block of sockets, then special frames for 2, 3 or more posts are sold.
The switch is installed in the same way as the sockets. The main thing is to ensure the correct connection - on the back side of the switch body there should be marks in the form of the letters L - phase, N - neutral wire, often there is only a designation for the neutral wire.
This completes the installation of sockets. Be sure to watch the video that shows how to connect a block of sockets using a cable.
Socket box for gypsum boards: characteristic features
The socket box for gypsum boards is an important element when installing electrical equipment into hollow walls, which is securely attached to the sheet and allows you to mount any electrical structures - switches, sockets, sensors or switchers.
The “glass” for drywall differs from the others in the presence of special fasteners installed on screws. These fasteners secure the socket box to the inside of the wall. This is the only way to securely fix the “glass” – neither with a putty solution nor with cement.
There are times when it is necessary to install 2 or 3 socket boxes in a row. In this case, you need to select “glasses” with connecting tunnels through which the wire will be laid. If you only need to install one socket box, these connections can be cut, as they may interfere with installation in the recess in the drywall. There is a second option - you can purchase special connecting elements. These partitions are installed in the glasses immediately before they are installed in the wall.
Additional video instruction
Having sufficiently admired the result of your labor, you can begin connecting the socket mechanism. It can be secured in the socket box either using sliding legs or with simple screws, for screwing which there are threaded holes on the walls of the box. Inexperienced home electricians are better off using screws, because... The fixation with the paws is not very reliable and can disappoint due to the azimuthal misalignment. This means we’ll attach it with screws, close it with a decorative cover on top, and we’ll be happy to use the electrical point we installed ourselves.
Do-it-yourself installation of plastic windows - step-by-step installation technology in photographs
Gas stoves for baths: learning to choose the right ones + rules for self-installation
Installing an electricity meter: rules and subtleties of electrical installation
How to install?
The procedure is as follows:
Making holes for sockets
Before you build a socket into the drywall, you need to drill a hole for the glass:
- using a pencil, mark the place where the socket will be fixed;
- take an electric drill or a screwdriver with a crown for drywall;
- a sharp segment of the crown is placed in the center of the applied mark;
- a hole is carefully drilled (if you don’t have a drill, you can use jigsaw files);
- Holes for switches are made in the same way.
Once the hole is made, the materials and all the tooling are prepared, installation work can begin. Depending on the installation technique, the sequence of work differs. If the electrical cable is fixed in the wall, all that remains is to install the socket and connect it.
And if electrical wires are supposed to be passed along the outside of the wall, a groove (notch) is cut in the drywall, an electrical wire is laid and fixed with a quick-hardening compound (for example, alabaster). The ends of the wiring are brought out at the specified level in the required places.
The following stages of installing a socket with your own hands are as follows:
We install the socket box. Before installing the glass, you need to cut a hole for the wires on its back surface with a knife. If you look at the body of the glass, you can see 4 screws, 2 of them are needed to secure the socket itself, and 2 are for adjusting the spacer legs. First, we take the electrical wires out of the hole and pull them through the glass. Then we mount the glass in the drywall, securing it with bolts on the opposite side with clamping tabs.
- Let's putty. Usually, after installing the socket box and testing the system for operational suitability, it is time for the initial finishing. Only after the starting and final layers of putty have dried, the subsequent installation of the socket is carried out.
- We connect electrical power to the outlet. Before making the connection, make sure that there is no voltage in the line (you can check using a regular indicator). We connect the “ground” and “zero” phases to the appropriate contacts on the socket body and tighten the wires tightly so that over time the electrical contacts do not loosen and the plastic case does not begin to melt.
We install the socket in the glass. The socket is mounted in the glass and fixed in it with the appropriate screws. After this, we install the plastic frame and front cover. Check the fit to the wall; if necessary, loosen the screws on the pad feet and make adjustments.
Installation of overhead electrical socket
In some cases, instead of the well-known socket with hidden electrical wiring, surface-type electrical sockets are used. They do not require drilling holes in the walls and installing installation boxes (cups). And the electrical wiring itself is not carried out under the plasterboard structure, but along its top.
This method is not very attractive from an aesthetic point of view. The overhead socket is massive. Wires running along the walls do not add consistency to the interior of the room. But in some cases this is justified, in particular when the distance between the gypsum plasterboard structure and the concrete wall is too small - less than 45 mm, and there is no hammer drill at hand.
Electrical wiring laid outside and overhead socket models are often used in design ideas when decorating rooms in loft, retro or steam-punk style. In such cases, specialized fire-resistant electrical wires in stable, non-flammable insulation are used. They may also be in a corrugated sleeve.
The electrical wiring is fixed to the wall using clips, and the socket is simply screwed to the drywall using screws, like an overlay. The advantage of this arrangement is that at any time you can change the location of electrical household appliances and the socket along with it.
We work with fittings
Replacing a burnt one
In this case, the best option is to install a surface-mounted socket in an old socket box, especially since the socket blocks are not sold separately, and the old socket box may have become damaged by time.
Transfer
Modular block
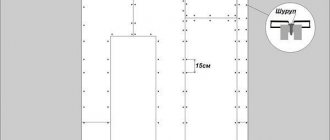
Moving sockets to a new location during the process of wall covering comes down to extending the cable to the required length and laying it in the sheathing before the actual covering begins. Splicing of wires is carried out as described above. The cable is run parallel to the floor at the height of the old outlet, secured to the wall with clamps. The new outlet is mounted either on the sheathing or on the base wall, see below
It is important to leave a sufficiently long “tail” of the cable, at least 15 cm, in the new location, this will simplify the installation of the socket
If the walls are finished, and the socket needs to be “pulled out” from behind the cabinet, and additional sockets must be added, then the best option is a corner modular block, see fig. It can be installed on standard mounts in a corner, under a window sill or in any suitable place. The unit is simply plugged into the old socket permanently.
But before blocking the old socket, it is necessary to go through: completely disassemble it, clean all internal contacts (say, contact lamellas with a terminal) and reassemble it using cold solder. Before inserting wires into them, also lubricate the terminals with solder. Immediately before turning on the unit, remove the socket cover, lubricate the contact lamellas with solder, put on the cover, turn on the unit and do not touch it again. If you follow these rules, the old socket will never remind you of itself.
Installation on concrete
To install a socket in a concrete wall, it is important to know the thickness of the future finish: the edge of the socket should be flush with the wall, plus or minus 1.5 mm. The standard height of the socket box is 40 or 44 mm. For a “puffy” finish, you may need a plywood cushion, on the left in Fig.
It is advisable to secure the socket box with self-tapping screws and dowels. If it does not have mounting holes, you can drill them yourself, but the line of mounting holes should be perpendicular to the line of contacts, in Fig. - on right!
For a “puffy” finish, you may need a plywood cushion, on the left in Fig. It is advisable to secure the socket box with self-tapping screws and dowels. If it does not have mounting holes, you can drill them yourself, but the line of mounting holes should be perpendicular to the line of contacts, in Fig. - on right!
Installation of socket boxes on concrete
If the wall is already finished, or the finish will be thinner, you need to use a crown to select a hole with a reserve in diameter and depth for the socket box. Before installing the socket box, the hole is filled with alabaster or gypsum mortar. Then they quickly level the socket box and, until the solution has set, wrap a couple of “fleas” in it for reliability, see fig. in the center.
It is convenient to align the socket box using a template made of plywood or boards as thick as the finishing height, with a hole along the diameter of the socket box. But the most important thing is that before installing the socket box, do not forget to thread the cable into it! Murphy's laws, you know.
Installation in drywall
Installation of the socket in drywall is done using special sockets for drywall with sliding (on the left in the figure) or rotating (in the center there) fixing stops.
Socket boxes for drywall
The technology is elementary:
- A hole of 67 mm is drilled using a crown.
- They bring the cable into it and pull it into the socket box.
- Put the socket box in place.
- If the stops are sliding, pull the retaining tape as far as it will go and bite off the excess.
- If the stops are rotary, screw in the screws pulling them until they stop; The paws will turn themselves as they should.
- They strip the wires, insert them into the terminals, place the block in the socket box until it stops and, turning one by one, tighten the screws of the block's legs.
- Place the cover and check the fit to the wall; If necessary, loosen the screws of the pad legs and adjust it.
Installation of a socket box in plasterboard with increased reliability
If the sheet of drywall is not yet on the wall, there are overhead sockets and a socket box with swivel legs, you can secure the sockets more securely (see figure on the right):
- Use a pen and a jigsaw to select a hole for the metal socket clip.
- Drill holes for the self-tapping screws of the socket box legs.
- Pull the clip with the socket box into a bag; The socket box stops are not needed.
- Install the socket block and cover.
With the described method of installing sockets in drywall, a large space is created under the holder of the block, which makes it easier to terminate the cable and its possible extension in the future.
Assembling socket boxes into one block
Considering that you are not installing a separate structure, but a block of four boxes, the socket boxes must be fastened together. Therefore, the installation of socket boxes in drywall begins with the removal of the side plugs. This is done according to a certain scheme: the first socket box has one plug, in the second and third there are two, in the fourth there is again one.
In this case, I will use cable adapters-connectors to connect Schneider Electric socket boxes to each other.
What’s interesting is that most ordinary concrete socket boxes are structurally designed to connect them into a block without additional adapters (there are special protrusions on the sides). GCR boxes do not have such protrusions, so you have to use special connectors.
The process of combining individual boxes into one structure looks like this: the adapter is installed in the mounting hole and snaps into place.
The procedure is repeated several times, depending on the number of socket boxes in the block. Considering that the adapters have a standard diameter, the distance between the socket boxes for drywall will be exactly 71 mm. According to a similar scheme, all electrical installation structures are installed, brought under one frame.
How to install a socket box in drywall
Now we come to the main thing - installing socket boxes in drywall. To do this, you need to remove the partitions that remain between the holes. To do this, we use a mounting knife or saw. Next, in one of the boxes we remove the plastic plug intended for inserting the power wire.
If the preliminary calculations are made without errors, the design exactly matches the cable installation location
Please note that some socket boxes for drywall are equipped with fastening tabs protruding beyond the outer diameter, so the structure must be installed diagonally
We insert the power cable through the hole in the plug, and carefully insert our unit into the prepared hole. All socket boxes should go in without effort. Before fixing the block, we check that everything is level.
After installing the socket block into the seat, all that remains is to tighten the fastening screws. This can be done with a regular screwdriver. After twisting, the clamping tabs will securely pull the structure to the inner wall of the plasterboard sheet. We remind you that you should not apply excessive force so that the drywall does not begin to crumble. Now all that remains is to check the symmetry of the installed block using a building level. This completes the installation process.
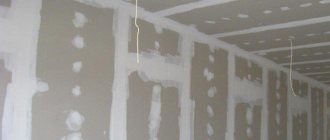
Preparing the walls
Many people have begun to finish these surfaces with plasterboard en masse, since in this case it is possible to significantly speed up repair work, as well as make them even without the use of bulk materials, which, in case of significant defects in the walls in old buildings, will require the use of a significant amount.
You can install plasterboard sheets on a profile that is 5 cm wide, leaving sufficient space for further placement of insulation, sound insulation and wires. When carrying out this work, there is also a need to install socket boxes.
Note! If you have little understanding of electrical engineering, it is best to resort to the services of specialists who can install electrical cables efficiently, since mistakes made during independent installation may in the future cause a short circuit that can lead to a fire. It is advisable to purchase socket boxes together with drywall, since in this case it will be possible to save a significant amount of time by selecting suitable mounting boxes
It is advisable to purchase socket boxes together with drywall, since in this case it will be possible to save a significant amount of time by selecting suitable mounting boxes.
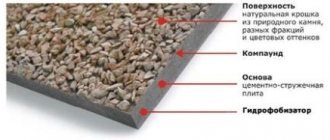
Ordinary plasterboard sheets easily ignite in a fire. The only exception is fire-resistant material, which is mostly pink or red in color and has special markings.
For this reason, when purchasing socket boxes, you also need to pay attention to their fire safety standards
Important! When choosing sockets for installation in plasterboard structures, it is necessary to consider only those products whose rim is made of metal, which, if the voltage is too high, will ensure the passage of current through itself and tripping of the fuse protection in the panel. In addition, there will be a power outage, which will eliminate the possibility of possible negative consequences
In order to still carry out high-quality installation of the socket box in plasterboard, it is necessary to prepare the walls properly:
- First of all, it is recommended to apply putty, thanks to which the surface becomes more durable and begins to hold its shape well during drilling.
- Next, after the putty composition has hardened, it is necessary to carefully open the material with a primer. After the applied mixture is absorbed, the drywall will stop crumbling during further processing.
Having completed these steps, you can begin to determine the future locations of the mounting boxes.
How to install a socket box in a concrete wall
Concrete base is one of the strongest bases for wall fencing. Vertical panels are reinforced concrete slabs. If a layer of plaster (2 - 3 cm) allows you to hide the wires in its mass, then to install a seat for the socket box you will need to drill into concrete. And for this you will need a special tool.
Installation of socket boxes in concreteSource prom.st
You should not trust advice on how to fix a socket box in a concrete wall using a drill and a drill bit with a Pobedit tip, or, even worse, do the work with a chisel and hammer. This can be recommended by those people who have never done it themselves. “Stubborn” concrete can only be done with a hammer drill.
Tool
Making an opening in a concrete wall for one seat without the help of a hammer drill can take a whole day of labor-intensive and dusty work. A universal power tool, equipped with a crown or a special drill, can handle small and deep holes quite easily in perforation mode. Any inhabitant of a home can easily master the control of a rotary hammer. If there is no instrument in use, then it is rented.
Rotary hammerSource cmp24.ru
You can make many holes with a drill and knock out the concrete with a chisel, but it is best to do this with a crown with diamond attachments or pobedit teeth. They are equipped with drills that center the entrance of the cutting attachment into the concrete mass. If further passage of the hammer drill is hindered by the reinforcement of a reinforced concrete wall, then it can be cut with an old used crown.
A level will be needed to indicate the horizontal line of a group of sockets. To apply the markings you will need a pencil and a ruler.
Crown for concreteSource static-eu.insales.ru
Marking
Determining the location of switches and sockets is regulated by the Rules for the Installation of Electrical Equipment (PUE). Sockets in residential premises must be placed at a distance of at least 30 cm from the floor. For switches, this size is a minimum of 90 cm. Transfer boxes should not be closer to window and door openings than 10 cm. Connection points to the electrical network are located at a distance of at least 50 cm from gas pipes.
Marking of socket boxes on the wall is done after installing hidden wiring. The seat center points are combined into one line. It is drawn with a pencil or marker under the level. If single socket boxes are installed, the distance between the points will be 71 mm. If the glasses are combined into one block, then you need to add the length of the interblock elements, that is, the distance between the centers will be 71 mm + 6 mm = 77 mm. This is not dogma. It is better to check the dimensions yourself with a ruler.
Marking of switches, sockets and transfer boxesSource chebo.biz
Adviсe
In order for the installation of sockets in drywall to be carried out as correctly as possible, it is advisable to adhere to the following recommendations:
- Take into account the presence of empty space between the drywall and the main surface of the wall (it must be at least 4.5 cm and the glass must be placed freely at the base). You can deepen the base using a hammer drill or chisel.
- Even at the stage of assembling the gypsum plasterboard structure, in the place where the socket is planned to be installed, it does not hurt to bring the wiring out with a margin of 20-30 cm.
- When installing several devices, use a building level to correctly mark and install sockets.
- Electrical wiring inside the structure should only be carried out while protecting the electrical wires from possible mechanical influences (in a corrugated sleeve) in order to minimize their damage during installation or operation.
- It should be taken into account that when creating holes you may come across the metal profile on which the gypsum board is based. To prevent this from happening, use a powerful magnet. Place it against the wall and move along the surface to find out whether there is a metal profile behind the ceiling.
- If you still come into contact with a metal structure, then you should not despair. Since there is no need to move the holes for the sockets to another location. The fragment of the profile that interfered with the work is cut off using iron scissors or knocked out (bent) with a simple chisel.
When making repairs, you most likely have thoroughly calculated everything. But after a certain period of time, you may need to install an additional switch, you will need to hang a picture or change the location of wall lights. And then chaotically laid wiring can turn out to be a serious problem. Because using a hammer drill or electric drill can easily cause damage to hidden electrical wiring and cause a short circuit. To avoid such surprises, place the electrical wiring parallel to the floors, adding a few 90-degree turns. It is advisable to record the laying diagram: sketch out a plan, a sketch, or simply take a photo, at least on your phone. Then, in a few years, you will be able to drill into walls at any point without any obstacles or doubts without any undesirable consequences for electrical wires.
Mounting a socket into a plasterboard wall is quite simple and can be done with your own hands. Following all the above recommendations, such a procedure as installing electrical sockets in a wall made of gypsum plasterboard will be implemented most correctly and in the shortest possible time.
To learn how to select and install a socket box in drywall, see the following video.
Cutting holes for socket boxes in drywall
So, we completed the markings, and we did it accurately and accurately. Now we need to take care of the mounting holes for our “plastic boxes”. To do this, you will need a drill or screwdriver equipped with a bit with a diameter of 67 mm.
I have a whole set of them with different diameters: 51, 57, 67, 76, 89,102. This set of Chinese crowns is therefore not very expensive. Anyone can afford such a set. But I must note that despite the fact that the Chinese set is very reliable and has served me for almost five years. Each crown for socket boxes on drywall when assembled has a centering drill.
The further procedure is quite simple: we rest the centering drill against the marks we made, and carefully drill four holes with a crown.
Please note that drywall is a fairly soft and pliable material, so you should not use excessive force when drilling. This may dent or break the septum.
Considering the characteristics of the material, you can completely do without a crown. Drywall can be cut with a utility knife, however, in this case, the holes will not look very presentable.
Shapes and designs
Shape of the socket box
Devices can have a round, square or rectangular shape in various colors. Round models are most often used. They differ in diameter and planting depth. When heated, they transfer heat to the drywall, which is important in case of a short circuit. Can be used with a maximum current of 16A and voltage up to 400 volts.
Main characteristics:
- The dimensions of the socket box for plasterboard vary - planting depth from 40 to 62 mm, diameter from 60 to 75 mm. When choosing, take into account the thickness of the sheet and the distance between them and the wall.
- In order for the box to fit tightly, the crown for drilling the hole must be the same diameter.
- Inner diameter maximum 65 mm.
- If several elements are installed under one frame at once, the distance between centers should be maintained within 71 mm.
There are products whose sizes differ from generally accepted standards.
When choosing a suitable product, you need to correlate the dimensions of the space behind the partition and the depth of the socket box. Made of metal or plastic, they are used to attach the entire structure to drywall. The ideal option is products made of self-extinguishing plastic. On their front part there are 4 fastening screws: a pair for fixing the socket frame, the other two screws are equipped with special pressers that rest against the back of the sheet.
On the back surface there are markings for holes for the cable. The front part is not completely round. Two opposite sides seem to be cut off, which helps to assemble a block from several boxes. If necessary, you can choose a double or triple socket box. They also produce special connectors for assembling the structure.