The bathroom is a special room in the apartment, which is almost always warm and humid. Such conditions are a favorable environment for the appearance of fungus and mold. It will be quite difficult to get rid of them in the future. Therefore, all cracks and gaps at the joints of surfaces in the bathroom must be sealed during renovation. And for these purposes, silicone sealant is most often used. And in order to do everything carefully, you need to first familiarize yourself with how to use it correctly.
Application of silicone-based sealant
There are different types of sealants, and the most common is silicone. It has excellent properties and is perfect for sealing joints in bathrooms. There are two types: acidic, used only for metals that do not rust, and neutral, used for any surface. It is the neutral sealant that is most often chosen for bathrooms. Among the advantages of silicone sealants are:
- high degree of strength;
- excellent elasticity;
- good resistance to temperature changes;
- excellent water-repellent characteristics;
- long service life.
Attention! The best option for bathrooms would be silicone sealant labeled “sanitary”. It contains special antibacterial additives that prevent the formation of fungus.
Preparing surfaces for sealant
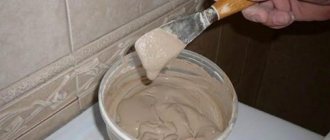
Using silicone sealant is very easy. But first it is necessary to carry out preparatory work in the places where it will be used. Surface preparation consists of three stages:
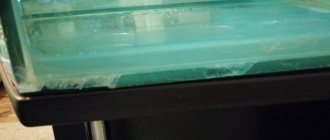
The sealant allows you to reliably seal all joints and seams
- cleaning joints and seams in the bathroom from dirt and dust - you can use a vacuum cleaner for this purpose;
- degreasing surfaces intended for sealing with sealant - to do this, wipe the cleaned seams with acetone or alcohol;
- drying the work surface - wipe it dry or do it with a hair dryer.
Attention! Careful preparation of the seams in the bathroom for the sealant will ensure its best adhesion to the surface.
Auxiliary materials and tools
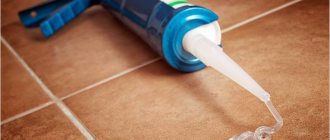
You can carefully fill the cracks with sealant using the nozzle that is included in each package. However, to increase productivity, professionals use special guns, from which the product is squeezed out either under the pressure of a manually actuated piston, or using pneumatic or electrically driven mechanisms. The larger the volume of work, the more powerful a tool the master will need to complete it as quickly as possible. Choosing the right tool also helps save material, which is important for reducing overall costs.
To level surfaces filled with sealant, rubber or plastic sleepers with different widths and shapes of the working surface are used. To remove excess product, white spirit is usually used, which is moistened with a regular cloth and wiped the contaminated surface with it.
How to use sealant
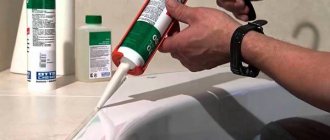
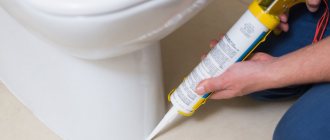
Silicone sealants are sold in standard packaging - tubes. Before you start using the product, you need to prepare it. To do this, cut the tip of the tube at an angle, which makes it easier to apply the silicone, and put on the cap included with the sealant. After this, the prepared tube is inserted into a special gun and fixed in it.
By inserting the tip of the tube with sealant deeper into the seam, you need to apply silicone evenly over the entire surface to be treated. The force of pressing when working with a gun must be compared with the moderation of movement along the gap or joint. This will result in a smooth and beautiful seam. Silicone serves to protect the surface from moisture penetration. Therefore, saving sealant would be inappropriate here. All voids in the seam being processed must be filled. If this is not done, then when the silicone dries, cracks may form between the surface itself at the joint and the sealant.
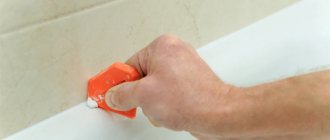
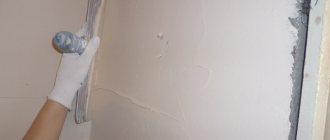
The seam may not always turn out perfectly straight the first time. There's nothing wrong with that. Before the sealant has time to harden, you can remove its excess and level the seam with a rubber spatula slightly moistened with water, or use a small scraper made from a piece of plastic for this purpose. Many people smooth out the seam simply with their finger when nothing suitable is at hand. But it’s better to at least wet your finger in a soapy solution before doing this.
Advice. In order not to stain the surfaces adjacent to the seam with silicone, it is better to stick mounting tape along it before applying the product as close to the joint as possible and remove it after completing the work.
How to do it yourself
If the master is professionally involved in finishing work, then the set contains from 7 to 15 spatulas. By choosing one shape, size or material, you can carefully and quickly create a seam. Having a dozen devices it is easy to make a joint of any complexity and length.
In the store, instruments are sold both as a set and as individual copies. For a home craftsman, a standard set of 2 to 4 pieces is enough. If finishing work occurs irregularly, then a couple of universal types are enough.
Source nazya.com
The cost of the tool depends on the material and brand. The price of a small set does not exceed 100 rubles, and individual copies range from 30-50. It is advisable to create a spatula for sealant with your own hands only when there is no time to run around construction stores or wait for an online order.
Homemade models are inferior in functionality to industrial tools. The easiest way to do this is to cut the device out of thick cardboard and bend the edges at an angle of 45 degrees. I recommend replacing the rubber model with a piece of plastic or wood from a stationery ruler. The spatula can be made from a tin can. I advise you to flatten the teeth and cut them with a hacksaw.
If you need a triangular model, then an old bank card will do. The dense and elastic material lends itself well to shaping. You can cut a corner or make a recess from the polymer, making it easier to work with the sealant. With low heating, the plastic becomes soft and flexible, which allows you to bend the edges of the canvas.
As a tool, I recommend using pieces of thin plywood, cut to the required sizes. If you have a lathe, then a homemade spatula can be cut from a block of wood. Wood is suitable for the handle; I cut the tip from shoemaker's polyurethane. I connect the finished parts with glue.
Source youtube.com
How long does silicone bathroom sealant take to dry after application?
Drying times for silicone sealants vary from manufacturer to manufacturer. But regardless of its composition, it can dry in different ways. This depends on the type of surface, the thickness of the applied layer, and the temperature in the room. The top layer of sealant ceases to be sticky after about 20-30 minutes, but inside it still remains liquid.
After a few hours, the silicone hardens and takes about a day to dry completely. For deep and voluminous seams, it may take even more time - up to two days. And all this time it is necessary to protect the composition applied to the seam from moisture that may get on it, that is, it is better not to use the bath.
Applying sealant
Smoothing seams with detergent = damage to sealant surface and white spots
If joints are smoothed with household detergents (which often happens in practice), there is a huge risk of silicone components being released from the surface of the joint. As a result, it becomes dull and dull, and subsequent cleaning may result in further abrasion of the silicone, leaving unsightly streaks in the sealant. When smoothing with detergent, the ratio in the mixture is often such that only a small amount of detergent dissolves in the water. Consequently, the smoothing ability is strictly limited. The surfactants contained in commercial detergents remain visible as white residue on the surface of the sealant. If a detergent is used on expensive natural stone, there is a very high risk that these stains will land on the surface of the stone, penetrate into the stone and cannot be removed later. Detergents also contain fat-soluble substances. These substances strip the skin of its natural oils and thereby damage the acid mantle of the skin. The result may be skin irritation. Our RAMSAUER® 506 GLÄTTMITTEL SPEZIAL joint smoothing agent for natural stone joints does not contain grease-dissolving agents. Therefore, it is safe for the skin. It has been tested at the renowned Fresenius Institute in Taunusstein, Germany. It has been proven that the product is harmless and does not irritate the skin.
Smoothing sealant joints in natural stone coatings
For processing natural stone joints, it is recommended to use only RAMSAUER® 506 GLÄTTMITTEL SPEZIAL . After filling the joints with silicone sealant for natural stone RAMSAUER® 440 NATURSTEIN, the silicone sealant is modeled with a smoothing agent using a spatula. If the smoothing agent cannot come out of the seams on its own, it is recommended to use the smoothing agent as sparingly as possible, i.e. only lightly moisten the smoothing tools. To avoid staining or discoloration on natural stone, excess smoothing agent should be removed before drying with clean water.
RAMSAUER® 440 NATURSTEIN matt and textured colors
When smoothing sealants in matt shades with RAMSAUER® 506 GLÄTTMITTEL SPEZIAL, the following must be observed: the joint should only be cleaned once using a smoothing tool dampened with smoothing agent. The more often the surface is treated with a smoothing agent, the more the matte effect can be lost and the seam becomes more shiny.
Smoothing seams when glazing wooden windows
When smoothing sealant into glazing joints on windows or doors using the RAMSAUER® 506 GLÄTTMITTEL SPEZIAL smoother, care must be taken to remove any resulting water streaks immediately after finishing and sealing the joint between the glass and the wood base (glazing beads). If cleaning is carried out later, even before a surface film has formed, there is a risk of streaks that cannot be removed later.
The best way to dissolve silicone sealant
A small amount of this product can be wiped off with alcohol, gasoline, or white spirit. There are plenty of different solvents on sale that can be used to remove sealant from the surface. But most of them do not completely clean the silicone, but only soften it. But after that it will be much easier to remove it. But it is worth keeping in mind that all of these products may have some restrictions on use on certain types of surfaces. Therefore, you first need to try them in an inconspicuous place.
Silicone-based sealant is a convenient and practical product, and it is quite easy to use. Using it in the bathroom can effectively protect this room from the appearance of traces of mold and mildew.
What it is
The small, easy-to-use device fits easily in your hand. The model for silicone is made in the form of a plate of a certain design, along the edges of which cutouts are located. The structure of the parts makes it easier to form the contour of the sealing seam, giving the line the desired roundness or angle.
Source uptainhome.com
I use a spatula to remove excess silicone sealant. The universal tool is suitable for leveling and for creating external and internal seams. Due to its compactness, the device does not take up much space when stored.
Practicality and ease of use depend on the material from which the model is made. Elasticity and resistance to cracking are demonstrated by spatulas for sealant made of rubber and silicone. Rubber and plastic tools break down quickly, but due to their high density, professionals prefer to work with them.
Source aliexpress.ru
Spatulas for grouting are available in different shapes and sizes. The structure of the model depends on the tasks for which the device is intended. The most popular are square or rectangular elements with protrusions on the edges and beveled corners. Using this tool, I can easily make seams and change the height and thickness of the line.
Models with a small recess in the center of the structure are very convenient. Thanks to the sharp edges, the spatula glides gently over the surface, fits tightly and removes excess sealant. If I need to seal joints in hard-to-reach places, then triangular tools are suitable for me.
Source koopil.com