Recently, chipboard sheets are very often used for interior decoration of wall structures. They are successfully used both in living rooms and in office premises, shopping and entertainment centers, and gyms. Chipboard stands for chipboard. Special adhesives made on a synthetic basis are also added to its composition. In some cases, additional components are used. In this article we will talk about installing chipboard sheets on the wall.
Return to content
Chipboard safety classes
The safety class of chipboard depends on the quality of the adhesives used in the manufacture of the material. Domestic and foreign-made slabs are divided into groups according to the following safety classes:
Super E. The highest safety class. This icon on the chipboard packaging means that the sheets can be used for finishing work in any room, including children's rooms. In addition, this material can be used to make children's furniture.
E1 . This safety class is assigned to sheets in which the content of free formaldehyde does not exceed 10 milligrams per 100 grams of material. Such boards can also be used in the production of children's furniture or for decorating children's rooms.
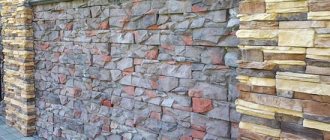
Wall covered with chipboard sheets
E2 . This safety class is assigned to a material in which the free formaldehyde content ranges from 10 to 30 milligrams per 100 grams of material. Such chipboards for interior wall decoration are prohibited from being used for decorating residential premises or making furniture.
Return to content
Application in the furniture industry
The high cost of natural wood has led to an increase in the popularity of particle boards. They are used to make partitions, wall panels, equipment for commercial enterprises, etc. However, the largest number of panels are used by furniture manufacturers.
Due to its simple processing and variety of colors, laminated chipboards are used in the manufacture of custom-made kitchen sets. In this case, take moisture-resistant boards with a thickness of at least 20 mm.
The edges of blanks intended for assembling drawers located close to the oven or hob are protected with an aluminum corner.
Each type of laminated chipboard is labeled according to its method of application:
- BS - for the manufacture of office equipment;
- SE - has a texture structured like natural wood and is suitable for furniture production;
- SM - with glossy sides used in the construction of partitions;
- MAT - with a smooth matte base;
- PR - with a porous surface;
- PE - the front side resembles an orange peel.
Wall panels are made from chipboard.
Pros and cons of chipboard
Finishing walls and ceilings from chipboard is an excellent option for decorating residential and non-residential premises. The fact is that the material has a number of advantages:
- large margin of safety;
- long service life;
- practicality;
- resistance to high temperatures;
- resistance to direct sunlight;
- attractive appearance;
- resistance to the formation of colonies of bacteria and fungi;
- high level of sound insulation;
- resistance to mechanical stress;
- lack of tendency to corrosion;
- relatively low cost.
By following the link https://vse-postroim-sami.ru/home/mebel-i-elementy-interera/8533_kak-v-dsp-sdelat-otverstie-pod-petli-montazh-mebelnoj-petli/, you will learn how make a hole in the chipboard panel. This article contains information about attaching plywood to a wood floor. We also recommend reading the article about moisture-resistant wood-polymer composite.
In addition, the panels can be treated with paints and varnishes to add freshness to the interior or simply to change the shade of the sheets.
Despite the impressive list of advantages, the material still has some disadvantages. Chipboards are made from wood, but at the same time do not have the properties of wood. The strength of the material is significantly lower than the strength of wood, so the fasteners that were installed in the chipboard sheet will no longer hold firmly in the holes after dismantling.
Also, the panels crumble easily during processing. Almost all types of chipboard panels are not resistant to liquids, so decorating walls with chipboard panels with your own hands in bathrooms, kitchens and other rooms with high humidity is impossible. In addition, this material does not tolerate temperature fluctuations, so they cannot be used for insulating balconies and loggias.
Structure of laminated chipboard
Return to content
Care of laminated chipboard furniture
The use of modern materials and technologies in the manufacture of household items has made caring for them simple and effortless.
Laminated chipboard will serve for a long time if you follow several rules:
- Avoid getting liquid under the protective film;
- does not place hot objects on the surface;
- To remove dust, use a soft, dry cloth;
- periodically treat the front side with polish to add freshness and shine.
Furniture made from laminated chipboard will remain beautiful if the room temperature remains between +2 and + 40 °C. Relative humidity should be in the range of 45-70%. Heating devices and heating equipment must not be placed near furnishings. When opening or closing doors and drawers, do not use excessive force.
Caring for furniture made from chipboard is easy.
Decorative coating is resistant to the following substances:
Avoid overloading:
- for shelves and cabinets - 15-20 kg;
- glass shelves - less than 5 kg;
- bottom of the box - 10-15 kg.
Types of finishing coating for chipboard wall panels
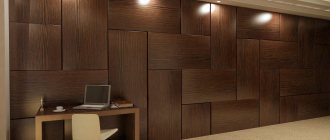
A huge number of substances that are used to treat the front surface of chipboard panels make it possible to create sheets that are suitable for creating a wide variety of interiors. For example, chipboard sheets with wood veneer are perfect for a classic interior.
Wood-like walls
Veneer is made from various types of wood. This can include a wide variety of wood types. If you decide to add a little sophistication and solidity to your interior, then chipboard sheets with natural veneer are the ideal option for you. The final coating for this material can be various varnish compositions.
Chipboard panels coated with artificial or natural leather are perfect for decorating libraries and offices. The only drawback of this material is the rather poor color range. On the other hand, using this material you can create a rich and luxurious interior. In addition, this coating is very easy to care for.
Leather panels
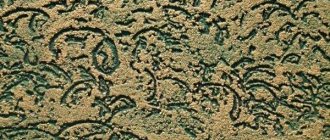
If there is a need to decorate rooms in which a high level of sound insulation must be maintained, special chipboard sheets are used. They have a perforated or micro-perforated surface. This material is covered with veneer or a polymer composition.
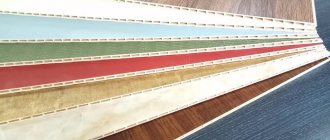
Really wide possibilities for creating an interior are provided by chipboard panels with a laminated surface. The modern market offers more than five hundred color solutions of the material. The color range is represented by all existing shades - from black to white. Surfaces can be glossy or matte, which means that you can definitely choose the material you need.
Decorating walls with laminated chipboards allows you to create a bright interior for a nursery or a calm one for a bedroom. In addition to its attractive appearance, the laminated material is characterized by a high level of mechanical resistance, resistance to high temperatures, and resistance to cracking.
Laminated chipboard sheets
Return to content
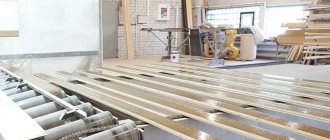
Production technology
For the production of laminated chipboard (LDSP), a first-class source material is used - chipboard. It must be without signs of defects, delamination, foreign inclusions, etc. The slabs are polished, then fed to the press, where the lamination process takes place.
The chipboard sheet is covered with specially treated paper. The color can be different - from monochromatic to recreating natural materials: wood of different species, stone, cork, etc. Maybe with some kind of pattern. The paper is impregnated with melamine, a substance that is insoluble in water and most solvents. Thanks to this impregnation, lamination paper becomes durable and moisture resistant.
Melamine paper is placed on the prepared sheet, then fed to the press
The prepared chipboard sheet is placed in a special press, and a sheet of melamine paper is placed on top. Next, the press comes into play. These are two horizontal plates. If necessary, a textured pattern imitating the structure of wood, stone, etc. is applied to the lower surface of the upper slab. Oil heated to high temperatures (140-230°C) circulates inside the press plates.
The texture and color of laminated chipboard may vary
The lower, movable part of the press lifts the material laid on it and, for a few seconds, presses it against the upper part of the press. The pressure is created high - more than 20 atm, so that the applied textured pattern is pressed into the slab. At the same time, heating melts the melamine and the surface layer of the “base” chipboard. Melamine penetrates the surface, firmly and rigidly fixing the paper to the material. After melamine hardens, a strong, hard film is formed on the surface, which is difficult to damage even with sharp and hard objects. The process is repeated on the other side, then the edges are processed.
How to choose chipboard panels
This material must be selected taking into account the characteristics of the room in which the finishing work is taking place, as well as the requirements for chipboards. Please note the following:
- possible mechanical loads;
- room design;
- air humidity in the room;
- average temperature;
- installation method.
The brand of material depends on the above factors. Modern markings look like this:
- grade P-A means that the material can be used to make furniture;
- grade P-B means that the sheets are best used for finishing work;
- the material is also divided into 2 grades according to the quality of the coating;
- grade M denotes sheets with a fine-textured coating;
- grade Ш means that the material has been ground, and grade NSh indicates unpolished slabs;
- Brand B designates moisture-resistant chipboard sheets.
Return to content
What is a tongue and groove?
The word tongue comes from the German word Spund, that is, plug or plug.
Tongue and tongue is a special method of processing the edges of a slab, in which 2 edges are processed in the form of a groove, and the other 2 edges are processed in the form of a ridge that completely corresponds to the groove.
When assembling structural and finishing material, the ridge of one slab fits into the groove of another , due to which adjacent elements are fastened to each other.
The thickness of the ridge is 1/3 of the thickness of the finishing element, and the length is 6–15 mm, while the length of the ridge is equal to or 1 mm less than the depth of the groove.
Fastening chipboard sheets
This material can be mounted in four different ways.
Lathing . The sheets are mounted on the lathing, which is pre-installed on the wall surface. This method is used in the case of uneven surfaces or when it is necessary to leave some space between the chipboard sheets and the wall. The method is used to hide utility networks. The lathing is fixed to the wall using dowels, and chipboard sheets are installed on the frame using self-tapping screws.
Lathing for chipboard sheets
Skobyanoy . This method is used to install panels on a wooden or level base. For installation, use a construction stapler, screws or nails.
Profile . This method is applicable for rooms with high levels of humidity or with uneven wall structures. The aluminum profile is first attached to the wall, and chipboard sheets are already installed on it. Provided that laminated material is used, the resulting structure will be moisture resistant.
Mounting on profiles
Adhesive . This method is easy and minimal in time, but after installation it will not be possible to dismantle the slabs without damaging them. In addition, finishing walls with moisture-resistant chipboard using this method requires a flat base and the use of a special adhesive composition. The base requires priming and treatment with an antiseptic substance.
Return to content
Best recommendations from experts
In order for the room to be decorated correctly, there are certain nuances that require attention. Eg:
- When purchasing laminated chipboard, make sure that all the material is from the same batch. The slabs should be immediately checked for flaws, damage and swelling. Ideally, all slabs are packaged in protective film, which is removed before installation.
- To ensure that the boards adapt perfectly to the conditions, they will be placed in the room for 24-48 hours. After some time, work can begin.
- To properly secure the slabs using self-tapping screws, it is better to make markings in advance, placing all the points perfectly level.
- When working with panels without tongue and groove, it is best to use moldings and additional components that help make the appearance even better.
If you choose the right chipboard panels, comply with all transportation and storage conditions, and also perform the installation correctly to ensure a perfect finish. It is reliable, beautiful and can last for decades. All that remains is to choose the installation method and start doing the work yourself.
Source
Installation features
We have prepared several recommendations that will help you avoid mistakes when installing slabs and save both the finishing material from damage and the installers from injury.
Thermal gap
The width of the thermal gap , which must be left between the finishing elements according to the instructions, depends on the temperature difference during installation and in winter when the heating is running.
The higher this difference, the larger the gap must be, otherwise the coating will be deformed.
Therefore, installing the finishing in summer, during hot weather or in winter with the heating running will allow a gap of 1 mm, while in other times of the year its optimal size will be 3–5 mm.
Number of people
For high-quality installation of finishing on the floor 3 people are needed , two will lower the slab, and the third will check the entrance of the ridge into the groove and knock in the finishing material to ensure the required thermal gap.
To install the finishing on the walls, 3 people are also needed, two will hold the slab, and the remaining one will attach it to the frame.
To attach the finishing to the ceiling, a team of 3–6 people is required (depending on the size and weight of the sheet).
Optional equipment
To attach the trim to the ceiling, not only an impressive number of people are required, but also supports in the form of mops with a leg adjustable in length.
It is very difficult to hold a heavy sheet in weight and ensure its immobility , so the team lifts and positions the material along the marking lines, then fixes it with supports in increments of 1–2 meters, after which the installer attaches the finish to the ceiling or ceiling.
When cutting slabs and drilling concrete or plaster, it is necessary to use protective equipment (goggles and a respirator), as well as ventilation using a construction vacuum cleaner.