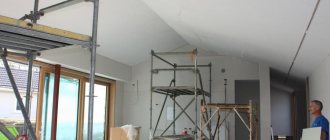
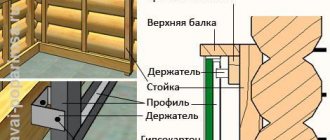
Installation of plasterboard sheets is carried out in two main ways: on the frame
or directly on the wall surface. In most cases, plasterboard is attached to walls without a frame in rooms with a small area, since the lathing takes up a lot of space and narrows the space. How and in what way frameless installation is carried out will be discussed in this article.The frameless method of installing drywall is most often used in rooms with small areas.
Advantages and disadvantages of frameless drywall installation
The frameless fastening method has the following advantages:
- Saving money spent on installation of sheathing.
- Quick installation. Basically, the duration of installation work is caused by the construction of the frame, and in its absence the process accelerates.
- This method allows you to save more free space, since the lathing takes up at least 5 cm of the usable area of each wall.
Flaws:
- If the humidity of the walls is high, drywall will quickly become unusable, even taking into account the use of moisture-resistant material.
- Finishing walls with plasterboard without a frame and profile is possible only with minor surface unevenness.
- The maximum permissible difference is 2 cm, but no more. For more significant differences, it is necessary to level the surface or use another method of attaching the finishing material.
- When using the frameless method, there is no way to hide communications.
Advantages and disadvantages
All building materials have a number of positive and negative qualities. This does not indicate an absolute advantage of one species over another. It all depends on the use in a specific situation and conditions.
Advantages
Drywall is used for rough finishing of walls of heated rooms; the following advantages are highlighted in this process:
- Quick installation. Taking into account all the preparatory work, the speed of screwing gypsum board sheets is much higher than plastering.
- The surface is perfectly flat. Even without puttying the seams, the surface remains perfectly smooth.
- The final cost of finishing is much lower than other options.
- Possibility to hide communications and electrical wiring behind the structure. This opportunity arises due to the presence of space between the frame and the sheets of drywall.
Flaws
Like any other material, drywall has its disadvantages, these include:
- Relatively low strength. Strong impacts can break the sheet; the surface is unstable to mechanical damage.
- It will not be possible to attach heavy objects to a wall covered with gypsum board. It is impossible to drive a nail into the sheets, tighten a screw, etc.
- High vapor permeability and low moisture resistance. It is not recommended to decorate walls with plasterboard in rooms with high humidity.
Preparing everything you need
To attach drywall without a frame, you need to plan the work and prepare everything you need:
Tools and material:
- Jigsaw.
- Drywall (the quantity is calculated taking into account the area of the walls of the room).
- Gypsum mixture.
- Level.
- Roulette.
- Container for diluting adhesive solution.
- Knife.
- Metal brush.
- Plaster mortar.
- Putty knife.
- Primer.
- Hammer.
Take measurements of the room and, based on the results obtained, cut the material. Measurements are also necessary to select the most appropriate option for the location of the material. If the standard height of the room is exceeded (2.5 m), it is necessary to prepare special inserts that will close the resulting gaps.
When calculating and cutting the material, you need to take into account that the arrangement of the sheets should be offset - to prevent the appearance of cross-shaped joints.
Before installing drywall, you need to prepare the wall: clean it of whitewash, wallpaper and paint. Existing holes must be plastered.
Alignment of walls
Preparation and leveling of walls plays an important role in the long-term operation of plasterboard coating. The complexity of their preparation lies in the material from which they are made.
The most suitable and convenient option are brick walls, which will only need to be coated with a primer.
If the walls are plastered, it is necessary to remove this coating, as it may fall off over time and deform the slab from the inside.
All other coatings, such as whitewash, old wallpaper, paint, also need to be removed.
The surface preparation process should be carried out in the following sequence:
- Tapping walls to identify weak spots and remove them.
- Removing the old coating.
- Plastering the resulting pits during the tapping process.
- Cleaning the surface from dust.
- Prime the walls with a deeply penetrating compound.
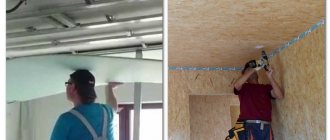
- Plasterboard sheets should also be primed.
A primer is necessary in order to preserve the finishing material from the appearance of mold, since primers have antibacterial properties that prevent the growth of fungus.
Solution and methods of its use
Gypsum is used as a fixing solution. As an option, you can use starting putty or alabaster, but to increase adhesion you need to add wallpaper glue or PVA to the solution.
Frame and frameless gypsum board wall cladding
How to apply the solution for different unevenness:
- If the difference in unevenness is 5 mm, the solution is applied to a sheet of drywall in a thin layer along the edges and in the center.
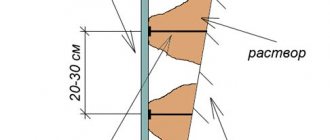
- For differences from 5 to 20 mm, a special adhesive composition is applied pointwise, in increments of 25 - 30 cm.
- If the differences reach 40 mm, then you first need to attach small pieces of plasterboard to the wall using glue, onto which, after the glue has dried, the main slabs will be attached.
- If it exceeds 40 mm, the method of frameless installation of finishing material is unacceptable.
Cladding walls with plasterboard with unevenness less than 2 cm
If there is an unevenness in the wall and it is less than 20 mm, then the technology changes a little. In this case, the glue is applied not in strips, but in cakes. The cakes are applied over the entire sheet, often along the perimeter, over the sheet area every 350 mm.
Then the sheet is pressed against the wall and aligned both along the longitudinal edge and along the plane. Light blows on the sheet adjust the sheet level.
Gluing plasterboard sheets to the base of the walls
This is the easiest way to finish interior surfaces.
Gluing technology:
- First of all, you need to prepare wooden pegs for placing them under the sheets of drywall. They are necessary to obtain small gaps between the sheet and the floor (1 cm). Gaps must also be made between the sheets - no more than 0.5 cm.
- The adhesive is applied to the sheet in the manner that is most suitable.
- As quickly as possible, but very carefully, the material is glued to the wall.
- Using a level, the unevenness of the coating is adjusted by tapping problem areas with a rubber hammer.
- After tapping, you should again carefully check the entire surface for evenness before the solution hardens.
- After leveling the surface, the plasterboard board is supported with a wooden plank.
The alignment of the sheets must be done very carefully, since drywall is very fragile and can easily become deformed.
Once the finishing material is attached, the joints are covered with fiberglass mesh and puttied. The roughness resulting from the work is smoothed out with sandpaper. After cleaning the surface from dust, it is primed and covered with the chosen method.
Cladding a flat wall with gypsum craton
- The evenness of the wall is checked by the building level;
- The wall is cleaned of dust and dirt;
- Then the wall is primed;
- A sheet of plasterboard 12.5 mm thick, cut to height (if necessary);
- Sheets are glued from the corner;
- The back side of the sheet is coated with mounting glue. The coating is done around the perimeter and in the middle of the sheet. The glue is applied in uniform wide stripes;
- The sheet is then lifted and pressed against the wall. The edge of the sheet is set according to the level. For alignment, lining is used under one of the lower edges of the sheet.
Installation of drywall with self-tapping screws
This method is more practical than the previous one, but the installation technology is also a little more difficult. When applying this method, you need to add polyurethane foam and thick foam rubber to the base materials.
Fastening technology:
- Having attached the cut plasterboard sheets to the wall, drill holes in 10 places that will serve as a marker.
- After removing the slab, anchors are driven in at the marks.
- Pieces of foam rubber (10 cm from the holes) are glued to the plate, which will serve as a shock absorber.
- If there are sockets and switches on the wall, holes are immediately cut in the drywall for them.
- Leaning the sheet against the wall, fasten it using self-tapping screws.
- Leveling the surface is done by unscrewing or tightening the screws.
- For high-quality fixation, holes with a diameter of 5 mm are made next to the screws, through which the mounting foam will be poured.
- After the sealant has hardened, the self-tapping screws are removed, and the holes after them are filled with putty.
- The final stage is gluing the seams and puttingty them, followed by sanding the surface.
Before pouring polyurethane foam, you need to first practice with the dosage. After the sealant comes out, you should get a spot no larger than 15 cm in diameter.
To summarize, we can say that installing drywall without a frame is a fairly acceptable way to level walls, which can be done by almost anyone without any special skills. To do this, it is necessary to correctly calculate and cut the material, as well as decide on the method of frameless fastening of drywall. If all requirements for the wall surface are met, the material will last a long time.
source: //mrgipsokarton.ru/steny/bez-karkasa
In most cases, to finish/cover walls with plasterboard, a frame is made/assembled (for this, profiles made of metal are used). Finishing using this method is suitable for large rooms. This is explained by the fact that the frame “eats up” the usable area, so this method is not relevant for small rooms.
For finishing walls in a small room, another method is suitable - frameless. In this case, there is no need to assemble a structure from metal profiles.
As for the complexity of the work, you can install drywall yourself, without a team of builders.
You can achieve this effect without using a frame.
Types of installation
The plasterboard fastening to the wall is selected according to the purpose and the condition of the base. You can fix the gypsum fiber board sheet using either a frame or frameless method. Each of these types of installation has its own characteristics and advantages.
The frame installation method is relevant in such cases as:
- Aligning large curvature of walls, creating geometric structures, niches;
- In cases where you need to create thermal insulation or hide communications behind the casing.
The main disadvantage of this method is the reduction in usable area. In addition, do not forget that to complete it you will need screws, profiles and additional tools.
Attaching drywall to a wall without a profile (frameless method) does not significantly change the volume of the room, but is done when the surface is relatively flat and there are no plans to insulate it.
The main advantages of this method include simple and quick installation, as well as low cost.
You cannot install gypsum boards if moisture accumulates on the walls or if there are areas affected by fungus. For high-quality installation, the surface must be dry and the fungus removed. If the humidity in the room is high, it is worth buying a moisture-resistant type of drywall.
Frameless fastening methods and base preparation
Installation of gypsum boards on a wall without assembling a frame, for which profiles are used, is carried out in two ways:
- on the adhesive composition;
- on self-tapping screws.
But even before attaching the sheets to the wall (without creating a frame), it is necessary to prepare the base coating - remove the old cladding, dirt and dust.
While working, take into account some nuances - they will help you cope with the old finish:
- It is convenient to remove old paint from the walls with a spatula ten centimeters wide, cut to length (so that it does not sag during the cleaning process).
- If you need to remove wallpaper, moisten it with water. After a quarter of an hour they will easily come off.
- To remove plaster from walls, use an axe, hammer or hammer drill (putting the tool in the impact position without drilling). When removing the plaster, make sure that no areas are left that have not been cleaned.
The surface is prepared for further work
When cleaning walls (not including wallpaper), spray water periodically to prevent dust from being raised.
Where to begin
To sheathe a wall with plasterboard, collect and prepare tools and materials:
List of what you will need for finishing:
- jigsaw;
- adhesive composition (gypsum dry mixture);
- level and rule;
- painting knife and lace;
- paint roller, brush, spatula and rubber hammer.
If you mount the sheets with self-tapping screws, then you will additionally need:
- screwdriver;
- foam;
- polyurethane foam and glue;
- self-tapping screws and screws with washers.
Self-tapping mounting
What to do if the unevenness is 20-40 mm
It is most difficult to finish walls with plasterboard if there are large depressions or bumps.
Scheme of covering walls with plasterboard on a metal frame.
In this case, “beacon” fastening is used.
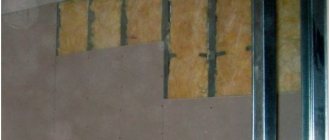
- From plasterboard you need to cut strips 10 cm wide and glue them to the wall vertically. They need to be fastened every 40 or 60 cm. The more frequent the step, the more secure the fastening. To do this, it is better to use Perlfix glue.
- The strips are aligned so that they are in the same plane. Thus, a kind of gypsum board frame is obtained. Leveling the walls with plasterboard occurs precisely at the stage of attaching the base. The glue will be applied in piles, but the height will be different for everyone: somewhere 10 mm, and somewhere 30 mm or more.
- When the frame is assembled on all walls (or places with large gaps), it is left to dry.
- After 2-3 days, the drywall is glued. It is secured using Fugenfüller. Some people prefer liquid nails. Both methods provide high-quality adhesion between the frame and the gypsum board.
Related article: Floor-standing gas boiler: do-it-yourself installation
The first method of frameless fastening is installation with glue.
Wall finishing with gypsum plasterboard sheets without the use of frames and planks is carried out in the following order:
- The process of installing a coating without a frame begins with preparing the surface. The old finish is removed, dirt and dust are cleaned off.
Porous surfaces are primed. To reliably cover the recesses and pores, use a paintbrush.
- Next, they move on to the most labor-intensive stage - cutting out the facing material:
- draw a line along which you want to cut the sheet;
- a shallow cut is made on one side of the material;
- then a painting knife is drawn along the entire length of the drawn line;
- a break is made, then the sheet is bent inward;
- cut the material on the other side;
- cut.
- At the third stage, glue is prepared and applied. Instead of glue, building plaster is suitable. Often builders use starting putty instead of glue. But in this case, add PVA glue to the water (wallpaper will do). After the mixture is ready, it is applied to the back side of the sheet using a spatula.
Glue drywall
and using polyurethane foam (with a low expansion rate).
If drywall is installed without a frame on the surface using polyurethane foam, the sheets must be securely fixed before the composition hardens, otherwise lumps will form that cannot be removed.
Installation on polyurethane foam
- Next they move on to attaching the gypsum board sheets. It is important to take into account the degree of curvature of the base. Drywall can be glued directly to a flat wall. If the surface has crooked places (height difference no more than 40 mm), then they are eliminated by first gluing narrow strips of drywall (10 cm wide).
If the height difference is less than four millimeters, then the panels are fixed with Fugenfüller putty. With a difference of 2 mm, fastening is carried out using “Perlfix” (the mass is applied to individual areas in increments of up to 0.35 m).
The cut parts are glued vertically, in half-meter increments. Using a plumb line, attach the outermost parts, then the remaining elements. Then the sheets are pressed against the wall as a rule.
Using a rubber hammer, periodically tap the material, thereby removing bulging areas. It should be noted that hitting the tool with a hammer is not recommended.
After leveling, the sheet is supported with a board.
- The seams are puttied. Seal the resulting gap near the floor. The gap at the top (near the ceiling) is filled with putty.
Grouting the remaining seams
If the unevenness of the walls ranges from 5 to 20 mm
In this case, leveling the walls with plasterboard is practically no different from the first method: the sequence of actions remains the same, only the glue and the method of its application are replaced.
- For large unevenness, use Perlfix. This glue is applied to the sheet in small piles. Their diameter is 100-150 mm, and the height should be slightly greater than the depth of the depressions (from 100 to 300 mm). These cakes are planted quite often: every 300-350 mm, first around the perimeter, and then in the central part.
- The sheet is then lifted and placed on the substrates. It is also aligned vertically (for this purpose, lines drawn on the floor and ceiling are used).
- When glue comes out at the joints, it is removed with a spatula. There should be no mortar in the seam.
The second method of fastening without a frame is using self-tapping screws
This type of wall cladding (without creating a frame) is more difficult to complete than the first option. However, it is considered more reliable. This method is used when finishing surfaces with large curvature.
Sheathing without creating a frame is possible if the height of the walls does not exceed 3 meters.
The finishing process using self-tapping screws without assembling the frame:
- The sheet is applied to the surface. Make small holes for fasteners. They should be spaced evenly. There should be a total of ten (eight allowed) holes per sheet.
- Then the plasterboard is removed. Dowels are inserted into the holes made.
- On the next stage, thick foam rubber is glued to the drywall, ten centimeters away from the drilled hole.
- Then the sheet is attached to the wall with screws and washers.
- Drywall
is installed in a vertical position, which is checked using a level. Then screw in/unscrew the fasteners - self-tapping screws. - Work similarly with all subsequent sheets.
- Next, a hole is made near each screw (about seven millimeters in diameter). Polyurethane foam is pumped there.
- Fix all sheets.
- After the foam has hardened, the screws are removed. The resulting holes are puttied.
- The seams are puttied and then sanded.
Sheathing walls with plasterboard without installing a frame is carried out before laying the floor covering. Please note that finishing work is carried out at a temperature not lower than +10 degrees and normal humidity.
Keep in mind that before installation, drywall must rest for two days in the room in which it will be installed.
source: //gipsohouse.ru/walls/631-otdelka-sten-gipsokartonom-bez-karkasa-i-profilya.html
One of the most convenient options for wall repair is covering the floors (reinforced concrete and wood) with plasterboard. The material has a number of advantages and allows you to carry out work with a minimum amount of dirt and dust. In addition, with the help of gypsum boards you can not only level walls and ceilings, but also install partitions. This will allow you to make any layout in the room or divide the room into zones. How to properly install drywall on walls and what methods can be used? The next article is about this.
Some aspects of the work ahead
Leveling walls with plasterboard without a profile requires minimal time and effort, because there is no need to build structures. However, there are a few points to consider before getting started:
- Leveling the walls with plasterboard is carried out before laying the floor.
- The surface of the wall to which the sheets will be attached must withstand the load exerted by the facing layer. Ideally, you need to attach drywall to load-bearing surfaces that are not in contact with moisture and not subject to temperature changes; otherwise, moisture-resistant sheets that are green in color and marked with gypsum plasterboard are used.
- The use of this method is permissible only if the walls in the room have a curvature of no more than 4 cm.
- With the frameless method, it is impossible to create niches, additional shelves and partitions.
- Laying of communications and electrical wiring is carried out before the start of leveling with plasterboard; it is also better to cut holes for sockets in the sheets in advance.
USEFUL INFORMATION: How to make a plasterboard partition with a door with your own hands
Information: the cost of frameless installation of drywall on walls in Moscow is from 350 rubles. for 1 sq. m, in St. Petersburg - from 320 rubles. for 1 sq. m, in other Russian regions prices may differ significantly. This method is cheaper than the frame method; the cost of consumables - drywall, glue - is not included in the price of services.
Options for covering walls with plasterboard
There are two main ways to finish gypsum board walls: framed and frameless. In addition, you can use several options for installing the frame using different profiles. Each option has a number of advantages and limitations in application. Therefore, to begin with, it is worthwhile to analyze the features of each design and choose the most suitable option for a particular room.
There are three main ways to install drywall on a wall:
- on metal profiles;
- on a wooden frame;
- using glue.
Metal is most often chosen as the frame material. Wood is less durable, “afraid” of moisture and is better suited for cladding wooden walls. For example, in country houses. Therefore, for standard city apartments it is recommended to use either a metal frame or glue.
A comparative description of cladding methods in terms of basic consumer characteristics is given in Table 1.
Table 1 - Advantages and disadvantages of various wall covering options.
| Characteristic | Frame method | Glue mounting |
| Labor intensity of work | – | + |
| Possibility of installation on uneven surfaces | + | – |
| Price | – | + |
| Possibility of installing sound insulation | + | – |
| Space Occupied | – | + |
| Reliability and durability | + | – |
Based on the table, it can be seen that installing drywall on walls with your own hands is easier and cheaper to do without a frame. But if there is significant curvature of the floor or a large number of defects, this method will not work. In addition, glued sheets cannot be decorated with tiles and sound insulation cannot be installed under them.
As a result, we can draw the following conclusion: it is difficult to say which method
better. The choice will depend on the area of the room and the operating conditions of the future structure. In any case, to create high-quality wall decoration you will have to work hard and spend a lot of time.
Selection of tools and components
To install plasterboard sheets on walls without a frame, you will need the following list of materials and tools:
- drywall;
- start profile;
- guide profile;
- straight suspension;
- profile extension;
- dowels;
- self-tapping screws;
- connectors;
- materials for finishing (tape, primer, putty);
- knife (for cutting gypsum board);
- metal scissors;
- perforator;
- tape measure and pencil;
- screwdriver (preferably);
- laser level.
For the frameless method, the list will be an order of magnitude shorter:
- gkl;
- seam tape;
- putty;
- finishing putty;
- primer;
- Perlfix glue;
- tool for cutting sheets and taking measurements.
Once all the necessary components have been purchased, you can begin installation. The following are instructions for installing drywall on walls in various ways.
Leveling walls by gluing drywall
The following method will allow you to level the walls with plasterboard by gluing it. To do this, you will not need to struggle with creating a frame and reducing the area of the room. In this case, at the preparation stage, it is highly advisable to remove all protruding surfaces and bumps from the walls.
- To increase the adhesion properties of materials, be sure to treat the wall with a primer.
- Cut the sheets to the required length in advance, and it is important to leave a gap at the bottom and top, which will help the glue dry faster. Usually it is 1 cm below and 0.5 cm above. To prevent gypsum board sheets from slipping after gluing, find a stand of suitable thickness for them.
- Holes are drilled across the entire surface of the wall for dowels, which will act as limiters. Screws are screwed into them so that the caps are located at the same level. So, the dowels will not allow you to press the sheet of drywall against the wall more tightly than necessary.
- Leveling walls with plasterboard without a frame is usually done using the Knauf PerlFix dry adhesive mixture. It is diluted to a paste-like consistency right before use, as it hardens quickly.
- The glue is applied to the back layer of sheets in generous pieces and stripes along the edges towards the center in increments of 20-30 cm. They cannot be leveled; the piles must be voluminous in order to fill the recesses when joining. You can apply the adhesive to the wall itself rather than to the drywall if you prefer.
- Attach the sheet of glue to the wall and press it tightly against the dowels. If necessary, tap the drywall with a rubber hammer. To avoid breaking the sheet, place a piece of board under the hammer.
- When the surface of the walls is very uneven, you can first glue an intermediate layer of strips. When they have hardened, full sheets are glued on top. A diagram of an alternative option for gluing drywall is shown in the photo.
- When the glue has completely dried, you can begin further finishing work, as described above. The drying time for the glue is written in the instructions on the package.
If you are doing a small amount of work, you can make your own drywall adhesive. To do this you will need putty, water and PVA glue. Fill a container of the required size with water and add putty. Mix the resulting mixture thoroughly with a construction mixer or a drill with an attachment so that there are no clots or lumps. It should not be too thick or liquid, otherwise it will be inconvenient to work.
Add PVA glue to the mixed solution, approximately 1 liter per 13-15 kg of putty. Stir it again and after a couple of minutes start gluing.
This homemade glue is almost as good as store-bought analogues, but takes longer to dry, so it is recommended to secure the gypsum board sheets after gluing them so that they do not “slip.”
Popular methods of applying glue
An alternative method of gluing drywall is suitable for very curved walls
The process of installing drywall sheets on walls is shown in the video:
Installation of drywall without frame (with glue)
Installation with glue has some features depending on the level of wall deformation. For example, for surfaces with defects of no more than 4 mm, the method of fixing gypsum boards using Fugenfüller type putty is suitable. If the size of the irregularities is up to 20 mm, then Perlfix glue is used for cladding. For defects up to 40mm, first you need to stick gypsum board strips onto the surface, and then install sheets of material using putty.
Before you start installing drywall on the walls with your own hands, you should pay attention to some nuances:
- room temperature (it should not be below 10 degrees);
- drywall should “lie” for a couple of days in the place where it will be installed;
- in rooms with high humidity, only moisture-resistant material can be installed;
- the walls must be cleaned of layers of old plaster, wallpaper and other elements of previous repairs;
- The finished glue hardens quite quickly, so you need to dilute the powder with water immediately before starting work.
The process of installing drywall begins with marking and cutting the material. At this stage, you should prepare the holes in which the sockets and switches will be located. After this, the surface is treated with a primer and left until completely dry.
When cutting sheets, we must not forget about the gap that should be between the sheets and the floor. It is subsequently closed using pads, which are removed at the end of the repair, and the gap is completely sealed.
The glue is applied to the back side of the sheet in the form of piles every 300 mm. Next, the gypsum board is pressed against the wall and leveled until the glue has completely hardened. The sheets are installed very tightly to minimize joints and prevent the formation of gaps. The installation is coming to an end. All that remains is to seal the joints, carry out the finishing touches and seal the gaps between the walls and the floor.
How to secure a sheet without first installing a frame
Let's look at ways to attach drywall to a wall without a profile. In practice, several options are used for how to level a wall with plasterboard without a profile:
- Dowels or screws.
- By gluing (plaster or cement glue).
Installation of GLK with self-tapping screws and dowels
It is recommended to sheathe walls using self-tapping screws in cases where the base itself has a wooden (OSB, plywood, timber) or plaster surface. Let's look at how to screw drywall to a wall step by step using self-tapping screws:
- All protrusions on wooden partitions are removed with a tool specially designed for this purpose (a hatchet or a chisel with a hammer). If you need to level a foam concrete wall, you can use a hammer drill.
- If the wall is made of OSB, plywood, or timber, then the GLK can be mounted directly on the wall. Installation is carried out using wood screws with a length of 2.5 cm.
- Sheets of drywall are secured with hardware in a checkerboard pattern in increments of about 25 cm. The self-tapping screw, or rather its head, should be slightly “recessed” into the material. We leave a deformation gap of 2-3 mm between the sheets.
The main thing is not to overdo it. Tightening the screws too tightly may screw through, or the gypsum plasterboard may crack.
I do not recommend this method of fastening with dowels. But if there is no way out and the surface is relatively flat, then you can resort to this method.
The option for attaching the GLK to dowels is as follows:
- The sheet is installed on a leveled base without defects.
- A hole is drilled through it and a plastic part is inserted.
- Then the dowel-nail itself is screwed in with a screwdriver.
How to fix drywall to a wall without profiles: gluing technology
The temperature of the room should be taken into account; it should not be lower than +10 degrees Celsius. At lower values, you will need to worry about heating the room.
When installing drywall directly on a wall using gluing technology, careful preparation of the surface is required. It consists of removing wallpaper, parts of peeling paint or plaster, sealing cracks, and applying a primer with an antiseptic (preferably in two layers).
We stretch the thread or use a laser level to understand how curved the surface is and what layer of glue we will need. If the wall is smooth, then you can glue the drywall under a special spatula (comb). But usually the walls are very crooked and you will need to apply glue buns.
It can be used as special gypsum glue (dries very quickly), or you can use tile adhesive (you can work with it for a long time). For one batch of glue, it is recommended to install no more than two sheets of drywall.
Glue buns are applied at a distance of 30 cm from each other. A sheet of GLK is applied and a level is gradually tapped and applied. Using the level, we determine how evenly the sheet is glued, apply it in different directions and planes so that there is no deflection of the sheet. We hammer glue into the resulting cracks along the edges. Let's start gluing the next sheet. Do not forget to leave a small gap of 2-3 mm between the sheets for subsequent finishing.
After the glue has completely dried, the sheets can be reinforced
Installing plasterboard on a metal frame
This method is more labor-intensive and expensive than the previous one. But such a design is not only more durable and reliable, but also allows you to maximally level any surface. It is better to first watch the entire procedure for installing plasterboard sheets on the walls in a video, and only then implement it.
The order of operations will look like this:
- marking based on the most protruding point of the wall using a level;
- fastening the starting profile to the ceiling using dowels;
- installation of hangers on the wall surface;
- installation of guide profiles and connecting it with hangers and starting profile;
- installation of sound insulation and wiring;
- fastening gypsum board sheets with self-tapping screws;
- seal the seams and apply a decorative coating.
The final finishing can be done in several ways: laying tiles, wallpapering or simply painting. Important: tiles can only be laid on a wall made of two layers of gypsum board! In any case, the strength of a double wall will be higher than a single one. But this will also affect the price.
There are many different instructions online for how to properly install drywall on a wall. Is there detailed information on how to properly hang heavy objects (for example, a TV) on the gypsum board? What tool will you need for this? The answers to these questions will be useful to every novice repairman.
source: //ogipse.ru/74-professionalnye-tonkosti-montazha-gipsokartona-na-steny/
Materials and tools
As already mentioned, there are several ways to install drywall on a wall - with construction adhesive and with lathing. It is clear that each case requires its own list of building materials and consumables. However, in order not to repeat ourselves, we will list them in one list - it will not be difficult to choose from it what is necessary when using this or that technology.
To install drywall on a wall, you will need certain materials, tools and accessories.
Materials
So, from the materials for leveling the walls you will need:
Various types of plasterboard sheets
1 – Sheets of plasterboard, which must be purchased with a margin of 15% of the total area of the walls to be covered.
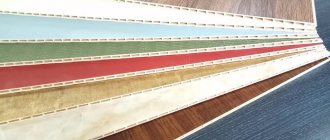
Drywall is a common name. It is divided into four types, and you need to choose it depending on the room in which it will be installed. Each type has its own color marking, which indicates the characteristics of the material:
— Ordinary sheets of drywall (gypsum board) have a light grayish color. they are used for leveling walls, erecting wall or ceiling structures in rooms with normal humidity levels.
— GKLV is a moisture-resistant material for installation in bathrooms. Its leaves have a pronounced greenish tint.
— GKLO—fire-resistant plasterboard. This material is used for cladding walls near stoves and fireplaces. Externally, it is distinguished by a surface painted in warm pink tones.
- GKLVO - this type of drywall combines the properties of moisture and heat-resistant material. It can be used for covering walls in bathhouses or boiler rooms. A characteristic feature of the sheets is their dark blue or dark gray color.
GKLVO - material. combining moisture resistance and resistance to high temperatures
Drywall can also vary in size - there are certain standards in this regard:
Type of plasterboard Thickness in mm Width in mm Sheet length in mm
| GKL | 8,0; 9,5; 12,5; 14; 16 | 1200 | Standard – 2500, upon request – from 2000 to 4000 |
| GKL | 18 and over | 600 | 1200 |
| GKLV | 1200 | Standard – 2500, upon request – from 2000 to 4000 | |
| GKLO | 12,5; 14; 16 | 1200 and 600 | Standard – 2500 or 1200, |
| GKLVO | 12,5; 14; 16 | 1200 | Standard – 2500, upon request – from 2000 to 4000 |
What you will need besides the drywall itself:
2 – Gypsum construction adhesive (dry mixture)—for leveling walls without using lathing.
Dry mixture Knauf - Perlfix - gypsum-based construction adhesive
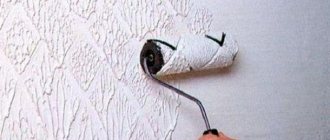
3 – Primer for treating the wall surface before installing drywall.
4 – Putty for sealing seams.
5 – Reinforcing mesh or tape.
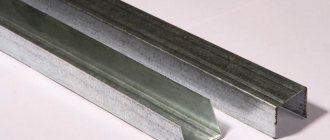
6 – Galvanized metal profiles for the sheathing, if it will be used. They may require special hangers, connecting elements, etc.
Galvanized metal profiles and fastening elements for them
7 – Self-tapping screws for assembling the sheathing structure and for fixing gypsum boards to the guides, dowels for attaching beams or profiles to a concrete or brick wall.
8 – Insulation material – if thermal and sound insulation work is planned.
9 – Vapor barrier film – in cases where insulation is used.
Tools
Tools you should prepare:
- Medium width spatula for applying glue and putty. Sometimes you may need a notched trowel.
- A sharp construction knife for cutting drywall.
- Electric drill and mixer attachment.
- Paint roller, brush.
- Container for mixing the adhesive composition.
- Metal shears – for cutting galvanized profiles.
- Pliers for connecting metal profiles or riveter.
- Tape measure, folding meter, level, plumb line, rule, other necessary measuring and marking tools and devices.
- Hammer.
- Screwdriver.
- Rule.
- A plane with a beveled blade will be a good helper - for quickly chamfering plasterboard sheets.
GVL classification and labeling
The gypsum fiber sheet used today varies, it all depends on its application. There are those that can only be used for dry rooms, and there are those that are suitable for conditions of high humidity. Manufacturers offer regular and moisture-resistant gypsum plasterboard, which can perfectly replace even tiles in industrial premises characterized by high constant humidity (the walls must be puttied before installation!).
Characteristics of gypsum fiber.
In addition, GVL sheets are divided into standard and small-format. The dimensions of standard slabs are: 2500 mm – length, 1200 mm – width, 10/12 mm – thickness. Small-format sheets have dimensions: 1500 mm – length, 1000 mm – width, 10/12 millimeters – thickness. Such small sheets are very convenient to install on walls in bathrooms and toilets using the frameless method (the walls must then be puttied with special moisture-resistant compounds).
All sheets that are used for installation on walls have a marking on the back side containing the characteristics of the sheet, its date of manufacture, and the name of the company that produced the material. The marking must necessarily contain information on the type of longitudinal edge of the slab, the exact name of the material (regular or waterproof), and the dimensions of one sheet in millimeters; designation of the group to which the material belongs.
Installation
Wall priming scheme.
Installation of GVL can be carried out on cleaned walls or after they have been putty (this depends on the condition of the wall). For this, the adhesive method is used, when the slabs are glued to the surface using gypsum putty or special glue. This can be done in several ways depending on the curvature of the wall; in some cases it is necessary to putty them first.
For the frame method, a special galvanized metal profile or wooden slats are used, to which the sheet is screwed.
General rules for covering walls with plasterboard sheets
Wall cladding without a frame is done using special mounting adhesive or putty. Frameless cladding can be used both for smooth walls and for walls with unevenness of less than or more than 20 mm.
Important! Cladding walls without a frame is impossible if the height of the room is higher than the length of the plasterboard sheet. Otherwise, there should be no horizontal joints on the cladding without a frame.
Smooth concrete must be coated with Concrete Contact. After cleaning, other surfaces are treated with acrylic primer.
Cladding walls without a frame is carried out using three different technologies, depending on the unevenness of the wall. Before we understand these three technologies, let's talk about the material for frameless cladding.
Before cladding, the wall must be cleaned of any dirt and the location of the sheets must be marked. Lay electrical wiring along the walls. In the case of cladding without a frame, it is better to recess the electrical wiring in the structure into the wall.
DIY frameless installation
Stages of laying gypsum boards on the floor
For gypsum fiber sheets, the frameless method is rarely used, but for the walls of residential premises, gypsum fiber boards are the most preferable option. Installation using this method is carried out in the following sequence:
- If the walls are uneven up to 4 mm, the sheets must be glued directly to the surface of the walls using gypsum putty, which is applied in longitudinal ridges in a fairly thin layer along the perimeter of the gypsum fiber board, after which the sheet is glued to the wall.
- If the unevenness is 4-20 mm, the sheets are laid using a special glue, for example, Perflix. The composition is applied to the surface of the gypsum fiber board in the middle and along the perimeter of the slab in increments of 30-35 centimeters.
- If the unevenness is very large, from 20 to 40 mm, then installation is more difficult. First, with your own hands, using special glue, strips of gypsum fiber board with a width of 100 mm are glued to the surface of the walls, and only then the slabs themselves are glued to them using gypsum putty.
Installation using the frameless method is carried out as follows:
Scheme for attaching drywall with glue.
- Installation must be carried out before the final floor covering is laid. The room temperature should be between + 10°C. The sheets themselves should be kept in the room where the installation will take place for two to three days before work. Humidity and temperature conditions must be maintained for the entire installation period; For very wet rooms, such as bathrooms, it is better to use plasterboard moisture-resistant boards.
- If necessary, the walls must be prepared and cleaned of remnants of the old coating. If the surface delaminates, then strengthening measures should be taken. The wall is puttied, it must dry, after which installation can begin.
- After the puttying is completed, you should use a building level to correct the verticality of the walls and the presence of unevenness (the choice of installation method depends on this). The location of the slabs is marked on the surface. If necessary, the walls are treated with a primer.
- GVL slabs are cut out, holes are cut in them for switches and sockets. The height of each piece should be such that there is a gap of 8-12 mm at the bottom. After installing large slabs, small sections are installed below to bridge the gaps. To be on the safe side, the sheets can be screwed to the wall surface with self-tapping screws.
- The GVL boards themselves are glued to the wall using special compounds according to the chosen method. This is done with a calibrating notched trowel; after applying the mixture, the sheet is leveled using a mallet. If you plan to mount any furniture on the wall surface, then glue must be applied to the entire surface of the gypsum plasterboard.
- Apply the adhesive in an even layer and constantly ensure that the installation level is maintained at the same level. This is usually done using a stretched thread. The DIY installation itself starts from the corner. Gradually, the entire room is covered around the perimeter. To cover a wall made of wood, all sheets are additionally fastened with self-tapping screws or tar nails with very wide heads.
After laying gypsum fiber sheets on the walls of the room with your own hands, it is necessary to putty all joints and fastenings with nails so that the surface becomes perfectly flat. When the mixture has dried, you can begin further finishing.
How to mount drywall on walls without a frame
Repair and decoration of any room is not complete without drywall. The material is a layer of gypsum covered on both sides with cardboard. It is used for installing partitions and finishing wall surfaces. With its help, they create complex multi-level suspended ceiling structures, arches of complex configurations, finish niches in the walls and make built-in wardrobes with open shelves.
Drywall is classified as a universal construction and finishing material that is used in all structural planes of the building. For ceiling work, thinner sheets of plasterboard are used. 9 mm thick, their size is 1.2 x 2.5 m. Wall sheets are 12 mm thick, 1.2 x 3.0 m in size.
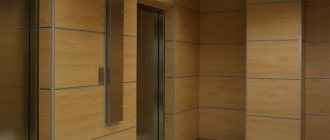
For work under normal conditions, standard beige plasterboard is used, green sheets are used for constructing moisture-resistant partitions, and construction in fire hazardous areas will require a gray tint to the surface of the material.
Sometimes attaching drywall to a frame is not possible due to the small size of the room, for example, on a balcony or loggia. in utility rooms, during the reconstruction of plumbing units in the apartment. If the frame structure “steals” such necessary centimeters, then it is allowed to attach sheets of material directly to the wall.