The relatively new Knauf technology was developed and proposed by the German company, whose main activity is related to the production of high-quality materials for repair and construction work, including various types of plasterboard sheets, profiles, and fastening elements.
The essence of the technology in the case of ceiling installation comes down to the use of Knauf products with the aim of maximizing the leveling of the ceiling and delicately masking communications with minimal time and labor.
What are the requirements for the frame within the technology
The Knauf company focuses on several important nuances that need to be taken into account when assembling a frame for a suspended ceiling using its technology. These include:
- the use of plasterboard sheets produced by the company with a high level of protection against moisture;
- installation of profiles in order to avoid deformation of the ceiling under the influence of the mass of finishing material is carried out in a checkerboard pattern with an overlap or staggered;
- Knauf fastening elements are used for connection;
- to prevent deformation of the coating under the influence of vibrations that occur when the door is regularly opened, avoid joining sheets in the center of the opening;
- the finished frame must be finished with thermal insulation tape.
With your own hands, a gypsum board ceiling using Knauf technology is assembled from special profiles marked UD and CD.
Frame
No gypsum sheets, even the best ones, can be fixed on the desired plane without constructing a frame. To do this, the company has developed a whole system of different parts that are easily connected to each other thanks to a unified sizing system. These parts are called profiles.
The profile for plasterboard, developed by Knauf, has excellent strength and performance characteristics, which made it possible to use it not only when working with plasterboard, but also for constructing frames for completely different finishing methods.
Each type of such elements has its own designation and is used to create certain elements of the base for drywall.
- CD - needed for constructing lathing on the ceiling surface.
- UD - serves to create a base in which the horizontal parts of the frame being constructed will be fixed. It also sets the level at which the ceiling covering will subsequently appear.
- CW is a profile similar to CD, but is used to construct vertically positioned parts of the base for plasterboard sheathing.
- The UW guide profile is mainly used as an analogue of UD parts, but in wall structures and partitions.
To connect all parts of the base for installing gypsum boards to each other, as well as to attach them to the planes, there will be specially designed connectors, which also have several varieties. Some of them are as versatile as the already indispensable gypsum sheet.
- Direct hanging elements are intended to connect parts of the frame with the surfaces of walls and ceilings.
- Adjustable elements of the same purpose can only be used in ceiling structures.
- A connecting element called a “crab” is used when you need to connect several parts located in the same plane.
- Corner and straight connecting nodes are intended for fastening two profiles together, at an angle, or end-to-end.
- A two-level connection knot is used when you need to fasten two profiles passing above each other.
All types of fasteners, profiles and all other components of the finishing system can be easily purchased at almost any hardware store.
You can read more about the components needed to create sheathing for drywall here.
Advantages of technology: why it is used
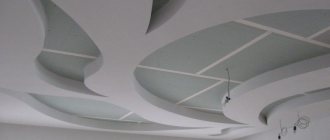
Properly planned and installed plasterboard structures can not only complement the interior, but also add the necessary accents, adjust the size of the room, and hide communications and electrical wiring. Ceiling installation using Knauf technology allows you to create practical designer ceilings with minimal effort and time. The finished design opens up more opportunities for experimenting with light and demonstrates excellent thermal and sound insulation performance.
Installation of ceilings is carried out from the materials included in the kit. It includes sheets of plasterboard from the manufacturer with optimal dimensions and properties, and a metal frame. Working with such a set is convenient even for a beginner.
conclusions
If you follow the instructions of the Knauf company, then to build a frame base, you can use only the components listed above and manufactured on Knauf equipment. Although they are not the cheapest, they have excellent characteristics, and in order to comply with the installation technology, only them should be used.
Despite the slightly higher price than its analogues, proprietary design elements will not only allow you not to violate the installation technology developed by the company, but also to obtain the highest quality design.
Preparation for installation of the structure
Installing a Knauf plasterboard ceiling is permitted only after completion of construction and finishing work associated with wet processes. In addition, by this time the walls should be leveled and finished.
It is allowed to begin the process of installing a ceiling structure provided that the temperature and humidity conditions are observed. It is important that the temperature is not lower than 10 degrees Celsius, and the humidity does not exceed 60%.
The beginning of the work must necessarily be the correct calculation of the ceiling, drawing up a design project, and carrying out markings. At the same stage, the functionality of ventilation, electrical and other communications is checked.
DIY frame: useful recommendations from the authors of the technology
Using a level for control and a tapping thread, mark a line on the walls around the perimeter of the room. Taking into account the type of drywall chosen for installation, mark the guides with points for mounting the hangers.
Suspensions are secured with anchors or dowels in the marked areas. Further work will depend on the choice of a wooden or metal frame.
So, the technology for installing Knauf plasterboard on a ceiling using a wooden frame involves the following algorithm:
- The beam is attached to the base using a direct or quickly mounted suspension. The second option will allow you to instantly change the mounting side.
- Fix the guide beam on the ceiling surface using pads to reduce differences in the height of the base.
Features of installation technology
In order for the Knauf ceiling to serve for decades without reducing its performance and aesthetics, it is important to follow clear rules for installing the system
Materials and tools for work
List of materials per 1 square meter:
- ceiling profile 28x27 according to the size of the perimeter of the room;
- profile 60x27 mm, length 3 m;
- straight and adjustable hangers 0.7 pcs./m2;
- crabs 1.7 pcs.;
- profile extensions, provided that the length of the wall exceeds 3 m;
- dowels and screws;
- plasterboard sheets 1 m2;
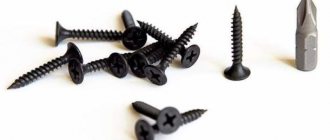
- LN 9 screws in the amount of 1.4 pcs/m2;
- anchors 0.7 pcs.;
- screws TN 25 (bugs) 23 pcs.;
- dowels K6/35, 2 pieces for each linear meter of guide profiles;
- putty gypsum mixture Knauf 400 gr.;
- sickle tape 1.2 m;
- deep penetration primer Knauf 100 ml.
List of tools:
- grinder with disc or metal scissors;
- a plane for cutting a chamfer from a sheet of plasterboard;
- rule;
- laser level, construction;
- roulette;
- painting cord;
- sharp knife for cutting sheets;
- perforator;
- screwdriver
The work will be carried out at heights, so a strong stepladder or table and protective equipment for the face and hands will be useful.
Preparation stage
The first thing to do is mark the ceiling surface for subsequent fixation of parts. A paint cord, laser level, pencil and tape measure will come in handy. To begin, find the lowest corner in the room and mark the profile installation mark along the wall from it. Then move the mark to all other corners with a level and connect the points with paint cord.
Along the plane of the ceiling, mark the attachment points of the PP profiles. The location step is 0.4 m, according to the drawing, calculate the installation zones of the suspensions - a step of 0.4-0.6 m or less, it all depends on the complexity and weight of the system.
Frame installation
Before starting work, you should check the location of the wiring in the walls so as not to accidentally get into the wires when drilling. A metal detector or a wiring diagram for the apartment will come in handy.
After the safety check, installation of the frame will be quick:
- Attach guide elements along the border of the line on the walls. Fasteners with self-tapping screws or dowels in 0.5 m increments.
- Ceiling markings show the fixation points of the suspensions. Screw them onto 2 dowel nails.
- Cut the ceiling profile into pieces of the required size, insert the ends into the guide rails on the walls, and attach them in the middle part to the hangers by the ears with perforations - short self-tapping screws will come in handy here.
- Install the transverse slats, connecting them to the longitudinal crabs. The transverse elements are not fixed to the hangers.
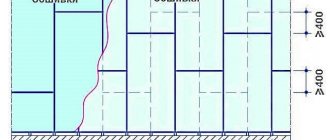
After installing the frame, the ceiling will be “lined” into cells of equal shape with a size of 400x400 mm. Now you need to stretch the cord between the guide parts and align the sheathing to the level of the plane - this is done by adjusting the length of the hangers.
Laying out plasterboard sheets
The technology for installing Knauf plasterboard on the ceiling is not complicated. Start work from the corner or center of the room, lay the joints of adjacent slabs so that they fall exactly in the middle of the batten. At the ends, the joints of the tiles should be located so that 4 adjacent corners do not meet at a point. The offset is made by a profile pitch of 400 mm.
The installation of the sheets is carried out one by one, fixing them with self-tapping screws; after fixing all the elements, the caps of the hardware are sealed with putty. You need to screw in the screws in the center of the sheet in increments of 250 mm, along the perimeter in increments of 150 mm with a distance from the edge of the element of at least 150-250 mm.
Source
Finishing gypsum board ceilings - what you need to know
When installing a ceiling using Knauf technology, you must adhere to the main rule: the sheets are fixed across the supporting profile with screws at right angles. Before installation, the sheets must be processed in the area of the edge not covered with cardboard to remove the chamfer.
Installation of sheets is carried out with an assistant or using a special lifting mechanism. The sheets are fastened without joints, as already noted, in a checkerboard pattern or staggered. It is correct that the sheet be laid in the longitudinal direction without a gap, while in the transverse direction a small gap would form. Only in this case will it be possible to putty the joint in such a way as to obtain a perfectly even seam.
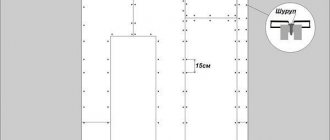
It must be taken into account that temperature changes will affect the plasterboard surface of the ceiling - the sheets will expand and slightly deform. To avoid serious deformations, special expansion joints are installed in increments of 15 m.
To prevent the self-tapping screws from spoiling the finish coating with the released caps, they are screwed in with a slight immersion into the sheet to a depth of no more than 1 mm. The joints are sealed with reinforcing tape.
Finishing - stages of implementation
When designing and installing two-level ceilings in accordance with the described technology, it is recommended to increase the strength of the material through the use of finishes based on water-repellent compounds and putty mixtures.
The seams are masked using the following technology:
- fill the joints with putty mixture using a narrow spatula, removing the residue;
- attach the seam tape;
- cover the tape with putty and remove residues from the surface no earlier than after 45 minutes;
- putty screw heads;
- putty the seams again, removing the residue, this time with a wide spatula;
- polish the surface;
- install an aluminum corner or PVC corner in the area of the outer corners;
- attach a separating tape between the gypsum board and the inner corner, and then cover the surface with putty;
- Paint and plaster the completely dry material.
By following all the above recommendations, even without experience and skills, using Knauf materials you will be able to produce a practical, aesthetic and durable ceiling.
What is the KNAUF system, its advantages. The materials used in the kit are in accordance with GOST standards. Tips for installing various systems. Video examples of systems from a global manufacturer.
Peculiarities
Working with KNAUF plasterboard sheets is practically no different from installing other gypsum boards. However, the manufacturer produces the necessary components to create a plasterboard surface. All materials assembled into a set for wall cladding are called a system. This simplifies the work because all components are made for each other. There is no need to think about installing non-standard additional elements.
Pros of using technology
The KNAUF complex includes all the necessary elements for cladding a wall or creating a partition. This has advantages:
- the use of high quality materials, which guarantees a long service life;
- ease of calculation of the necessary materials for installation;
- KNAUF kit includes detailed assembly instructions;
- If you purchase gypsum boards and components separately, some small details are often forgotten. Everything is included in the kit.
Features of the partition
Depending on the conditions and architectural features of the room, different requirements are imposed on the partition. The main criteria to build on are:
- dry or damp room;
- ceiling height;
- probability of mechanical impacts;
- fire safety requirements;
- the need to hang furniture or equipment.
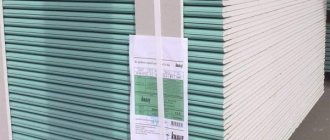
Choosing drywall
GCRs vary in thickness and specialization. In terms of thickness - sheets for frame (12.5 mm) and frameless (9.5 mm) installation. Since the partition is made on a frame, you should choose plasterboard with a thickness of 12.5 mm.
Sheets of 9.5 mm are intended for installation with glue or for covering an old surface with support on the entire plane. At the same time, dividing plasterboard into wall and ceiling is erroneous.
According to their specialization, gypsum plasterboards are divided into standard, moisture-resistant, impact-resistant and fire-resistant.
The moisture-resistant material is used in wet rooms - bathrooms, swimming pools, bathrooms, kitchens, etc.
Impact-resistant is used when there is a likelihood of mechanical impacts provided for by the purpose of the room, for example, gyms, children's rooms. Due to its increased strength, such plasterboard is also used for the construction of structures 8 m or more in height. Fire-resistant HA is used in rooms with increased fire safety requirements, as well as for lining areas where it is planned to install a stove, boiler or electric heating devices. Standard ones are cheaper and are great for dry residential and public spaces.
Double or single layer sheathing
Covering the frame with HA sheets can be done in either one or two layers. An ordinary partition that does not perform load-bearing functions is made with single-layer cladding. If it is necessary to hang any equipment, furniture on it, or to cover it with massive ceramic tiles, the sheets are mounted in 2 layers.
If it is intended to use impact-resistant sheets with two-layer sheathing, the first layer can be made with simple plasterboard. It is also possible to implement a “warm wall” using IR heating film. In this case, the film is mounted on the first layer of HA, and the second layer can be applied in sheets 9.5 mm thick.
Selecting Profiles
Galvanized PN profiles with a base of 50, 75 or 100 mm and a shelf width of 40 mm are used as guides. Rack-mounted - PS must correspond to the guides, so they have a corresponding base width that is 2 mm smaller with a shelf width of 50 mm. All KNAUF profiles have a wall thickness of 0.6 mm, which differs from products from other manufacturers with a wall thickness of 0.4 mm.
The choice of size is made depending on the height of the partition and sound insulation requirements. For a height of up to 3 m, it is enough to use a profile with a width of 50 mm, from 3 to 5 m - 75 mm, and over 5 m - with a width of 100 mm. Naturally, the wider the frame, the greater the distance between the walls will be, and, therefore, the thicker the sound insulation layer. Therefore, if the requirements for sound insulation performance are increased, then even for a standard partition height of 2.5 m, wider profiles should be chosen.
Knauf installation technology: drywall, walls and partitions
Knauf installation technology is not much different from the generally accepted work on wall cladding and creating partitions.
When assembling the structure, you must adhere to some rules:
- plasterboard sheets are fixed to a metal or wooden frame from the center or from the corner. This is done so that the fox does not become deformed. For fixation, use NK 11 screws.
- To create a strong joint between the sheets, they are mounted close to each other, without leaving a gap.
- GKL is mounted so that there are no cross-shaped seams. Sheets on the surface must be shifted.
- To use the frameless method, you need to choose 12.5 mm sheets.
- To glue the sheets, use PERLFIX glue. After gluing, the master has 10 minutes to level the sheet on the surface.
- When laying thermal insulation material for attaching gypsum boards to the frame base, the kit includes 35 mm screws for a wooden base and 25 mm screws for metal profiles.
- The KNAUF profile is cut with metal scissors.
- Before fixing, soundproofing tape is applied to the guide profiles.
- For good sound insulation, you need to retreat at least 50 mm from the rough wall to the guide.
- If a Knauf system partition is created, with a room height of 2.80 m, the door leaf should be 90 cm wide and weigh up to 25 kg.
Installation technology
If you strictly follow the installation technology, the assembled structure will last for decades if used under normal conditions.
Tools and materials for work
If Knauf technology is used to install drywall on the ceiling, then you will need the following tools for the job:
- screwdriver;
- perforator;
- scissors for cutting metal products or a grinder with a circle for working on metal;
- a plane for chamfering the edge of a sheet of drywall;
- rule;
- levels (construction and laser);
- roulette;
- painting cord;
- stationery knife for cutting plasterboard.
In addition, you will need the following materials (consumption per square meter is indicated in brackets):
- PN profile of the Knauf brand with a section of 28x27 mm (the amount is equal to the perimeter of the room);
- PP profile of the Knauf brand with a section of 60x27 mm (2.9 m.p.);
- direct or adjustable suspension (0.7 pcs/m²);
- crab connector (1.7 pcs.);
- elements for extending the profile will be needed if the sides of the room are more than three meters;
- screws and dowels;
- Knauf brand plasterboard of a suitable variety (1 m²);
- screw LN 9 (quantity is 1.4 pcs./m²);
- anchor elements (0.7 pieces);
- screw TN 25, which is popularly called “bug” (23 pcs.);
- dowel K 6/35 (2 pieces per linear meter of guide profile);
- Knauf gypsum putty (0.4 kg);
- reinforcing tape (1.2 m.p.);
- Knauf brand primer (0.1 l).
Surface preparation
First, let's mark the ceiling surface. To do this, we use a painting cord, a laser level and a tape measure. We find the lowest corner of the room, to do this we measure all the corners of the room. Then, from this angle, the amount of decrease in our structure is postponed. We transfer the mark to other corners of the room using a laser level. Then we connect all the marks with horizontal lines on the walls.
On the ceiling surface we make markings for PP profiles. They are usually mounted in increments of 40 cm. Using this marking we mark the installation locations of the hangers. Their pitch is 40-60 cm, but may be less frequent depending on the complexity and weight of the entire structure.
Frame installation
Make sure that there is no wiring running through the area where the fasteners are screwed into the walls, as this can lead to electric shock and loss of power to the room. If you do not have a wiring diagram for the electrical wires in the room, you can use a portable metal detector.
We install the frame in the following sequence:
- According to the markings on the walls, we attach the guide rails. We select fasteners depending on the wall material. The installation step of fasteners is 50 cm.
- We attach the suspensions according to the markings on the ceiling. To fix each element we use two dowel nails.
- Ceiling profiles are cut into pieces of the required length and their ends are inserted into guides on the walls. The middle part of the profile is attached to the perforated ears of the suspensions using short self-tapping screws.
- We mount the transverse profiles of the frame. We connect them to the longitudinal slats using crab connectors. There is no need to attach these elements to hangers.
- The result is a frame with cells 40x40 cm. After this, we stretch the cord between the guide rails on the walls and align the position of the frame in one plane. To do this, we adjust the length of the hangers.
Installation of gypsum board sheets
Fastening sheets of drywall begins from the corner or center of the room. The joints of adjacent slabs should be in the middle of the profile. The end joint of the slabs in the adjacent row should be shifted so that the four corners do not meet at one point. Usually the offset is made per profile step equal to 400 mm.
If there is no finished chamfer on the sheet, then it is removed with a plane before installation begins. The chamfer is made at an angle of 22 degrees to the plane of the sheet and to a depth of 1/3 of the thickness. It is needed for puttying and reinforcing seams.
To fix the drywall slabs we use self-tapping screws. The fasteners are deepened into the body of the material, and this place is then puttied. The step for installing fasteners in the central part of the sheet is 25 cm, and along its perimeter - 15 cm. The self-tapping screw is screwed in from the edge of the plate at a distance of at least 15-25 mm.
On what surfaces is cladding acceptable?
The Knauf design is applicable in various areas: walls, ceilings, floors.
Frameless method applicable for concrete and brick walls. When installing the system using this method, you need to choose the right primer.
The frame method is used if the room is damp, the walls tend to become damp, and there is a desire to improve sound and thermal insulation with the help of additional material.
- There are kits for creating suspended ceilings;
- kits for working in the attic - fastening from the rafters.
KNAUF plasterboard kits are mounted on various surfaces. Each of which has its own requirements and compliance with certain rules.
How effective is Knauf drywall/walls/partitions technology: heat consumption standards
Knauf kits use heat and soundproofing materials in accordance with GOST 9573-96, 21880-94, 10499-95, as well as materials included in the “List of polymer materials and structures approved for use in construction by the USSR Ministry of Health” - M. 1985. Having a conclusion on compliance with sanitary standards of the Legislation of the Russian Federation.
To maintain indoor heat consumption standards, KNAUF systems have materials that are calculated individually for each case (dry but cold rooms, wet rooms).
Examples: video tutorials
The use of the frameless method is shown in the video:
Soundproofing walls with 1-layer cladding in the video:
Assembly of the KNAUF gypsum board partition and 2 layers of sheets:
KNAUF is a global manufacturer of mixtures, profiles and plasterboard sheets, widely used in various installation and repair work. Knauf systems allow you to reduce the time for purchasing materials, make your work easier when doing it yourself, and prevent mistakes that will subsequently affect the entire structure.
Types of partitions and installation features
The Knauf company produces partitions that are excellent in size and type. For convenience, they are divided into models.
Device diagram and design of the Knauf partition
According to the design, Knauf partitions are divided into the number of layers of plasterboard (GLP):
- One layer of drywall.
- Two layers.
- Three layers of plasterboard.
- One layer of moisture-resistant drywall on one frame.
- Combined drywall on one side and two-layer on the other side.
- Three-layer cladding of moisture-resistant plasterboard and metal sheets.
The design of the partitions has channels for communications, as well as dedicated spaces for ventilation.
According to the Knauf frame, there are partitions: single-frame, designed for places where strong sound insulation is not needed and there will not be a heavy weighting of the structure. Two-frame structures are durable interior walls made of plasterboard, on which you can hang a TV on plasterboard or use it as a basis for creating furniture.
Useful video
Drywall partitions are the fastest way to delimit space. In addition, this is a fairly simple process, so even a home craftsman can handle a plasterboard partition. To install the most economical partition with single-layer plasterboard sheathing, watch the video presented on this page.
Partition C111 is a profile metal frame, sheathed on both sides with plasterboard sheets (GKL) in one layer.
This partition is ideal for use as a lightweight enclosing structure in residential, civil and industrial buildings with normal humidity conditions.
Stages of installation of a partition made of plasterboard C111.
It is recommended to install partitions before installing finished floors, when all wet processes have already been completed under normal humidity conditions. The room temperature should not be less than 10C. If the room has high humidity, it is recommended to use moisture-resistant gypsum board sheets.
- Marking – markings are made on the floor, walls and ceiling using a tape measure and a plumb line for the future plasterboard partition.
- Frame installation
- installation of guide profiles - PN profiles are attached to the floor and ceiling
- installation of rack profiles – rack profiles are attached to the PN profiles using a cutter with a pitch of 600 mm. Rack profiles adjacent to the walls are attached to them with dowel nails.
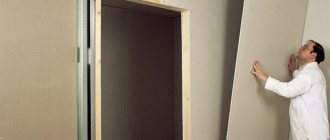
- Installation of plasterboard sheets to profiles –
- marking, trimming, chamfering from the cut edge of a gypsum sheet.
- The sheet is first fastened to the profiles on one side, and the installation is carried out with a small gap from the floor to protect the sheet from getting wet.
- installation of electrical wiring, installation of sound insulation (if necessary).
- installation of gypsum board from the second side
- Sealing joints and surface finishing
- priming the seams
- puttying screw heads and seams, gluing seams with reinforcing tape
- final priming and puttying of the entire surface
To reduce the cost of the partition, you can use instead of Knauf gypsum boards, their analogue is Volma plasterboard.
Selection of components
The plasterboard installation technology developed by Knauf includes not only the process of constructing frames and fixing sheet plasterboard on it, but also the correct choice of materials.
The main recommendations of the company’s specialists and developers suggest using only “branded” versions of products of the following types:
- Standard gypsum board, without distinctive features. Intended for finishing premises where there are no specific fire safety requirements, as well as normal temperature and humidity conditions.
- Moisture-resistant types of gypsum boards are used for work in rooms or areas with a high percentage of humidity or variable temperature conditions.
- Types of gypsum boards with a fire-resistant core should be used for finishing surfaces near heating devices with the possibility of exposure to open fire or high temperatures. Also, fire-resistant types of Knauf materials can be used for sealing places with laid electrical wiring and finishing places where heating pipes are laid.
- Combined moisture and fire-resistant types of gypsum plasterboard are suitable for finishing in places with recommended safety and humidity requirements.
Each type of gypsum board has a marking applied to the surface of the product, which allows you to determine its main properties. In addition, you can determine the type of product by the color of the paper with which the outer side of the product is finished.
If the knauf drywall is gray with blue markings, it is a regular type. When finished with green paper, the products are moisture resistant, and if the paper is red, then you have a fireproof type of gypsum sheet.
Also, options are possible with gray paper, but marked with a red inscription, which indicates the presence of fire-resistant qualities of the material, and the marking with a red inscription on green sheets indicates that this is a gypsum sheet with combined properties. It is both fire-resistant and moisture-resistant.
Characteristics that are not related to properties, but represent data on the length, width and thickness of materials, can be seen by reading the numbers in the labeling.
Most often, there are sheets with a width of 1200 and 600 millimeters, and the length can range from 2500 millimeters to 4000. The thickness of such material can be from 6 to 24 millimeters, but most often, a thickness of 6 millimeters is used for sheets with reinforcement in the middle, up to 9.5 and 12.5 millimeters.