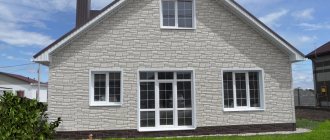
People who do not have experience in construction, having heard about two-layer drywall (the installation technology of which is much more complicated than single-layer), do not always understand why such a design might be needed. Carrying out renovation work often involves the need to divide a large room into several parts using additional partitions. For these purposes, plasterboard finishing in 2 layers is usually used.
Partition made of two layers of plasterboard using Knauf technology
Taking the technology of complex systems of the Knauf company as a basis, it should be noted that partitions made of two layers of plasterboard are correctly called a partition of type C112 with a structure made of a single metal frame, sheathed on both sides with two layers of plasterboard sheets (gypsum boards). The height of such partitions can reach 9 meters, with a square mass of about 50 kg (sheet 12.5 mm).
What is the second layer of drywall used for?
Before answering the question: how many layers of cladding are required, you should understand for what purpose it is carried out. In the case of conventional ceiling or wall finishing, one layer of plasterboard will be sufficient, which allows you to achieve the desired result without additional costs.
Finishing walls and ceilings with plasterboard
As a rule, sheathing and construction of plasterboard partitions using two layers is used to give stability and strength to the entire structure. Due to two layers of material, the structure has more weight, and therefore strength, which makes it more reliable.
Plasterboard partition for dividing a room into functional zones
Double-layer partition frame
The frame of a two-layer partition can be made with a thickness of 50/75/100 mm using the appropriate PS profiles 50/75/100 mm.
By the very definition of this type of partition, the frame is made one profile wide. Guide profiles (PN) are mounted along the ceiling and floor of the partition border. Rack profiles (PS) are inserted into the PN profiles strictly vertically and attached to them with a cutter or bug screws, 8 pieces per rack.
It is important that the edges of the gypsum board sheets, when attached to the frame, fall into the middle of the profiles. Based on these considerations, the pitch between the frame posts is selected and additional horizontal profiles are installed between the posts.
We know that the dimensions of a plasterboard sheet are divisible by 600, so it is logical to choose the distance between the partition frame profiles as a multiple of this figure - 600.
Important! According to technology, the normal spacing of racks in partitions up to 4 meters high should be 600 mm, but not less than 250 mm, for any size of PS profiles. In confirmation, catch the table.
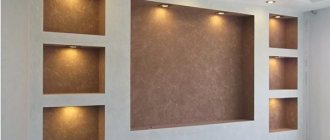
Wall paneling
If we are talking about double cladding of a simple concrete wall, then the technology as a whole is no different from the option with an additional partition. There will be some changes in the structure of the frame, but covering the walls with plasterboard in 2 layers should be done using the same principles that are used to cover the partition.
However, it is not entirely clear why to make double plasterboard to cover ordinary concrete walls. There is no need to strengthen them, but to ensure sound insulation, insulate and level such a wall, finishing in the thickness of one sheet should come in very handy. In addition, the use of double cladding leads to a reduction in room footage. If it was small before, then the losses will be very noticeable.
Regarding how many layers of drywall need to be made in a niche or other similar structures: in each case you should look individually. Everything will depend on why it is being created and what functions it will perform. Regardless of the final decision, everything must be done in accordance with established technology.
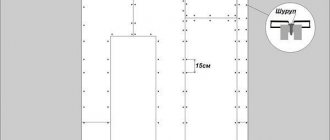
Drawing of a two-layer partition
The drawing of a two-layer partition is important, not only for the purchase of materials, but also for subsequent installation. Let me explain.
In addition to the fact that the edges of the gypsum board sheets must fall on the middle of the frame profiles, the second layer of sheets must be offset in relation to the first by at least 400 (horizontal) and 600 (vertical) mm. All this needs to be displayed on the drawing of the future partition using such a template.
Using it you can easily calculate the required number of racks, guides and gypsum board sheets.
Installation of the second layer
Installation of the second layer of drywall begins only after the sheets of the first layer are securely attached to the ceiling. When performing installation, increase the interval between fasteners.
Interior partition
The two-layer fastening technology means that plasterboard sheets are installed in such a way that the seams of the first layer do not coincide with the seams of the second. The first sheet is not laid whole, but starts with half. The order of work is as follows:
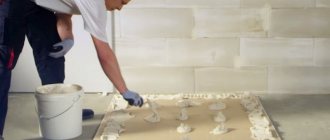
- The end surface of the gypsum board is lubricated with glue;
- It is optimal to plant sheets on PVA glue;
- Screw the sheets with long self-tapping screws to the frame slats through two layers;
- Next, installation is carried out by analogy with the first layer.
The seams are sealed using reinforcing material.
The result is a ceiling with a strong, rigid, almost monolithic ceiling sheathing. The total thickness of such a coating is 19 mm, onto which a frame can be safely installed in two or more levels.
There are many variations in the design of the formed ceiling base. They combine perfectly with other types of finishes. Multi-level illuminated systems amaze the imagination with luxury and variety.
Number of screws for the partition
It is important to understand that to secure plasterboard sheets you will need plasterboard-to-metal screws of various lengths. For the first layer you need 25 mm TN screws, for the second layer you need 35 (or 45) mm TN screws.
I remind you:
- The sheets are attached to the frame horizontally and vertically;
- The pitch between screws is no more than 250 mm. Such technology;
- In this case, the screws must be at least 15 mm away from the horizontal edge of the sheets. At least 10 mm from the vertical edge. This will prevent the edges of the sheet from breaking;
- The displacement of the rows of vertical screw fastenings at the joints of two sheets must be at least 10 mm. This will strengthen the structure.
How to sheathe a partition in two layers
The first step in making double skin is to secure the single layer. Next, you need to act in accordance with four basic rules for carrying out such work:
- The location of the vertical joints of plasterboard sheets when sewing on opposite sides of the partition should not coincide. These lines must be 60 cm apart from each other. Otherwise, cracks will appear and the structure will no longer be stable.
- The location of horizontal joints on the profile is mandatory (they should not hang without support). When sewing, horizontal connection lines (similar to vertical ones) cannot be placed at the same level. Even an approximate match is unacceptable. Minimum indentation – 40 cm
- If a number of horizontal joints are on one side, then they must be placed in a checkerboard pattern, maintaining the same established distance (40 cm)
- The joints of the outer and inner layers should also not match
Having mastered these rules, you need to do calculations and determine how many layers of drywall are needed on the wall in the case under consideration. And if you can’t do with just one, then exactly how many materials will be needed to sheathe the partition in two layers on both sides.
The technology used for carrying out the work includes the following points:
- Before installing the first layer of plasterboard (9.5 or 12.5 mm thick), insulating material is attached to the frame
- The sides are sheathed strictly alternately - first one, and then the other.
- Docking is carried out strictly on vertically placed profiles
- To join sheets in places where there is no profile, jumpers should be used (their installation can only be done together with a partner, who will hold the jumpers that have not yet been secured with self-tapping screws)
- When installing the first layer, the step from one screw to another should not be more than 75 cm
- If wiring was placed inside the structure, be sure to mark where the ends of the wires are located (it would be best to photograph their entire location)
- The space between the profiles must be completely filled with sound-absorbing mineral wool (it’s good if there is a little in excess, then there is no need to do additional reinforcement)
- After single-layer sheathing has been completed, the seams between the sheets are finished using putty (it is not necessary to use reinforcing tape to lay the joints of the first layer, but it will be needed when the second layer is ready)
- If putty is applied to the seams, work continues only after it has dried.
- The distance between the profiles should be equal to the width of the plasterboard sheet divided by two, then the connections of the first layer will fall on all even lines, and the second - on odd ones
It is difficult to fulfill all these requirements in the absence of calculations and records with appropriate notes, which will indicate:
- sheet dimensions
- coordinates of the location of jumpers and profiles
- wiring diagram
- general diagram of the partition with the parameters of the required sheets and frame
This will be required for more accurate orientation when installing the second layer. To secure the internal sheets, it would be better to use self-tapping screws 25 mm long, and external ones - 35 mm (the pitch in this case narrows to 25 cm).
IMPORTANT: when installing plasterboard in 2 layers, the working technology requires that the sheets of facing plasterboard do not lie flush against the surface of the floor or ceiling. Both at the top and bottom you should make an indent of 5-10 mm. To eliminate the possibility of internal stress in the sheets, they must be secured with self-tapping screws sequentially from the central part to the edges or moving from one edge to the other.
If the plasterboard covering in two layers is completed, then you can begin to make sockets and switches (if necessary). A wiring diagram will be helpful here. Installing the necessary elements will not require significant effort. Compared to the situation when the gypsum board wall is single, if the wall is covered with a two-layer coating, the connectors are made twice as deep.
When all the necessary niches are in place, you can start priming the joints of the second layer:
- Fill the gaps between the sheets completely with primer;
- Putty the seams on top;
- Using a spatula positioned at an angle of almost 90˚, remove excess from the wall (the seams should be absolutely smooth - not concave or protruding);
- Glue the tape.
The proposed course of action applies to vertical joints. When processing corner and horizontal joints, after filling empty recesses and niches with putty, you need to wait until the working area is completely dry. Only after this can you make a second (leveling) layer and stick the tapes.
It will be easier to get rid of unnecessary excess putty if it is a little thinner than originally planned. You need to “drive” it out from under the reinforcing tape with a spatula (pressing firmly on the tool, you should move it up and down along the entire length of the tape).
After this, covering the partition with plasterboard sheets can be considered complete. The result is a dense structure with noise-insulating properties. Next, all that remains is to install switches and sockets in pre-prepared niches and carry out cosmetic finishing of the double wall made of plasterboard.
If the frame is not made strong enough, the 2-layer plasterboard finish will soon crack. To ensure the safety of the structure, it is advisable to be careful when exposed to vibration (painting with a roller or sanding).
Features of the frame design for a partition with 2 layers of gypsum plasterboard
There are no special features of the partition frame made of two layers of plasterboard. All the same general rules for working with metal frames of plasterboard structures:
- The side of the PN profile that comes into contact with the wall (floor) during installation should be glued with soundproofing tape of the Dichtungsband type (about soundproofing tape here);
- A layer of sound insulation must be placed in the frame of the partition. It should fit tightly between the sheets of gypsum plaster;
- The screw heads are recessed into the gypsum board sheet by 2-3 mm;
- The seams between the sheets of the first layer are not glued;
- The seams between the sheets of the second layer are taped with masking tape and puttied, preferably with Fugenfugel type gypsum putty. How to seal seams here;
- The entire surface of the partition is puttied with plasterboard putty the required number of times to achieve technological evenness. How to putty drywall here.
Why do you need a second layer of drywall when covering walls or partitions?
When trying to determine how many layers of drywall you need on a wall, you should find out why the flashing is being done. To simply sheathe a wall, only one layer of material is required. This allows you to achieve the desired effect without extra costs.
Why is plasterboard in 2 layers attached to walls and partitions? Typically, a double wall made of plasterboard is constructed specifically during the construction of partitions that need to be made more durable. Therefore, they are sheathed in two layers, which gives the structure greater weight and stability.
Taking these points into account, it becomes clear why sometimes it is necessary to cover a wall with a double layer of drywall.
Partition and door
A door can be installed in any gypsum board partition. We read about it here. Here, let me remind you that the weight of the door leaf should be:
- No more than 25 kg, for a PS stack without reinforcement with timber;
- No more than 50, 75,100 kg, if racks in the door opening type UA 50\75\100 are used.
Note: The UA rack is a standard power (reinforced) rack from the Knauf company.
conclusions
A partition made of two layers of plasterboard costs more than a C111 partition (one layer partition). This is probably why in apartments and houses with ceilings up to 3 meters they prefer to make single-layer partitions, which in principle is not correct, since single-layer partitions are more suitable for technical rooms.
©Gipsokart.ru
Articles on the topic
- Tall plasterboard partitions
- How to make a doorway in a plasterboard partition
- Interior partition made of plasterboard with a door
- Installation of a plasterboard partition
- General information about plasterboard partitions
- DIY plasterboard partition
- Partition made of two layers of plasterboard: technology of covering 2 layers of plasterboard
- Rules for installing plasterboard partitions
- Profile for plasterboard partitions
- Calculation of a plasterboard partition
Installation points
The next stage is the installation of the second layer of plasterboard. However, before doing this, there are some points to consider:
- during the installation of the first layer of drywall to the metal frame, you need to cover one side of the partition with sheets, then attach the insulating material and cover the second side of the partition;
- joining of sheets in places where there is no profile is carried out using installed jumpers between the vertical profiles;
- when installing the first gypsum board, the distance between the screws should not exceed 15-20 cm;
- if there is wiring inside the structure, this should be taken into account when fixing the insulation, as well as gypsum boards. You can find out more about laying wiring under plasterboard sheets at the link;
- the space between the metal profiles must be completely filled with insulation;
- upon completion of one-sided cladding, you can begin finishing the second side of the partition;
- the metal structure is made taking into account that the distance between the profiles is 40-60 cm;
- fastening the second layer of drywall is no different from the first; it is also fixed with screws directly to the metal profile through the first layer, passing right through it;
- To attach the second layer of drywall, small marks are first made with a pencil to accurately hit the metal profile.
Watch in the video: a partition made of gypsum plasterboard in two layers using KNAUF technology.
It is worth noting that it is quite difficult to fulfill all the rules and conditions for the correct installation of the partition; for this, all calculations should be carried out in paper form and saved until the end of the work.
Pay attention to the shape of the gypsum board edge
Standard gypsum board sheets are produced with two forms of longitudinal edges: straight (PC) and thinned on the front side (UK). Gyproc gypsum board with thinned edge (Edge Pro) is suitable as the outer layer of multi-layer structures or for single-layer cladding. During installation, two adjacent sheets with CC form a groove, which is filled using special joint putty and reinforcing tape. The result is a strong, smooth, continuous surface.
Gyproc gypsum boards with a straight edge are used as a basis for the production of decorated (painted, wallpapered) sheets. The same sheets can be used for the inner layer of two- and three-layer frame cladding.
Strengthen walls with heavy storage systems
If you plan to place storage shelves on the wall, a large TV, or decorate vertical surfaces with heavy decorative brick, ordinary drywall will not work. Bet on Gyproc Strong
with increased thickness and reinforcing fibers in the gypsum core.
This is a good alternative to “wet” construction: a partition made of Gyproc
, with a smaller thickness, provides better sound insulation, and the process of installing a gypsum plasterboard structure is significantly reduced, due to the absence of such lengthy “wet” processes as plastering.
And 3 more tips from an expert
Today, not a single renovation can be completed without the use of drywall. Therefore, it is important to have an understanding of its installation to avoid mistakes. Blogger Alexander Perikov answered the most pressing questions.
1. How many layers of plasterboard are best used in partitions and cladding? With a partition height of up to 4 m, you can install one layer of gypsum board on both sides. If the partition is about 4.5 m, then it is necessary to sew up the gypsum board on both sides in two layers; for a height of 5 m or more, three layers of gypsum board will be needed. By increasing the layers of gypsum plasterboard, you increase not only the stability and strength of the partitions, but also sound insulation.
2. Is it possible to glue wallpaper without first puttingtying the sheet over the entire surface? You shouldn’t do this: the sheet may be damaged from transportation and the wallpaper will not lie flat. Apply at least one layer of putty: it will not only level the surface, but also make it uniform - when hanging light-colored wallpaper, the drywall may show through.
3. How to hang heavy objects on plasterboard walls? In places where heavy objects are attached, for example, kitchen cabinets, it is best to install fasteners made of thick plywood. If you want to secure less bulky items, use special dowels for attaching to gypsum boards.
Some features and secrets of installation
Although two-layer cladding somewhat raises the cost of apartment renovation, there are certain tricks that will allow you to save money. First of all, this is the use of thinner (9.5 mm) plasterboard for the inner layer. For the exterior, you will have to use standard Knauf wall plasterboard with a thickness of 12.5 / 2.5 m. If a double partition should be erected in rooms with high humidity, then for the first layer it is allowed to use ordinary, non-moisture resistant gypsum board.
If there is no supporting profile at the junction of the first layer, the use of jumpers is allowed. These are strips of standard wall gypsum board with a width of at least 20 cm. Installation of the lintel is best done by two people. While one worker supports the jumper from the inside of the wall, the second secures the element with a screwdriver. The pitch of the screws for fastening the jumper should not exceed 30 cm.
The distance between the supporting frame profiles is best taken as half the width of the plasterboard sheet. Thus, the first layer of gypsum board will be attached to odd racks, and the second to even ones. The first layer is fastened to the supporting frame with self-tapping screws for plasterboard 25 mm long in increments of no more than 75 cm. The second layer is attached with self-tapping screws 35 mm long in increments of 25 cm. It is recommended to fasten the sheet from the center to the edges or from one edge to the other, this will prevent the formation of waves .
Layout of joints for two-layer installation
It must be remembered that both the first and second layers of gypsum plasterboard should not fit closely to the ceiling or floor of the room. This can cause internal stress in the structure as the building shrinks, which will lead to cracking of the load-bearing layer and external decorative finish. The distance to the ceiling and the finished surface of the floor covering should be at least 5-10 mm.
There should be no gaps between the two layers of drywall; their presence can lead to acoustic reverberation, in other words, the second layer of drywall can resonate like a tense drum. Still, between the sheets of the first layer it is necessary to seal it with putty, but without using plaster tape. To improve the connection, some craftsmen coat the entire surface of the first sheets with wallpaper glue for paper (bustilate or PVA), this guarantees a reliable connection and gives the instructions additional solidity.
Our services
If necessary, our craftsmen will level the walls in your home. Many years of experience of each of them is a guarantee that the walls will become perfectly smooth and will receive a new life for many, many years. We never rush or chase the number of orders, but treat each object as our own brainchild, taking care that every detail becomes flawless. This applies not only to the alignment of walls. Plasterboard partitions, plasterboard ceilings and suspended ceilings – the company’s specialists perform any task conscientiously and at the highest technological level. Plus, we can provide you with impeccable sound insulation , as well as a full range of electrical installation services - from wiring and installing switches with sockets to installing ceiling and wall lighting. There are no impossible tasks for us.
If necessary, we will completely relieve you from the hassle of repairs by providing all the necessary materials.
Our warehouse contains only high-quality metal profiles, drywall and everything that is required for construction work.
You can order specialist services by either filling out a form on the website or by calling.
Installation diagram - you can draw a diagram of the installation of gypsum plasterboard sheets according to the drawing of the future ceiling on a reduced scale in order to clearly see how the ceiling plasterboard will fit on the frame, and how many sheets you need to buy. Plasterboard floor. To level the floor and give it thermal insulation properties, waterproof plasterboards are used. Calculations of the required number of sheets are made similarly to the formula for a single-level ceiling.
It is important that the profile thickness is at least 0.55 mm, otherwise it will deform over time, resulting in cracks along the seams.