After building a house, carrying out a major renovation or replacing a door in an apartment, unsightly openings remain around the frame, in some cases with through holes. There are many ways to seal, seal and finish them. Plastering the slopes of the front door is a classic that remains relevant to this day despite the invention of new interesting technologies. This process is quite labor-intensive and complex, but it allows you to achieve an effective and practical result. To do this, you need to study the rules for selecting, preparing, applying mortar and the sequence of work.
Why do you need to plaster slopes?
Plastering door slopes is a classic method of sealing, sealing, finishing and finishing, used when building houses, carrying out major repairs or even replacing doors.
The complexity of the process does not mean that it is not in demand: knowing how to plaster door slopes, you can achieve several pressing goals at once, ensuring:
- strengthening the structure, making it difficult for a potential burglar to reach the vulnerable bolt and anchor bolts on the door lock;
- insulation of the opening, protection from temperature changes and drafts, heat loss in the room and the appearance of cracks;
- complete sound insulation from external noise - from the street or entrance, sounds from strangers and neighbors;
- a beautiful and durable base, if additional finishing is expected - paint, varnish fits perfectly on plastered slopes, finishing tiles and wallpaper of any kind are glued;
- presentability of the first type of finishing, subject to the use of appropriate technology and building materials used.
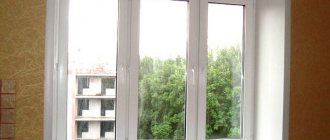
Design of door slopes is an obligatory part of a major overhaul.
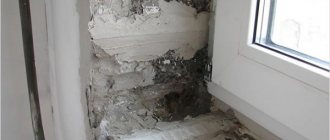
The doorway after installing the door is a deplorable sight. The formation of a technological gap filled with polyurethane foam spoils the appearance of the already completed room. But it is impossible to do without it when installing a door frame, since it is used to adjust the vertical position of the door posts.
If you leave the work of the door masters in its original form, the appearance will be extremely unaesthetic. But it is the walls and slopes that are the main evidence of high-quality repairs, an important and integral component of the overall post-repair interior. Correctly sealing the slopes on the front door means making the final chord in the interior design.
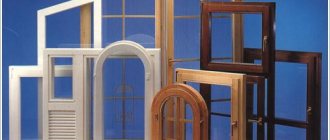
What can slopes be made from?
Slopes can be internal or external, depending on their location relative to the room. When finishing them, two problems are solved: aesthetic and thermal insulation. To do this, you need to choose the right material.
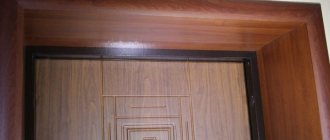
MDF panels
Now for this type of work, in most cases, MDF panels are chosen, which have proven themselves in bathroom renovations. This wood fiber material comes in several types.
- Veneered is a material perfectly suitable for finishing a doorway; it is particularly strong and durable compared to other types of panels.
- Laminated is a water-resistant material that is slightly less durable than veneered MDF. But it is very attractive from the outside: it has a rich palette of colors, and there are also panels that imitate the texture of natural wood. Such MDF is also perfect for finishing a doorway after installing a metal entrance door.
- Painted is a material whose surface is less durable. It is not suitable for this type of work.
We make slopes from MDF with our own hands
If you decide to finish the doorway with MDF panels on your own, then the following materials and tools will be useful to you:
- MDF panels (3 pcs.);
- platbands (3 pcs.);
- decorative bending corner (3 pcs.);
- decorative rail (3 pcs.);
- guides (slats with a width of 10 mm and a width of 30 mm, the total length of the slats is approximately 9 m);
- screws (length 35 mm), approximately 30 pcs.;
- dowels (diameter – 6 mm), approximately 30 pcs.;
- watery nails;
- cement mortar;
- polyurethane foam;
- jigsaw;
- assembly knife;
- chisel;
- brace;
- bit;
- roulette;
- pencil.
To perform high-quality work on finishing a doorway, you must follow the following rules:
- slopes should be located approximately 1.5-2 cm below the level of the box;
- the distance between the external slopes should be greater than the distance between the internal ones;
- To properly install the door and obtain even slopes, you need to accurately measure the dimensions of the doorway.
Stages of finishing a doorway
- Sealing cracks with cement
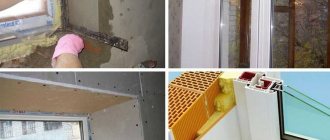
First, inspect the slopes, seal large cracks and holes with cement or putty (if small), remove any protruding old cement mortar, old whitewash or paint; Seal the gaps between the wall and the door structure with polyurethane foam, and after it has hardened, cut off the excess with a knife.
- Treat the surface of the slopes with a primer: this is necessary for better adhesion of the plaster to the wall.
- Level the slopes with plaster or cement mortar; to do this, use a system of beacons (iron profiles fixed to the wall with dowels). Plaster consists of cement, sand, and lime mortar. You can purchase a ready-made plaster solution created for facade work.
- securing the outer corners with a mounting profile.
Reinforce the outer corners of the slopes with a mounting profile. It must be carefully pressed into the fresh plaster. The base for the slopes is ready. Let it dry completely. - Carefully measure the dimensions of the slopes, pay special attention to the corners in order to avoid inconsistencies later when installing the panels. From MDF panels, cut out two side and one top parts of a suitable size.
- Cover the entire upper surface of the slope with special glue and press the MDF panel onto it. You need to hold it tightly until the glue sets one hundred percent.
- The side panels must be secured in the same way. Experts advise using spacers for reliable and high-quality fixation.
- installation of MDF panels on slopes
Close the gaps formed between the panels and the wall with a decorative plastic corner, which is glued using watery nails.Finish the outer edge of the slopes with a decorative corner or nail in cash.
How to finish the front door clearance.
Order doors
"TOREX" in Moscow and the region: Qualified hardening and installation.
How to put the entrance wall in order after installing the front door
Complex for plastering door slopes
DSP. Plastering the concrete lintel of the upper slope. Side plaster.
If you do not smooth out the slopes earlier, you can put guide strips on them, to which you can attach MDF panels with screws. The whole process is only slightly different from finishing the slopes on the windows.
Decorative rock
After installing a steel door, door openings can be trimmed with decorative stone. This finishing is done with or without jointing. In the first case, textured materials are used, in the 2nd case, slate or pebbles. The process is easy, but requires certain knowledge and abilities. To decorate with decorative stone, you will need a spatula, a rubber hammer, a bucket for cement mortar, and a grinder with a concrete attachment.
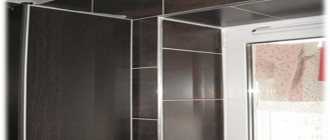
PVC panels
Often internal slopes are finished with plastic. This is a cheap material that does not require special care and is easy to install. PVC panels also have a rich palette of colors, so you can choose the finishing color you need.
A popular option is panels with an imitation of the texture of fabric or wood.
The plastic is secured to a wood sheathing or fixed to the plaster with a special glue. The disadvantages of this material include its fragility: as a result of careless use, the plastic can simply be destroyed (for example, if you bring something bulky with corners through the door and catch the plastic slopes, then a hole or hole may remain on them, which cannot be repaired with anything it will work).
Cement screed or plaster
One of the most common types of finishing of internal and external slopes is cement screed or plastering. A solution or plaster solution prepared from cement, sand and water is applied to the door opening with a trowel, smoothed out, and all roughness and smudges are removed. If you decide to plaster the slopes
or cover them with a cement substance, then you need to set up beacons: this way the material will lie more perfectly.
Flat wooden slats or special iron profiles can be used as beacons. They are fixed using alabaster correctly vertically. After the beacons have hardened, the gaps between them and the walls are filled with cement or plaster. To level it, use a spatula. This type of screed needs a number of days to dry. After this, the surface of the slopes can be painted with facade paint on an acrylic base in a suitable color. A door
with such slopes looks neat. It is completely protected from water and cold. Then such a surface can be decorated with any finishing material. But it is quite difficult to evenly cover the slopes with screed or plaster, and such work takes quite a lot of time.Plasterboard finishing
Internal slopes made of plasterboard look beautiful; if installed correctly, such structures will not cause any trouble for their owners for a long time.
To produce plasterboard slopes, you will need the following materials and tools:
- wall plasterboard;
- dowels 6*60 (“fungus” with self-tapping screw);
- plastic profile (starting, guide);
- metal screws;
- a knife for drywall (you can use an ordinary stationery knife);
- roulette;
- the construction level is small;
- screwdriver;
- perforator;
- hammer;
- putty knife;
- container for plaster solution.
glue for working with drywall;
Stages of finishing slopes with plasterboard
- Remove excess polyurethane foam with a spatula or knife.
- Using a hammer drill with a concrete drill, make holes along the entire perimeter of the slopes (every 20 cm). Drive dowels into them. Do not screw in the screws all the way: they will improve the adhesion of the drywall and the surface of the slope.
- Using a tape measure, measure the dimensions of the starting profile on all three sides of the doorway
. Along the top of the slope, a guide is usually made to cover the width of the entire opening: the side sheets of drywall will rest against it. Secure the guide sections with screws. Its small side should be placed inside the slope, and its long side should be located outside. - Cut three strips of drywall according to the dimensions of the slope. The width of the upper slope and the width of the opening must match. To ensure that the edge of the drywall strip comes out even, attach, for example, an aluminum rule or a piece of profile to the drawn strip when cutting. First, cut through the top layer of paper. Then tap the slot on the back of the sheet. When the plaster breaks, cut a piece of paper on the other side from the edge to the center.
- Mix the drywall adhesive according to the instructions on the package. Stir it with a spatula until there are no lumps.
- Apply glue to the places where the dowels are attached and the back side of the plasterboard strips.
- Place the edge of the drywall strip into the top starting guide and press firmly into the concrete. Use a building level to check the evenness of the slope. Use spacers to securely hold the drywall in place until the adhesive cures (several hours).
- Do the same work with the side strips of drywall. Get rid of excess glue, otherwise the drywall will bend. Tap the surface of the slope through the drywall scraps.
- Do not forget to constantly check the evenness of the slope with a level.
- After 12 hours, plasterboard structures can be puttied and painted in the appropriate color.
We looked at several options for finishing the doorway after installing the steel door. We hope that our advice will help you quickly and efficiently make slopes for your own home.
Pros and cons of plastering slopes
Plastering the slopes of the front door or decorating them in other ways is a conscious choice of the owners of the premises, who have weighed all the advantages and disadvantages of such a choice. Preference is not necessarily dictated by renovation budget constraints. Often, a layer of plaster is only the base layer for more expensive finishes.
Note!
However, practicality, efficiency, wide possibilities for a spectacular finish (tiles, panels, wallpaper, lining, porcelain stoneware), the absence of internal cavities - a breeding ground for pathogenic fungi or unpleasant insects, the impossibility of destruction and the ease of eliminating minor defects - are constant arguments for owners who decide to the use of plastering slopes.
Small disadvantages of the process rarely prevail over its undeniable advantages, but you should not forget about them:
- probable contamination - from construction waste, flying dust and the mortar used;
- the complexity and duration of the process - applying several layers and waiting for each of them to harden;
- the difficulty in ensuring aesthetic, even edges, which requires skillful hands, constant measurements, extreme care and responsibility of the master plasterer.
Listing the disadvantages does not mean that such design of slopes is less in demand than more modern and simpler technologies. Plastering walls, according to statistics, still remains the most popular finishing method, and is used on an industrial scale, in multi-apartment buildings, private houses, and when carrying out major repairs by professional performers.
Sealed slopes have an aesthetic appearance
Installation of PVC panels
This material is rarely installed on the slopes of the front door and if possible, it is better to replace it with other options, but if not, then you can start fixing the panels with glue.
First, the panels are cut according to the measurements obtained. They are laid with glue, so before proceeding with installation, it is worth pre-treating the surface with a primer and rubbing the panels on the reverse side with sandpaper to improve adhesion.
The glue is applied to the surface of the panels in the form of a snake, but it is better to remove the excess immediately so as not to damage other decorative elements. The panel is pressed to the place where they are installed and immediately torn off; after a few minutes they are installed again, only this time it is final.
Problems that may arise
Before starting plastering work, you need to make sure that there are no obstacles to the start of the finishing process. Their variability and versatility mean the existence of many nuances that can interfere with the high-quality implementation of what was planned:
- Craftsmen who install windows or doors do not always perform their professional functions efficiently. Before you start plastering, you need to make sure there are no errors or defects. During operation, they will certainly make themselves felt, and then everything that has already been done will have to be broken.
- The electric cable, in secondary housing, is placed in the upper or lower corner of the slope, and if this point is not taken into account, you will have to do additional work - punching a passage and sealing it.
- When engaged in finishing work, especially in cold weather, workers do not take into account the properties of the plastering mixtures used. The temperature at which work is carried out does not meet the manufacturer's requirements. The result is cracking and breaking of already formed layers, the need for re-application in order to eliminate visual defects or additionally strengthen the base layer for final finishing.
- The preparatory stage takes a lot of time, which is reflected in the cost if the master is paid according to the number of hours worked, and not according to the result obtained.
It is necessary to conduct a high-quality and professional assessment of the upcoming scope of work - to see whether external finishing is necessary (when installing a metal door, manufacturers usually have a platband covering external defects), but in other options it may be necessary to carry out work both inside and outside. A thrifty owner will pay attention to the metal trim in order to avoid future problems with operation.
Determining the scope of work for finishing slopes
First of all, it is necessary to determine the quality of the old plaster that is applied to the slopes. Of course, the best option is to dismantle it down to the wall material (brick or concrete). But not everyone can master the complex plastering process. Although, having thoroughly understood it, you can try to make it yourself.
Option one
Here is the algorithm for how to plaster slopes:
- The old layer is being dismantled. This must be done carefully so as not to damage the surface of the plastic window.
- Priming is being carried out.
- After drying, a thick layer of plaster mixture is applied. With its help, you must immediately achieve the creation of the required shape of the plaster slope. This is the most difficult stage, not every beginner can cope with it. Please note that if the load-bearing facade wall is a concrete slab, then to plaster the window slopes you need to fix the plaster mesh to the plane. If the wall is brick, then you can do without it. The mesh is attached to the plane with dowels or screws.
- After the solution has dried, another layer of primer is applied. It should dry out too.
- Now a thin layer of finishing putty is applied. This is a leveling operation that requires care.
- After the putty has dried, the surface is refined with fine sandpaper, primed and painted.
Many may ask, why do you need to prime each layer to plaster window slopes? The thing is that this liquid performs two functions at once. The first is that a layer with a high adhesion (fastness) index is formed on the surface being treated. That is, the primer helps any material cling to the treated surface. Secondly, penetrating into the upper layers of the material being processed, the primer polymerizes, thereby strengthening these same layers.
Option two
Having examined the surface of the slope, it was found that the old plaster was in good condition. For beginners this is the best option. You just have to learn how to putty slopes.
- Detected surface defects (such as cracks, chips or gouges) must be repaired. That is, expand and deepen. Then fill with putty solution.
- Then the slope is primed.
- After drying, a layer of putty is applied, which, after drying, is sanded, primed and painted.
Here are two options for the wet process, where plaster and putty mixtures are used. Let's face it, the process is not the most convenient because it takes a lot of time. We offer two other options that use ready-made products.
How to plaster
An important condition for high-quality finishing is the correct choice of mixture for preparing the mortar. A wide selection of traditional materials is offered at construction markets and supermarkets:
- You can prepare cement-sand mixture yourself - for this you need M400 cement and sand in a ratio of 1:4. However, it is practically not used for external decoration and additional effects, except in cases where large cavities need to be sealed and there is a need to save building materials.
- The use of a gypsum mixture has its additional advantages - plasticity and ease of processing, but despite the ease of preparation and application, gypsum starting mixtures are only suitable for decorating door slopes located between rooms.
- The best option is to use ready-made mixtures with plasticizers and additives that improve the adhesiveness of the composition. Here you need to carefully study the instructions from the manufacturer. For example, perlite or vermiculite are necessary to provide thermal insulation, and Ecotermogroup provides not only heat conservation, but also soundproofing.
Important!
After carefully studying the composition and instructions, you can choose high-quality and inexpensive products from trusted manufacturers - Teplover, Ceresit, WarmMix, Houncliffe. The main selection principle should not be cost or country of origin. It is necessary to select a composition with the necessary properties and reliable components that provide stability, adhesion or insulating properties.
Various building compounds can be used for plastering.
Selection of putty
Which putty to choose for finishing slopes with your own hands? The modern construction market is famous for its huge assortment, so depending on the specific conditions, you can choose exactly the mixture that suits you best. The entire range can be divided into the following categories:
- Cement. Durable and quite moisture resistant, but after drying they shrink.
- Plaster. Homogeneous, easy to apply, provide a smooth surface, but do not like a humid environment.
- Polymer. Waterproof, easy to use, durable, but expensive.
In addition, plastering slopes with your own hands is often done in several stages. For the base coat you will need a starting, stronger but coarser mixture. It must be leveled with a plastic and uniform finishing putty. Some manufacturers offer universal formulations, but their cost is much higher.
Types of putty used for finishing door slopes
If you are planning further surface finishing of the opening after plastering the slopes, you can use a standard cement-sand mortar for basic sealing of cracks and elimination of unevenness.
Tools and materials for work
Another secret to how to apply plaster correctly is a set of necessary tools. Sometimes auxiliary devices are included in it, but the main ones on the list are tools for applying the mixture:
- trowel and spatula;
- graters and graters;
- ironer; sponge grater (if we are talking about gypsum mixture);
- pencil; roulette;
- aluminum rule;
- construction level (preferably with 2 ampoules).
The work is carried out in difficult conditions, so you must have protective equipment (mask, goggles, gown, hat and gloves).
You can’t do without utensils for preparing plaster mortar and measuring devices. You will need a stepladder or durable sawhorses, especially in rooms with non-standard ceilings and door frames.
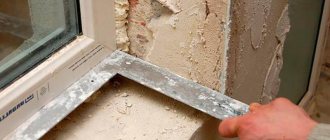
Aligning corners
When it comes to door slopes, everything is simple - the corners will be right. In the case of window slopes, everything is a little more complicated.
find the angle of dawn
Since the window has a slight extension - dawn on one side, it is necessary to take measurements from it. To do this, make a pencil mark on the windowsill at a distance of 1 m from the edge of the window and at intervals of 10 cm along the slope.
If the next edge of the slope does not fall under the mark, it is necessary to make the plaster layer thicker. Restrictive slats are often used, which are fixed vertically, guided by level, on the inside of the window slopes.
Straight boards can act as limiters. Next, a mixture is applied to the edges to secure the beacon profile, which will serve as a guide for the angle of inclination of the surface.
Template for plastering the slope
Also, to obtain neat window corners, use a plaster template. To make it, take plywood 15 cm wide and 5-10 cm longer than the length of the slope.
There should be a hole on one of the sides, which will subsequently move along the slope. The other side will move along the lighthouse.
This will allow you to get neat window slopes. In addition, a cutout for window hinges is required.
It is important to make the template as neatly as possible, without chips or irregularities.
How to plaster door slopes
Recommendations for the implementation of the overall process can be divided into several different stages, each of which will require additional preparation and prerequisites for implementation. Tips on how to plaster a doorway ,
may depend on the condition of the doorway and the degree of damage. There are special schemes, requirements, the need to use additional means - perforated corners, putty, primer. All this is decided depending on the situation and requires a certain amount of professional knowledge.
Preparatory work
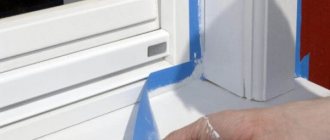
The first thing you need to do before you start decorating the doors with your own hands is to prepare the field for the upcoming work. Maximum adhesion between the plaster and the wall covering can be achieved by pre-treating the sections of the wall and floor located around the door opening. Otherwise, during operation, there is a possibility of peeling or falling off of already formed layers under the influence of vibration and shock, temperature changes or simply the weight of the applied coating.
The first stage of work is surface preparation
To do this, remove dirt, cement residues and broken bricks, clean seams and cracks, and remove sagging or oil stains. It is necessary to cut off the excess polyurethane foam with a sharp knife, and be sure to check the evenness of the installation of the door frame. If there are flaws, you can use wooden wedges to adjust the vertical and horizontal pores.
Installation of beacons
Experts advise using the frame of the frame as a visual guide, but sometimes this is simply impossible to do due to the tight fit of the slopes to the door block. In this case, it is convenient to use a metal profile, a wooden strip or a mortar track as a guide, provided that perforated corners made of a metal profile are installed at the corners. The next step is to prime the area prepared for work, fill it with sealant and rub it in.
Creation of notches and reinforcement
Notches are visual and tactile marks made with a bush hammer, chisel and hammer drill on the surface to be plastered to form a functional unevenness to which the layer of plaster will cling during work.
A depth of half a centimeter is enough, but the length will have to be a little larger - 5-10 cm.
Reinforcement - attaching a metal mesh to the wall being treated with self-tapping screws or nails. Sometimes reinforcement is carried out by tying it to uncovered areas of reinforcement. All this creates a durable surface that can withstand additional finishing.
Plastering entrance door slopes
After you have followed all the recommendations on how to make slopes in a preliminary version - with reinforcement, notches and perforated corners, you can proceed to the main stage - applying the base layer. Usually the process begins from the lower tier of the doorway, gradually rising to the upper ones. Before doing this, the surface is slightly moistened, but if the solution prepared according to the instructions does not stick well, additional processing will have to be done. The choice of additional product – primer or tile adhesive – depends on the material of the slope. This will ensure sufficient adhesion and prevent the finished composition from slipping.
Fact!
Experienced craftsmen advise doing this slowly, pressing a thin layer with a wide spatula and spreading it in the direction of movement.
Plastering is usually done in two stages
Finishing layer
In the instructions on how to plaster slopes, great attention is paid to the finishing layer - after all, the final result and aesthetic visualization of the work done depend on it. Finish plastering is carried out no earlier than the previous layer has dried and hardened. To achieve the maximum degree of surface leveling, the solution is made of a more liquid consistency than in previous cases. Apply it in a thin layer, rub it thoroughly in a circular motion, and special attention is paid to giving the slope evenness and symmetry.
Finishing work
Grouting is not a finishing activity, but the success of the final stage depends on it. Perfect evenness is a great way to ensure the surface adheres to the putty. Therefore, a grater and a liquid solution are used, which is applied to the slope and evenly distributed over the already dried surface.
The final design will require additional effort if the owners intend to paint or wallpaper. In the latter case, you can get by with one layer of putty, but for painting or decorative tiles you will have to do this twice.
The choice is always yours
It would seem that finishing methods such as puttying and plastering of slopes should be gone a long time ago. But life shows that many people still use this technology. Especially in situations where the old window
. Simple repairs in the form of putty or minor plastering of window slopes are used quite often today.
As mentioned above, this process is complex and long-term. But for small country houses this is a good option. Especially when the slope plane itself is small in size. It is difficult to install a small strip of drywall in such an opening. And, even more so, pick up and insert a plastic product. Although everything is changing every day. In the near future, simplified technologies for fastening both plastic and gypsum boards may appear.
We would like to invite you to discuss this topic. Maybe someone will share their personal experience, or maybe someone has questions. We are ready to answer everything.
source: //ogipse.ru/179-sovety-spetsialista-kak-pravilno-shpaklevat-i-shtukaturit-otkosy/
Plastering window slopes
The slope is the space between the window or door and the wall. Plastering of window and door slopes is carried out so that they look complete and are ready for use.
Wooden slopes are usually used for finishing doorways, and both wooden and plastic are used for window openings.
The best option for plastering is the use of cement-sand mortar, although it is inferior in convenience to gypsum. This is explained by the fact that gypsum reacts to any changes in the microclimate and begins to deteriorate at high humidity.
Thus, in winter, it is necessary to frequently ventilate the room, otherwise condensation will accumulate on the windows, which will negatively affect the slopes.
Plastering slopes is a procedure that requires certain qualifications. Therefore, before starting it, it is better to practice plastering walls or ceilings, or entrust the work to professionals.
If you are determined to plaster
with your own hands, there are a few things to consider.
Plastering arched door slopes
Arches are a popular trend in the modern design of residential and public premises, so the question of how to plaster door slopes in a version rounded up is one of the most common. There are no particular difficulties in this process; the sides of the opening are finished using conventional technology:
- profile installation;
- applying the solution;
- finishing layer;
- grout.
The arch is finished using pre-made plywood templates
For an amateur, only the design of the arched opening itself may cause difficulty. To do this, a template is cut out of plywood, which is attached to pre-equipped semicircular borders made of reinforcement or metal wire. After the template is attached on both sides, the resulting hollow space is filled with polyurethane foam and waited until it hardens completely. Next you need to work according to the usual scheme.
Fastening decorative stone or brick
First you need to draw up a diagram for laying out brick or stone. If when laying a brick the entire diagram can be drawn on a piece of paper, then with stone everything is more complicated. First, you need to mark the entire surface and immediately think about how the stone elements will be placed: in the opening and along the outer part, or they will only frame the outer part.
On the floor, it is worth completing the detailing of the future layout, which should be as accurate as possible, after which you can begin lining. The stone is attached to the slopes using glue or a special mixture. After all the elements are attached, the stone is varnished.
Thus, by following all the technologies for installing this or that finishing material, you can give the interior a style and create a unique design, without hiring a master, but doing everything yourself.
Advice from professionals
Real craftsmen recommend using only high-quality materials from manufacturers with a good reputation, and monitoring the surface being created using special measuring tools. There is no need to rush when decorating the surface; you must wait until each layer is completely dry.
If excess solution is formed during the work, you should not dump it into a container with unused solution - this can cause the raw material to harden and render it unusable. We must not forget about the need to moisten the finished surface if it is in a hot room.
It is not necessary to invite professionals to plaster slopes
Despite the constant development of new materials and progressive technologies by the construction industry, classical methods invariably remain in trend due to their relative cheapness, familiarity of the processes performed and good decorativeness.
Was this information useful to you? Share in the comments!
What you need to know about plaster
The temperature in the room must be maintained. The permissible temperature is not lower than +5 C if you are working with cement mortar, and not lower than +10 C if you are working with gypsum mortar.
When preparing the mixture, you must strictly follow the instructions. Plaster that has expired cannot be used, even though it looks no different from new one.
The mixture hardens quite quickly, so you need to apply it quickly. It is better to prepare small portions of the solution as you work. Usually half an hour after mixing, the plaster is no longer suitable for use.
The volume of the mixture depends on the area of the slope. The thickness of the applied layers is also taken into account. When processing door and window slopes, you need to follow all the same rules as when plastering walls, only in this case you will have to use not an ordinary angle, but a small one.
You need to understand where the angle of the slope will be. Next, a rule is set on it, a pencil mark is made.
The mortar is placed against the window sashes, and the solution is slowly smoothed down to the slopes. As a result, you will get a neat angle and a flat surface. The rule must be removed very carefully, slowly moving it along the corner.