Even the most beautiful and expensive front door or new window looks unaesthetic. Until the slopes are finished, giving a complete look to the interior.
Common materials for decorating openings are plastic panels and drywall, but the work can also be done using laminate.
Advantages of design
The popularity of finishing slopes with laminate is due to the advantages of this material:
- Economical. For installation on walls, there is no point in choosing an expensive coating of a high strength class - the load on the internal surfaces of the openings will be insignificant.
- Long service life, moisture resistance.
- A wide range of laminate flooring - a variety of colors and shades of material, types of textures (imitation wood, tile, natural stone, leather).
Cutting laminate and assembling it will not be difficult for a person doing this work for the first time.
Main types of materials
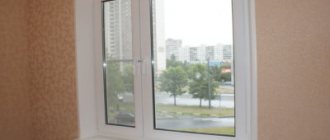
PVC slopes on plastic windows
The finishing of doors, windows, loggias and balconies is carried out using different panel-type materials. The main types include:
- MDF panels.
- Plastic wall panels.
- Sandwich panels.
MDF is not often used for windows; as a rule, it is used to cover a door and is used as cladding. MDF panels have their own characteristics:
- Slopes require meticulous work. Moisture can get in through cracks and crevices, which means everything needs to be carefully sealed.
- The size of the panels is factory-made, due to which it will not be possible to use MDF everywhere. If the width of the slope is large, then MDF will do.
- Small selection of colors and textures.
- Plastic windows will not always be combined with MDF.
It is better to use the material by carefully considering the interior of the house. Goes well with wood or wood-look materials.
Advantages of PVC slopes
Plastic panels for slopes are the most popular choice of people. They have many advantages:
- The material is cheap compared to other types.
- Installation is simple, even without experience.
- The choice of colors is huge, so you can match any design inside or to match the facade of the house outside.
There are also difficulties during work:
- If the slope is more than 25 centimeters, then additional clamps are installed, otherwise the cladding will “walk”.
- It is recommended to use insulation, because insulation will not allow cold to pass into the house.
- Plastic panels are easy to damage.
Despite the disadvantages, plastic panels for slopes are an excellent option for window design. Cutting, installation and insulation are very simple, the appearance is decent. Slopes made of sandwich panels are a type of plastic material, but the characteristics of such raw materials are better, of course, this differs in the price of the product.
PVC sandwich panels for slopes
Sandwich panels for window slopes have their own characteristics:
- The product is made from two pieces of plastic, and there is already insulation between them. Due to this, there is no need to insulate the slopes.
- Installation work does not require large financial costs, the main thing is to calculate everything correctly and install the slopes carefully.
There is also a disadvantage of sandwich panels for slopes - if the window sealing is poor, moisture will begin to penetrate, the material will deteriorate and collapse, in other words, it will peel. You can also find other panel elements on sale:
- Natural wood is highly expensive and difficult to install.
- Composite panels based on gypsum, lined with PVC.
- Metal panels are used more often outside and require certain knowledge when installing slopes.
Although the materials are different, their installation instructions are almost always the same.
Slopes made of PVC panels and PVC corners (video)
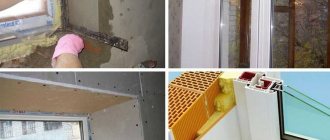
Mounting methods
Door or window openings are finished using one of the following methods:
- Glue. Installing laminate flooring using this method requires preliminary leveling of the base with plaster or plasterboard. To fix the material in the opening, polymer glue (for example, liquid nails) is used.
- On polyurethane foam (with low pressure during the polymerization process). In this case, there is no need to level the rough surface - the foam, expanding, will fill all existing unevenness.
- With the construction of the frame. Finishing is carried out without plastering the base. Simultaneously with laying the laminate, a layer of insulation is laid. The sheathing is done using wooden slats or metal profiles. The laminate is fixed with self-tapping screws and glue.
Strips of material are laid along or across the door (window) opening: in the case of horizontal installation, installation of laminate slope elements is carried out from the bottom up.
Preparing for work
The preparatory stage includes the following actions:
- to avoid contamination or damage during work, cover the door or window frame with masking tape;
- if you need to connect a switch for lighting devices, think over and outline the cable routing diagram;
- provide free access to openings, remove curtains, move furniture and prepare all necessary materials and tools.
Selecting the best materials
To decorate door or window openings, laminate is suitable, which is left over after covering the floors in the apartment. If there are no such residues, buy panels intended for residential premises. The optimal thickness of the product is from 6 mm to 8 mm.
An important selection parameter is the environmental friendliness of the laminate (formaldehyde emission class) - the “E1” sign on the product packaging indicates that the amount of organic compound emissions is safe for human and animal health.
Before purchasing, make sure that the surfaces of the material are intact and that there are no dents or cracks. Compare the shades of the stripes - there may be differences in the color of products in the same package.
What tools are needed?
Before starting work, prepare the necessary tools:
- metal square;
- roulette;
- pencil;
- jigsaw or hacksaw for metal;
- rule;
- level.
If installation involves arranging a frame, you will additionally need:
- perforator;
- screwdriver;
- metal scissors.
Materials:
- laminate;
- profiles or wooden beams (slats);
- polyurethane foam or adhesive;
- self-tapping screws;
- dowel-nails;
- wooden planks or decorative corners for finishing slopes;
- primer.
Measurements and adjustment of plastic panels
Having secured the plastic U-shaped profiles in their proper places, I began to work on the panels themselves. Here it is worth saying why PVC material was chosen rather than drywall. Despite the fact that gypsum boards are easier to install and cheaper, plastic panels attracted me precisely because of their appearance and the absence of the need for finishing. Well, I don’t like this “dirty” work with putty.
Another plus of plastic panels in an assortment of colors. The slopes can be made in any style and matched to the interior of the bedroom, living room or kitchen. This is quite difficult to do with gypsum boards.
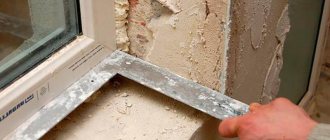
I started (as in the case of profiles) from the top. Here it is important to measure the inner and outer sides along the length and width of the future slope. On the last point, I allowed a slight increase in the direction of increase - with the help of the same stationery knife, everything can be trimmed in place.
In the photo you can see how I “cut” the panel using a jigsaw. Surely everyone who is a little familiar with the work of such a tool is clear that it is impossible to work like that! For those who have not encountered a similar question, I will explain my mistake. It is better to place the panel on the same hard stool so that there is a support. This kind of work should not be done by weight.
Adjusting the panel to the size of the slope using a jigsaw is very simple
How to do it yourself?
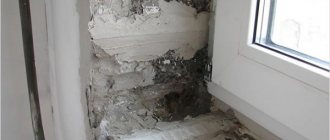
The initial stage of finishing the openings with your own hands is to prepare the rough foundation.
Preparing the base
Follow these steps:
- eliminate all protruding areas on the surface of the opening, remove peeling paint or plaster;
- Clean all surfaces to be finished from dust with a moistened sponge, wait until the surfaces dry;
- plaster or foam all holes and cracks.
Regardless of the method of constructing slopes, be sure to treat the rough base 2-3 times with a primer mixture - this will prevent the development of mold and mildew under the laminate.
Marking and cutting
First of all, use a tape measure to measure the openings, taking into account the angle of deviation of the slopes from the door or window. When using a horizontal method of arranging the laminate and interlocking the planks, apply the markings to the pre-assembled material.
Please take into account that the decorative covering of the slope should extend onto the window or door frame by a few millimeters. Measure the sides of the openings only after preliminary “trying on” (without fixing) the top laminate strip.
Advice
Make sure that the covering does not interfere with the opening of the window or door.
Transfer the pencil markings onto the laminate and start sawing:
- If you use a jigsaw, use a knife to cut through the protective film on the front side of the laminate (along the marked line), fix the bar with the outer side down. Set the power tool to a high speed and smoothly, without moving the jigsaw from side to side, cut the material.
- A hacksaw with fine teeth is also suitable for working with laminate. To avoid chipping, apply masking tape to the cut line. Perform the process with the plank facing down.
How to decorate the front door or window?
The installation of panels also begins with the installation of the top panel.
Mounting on a profile frame
- Remove any remaining foam after sealing the cracks around the perimeter of the door or window frame.
- Drill holes and use dowel nails to secure vertical profiles on the inside, adjacent to the window or door, and on the outside of the opening. Attach the plank with one side to the wall.
- Install horizontal slats at the bottom and top of the sides of the opening. Also fix the transverse profiles on the upper section of the opening. Thus, you will form 3 perimeters from the profiles - 2 side and 1 top. If the opening is large, secure several more cross bars between the guide profiles.
- Screw the laminate to the frame using self-tapping screws.
On a wooden sheathing
- Drill holes of the required diameter and secure wooden slats along the inner and outer perimeter of the opening.
AdviceBe careful - the frame elements should not protrude above the wall surface.
- To create additional structural rigidity, fix several more transverse slats into the vertical posts of the sheathing.
- If the surface of the slats corresponds to the location of the parts of the laminate and the area of their contact is sufficient, glue the sawn parts of the floor covering to the frame. Otherwise, screw the laminate with self-tapping screws.
Cover the heads of the screws with furniture plugs that match the color.
By glue method
Level the rough base:
- Mix the amount of plaster required for the job.
- Scoop the solution onto a spatula and apply it to the surface of the base, starting from the bottom of the slope and moving upward.
- Apply the rule and lift it up, leveling the layer of plaster. After the procedure, inspect the surface - if there are unevenness, add solution to these areas, repeat the leveling procedure with a spatula with a wide blade. Check the evenness of the base with a level.
- After the solution has dried, work the slopes with a construction float in a circular motion, paying attention to the corners.
- Cover the surface with primer mixture 2-3 times.
When the slopes are dry, start gluing the laminate: apply glue to the back side of the laminate, press the material to the plastered surface, and hold for a while.
Attention
To prevent the panels from moving, secure the top strip with masking tape and the side strips with spacers.
On the foam
- To prevent changes in the position of the coating during polymerization of the foam, install limiting slats around the perimeter of the opening.
- Apply a light layer of foam to the top of the opening and the back of the trim panel, set the laminate in place and secure it with masking tape.
- Treat the side parts of the slopes with the mounting mixture, then the back part of the finishing material.
- Place the laminate on the slope and secure with masking tape. Check the evenness of the surfaces with a level.
- After the foam has dried, cut off any protruding parts. Apply plaster to cracks in joints and corners. Lubricate the joints of the panels with glue.
Finishing work - decorating the corners with platbands, metal or plastic decorative corners.
Our experts have prepared a number of separate publications devoted to how to properly make, install, insulate and plaster window slopes. After reading them, you can find out why and how to insulate slopes inside the house, how to properly seal them after installing windows, how to line internal slopes, as well as how and for what you can use siding.
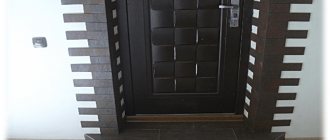
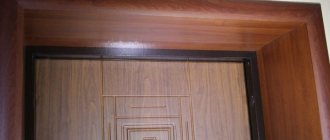
Finishing entrance door slopes with laminate
Let's consider the issue of finishing the slopes of the front door with laminate. Metal entrance doors covered with laminated panels are popular in apartments as well as in office buildings. This design option allows you to quickly and aesthetically decorate the business card of the room. To form a slope, lamellas 7-8 mm thick are used. To perform finishing work, high qualifications and skills are not required. For this reason, such finishing with your own hands will allow you to decorate the door structure while saving money.
Possible installation errors
The accumulation of condensate or the presence of a draft after installing laminate slopes indicates the following:
- poor preparation of the rough foundation before installing the panels;
- inaccurate measurements;
- using insufficient amounts of adhesive;
- leaving voids in the area where the decorative covering adjoins the window or door.
Finishing openings is a fairly simple task. However, before performing work, you should carefully familiarize yourself with all installation methods and features , since failure to comply with the technology can lead to subsequent freezing of windows or doors, the formation of condensation on their surface, and the development of mold or mildew. And then dismantling and constructing new openings can be expensive, both for the wallet and for the windows and doors themselves.
We continue the installation of plastic corners
Having secured the PVC profile to the top, you can move on to the side surfaces. Similar work is done here - measuring, cutting, fixing. The profile is not attached to the lower part of the frame; here the slope replaces the window sill.
When joining the corners, you should be extremely careful - the part that will be on top of the panels must be connected carefully. Many dock at an angle of 45º. I decided that it could be done at 90º. You will see the results of the work done at the end of the article.
The sides of the window block are measured similarly to the top part
Installing the strip across the window sill will also be a rather important task. Here it is better to cut the profile longer than necessary, and then, in place, adjust the size to the desired size. You should also pay special attention to the docking.
I can’t judge why it turned out this way, but due to incorrect cuts along the length and in the corner areas, the consumption of the corner turned out to be almost twice as much as necessary. Most likely, the lack of experience in producing such work played a cruel joke on me. Although, one cannot write off both inattention and the desire to do everything as quickly as possible. In any case, the result of my haste and inexperience was the overuse of the profile and an increase in time for installing internal plastic slopes on window blocks.
PVC profile section that requires the most attention when measuring