Masking tape
This is the most universal method of sealing a joint. A wide variety of such tapes allows you to choose the edging to match the tone and style of the ceiling. But it does not always fit into a classic interior. Despite this, this method of masking has a number of advantages:
- simple and quick installation;
- low cost
- variety of color solutions;
- resistant material;
- high elasticity;
- ease of subsequent care;
- no accumulation of dust.
Masking tape is also convenient because you can easily remove it and install it back at any opportunity.
Universal Profile Apply
Based on it, you can assemble four types of products:
floating ceiling
light lines
floating lamp
curtain rods
It fits easily with all other profiles. In this case, the screws in it are screwed into the technological cavity and do not end up in the visible light zone.
But most importantly, if your light line runs along the perimeter of the ceiling, you can easily adjust and set the width you need.
When assembling a floating line in the center of the room, two such universal profiles are combined into one with self-tapping screws.
And even here it is possible to adjust the width of the luminous line.
To create a floating backlight from 10cm and wider, you will already need a plastic insert.
With such a universal thing you can assemble quite complex figures.
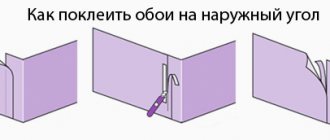
How to hide seams between wallpaper
Contents Many fans of wallpaper decor are well aware of the situation - the craftsmen seem to be very good, and the wallpaper is expensive, but after gluing the wallpaper on the walls, seams between the panels clearly appeared.
Most often, owners blame both the craftsmen and the quality of the wallpaper. But if the craftsmen are professionals, and before this room they managed to glue kilometers of canvases with high quality without any comments, why did they not take into account the peculiarities of the brand of trellis when gluing.
Indirect confirmation is the fact that the same problem occurs with both cheap paper and expensive non-woven wallpaper.
Step-by-step apartment renovation plan - where to start?
The lack of planned actions in repairs is a huge risk, which is expressed not only in the delay of work for many months, but also in unnecessary financial costs arising from alterations. For example, when on a ready-made plastered wall you have to make grooves for wiring, which was forgotten so untimely.
So, let's begin
To draw up a design project, you will need a detailed and accurate diagram of the apartment with all the parameters of the rooms, the current location of communications, windows and doors. Next, decide what budget you are counting on, whether you intend to invest in repairs as much as you need, or must fit into a certain amount. For renovations without budget restrictions, we can recommend such interior design styles as classic, decorative modern, hi-tech, country, and oriental.
But if you have to save money, then take a closer look at constructive modernism, which differs from decorative modernism in a more practical view of furniture and decoration and minimizes decorative details, at the same time reducing costs. Minimalism and eclecticism (mixing several styles) will also be more economical directions. In any case, do not expect to save on building materials - otherwise the result of the repair will be short-lived.
Decide how long you plan to use the apartment or house without repeated major repairs. With the advent of ultra-durable modern materials, you can renovate your apartment for the next 30–40 years. For example, polyurethane self-leveling floors make it possible to obtain a smooth and surprisingly durable surface that is not afraid of moisture, acids and alkalis; acrylic putty compounds have the same properties. The only significant disadvantage of such building materials is their high cost and unnaturalness.
If the high price is justified by a long service life, then the chemical origin of building materials scares off many, because they want to live in a safe environment. In fact, polymeric materials and components are found everywhere today, and they are not at all harmful to our health. Only suspiciously cheap materials from unknown manufacturers can be harmful - in this case, you only have yourself to blame.
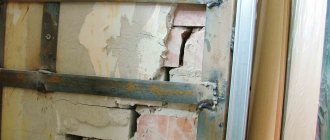
Surface preparation
To prepare you need:
Remove old coating. Clean the surface, smoothing out any unevenness. Seal the cracks: deepen them with a spatula, then treat them with a primer and seal them with putty. Small cracks are best sealed with acrylic sealant.
Important The wallpapered surface must be cleaned by removing the old coating. Old wallpaper is generously moistened with warm water and cleaned off after a while. If the surface has been whitewashed with lime, it will need to be washed away
A solution of ammonia, soda or soap and water helps with this. The surface is first wetted with the solution and then washed off with clean water. After cleaning and leveling, the surface is washed with clean water, which will remove dust, and primed. The primer is applied to a clean, dry surface in two layers. The second layer is applied only after the first has completely dried.
Ceiling plinth
As a rule, baseboards are made of polystyrene foam and polyurethane, which is quite fragile, but other materials can also be found. Thanks to the varied designs, now your sloppy joint will be hidden by all sorts of designs and patterns that imitate stucco. Special models are equipped with a recess for the LED strip and a reflective layer that creates diffused light. If you wish, you can always choose the classic version of a white plinth without stucco and additional equipment. This inexpensive method requires time and effort. Stock up on glue and installation tools!
Decorative cord
The piping is made of textiles and has large knitting in different design solutions. The color palette allows you to choose a cord to suit every taste. With it you will give the room an expensive and sophisticated look. Hiding small gaps, it is flexible in installation, which does not require much effort during installation. Although this textile finish traps a lot of dust, the cord effectively emphasizes the size of the room.
Phased start of renovations in rooms
We have provided general instructions for carrying out repair work. Of course, in each specific case certain adjustments can be made. There will be especially many of them if one or more rooms, or even part of a room, are being renovated.
At the same time, clearing the room of furniture will significantly simplify the work and ensure the safety of things.
Where to start renovating a room
Where to start repairing floors, walls and ceilings
Complete (major) or partial (cosmetic) repairs of the ceiling, walls or floor must begin with clearing the surface, removing wallpaper, paint, and flooring. Next, the previous solutions are removed, the surface is leveled, sanded, primed and becomes suitable for final finishing.
Where to start repairing a balcony and loggia
Repairing a loggia and balcony should begin with dismantling (if necessary) window units and interior decoration. Next, new blocks are installed, the balcony or loggia is insulated
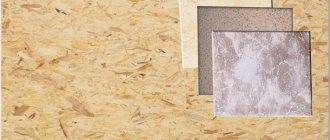
Wood, plaster or plastic - these materials are the most common and have proven their suitability in practice.
Where to start renovating a kitchen
Kitchen renovation requires the most careful planning due to the fact that the kitchen is one of the most used rooms in the house. The presence of a large number of kitchen appliances creates an increased load on electrical wiring. Therefore, repairs here begin with replacing the wiring and installing additional sockets
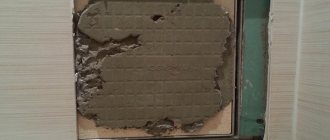
Next, the working wall must be tiled. The remaining walls are leveled and painted or covered with washable wallpaper. It is better to use linoleum or tiles as a floor covering. The popular laminate flooring in the kitchen is exposed to moisture, which significantly reduces its service life. The finishing work is carried out last - installation of plinths, trim, painting of radiators. Installation of furniture, built-in and other appliances completes the kitchen renovation.
Where to start renovating a toilet, bathroom (bathroom)
The bathroom and bathroom create the greatest difficulties during renovation. Primarily due to the availability of communications and increased requirements for operational characteristics. When renovating these premises, pipes are replaced, the location of sockets is thought out, and additional exhaust systems are installed. Installation of additional waterproofing, especially when installing a shower. Most often, walls and floors are tiled. Lastly, the plumbing is installed.
It is worth noting that you need to think carefully about the combination of a bathroom and a toilet (WC). The combination option is only acceptable if you have a duplicate bathroom.
Where to start renovating a room
Living rooms, bedrooms, and halls do not have any special requirements. Although in this case everything depends on the manufacturability of these rooms. For example, smart home technology requires special engineering calculations and increases the cost of work significantly. The renovation of these rooms begins with the removal of furniture and dismantling.
Next, the door frames are installed. The door leaf must be removed or protected with film during the work. Moreover, if several rooms need repairs, work can be done in parallel. As for finishing, it is done from top to bottom, i.e. First the ceiling is finished, then the walls and finally the floor. The final touch to the renovation will be the installation of furniture, appliances and decorative elements.
Where to start renovating the corridor
Repairing the corridor occurs last. The work is complicated by the fact that by this time the repairs in other rooms have been completed, and the remaining materials and tools are stacked in the corridor. Thus, first you need to remove all building materials and tools, leaving only what is necessary.
Stretch ceiling
This method will help hide unevenness and give it an interesting look. Hanging structures made of plasterboard allow you to create spectacular differences. And with the installation of LED strips, the room will be filled with beautiful color. The variety of forms of such structures is almost limitless. Their installation will cost more than, for example, masking tape or decorative cord, but the result is worth it.