Patination is a technique for “aging” the surface of metal or wood, which is achieved by applying dyes based on various acids. As a result, the products acquire a special charm and the spirit of antiquity. Before carrying out manipulations, working surfaces are put in order, then treated with a special primer from a spray can, which allows the paint to better adhere to the surface. Patination of metal requires time and patience; we will look further at how to apply patina paint to the surface and what effect can be achieved.
What you need for work
The very meaning of the word “patina” has nothing to do with the dyeing process. It is of Italian origin and refers to the film that forms on metal after prolonged interaction with oxygen.
Initially, you had to wait a long time for the metal to oxidize itself, and the result was completely unpredictable; now this technique can be reproduced at home with your own hands using the following materials:
- patina of the color you like (in powder);
- liquid solvent;
- brush (size 2-3) or sponge;
- small plastic or glass trays (do not take metal ones, they can interact with the paint);
- metal product that you want to decorate.
Pay attention to safety precautions! Patination products involve working with chemical oxidizing agents, solvents and require special care.
It is recommended not to work in confined spaces without respiratory protection. It is better to work in the fresh air, in rooms with good ventilation (with open windows, an exhaust fan on, a draft). If acid gets on the surface of the skin, immediately rinse under running water and then apply a paste of baking soda. If rashes, burns or any skin changes occur, consult a doctor immediately!
Protect your hands! Always patina with gloves.
What is patination
Not only furniture is patinated, but wooden doors, windows, picture frames and even floors. Kitchen facades, dining areas and bedroom sets are also restored in this way. The most common option is white furniture, decorated with patina, in the classic, Provence or Mediterranean style.
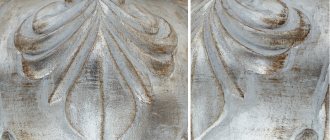
Patina can be white, colored, dark and metallic, imitating gold, silver, bronze or copper. Milk paint with gilding is often used on white furniture - this option is the most popular for furniture in a classic style.
In the photo, another popular option is a noble champagne patina on a white background. This solution will also look great in a classic-style room.
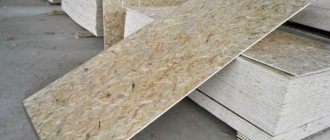
Patination as a process is the application of different compounds to the surface of furniture or ordinary wood. The greatest difficulty is presented by corners, recesses and edges - it is difficult to apply the composition to them in an even layer. This is how furniture made from solid hard and even soft wood is processed: oak, birch, pine, beech and others.
If in the natural environment patina appears only on furniture made of natural wood, then modern technologies make it possible to age even MDF or chipboard panels.
It is worth understanding that artificial patination is rather a conventional coloring with the aim of giving furniture an antique look. At home, no chemical compounds are used that could change the structure of the wood, so if the result is unsuccessful, the paint can be removed without problems - this, of course, is a plus for beginners. Removing the patina is done with a grinder or sandpaper, as in the following video.
Removing the patina
Patination colors
On different metal surfaces, completely different color schemes can be achieved by patination. The most common patina color is greenish, which is produced by the oxidation of copper. On other metal surfaces, the resulting shade may be completely different:
- Rich yellow or ocher color on steel surfaces.
- Chocolate brown on brass and bronze items.
- Dark gray on silver items.
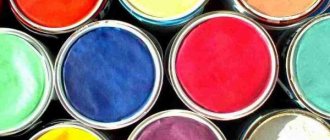
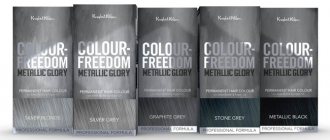
The choice of dry patina for metal work is quite varied. Powder is sold in almost every hardware store. Most common colors:
- aged silver;
- natural or oxidized copper;
- red gold.
Brighter radical colors are also available, for example, blue, lilac, red, allowing you to achieve an original effect on the surface of various metals.
Surface preparation
Decorative application of patina requires careful preparation of the surface being treated; the metal must be perfectly smooth. There should be no signs of corrosion on it; it will not allow the surface to be well primed; the top layers will quickly bubble and peel off.
All burrs must be removed, chips and potholes must be filled and sanded with sandpaper (first coarse, then finer).
The prepared product is coated with a special primer (most conveniently, from a spray can), and then metal patina paint is applied to it.
Please note that the patina effect looks best on items painted with dark, especially black paint. The painted product must dry well, otherwise the patina will not adhere well and you will not achieve the desired effect.
Patina paint application technique
There are two ways to age metal: applying patina with a brush or sponge. By placing dissolved paint on the tip of a brush, you can achieve completely different textures, directional strokes and different depths of paint. Do not wet the brush before starting work; it must be dry; a wet brush will cause smudges and drops on the metal being processed.
Do not take a brush that is too large or small - the optimal bristle size is 2-3 cm. The sponge gives a “dusty” effect, but do not press it too hard, otherwise pores will be imprinted on the surface being treated.
Keep a napkin with solvent and some of the base paint with which the product is painted at the ready. Working with the patina should be virtually error-free. Repeatedly applying patina to metal in the same place gives an unsightly “flat” effect. When painting individual elements, be careful: if you accidentally “smeared” something nearby, simply paint over this area with background paint.
On video: applying patina to metal.
LiveInternetLiveInternet
Quote from Marrietta
Read in full In your quotation book or community!
Ceiling rosette - gilding and creating a patina effect.
3 master classes If you love the effect of antiquity, luxury and the shine of gold in the interior - come, this publication is just for you) Below you can familiarize yourself with three master classes on decorating a ceiling rosette made of foam plastic: using gold leaf gilding, acrylic gold paint and with patina effect
Before you start getting acquainted with the ideas of decorating and gilding a ceiling rosette with gold leaf for interior decoration, I want to make a small but very pleasant digression regarding our vacation, which is just around the corner) If you have not yet decided on the choice of country for your vacation and travel, I invite you You should take a look at the pages of the website - a portal about children's and family recreation, Kidpassage. Here you will find a lot of useful and interesting information about resorts, hotels and children's camps. One of the articles will tell you about entertainment in Turkey; you will find out which attractions of Antalya (Turkey) are especially popular among tourists. This site will help you decide on the choice of country and place to vacation with your children, take a look)
So, let's start with a decorating technique that allows you to turn any object into gold. This technique, called gilding, allows us to create the appearance of metal on any surface by gluing the thinnest sheets of metal foil to imitate precious metals. In interior design, gilding is used as a way to highlight various decorative elements on furniture, picture frames, frieze parts, vases, candlesticks and other items.
Gold leaf of various shades imitates gold leaf made from bronze alloys, silver – from aluminum. Potal is presented in sheets, cuttings of sheets, and also in the form of crumbs of foil sheets. Relatively recently, a new type of such materials appeared - the so-called multi-colored gold leaf. These new materials significantly expand the possibilities for decorating various objects and surfaces, fully showing the nobility of the metal and its characteristic shine, moving from the warm shade of gold to the cold, lunar shade of silver.
Ceiling rosette, made of polystyrene foam, decorated with natural plaster molding with gilding elements. For gilding I used the following materials: 1. Ceiling rosette made of foam plastic; 2. Acrylic primer from Maimeri Gesso No. 617; 3. Light gold gold leaf from Maimeri; 4. Mordan water-acrylic glue; 5. Shellac varnish; 6. Soft synthetic brush; 7. A small piece of soft fabric.
First you need to prepare the surface. To make a rosette made of foam plastic look similar to a rosette made of plaster, we cover the entire surface of the rosette with acrylic primer. In my work I used acrylic primer from Maimeri Gesso No. 617.
Apply the primer in 2 layers with an interval of 30 minutes between layers to ensure complete drying. This procedure is also necessary to prepare the surface of the rosette for gluing fragments of gold leaf.
After the primer has dried, use a soft brush to evenly apply the adhesive. Water-acrylic Mordan from Maimeri No. 762 is very suitable for this.
Glue is applied only to those areas of the rosette that will be decorated.
After at least 20 minutes, gold leaf is applied to the glued surface using a very soft brush. Touch the sheet gently to cover all the indentations. It is necessary to completely cover the entire surface to be gilded. Don't worry if the foil sheets tend to tear, this is common with this application technique. It is better to carefully transfer sheets of sweat to the surface to be treated with a wide, soft synthetic brush. You need to act very carefully and carefully, since you will not be able to move or remove the gold that has already been applied without deforming it. If you are working with sheet material, then it must be applied, trying to cover as much surface as possible.
Small parts are gilded, as a rule, with pieces left over from large sheets. You can walk over the surface covered with gold leaf with a piece of soft cotton fabric without applying too much pressure.
Thus, the gold leaf will lie tightly on the base. Excess gold can be easily removed from the surface not covered with glue with a couple of strokes with a brush.
Leftover gold can be reused.
After laying the sweat, in order to prevent your work from darkening, you must apply a protective layer of varnish to its surface. To protect the gold plating, I recommend using shellac varnish No. 763 from Maimeri.
After the varnish has dried, use a clean soft cloth to polish the gold-plated surface.
We cut out the rosette core with the diameter required for the base of the chandelier. Apply glue to the back of the socket, let it dry according to the instructions and carefully attach the socket to the ceiling. The ceiling rosette is ready to delight you and surprise your guests with its brilliance and splendor.
Helpful tips: 1. Sheets of gold leaf - gold leaf - have a very fine structure, they are almost weightless. Therefore, you need to work with them extremely carefully and carefully, since even careless breathing can carry away a sheet of gold from your palm. 2. Sheets of sweat should not be handled with your hands as they stick to your fingers and remain on the skin. For these purposes it is better to use soft brushes. 3. Decorators usually have a special gilding brush in their brush set, which they use from one job to the next. This brush is no longer used for other purposes. The gold crumbs remaining in the brush in no way interfere with subsequent work.
Decorating a ceiling rosette
We will need: a ceiling rosette made of plaster or polyurethane. Two-phase craquelure system in aerosols, acrylic paint “Olympic gold”, synthetic brush.
We cover our rosette with gold-colored paint from the craquelure system. The depth and size of future cracks depends on the thickness of the layer. We wait 15-20 minutes. We cover our rosette with white from the craquelure system. The layer should be uniform. As soon as you start covering the relief with paint, cracks will appear: large or small, depending on the thickness of the layers.
The antiquity effect has been achieved. Once the rosette is dry, you can give it some decoration by highlighting the protruding parts with gold paint using a brush. With the help of simple techniques we got a stylish decorative element.
Materials used: materials from the Italian company Maimeri, IDEA PATINA series, were used in the work:
| Metallic base paint No. 475 - bronze Chemical patina No. 712 (blue) Primer for chemical patina No. 714 Paint and varnish patina No. 710 (bitumen varnish) Protective varnish for chemical patina No. 715 Decorated surface: Tools for work: flat soft synthetic brush, round synthetic brush, sponge, paper napkins, gloves. | |
| 1. The first stage of our work is preparing the surface of the object to be decorated, which consists of applying primer for chemical patina No. 714. This stage is recommended for better adhesion of the paint to the surface. Moreover, in this work it is not necessary to use a special primer; you can also use any water-based primer or acrylic paint of a suitable color The soil must be thoroughly dried. | |
| 2. After the surface has completely dried, we begin decorating. We apply metallic base paint to the entire surface of our socket. We had to coat the surface twice with metallic paint because... The first layer went on unevenly. In this case, the second layer was applied only after the first had completely dried, this took about 30 minutes. Also, for better adhesion of the paint to the next layer, you can lightly rub the first layer with sandpaper - zero. | |
| The surface is ready. It is better to apply the patina without waiting for the paint to dry completely, then oxidation will occur a little faster. | |
| 3. Using a soft round synthetic brush, begin to apply the patina. To achieve the effect of natural oxidation of the metal, it is better not to stretch the patina with a brush, but to let the drop “drip on its own” along the relief surface. Since the composition of patina is quite fluid, you can use a paper napkin or sponge to remove excess. | |
| The effect does not take long to arrive. Almost immediately after applying the patina, streaks of greenish-blue color begin to appear. | |
| 4. To give our composition a finished look, we supplemented it with decoupage, which was also aged using Maimeri craquelure products, IDEA Dekoupage series: Patinated varnish No. 739 and Picturesque craquelure varnish No. 740. | |
| 5. To achieve the maximum aging effect, we used bitumen varnish No. 710 of the same series from Maimeri. Apply bitumen using a sponge, blotting the excess with a clean side. | |
| 6. The final stage of decorating our outlet was to consolidate the resulting effect using Protective Varnish for Chemical Patina No. 715. You can also secure the work with regular clear acrylic varnish or use aerosol varnish. 7. We admire the result. | |
| Thus, with the help of Maimeri products, the IDEA PATINA series, we obtained a unique antique piece of furniture from an ordinary plastic ceiling rosette. | |
Marrietta's inspiration
Patination of metal with oxidizing agents
Obtaining a patina on metal by immersing it in various chemical compounds is a labor-intensive method, which will result in the formation of a colored film (patina) on the surface of the metal. This type is much more durable, since the film does not wear off quickly under mechanical stress, like paint. If you want to feel creative and try to age metal using patination solutions, you will need special chemicals.
The surface to be treated should be prepared, as when working with paint, but not primed or painted, but degreased and bleached in an acid solution. You can carry out all the manipulations at home, create a masterpiece with your own hands or give new life to old objects.
How to do classic patination at home and get the colors you want? When patinaing brass, the most common colors sought are black or deep brown, olive, dark orange, or mouse gray. The brown color is achieved by immersing the metal in a solution of sodium thio-sulfite, popularly known as photofix.
An acid (sulfuric, hydrochloric, nitric) is first added to the prepared solution and the metal is lowered into it. Do not overexpose the product! The patina will appear very quickly. Work carefully! Use rubber gloves and take short breaks every 15-20 minutes.
Important! The coating is not very durable; it must be coated with varnish on top.
How to get other shades:
- To obtain an olive tint, brass products are immersed in a solution consisting of ammonia, water and chlorinated copper oxide (in a ratio of 4/5/2). Be very careful - the composition is toxic.
- A thick orange tint on brass will be given by a mixture of potassium sulfite, and a gray gray tint will be produced by liver of sulfur (a sintered mixture of sulfur 5 g in powder and potash).
- On copper, as on brass, the patina is very impressive. You can get a black tint on it (when immersed in sulfuric liver solution) and ancient blackness (if you mix 2-3 g of sulfuric liver, add the same amount of ordinary salt).
- Copper sulfate together with zinc chloride will give a blood-red patina.
- The luxurious blue color of steel will be given by a mixture of hyposulfite and acetic acid lead (150 g plus 50 g per 1 liter of water). The patina on steel appears both when immersed in a cold solution and when it boils (the shade will be more saturated).
- You can achieve a raven wing shade (“bluing”) by immersing the product in a chromium solution at the rate of 100 g per liter of water. The steel will acquire an amazing metallic glow with a deep, black-blue tint. After about 20 minutes, the steel will be covered with a film of an amazing blue-black hue.
- When bronze items are patinated, they acquire various shades of green and blue. To obtain a light green tint you will need 3 parts aluminum chloride, 1.5 5% vinegar and 5 copper salts. The exposure time of the desired shade on bronze is determined visually. The longer the exposure, the deeper and darker the resulting shade will be.
After completing work with acids, unused liquids must be disposed of. Do not store mixtures! The resulting products must be thoroughly dried and coated with matte or shiny varnish.
Patination, giving objects a touch of antiquity is a fascinating process that will not only captivate all family members, but will also allow you to realize your design ideas. No matter what type of aging you choose - using paint or a complex process of working with chemicals, the result of painstaking work will be a new life for your favorite items.
Painting with blacksmith enamels and patina (1 video)
Aged metal products (20 photos)
PATINATION and OXIDATION of copper and brassBronze painting
Antique cast bronze is an expensive way to decorate the interior, so most often they use imitations of cheap metals (forged steel, aluminum) or even non-metallic objects. Do-it-yourself painting with a golden-colored alloy and patination (old bronze darkens when exposed to air) helps give them an antique look.
Giving a monochromatic effect
Decorating as antique bronze begins with painting and giving the black metal an external resemblance to a casting from a non-ferrous alloy. If the product is made using hot forging technology, it must be sanded to a clean and shiny steel surface. A dark deposit of scale, which forms due to heating, can interfere with the even application of the dye or fall off during use, destroying its layer.
Pay attention to: Paint composition for stainless steel: features of powder coatings and painting nuances
Cold forged and bent products are cleaned of dirt and rust. When using acrylic or polyurethane paints without solvent additives, it is advisable to clean them in the same way as for hot-forged products.
When using a three-component forge mixture, you can only remove what weakly adheres to the metal: a thick layer of rust, peeling old coating or dirt.
After removing deposits with sandpaper, coat the product with a metal primer. When using three-component color mixtures, this step is also optional.
After drying the primer layer according to the manufacturer’s instructions, proceed to painting:
- apply a layer of bronze paint of the desired shade to the product (dark or light, old bronze, etc.);
- dry the product until the coating is completely cured (the minimum period is specified by the manufacturer and is about 24 hours);
- paint again, dry and apply 1 more layer;
- The product, ready for aging, will acquire a uniformly golden surface with a shine characteristic of polished bronze.
To achieve antique bronze, special paint and varnish coatings are used, which are applied using the contour method to the product.
Achieving the effect of antique bronze
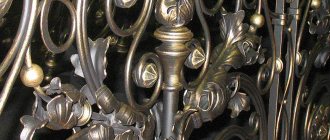
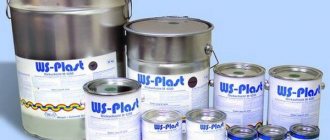
Patination helps to achieve the effect of bronze darkened over time - painting the surface with special compounds (for example, WS-Patina or others). Translucent dark varnish can also be used as a patina. It is more convenient to apply patina with a brush; this will fill the recesses with a thicker layer, creating dark areas there. The bumps will be lighter.
The final stage is the application of light bronze paint to the highest points of the relief. When using bronze products, these protruding points are polished upon contact with hands (for example, railings, handles, etc.), they look lighter and shine.
This effect can be artificially created with a semi-dry brush or foam sponge with a minimal content of coloring composition. Using a tool, blot all protruding parts of the pattern.
Consider: Why Painting Your Living Room Is So Appealing
After glazing, the product is allowed to dry again and coated with varnish. It will protect the results of the work done from rapid abrasion during operation and accidental mechanical damage.